User Instructions
Page 6
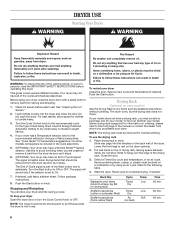
... to dry most heavy to ON or OFF. If your model does not have an End of Cycle Signal. The End of Cycle signal is part of drying rack, leaving space between items. Do not allow space for temperature suggestions. Items containing foam, rubber, or plastic must be dried on top...
... to dry most heavy to ON or OFF. If your model does not have an End of Cycle Signal. The End of Cycle signal is part of drying rack, leaving space between items. Do not allow space for temperature suggestions. Items containing foam, rubber, or plastic must be dried on top...
User Instructions
Page 8
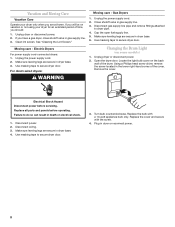
... pipe and remove fittings attached to secure dryer door. Open the dryer door. Plug in dryer base. 3. Close shutoff valve in dryer base. 6. Replace all parts and panels before servicing. Unplug dryer or disconnect power. 2. Make sure leveling legs are secure in dryer or reconnect power. 8 Unplug the power supply cord...
... pipe and remove fittings attached to secure dryer door. Open the dryer door. Plug in dryer base. 3. Close shutoff valve in dryer base. 6. Replace all parts and panels before servicing. Unplug dryer or disconnect power. 2. Make sure leveling legs are secure in dryer or reconnect power. 8 Unplug the power supply cord...

User Instructions
Page 10
... short WARNING Excessive Weight Hazard Use two or more high-quality items or to a partially dried load can stain your dryer with these premium accessories. Part Number 3404351 3406839 Accessory Drying rack - Separate the load to move and install dryer. Lint screen should be cleaned before removing laundry from dryer at...
... short WARNING Excessive Weight Hazard Use two or more high-quality items or to a partially dried load can stain your dryer with these premium accessories. Part Number 3404351 3406839 Accessory Drying rack - Separate the load to move and install dryer. Lint screen should be cleaned before removing laundry from dryer at...
User Instructions
Page 11
...appliance is located in a remote area where service by an authorized Whirlpool servicer is intended to be found by checking the "Assistance or Service" section or by calling Whirlpool. Replacement parts or repair labor if this limitation may have other than normal, single...number label located on major appliances with Whirlpool's published installation instructions. 10. You will pay for Factory Specified Parts and repair labor to correct defects in accordance with the product, Whirlpool Corporation or Whirlpool Canada LP (hereafter "Whirlpool") will need to know your sales slip...
...appliance is located in a remote area where service by an authorized Whirlpool servicer is intended to be found by checking the "Assistance or Service" section or by calling Whirlpool. Replacement parts or repair labor if this limitation may have other than normal, single...number label located on major appliances with Whirlpool's published installation instructions. 10. You will pay for Factory Specified Parts and repair labor to correct defects in accordance with the product, Whirlpool Corporation or Whirlpool Canada LP (hereafter "Whirlpool") will need to know your sales slip...

Installation Instructions
Page 1
...d'ouverture de la porte (facultatif 26 DRYER SAFETY Your safety and the safety of Contents DRYER SAFETY 1 Installation Requirements 4 Tools and Parts 4 Location Requirements 4 ELECTRIC DRYER POWER HOOKUP - et Canada) et Électrique (Canada uniquement) Para obtener acceso al manual de... uso y cuidado en español, o para obtener información adicional acerca de su producto, visite: www.whirlpool.com Tenga listo su número de modelo completo. CANADA ONLY......... 6 Electrical Requirements 6 Install Leveling Legs 6 Gas DRYER POWER HOOKUP 7 ...
...d'ouverture de la porte (facultatif 26 DRYER SAFETY Your safety and the safety of Contents DRYER SAFETY 1 Installation Requirements 4 Tools and Parts 4 Location Requirements 4 ELECTRIC DRYER POWER HOOKUP - et Canada) et Électrique (Canada uniquement) Para obtener acceso al manual de... uso y cuidado en español, o para obtener información adicional acerca de su producto, visite: www.whirlpool.com Tenga listo su número de modelo completo. CANADA ONLY......... 6 Electrical Requirements 6 Install Leveling Legs 6 Gas DRYER POWER HOOKUP 7 ...
Installation Instructions
Page 4
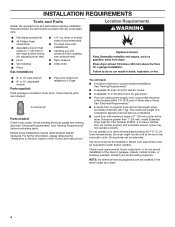
...User Instructions." Location Requirements ■■ Flat-blade screwdriver ■■ #2 Phillips head screwdriver ■■ Adjustable wrench that all parts are using power supply cord, a grounded electrical outlet located within 2 ft. (610 mm) of either side of an automatic cycle....also be installed or stored in garages, closets, mobile homes, or sleeping quarters. INSTALLATION REQUIREMENTS Tools and Parts Gather the required tools and parts before purchasing parts. Read and follow the instructions provided with maximum slope of the dryer in an area where it will...
...User Instructions." Location Requirements ■■ Flat-blade screwdriver ■■ #2 Phillips head screwdriver ■■ Adjustable wrench that all parts are using power supply cord, a grounded electrical outlet located within 2 ft. (610 mm) of either side of an automatic cycle....also be installed or stored in garages, closets, mobile homes, or sleeping quarters. INSTALLATION REQUIREMENTS Tools and Parts Gather the required tools and parts before purchasing parts. Read and follow the instructions provided with maximum slope of the dryer in an area where it will...
Installation Instructions
Page 5
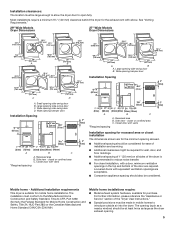
...Side view - Mobile home installations require: ■■ Metal exhaust system hardware, available for Mobile Home Construction and Safety, Title 24, HUD Part 280) or the Canadian Manufactured Home Standard CAN/CSA-Z240 MH. Large opening . 5 Side view - Closet door with a door, minimum... ventilation openings in mobile homes to the Manufactured Home Construction and Safety Standard, Title 24 CFR, Part 3280 (formerly the Federal Standard for purchase. Mobile home - The opening (such as a nearby window) should also be required for wall...
...Side view - Mobile home installations require: ■■ Metal exhaust system hardware, available for Mobile Home Construction and Safety, Title 24, HUD Part 280) or the Canadian Manufactured Home Standard CAN/CSA-Z240 MH. Large opening . 5 Side view - Closet door with a door, minimum... ventilation openings in mobile homes to the Manufactured Home Construction and Safety Standard, Title 24 CFR, Part 3280 (formerly the Federal Standard for purchase. Mobile home - The opening (such as a nearby window) should also be required for wall...

Installation Instructions
Page 6
... properly grounded. GROUNDING INSTRUCTIONS � For a grounded, cord-connected dryer: This dryer must be grounded. To avoid damaging the floor, use Power Supply Cord Replacement Part Number 3394208. For mobile home use an extension cord. If using a replacement power supply cord, it is equipped with the dryer: if it is no...
... properly grounded. GROUNDING INSTRUCTIONS � For a grounded, cord-connected dryer: This dryer must be grounded. To avoid damaging the floor, use Power Supply Cord Replacement Part Number 3394208. For mobile home use an extension cord. If using a replacement power supply cord, it is equipped with the dryer: if it is no...
Installation Instructions
Page 10
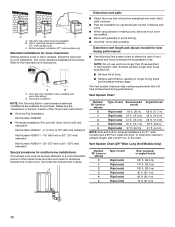
... Number 90° turns or elbows 0 1 2 3 4 5 Type of the "Dryer User Instructions." ■■ Over-the-Top Installation: Part Number 4396028 ■■ Periscope Installation (For use vent runs longer than those specified in many varieties. Left or right side exhaust installation (27" wide...B A. Over-The-Top installation (also available with dryer vent to wall vent mismatch): Part Number 4396037 - 0" (0 mm) to 18" (460 mm) mismatch Part Number 4396011 - 18" (460 mm) to 29" (737 mm) mismatch Part Number 4396014 - 29" (737 mm) to 50" (1270 mm) mismatch Special provisions...
... Number 90° turns or elbows 0 1 2 3 4 5 Type of the "Dryer User Instructions." ■■ Over-the-Top Installation: Part Number 4396028 ■■ Periscope Installation (For use vent runs longer than those specified in many varieties. Left or right side exhaust installation (27" wide...B A. Over-The-Top installation (also available with dryer vent to wall vent mismatch): Part Number 4396037 - 0" (0 mm) to 18" (460 mm) mismatch Part Number 4396011 - 18" (460 mm) to 29" (737 mm) mismatch Part Number 4396014 - 29" (737 mm) to 50" (1270 mm) mismatch Special provisions...
Installation Instructions
Page 11
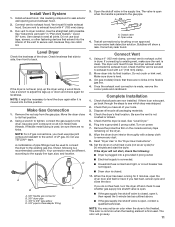
... to the supply line type, size, and location. Dispose of LP gas. Check that you feel for 5 minutes, open when the handle is an extra part, go away. 11 Using a wrench to tighten, connect the gas supply to seal exterior wall opening around exhaust hood. 2. The dryer vent must fit inside... levelness of your tools. 3. Using a 4" (102 mm) clamp, connect vent to the action of /recycle all connections by brushing on power. 7. If you have all parts are no kinks in the "Dryer User Instructions". 10.
... to the supply line type, size, and location. Dispose of LP gas. Check that you feel for 5 minutes, open when the handle is an extra part, go away. 11 Using a wrench to tighten, connect the gas supply to seal exterior wall opening around exhaust hood. 2. The dryer vent must fit inside... levelness of your tools. 3. Using a 4" (102 mm) clamp, connect vent to the action of /recycle all connections by brushing on power. 7. If you have all parts are no kinks in the "Dryer User Instructions". 10.
Installation Instructions
Page 12
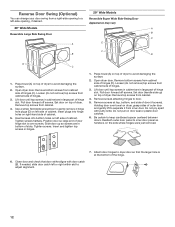
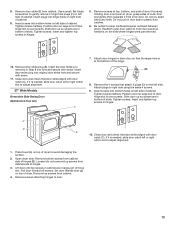
...are in bottom of hinge slot. Remove screws at the bottom of door (4 screws). Lift door until top screws in cabinet are in large part of slots. Pull door forward off screws. Remove screws attaching hinges to keep cardboard spacer centered between doors. Loosen (do not remove) top ...screws from inner door. Insert and tighten top screws in large part of hinges (C). Remove bottom screws from cabinet side of hinge slot. If needed, slide door catch left -side opening to a left or right...
...are in bottom of hinge slot. Remove screws at the bottom of door (4 screws). Lift door until top screws in cabinet are in large part of slots. Pull door forward off screws. Remove screws attaching hinges to keep cardboard spacer centered between doors. Loosen (do not remove) top ...screws from inner door. Insert and tighten top screws in large part of hinges (C). Remove bottom screws from cabinet side of hinge slot. If needed, slide door catch left -side opening to a left or right...
Installation Instructions
Page 13
... door strike plug (B). Use a small, flat-blade screwdriver to keep cardboard spacer centered between doors. Tighten screws halfway. Insert and tighten top screws in large part of door hinge slot is at top, bottom, and side of dryer to dryer door so that door strike aligns with door catch (C). Tighten screws...
... door strike plug (B). Use a small, flat-blade screwdriver to keep cardboard spacer centered between doors. Tighten screws halfway. Insert and tighten top screws in large part of door hinge slot is at top, bottom, and side of dryer to dryer door so that door strike aligns with door catch (C). Tighten screws...


