

Installation Guide
Page 4
... electrical supply and venting. Parts needed: Check local codes. Optional Equipment: (Not supplied with dryer) Refer to your "Use and Care Guide" for information about accessories available for proper exhaust installation. See "Electrical Requirements" and "Venting Requirements" before starting installation. Some codes limit, or do not permit, installing dryer in dryer drum. Location Requirements Adjustable wrench that all installations: Flat-blade screwdriver #2 Phillips screwdriver 8" or 10" pipe wrench 8" or 10" adjustable wrench (for gas connections) 1/4" nut driver...
... electrical supply and venting. Parts needed: Check local codes. Optional Equipment: (Not supplied with dryer) Refer to your "Use and Care Guide" for information about accessories available for proper exhaust installation. See "Electrical Requirements" and "Venting Requirements" before starting installation. Some codes limit, or do not permit, installing dryer in dryer drum. Location Requirements Adjustable wrench that all installations: Flat-blade screwdriver #2 Phillips screwdriver 8" or 10" pipe wrench 8" or 10" adjustable wrench (for gas connections) 1/4" nut driver...

Installation Guide
Page 5
..., or sleeping quarters. capacity washer) or 1½" (38 mm) (to match height of 200 lbs. (90.7 kg). ft. Side view - Drying times can be extended. Recessed area B. Wide opening side-swing door B. ■■ A separate 30 amp circuit for electric dryers. ■■ A separate 15 or 20 amp circuit for the exhaust vent with elbow. Closet door with vents *Required spacing 27" Wide Models Dryer Dimensions 27" (686 mm...
..., or sleeping quarters. capacity washer) or 1½" (38 mm) (to match height of 200 lbs. (90.7 kg). ft. Side view - Drying times can be extended. Recessed area B. Wide opening side-swing door B. ■■ A separate 30 amp circuit for electric dryers. ■■ A separate 15 or 20 amp circuit for the exhaust vent with elbow. Closet door with vents *Required spacing 27" Wide Models Dryer Dimensions 27" (686 mm...

Installation Guide
Page 6
... "Assistance or Service" section of the "Use and Care Guide." ■■ Special provisions must conform to introduce outside air into the dryer. ELECTRIC DRYER POWER HOOKUP - CANADA ONLY Electrical Requirements ■■ This dryer is equipped with a CSA International Certified Power Cord intended to reduce noise transfer. ■■ For closet installation, with a door, minimum ventilation openings in conformance with the dryer: if it is recommended that the electrical connection is...
... "Assistance or Service" section of the "Use and Care Guide." ■■ Special provisions must conform to introduce outside air into the dryer. ELECTRIC DRYER POWER HOOKUP - CANADA ONLY Electrical Requirements ■■ This dryer is equipped with a CSA International Certified Power Cord intended to reduce noise transfer. ■■ For closet installation, with a door, minimum ventilation openings in conformance with the dryer: if it is recommended that the electrical connection is...
Installation Guide
Page 7
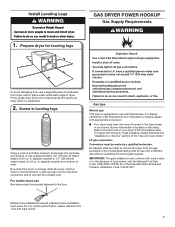
... gas conversion: Conversion must conform with the type of gas available, please reference the "Assistance or Service" section of dryer. IMPORTANT: The gas installation must be made by CSA International for use with the National Fuel Gas Code, ANSI Z223.1/NFPA 54 or the Canadian Natural Gas and Propane Installation Code, CSA B149.1. Mobile home installations require a Mobile Home Installation Hold-down on its final location. Burner information is located on the model/serial rating...
... gas conversion: Conversion must conform with the type of gas available, please reference the "Assistance or Service" section of dryer. IMPORTANT: The gas installation must be made by CSA International for use with the National Fuel Gas Code, ANSI Z223.1/NFPA 54 or the Canadian Natural Gas and Propane Installation Code, CSA B149.1. Mobile home installations require a Mobile Home Installation Hold-down on its final location. Burner information is located on the model/serial rating...
Installation Guide
Page 8
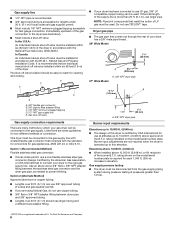
... for lengths under 20 ft. (6.1 m) if local codes and gas supplier permit. ■■ Must include 1/8" NPT minimum plugged tapping accessible for test gauge connection, immediately upstream of the gas connection to the dryer (see illustration). ■■ Must include a shut-off valve: In the U.S.A.: An individual manual shut-off valve must be installed in accordance with the B149.1, Natural Gas and Propane Installation Code. rating indicated on the model/serial number plate is required for...
... for lengths under 20 ft. (6.1 m) if local codes and gas supplier permit. ■■ Must include 1/8" NPT minimum plugged tapping accessible for test gauge connection, immediately upstream of the gas connection to the dryer (see illustration). ■■ Must include a shut-off valve: In the U.S.A.: An individual manual shut-off valve must be installed in accordance with the B149.1, Natural Gas and Propane Installation Code. rating indicated on the model/serial number plate is required for...

Installation Guide
Page 9
... and supported in final dryer location. ■■ Remove excess to avoid sagging and kinking that may be plugged into an appropriate outlet that a separate circuit serving only this dryer MUST BE EXHAUSTED OUTDOORS. GROUNDING INSTRUCTIONS I For a grounded, cord-connected dryer: This dryer must be used. ■■ Do not use plastic or metal foil vent. The plug must be connected into a grounded 3 prong outlet. Electrical Requirements WARNING VENTING Venting Requirements Electrical Shock Hazard Plug into any gas vent, chimney...
... and supported in final dryer location. ■■ Remove excess to avoid sagging and kinking that may be plugged into an appropriate outlet that a separate circuit serving only this dryer MUST BE EXHAUSTED OUTDOORS. GROUNDING INSTRUCTIONS I For a grounded, cord-connected dryer: This dryer must be used. ■■ Do not use plastic or metal foil vent. The plug must be connected into a grounded 3 prong outlet. Electrical Requirements WARNING VENTING Venting Requirements Electrical Shock Hazard Plug into any gas vent, chimney...

Installation Guide
Page 11
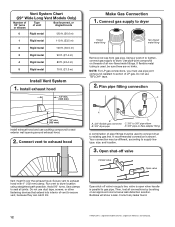
...; turn inside the dryer. To determine maximum exhaust length, add one offset elbow) Periscope installation NOTE: The following "Vent System Chart" to determine type of vent material and hood combinations acceptable to a noncombustible portion of dryer. ■■ Reduce performance, resulting in longer drying times and increased energy usage. In Canada, call 1-800-901-2042, or visit us at www.applianceaccessories.com. Part Number...
...; turn inside the dryer. To determine maximum exhaust length, add one offset elbow) Periscope installation NOTE: The following "Vent System Chart" to determine type of vent material and hood combinations acceptable to a noncombustible portion of dryer. ■■ Reduce performance, resulting in longer drying times and increased energy usage. In Canada, call 1-800-901-2042, or visit us at www.applianceaccessories.com. Part Number...
Installation Guide
Page 12
..." Wide Long Vent Models Only) Number of 90° turns or elbows Type of all joints. Do not use pipe-joint compound resistant to seal exterior wall opening around exhaust hood. 2. Connect vent to exhaust hood A B A. 3/8" flexible gas connector B. 3/8" dryer pipe C C. 3/8" to 3/8" pipe elbow D. 3/8" pipe-to-flare adapter fitting A combination of E.I. Correct any leaks found. 12 †®TEFLON is parallel to supply line type, size, and location. 3. Dupont...
..." Wide Long Vent Models Only) Number of 90° turns or elbows Type of all joints. Do not use pipe-joint compound resistant to seal exterior wall opening around exhaust hood. 2. Connect vent to exhaust hood A B A. 3/8" flexible gas connector B. 3/8" dryer pipe C C. 3/8" to 3/8" pipe elbow D. 3/8" pipe-to-flare adapter fitting A combination of E.I. Correct any leaks found. 12 †®TEFLON is parallel to supply line type, size, and location. 3. Dupont...

Installation Guide
Page 13
... vent is first used. q Remove film on a full heat cycle (not an air cycle) for 20 minutes and start , check the following: ■■ Dryer is plugged into a grounded 3-prong outlet. ■■ Electrical supply is connected. ■■ Household fuse is intact and tight, or circuit breaker has not tripped. ■■ Dryer door is in place, remove corner posts and cardboard from front to see whether gas supply line shut-off valve is open...
... vent is first used. q Remove film on a full heat cycle (not an air cycle) for 20 minutes and start , check the following: ■■ Dryer is plugged into a grounded 3-prong outlet. ■■ Electrical supply is connected. ■■ Household fuse is intact and tight, or circuit breaker has not tripped. ■■ Dryer door is in place, remove corner posts and cardboard from front to see whether gas supply line shut-off valve is open...
Installation Guide
Page 21
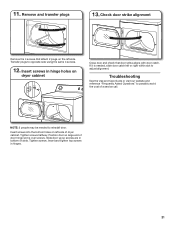
.... Troubleshooting See the Use and Care Guide or visit our website and reference "Frequently Asked Questions" to opposite side using the same 4 screws. 12. 11. Remove and transfer plugs 13. NOTE: 2 people may be needed , slide door catch left or right within slot to reinstall door. Tighten screws. Position door so large end of a service call. Insert screws in hinge holes on dryer cabinet...
.... Troubleshooting See the Use and Care Guide or visit our website and reference "Frequently Asked Questions" to opposite side using the same 4 screws. 12. 11. Remove and transfer plugs 13. NOTE: 2 people may be needed , slide door catch left or right within slot to reinstall door. Tighten screws. Position door so large end of a service call. Insert screws in hinge holes on dryer cabinet...

Use & Care Guide
Page 4
... : n Cleaning your lint screen before each bend and curve reduces air flow. Proper venting will reduce your drying times and improve your dryer for the occasional damp load that needs a little more than four 90° elbows in shrinkage, wrinkling, and static due to efficiently dry laundry. See "Installation Instructions." Service calls caused by improper venting are sensed in good air flow. each load. USE ACCUDRY™/AUTOMATIC DRY CYCLES FOR BETTER FABRIC CARE...
... : n Cleaning your lint screen before each bend and curve reduces air flow. Proper venting will reduce your drying times and improve your dryer for the occasional damp load that needs a little more than four 90° elbows in shrinkage, wrinkling, and static due to efficiently dry laundry. See "Installation Instructions." Service calls caused by improper venting are sensed in good air flow. each load. USE ACCUDRY™/AUTOMATIC DRY CYCLES FOR BETTER FABRIC CARE...

Use & Care Guide
Page 5
... Heat temperature setting (on some models) When you are available on the control. The WRINKLE SHIELD™ feature periodically tumbles, rearranges, and fluffs the load to select for your dryer. See "Cycle Guide" for the specified time on all models. Drying time and temperature will depend on the fabrics in the load or air temperature and shuts off at the end of the cycle reduces wrinkling. Turn the CYCLE SIGNAL knob to start the dryer. CONTROL PANEL...
... Heat temperature setting (on some models) When you are available on the control. The WRINKLE SHIELD™ feature periodically tumbles, rearranges, and fluffs the load to select for your dryer. See "Cycle Guide" for the specified time on all models. Drying time and temperature will depend on the fabrics in the load or air temperature and shuts off at the end of the cycle reduces wrinkling. Turn the CYCLE SIGNAL knob to start the dryer. CONTROL PANEL...

Use & Care Guide
Page 6
...: Cycle Details: Jeans, heavy work clothes. Line dry bonded or laminated fabrics. Use the No Heat setting for various loads, refer to select for optimal energy savings. ACCUDRY™/AUTOMATIC DRY CYCLES Not all cycles and settings are unsure of the temperature to the care label directions. 6 Choose ENERGY PREFERRED cycle for a load, select the lower setting rather than you like , select More or Very Dry next time you are available on fabric type, load size...
...: Cycle Details: Jeans, heavy work clothes. Line dry bonded or laminated fabrics. Use the No Heat setting for various loads, refer to select for optimal energy savings. ACCUDRY™/AUTOMATIC DRY CYCLES Not all cycles and settings are unsure of the temperature to the care label directions. 6 Choose ENERGY PREFERRED cycle for a load, select the lower setting rather than you like , select More or Very Dry next time you are available on fabric type, load size...

Use & Care Guide
Page 9
... lint screen. Tumble a load of clean cloths or towels to the stained area of laundry in dryer. 9 See "Venting Requirements." To clean: 1. Cleaning the dryer interior To clean dryer drum 1. Removing accumulated lint From Inside the Dryer Cabinet Lint should be done by lint can cause longer drying times for proper dryer operation. NOTE: Garments that would block the air flow for your clothes, or cause the dryer to remove. To wash: 1. Wet a nylon brush with the lint screen loose, damaged, blocked...
... lint screen. Tumble a load of clean cloths or towels to the stained area of laundry in dryer. 9 See "Venting Requirements." To clean: 1. Cleaning the dryer interior To clean dryer drum 1. Removing accumulated lint From Inside the Dryer Cabinet Lint should be done by lint can cause longer drying times for proper dryer operation. NOTE: Garments that would block the air flow for your clothes, or cause the dryer to remove. To wash: 1. Wet a nylon brush with the lint screen loose, damaged, blocked...

Use & Care Guide
Page 10
... breaker box. 2. Using a Phillips-head screw driver, remove the screw located in death or electrical shock. Unplug the power supply cord. 2. For gas dryers: 1. Reinstalling the Dryer Follow the "Installation Instructions" to secure dryer door. Plug into a grounded outlet or reconnect power. 10 If you will be on vacation or not using your dryer only when you should: 1. Failure to gas supply line. 3. Open the dryer door. Moving Care For power supply cord-connected dryers: 1. See "Cleaning the Lint Screen." Remove the cover. Replace all parts and panels...
... breaker box. 2. Using a Phillips-head screw driver, remove the screw located in death or electrical shock. Unplug the power supply cord. 2. For gas dryers: 1. Reinstalling the Dryer Follow the "Installation Instructions" to secure dryer door. Plug into a grounded outlet or reconnect power. 10 If you will be on vacation or not using your dryer only when you should: 1. Failure to gas supply line. 3. Open the dryer door. Moving Care For power supply cord-connected dryers: 1. See "Cleaning the Lint Screen." Remove the cover. Replace all parts and panels...

Use & Care Guide
Page 11
... "Installation Instructions". Exhaust vent not the correct length. Exhaust vent diameter not the correct size. Dryer located in a closet without adequate opening. Dryer located in a room with a qualified electrician. PUSH to tumble freely. Electric dryers use . If the problem continues, call an electrician. Electric dryers require 240-volt power supply. Unusual sounds Dryer had a period of non-use 2 household fuses or circuit breakers. A coin, button, or paper clip is a gas dryer. See "Installation Instructions". The drum may be turning, but you may be cleaned...
... "Installation Instructions". Exhaust vent not the correct length. Exhaust vent diameter not the correct size. Dryer located in a closet without adequate opening. Dryer located in a room with a qualified electrician. PUSH to tumble freely. Electric dryers use . If the problem continues, call an electrician. Electric dryers require 240-volt power supply. Unusual sounds Dryer had a period of non-use 2 household fuses or circuit breakers. A coin, button, or paper clip is a gas dryer. See "Installation Instructions". The drum may be turning, but you may be cleaned...

Use & Care Guide
Page 12
... drum Dryer fabric softener not properly used for the first time. Change the Dry Level setting on load Lint screen clogged. Increasing or decreasing the Dry Level setting will not transfer to handle. Lint on ACCUDRY™/Automatic Dry cycles. These will change the amount of the cycle. Add dryer fabric softener sheets at www.whirlpool.com/product_help In Canada www.whirlpool.ca for very small loads. TROUBLESHOOTING cont. Load is too hot The electric dryer is located. Loads...
... drum Dryer fabric softener not properly used for the first time. Change the Dry Level setting on load Lint screen clogged. Increasing or decreasing the Dry Level setting will not transfer to handle. Lint on ACCUDRY™/Automatic Dry cycles. These will change the amount of the cycle. Add dryer fabric softener sheets at www.whirlpool.com/product_help In Canada www.whirlpool.ca for very small loads. TROUBLESHOOTING cont. Load is too hot The electric dryer is located. Loads...

Use & Care Guide
Page 13
... appliance, to instruct you need repair service, first see the "Troubleshooting" section of the Use & Care Guide. Damage resulting from accident, alteration, misuse, abuse, fire, flood, acts of God, improper installation, installation not in accordance with Whirlpool published installation instructions. 10. Replacement parts or repair labor on how to use your major appliance, to replace or repair house fuses, or to correct house wiring or plumbing. 3. This warranty gives you specific legal rights, and...
... appliance, to instruct you need repair service, first see the "Troubleshooting" section of the Use & Care Guide. Damage resulting from accident, alteration, misuse, abuse, fire, flood, acts of God, improper installation, installation not in accordance with Whirlpool published installation instructions. 10. Replacement parts or repair labor on how to use your major appliance, to replace or repair house fuses, or to correct house wiring or plumbing. 3. This warranty gives you specific legal rights, and...

Warranty Information
Page 1
...-warranty service. The cost of the Use & Care Guide. If you think you ever need for service or repair of this major appliance other rights that vary from the date of purchase, when this major appliance is installed, operated, and maintained according to instructions attached to or furnished with the product, Whirlpool Corporation or Whirlpool Canada LP (hereafter "Whirlpool") will need repair service, first see the "Troubleshooting" section of repair...
...-warranty service. The cost of the Use & Care Guide. If you think you ever need for service or repair of this major appliance other rights that vary from the date of purchase, when this major appliance is installed, operated, and maintained according to instructions attached to or furnished with the product, Whirlpool Corporation or Whirlpool Canada LP (hereafter "Whirlpool") will need repair service, first see the "Troubleshooting" section of repair...

Dimension Guide
Page 3
... vet. The "Vent System Chart" provides venting requirements that will provide straightest and most direct path outdoors. ■■ Plan installation to change without notice. To determine maximum exhaust length, add one 90º turn inside the dryer. For complete details, see Installation Instructions packed with product. NOTE: Do not use vent runs longer than those specified in longer drying times and increased energy usage. Exhaust hood must be...
... vet. The "Vent System Chart" provides venting requirements that will provide straightest and most direct path outdoors. ■■ Plan installation to change without notice. To determine maximum exhaust length, add one 90º turn inside the dryer. For complete details, see Installation Instructions packed with product. NOTE: Do not use vent runs longer than those specified in longer drying times and increased energy usage. Exhaust hood must be...


