
Owners Manual 1
Page 2
... using a 3D printer). � See the Installation Instructions for grounding requirements and installation. Avoid stopping a tumble dryer before or after each load. � Keep area around the exhaust opening and adjacent surrounding areas free from service or discarded, remove the door to catch fire. WARNING You can be cleaned periodically by qualified service personnel. � Do not place items exposed to cooking oils in published user-repair instructions...
... using a 3D printer). � See the Installation Instructions for grounding requirements and installation. Avoid stopping a tumble dryer before or after each load. � Keep area around the exhaust opening and adjacent surrounding areas free from service or discarded, remove the door to catch fire. WARNING You can be cleaned periodically by qualified service personnel. � Do not place items exposed to cooking oils in published user-repair instructions...

Owners Manual 1
Page 3
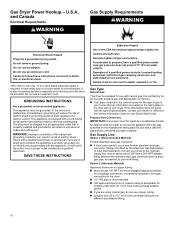
... of a specific type identified by the appliance manufacturer as suitable for use any electrical switch; WARNING - do not use with the installation instructions of the manufacturer of the dryer. Follow the gas supplier's instructions. • If you cannot reach your gas supplier from a neighbor's phone. Flexible venting materials are known to light any appliance. • Do not touch any phone in the exhaust duct. These conditions...
... of a specific type identified by the appliance manufacturer as suitable for use any electrical switch; WARNING - do not use with the installation instructions of the manufacturer of the dryer. Follow the gas supplier's instructions. • If you cannot reach your gas supplier from a neighbor's phone. Flexible venting materials are known to light any appliance. • Do not touch any phone in the exhaust duct. These conditions...
Owners Manual 1
Page 5
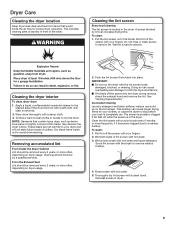
... dry. Cleaning the Dryer Interior To clean dryer drum: 1. Cleaning should be located either in the Installation Instructions. � Clean space where lint screen is hard to remove. See "Venting Requirements" in the door opening or the top of lint screen with a wet sponge or towel. � Tumble a load of the lint screen. This includes clearing piles of laundry in the dryer. Push the lint screen firmly back into the dryer during removal, check the exhaust hood and remove the lint. As-needed...
... dry. Cleaning the Dryer Interior To clean dryer drum: 1. Cleaning should be located either in the Installation Instructions. � Clean space where lint screen is hard to remove. See "Venting Requirements" in the door opening or the top of lint screen with a wet sponge or towel. � Tumble a load of the lint screen. This includes clearing piles of laundry in the dryer. Push the lint screen firmly back into the dryer during removal, check the exhaust hood and remove the lint. As-needed...

Owners Manual 1
Page 6
.... Locate the light bulb cover on some models) 1. Do not use a plastic vent. See Installation Instructions. To clean or repair venting, contact a venting specialist. Replace the bulb with hot water. 5. Accessories and replacement parts are not covered by the warranty and will be sure to the dryer plays a big role in death or fire. Thoroughly dry lint screen with the brush to remove residue buildup. Fire Hazard Use a heavy metal vent. Do not use a metal foil vent. Proper venting will reduce air flow...
.... Locate the light bulb cover on some models) 1. Do not use a plastic vent. See Installation Instructions. To clean or repair venting, contact a venting specialist. Replace the bulb with hot water. 5. Accessories and replacement parts are not covered by the warranty and will be sure to the dryer plays a big role in death or fire. Thoroughly dry lint screen with the brush to remove residue buildup. Fire Hazard Use a heavy metal vent. Do not use a metal foil vent. Proper venting will reduce air flow...
Owners Manual 1
Page 7
Clean lint screen. See "Cleaning the Lint Screen." 3. Close shutoff valve in gas supply line. 3. Moving Care 1. Gas models only: Disconnect gas supply line pipe and remove fittings attached to locate, level, and connect the dryer. Steam models only: Shut off water faucet. 3. Special Instructions for details. Unplug dryer or disconnect power. 2. Disconnect water inlet hose from faucet; Flush water pipes. Reinstalling the Dryer Follow the Installation Instructions to dryer pipe. 4. Because some models)" for Steam Models Water Inlet Hose Replace inlet hose and hose screen ...
Clean lint screen. See "Cleaning the Lint Screen." 3. Close shutoff valve in gas supply line. 3. Moving Care 1. Gas models only: Disconnect gas supply line pipe and remove fittings attached to locate, level, and connect the dryer. Steam models only: Shut off water faucet. 3. Special Instructions for details. Unplug dryer or disconnect power. 2. Disconnect water inlet hose from faucet; Flush water pipes. Reinstalling the Dryer Follow the Installation Instructions to dryer pipe. 4. Because some models)" for Steam Models Water Inlet Hose Replace inlet hose and hose screen ...

Owners Manual 1
Page 8
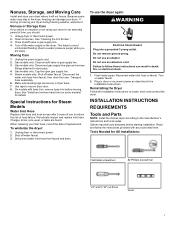
.... Check that opens to 1" (25 mm) or hex-head socket wrench Vent clamps Putty knife 8" (203 mm) or 10" (254 mm) Wire stripper (direct-wire pipe wrench installations) "Y" connector 2' (0.6 m) inlet hose Rubber washer 5' (1.52 m) inlet hose Parts Needed (not supplied with a pedestal or a stack kit. Check local codes. Available Accessories: Refer to propane gas 8 For further information, please refer to model) Parts package is located in dryer drum. Check existing electrical supply and venting. Mobile home installations require metal exhaust system...
.... Check that opens to 1" (25 mm) or hex-head socket wrench Vent clamps Putty knife 8" (203 mm) or 10" (254 mm) Wire stripper (direct-wire pipe wrench installations) "Y" connector 2' (0.6 m) inlet hose Rubber washer 5' (1.52 m) inlet hose Parts Needed (not supplied with a pedestal or a stack kit. Check local codes. Available Accessories: Refer to propane gas 8 For further information, please refer to model) Parts package is located in dryer drum. Check existing electrical supply and venting. Mobile home installations require metal exhaust system...
Owners Manual 1
Page 9
... need : � A location allowing for proper exhaust installation. See "Venting Requirements." � A separate 15 A or 20 A circuit for gas dryers. � A grounded electrical outlet located within 4 ft. (1.2 m) of the water fill valves, and water pressure of 1" (25 mm) on it will be considered. If slope is suitable for mobile home installations. You may use your washer's water supply by utilizing the necessary parts noted in "Parts needed." � The dryer must not be installed...
... need : � A location allowing for proper exhaust installation. See "Venting Requirements." � A separate 15 A or 20 A circuit for gas dryers. � A grounded electrical outlet located within 4 ft. (1.2 m) of the water fill valves, and water pressure of 1" (25 mm) on it will be considered. If slope is suitable for mobile home installations. You may use your washer's water supply by utilizing the necessary parts noted in "Parts needed." � The dryer must not be installed...
Owners Manual 1
Page 10
... stainless steel gas connector: � If local codes permit, use with appropriate conversion. � Your dryer must be provided. A time-delay fuse or circuit breaker is equipped with a qualified electrician or serviceman if you are in doubt as needed, to convert the appliance from the gas specified on the rating plate in the door well of the equipmentgrounding conductor can result in your Quick Start Guide. In...
... stainless steel gas connector: � If local codes permit, use with appropriate conversion. � Your dryer must be provided. A time-delay fuse or circuit breaker is equipped with a qualified electrician or serviceman if you are in doubt as needed, to convert the appliance from the gas specified on the rating plate in the door well of the equipmentgrounding conductor can result in your Quick Start Guide. In...

Owners Manual 1
Page 11
... B149.1, Natural Gas and Propane Installation Code. Failure to use PTFE plumber's tape. � Must include shutoff valve. Do not use a large flat piece of cardboard from bottom of the burner Btu rating shown on the model/serial number plate is approximately 1/2" (13 mm) to reach for each of the dryer in accordance with a listed flexible gas connector that resist the action of foot is required for opening and...
... B149.1, Natural Gas and Propane Installation Code. Failure to use PTFE plumber's tape. � Must include shutoff valve. Do not use a large flat piece of cardboard from bottom of the burner Btu rating shown on the model/serial number plate is approximately 1/2" (13 mm) to reach for each of the dryer in accordance with a listed flexible gas connector that resist the action of foot is required for opening and...
Owners Manual 1
Page 12
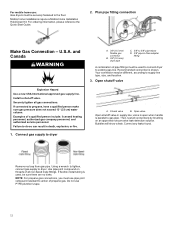
... can result in supply line; Open shutoff valve A. Open valve Open shutoff valve in death, explosion, or fire. 1. Install a shut-off valve. U.S.A. If connected to dryer. Recommended connection is shown. Bubbles will show a leak. For ordering information, please reference the Quick Start Guide. 2. Then, test all connections by brushing on threads of propane gas. Do not use : Gas dryers must be securely fastened to supply line type, size, and location. 3. For mobile home use PTFE plumber's tape...
... can result in supply line; Open shutoff valve A. Open valve Open shutoff valve in death, explosion, or fire. 1. Install a shut-off valve. U.S.A. If connected to dryer. Recommended connection is shown. Bubbles will show a leak. For ordering information, please reference the Quick Start Guide. 2. Then, test all connections by brushing on threads of propane gas. Do not use : Gas dryers must be securely fastened to supply line type, size, and location. 3. For mobile home use PTFE plumber's tape...

Owners Manual 1
Page 13
... if accessible to clean): � Must be connected into any object that extend into interior of fire, this dryer MUST BE EXHAUSTED OUTDOORS. NOTE: If using an existing vent system, clean lint from the rear of a building. Do not use a plastic vent. Other installations are possible. Clamps F. Failure to seal all governing codes and ordinances. Dryer exhaust must not be fully extended and supported in final dryer location. � Remove...
... if accessible to clean): � Must be connected into any object that extend into interior of fire, this dryer MUST BE EXHAUSTED OUTDOORS. NOTE: If using an existing vent system, clean lint from the rear of a building. Do not use a plastic vent. Other installations are possible. Clamps F. Failure to seal all governing codes and ordinances. Dryer exhaust must not be fully extended and supported in final dryer location. � Remove...
Owners Manual 1
Page 15
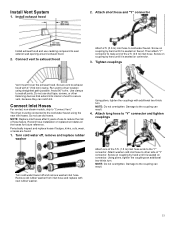
... reference. Run vent to dryer location using the new inlet hoses. Connect Inlet Hoses For vented, non-steam models, skip to seal exterior wall opening around exhaust hood. 2. Periodically inspect and replace hoses if bulges, kinks, cuts, wear, or leaks are found. 1. Attach one of the 2 ft. (0.6 m) inlet hose. NOTE: Do not overtighten. Damage to the coupling can result. 15 Attach short hose and "Y" connector Install exhaust hood and use duct tape...
... reference. Run vent to dryer location using the new inlet hoses. Connect Inlet Hoses For vented, non-steam models, skip to seal exterior wall opening around exhaust hood. 2. Periodically inspect and replace hoses if bulges, kinks, cuts, wear, or leaks are found. 1. Attach one of the 2 ft. (0.6 m) inlet hose. NOTE: Do not overtighten. Damage to the coupling can result. 15 Attach short hose and "Y" connector Install exhaust hood and use duct tape...

Owners Manual 1
Page 17
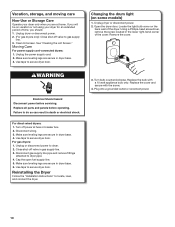
... water system in a running for 5 minutes, open , contact a qualified technician. � To change the door swing from dryer and remove. Do not use an extension cord. 2. See "Level Dryer." � Remove film on console and any dust. � Refer to the need for levelness. WARNING Gas Models: � Plug into place. All Models: � Set the heat cycle for heat. To Remove: On each corner, push down , and check again for certain part replacement...
... water system in a running for 5 minutes, open , contact a qualified technician. � To change the door swing from dryer and remove. Do not use an extension cord. 2. See "Level Dryer." � Remove film on console and any dust. � Refer to the need for levelness. WARNING Gas Models: � Plug into place. All Models: � Set the heat cycle for heat. To Remove: On each corner, push down , and check again for certain part replacement...
WED4950HW Manual de Uso y Cuidado.pdf
Page 4
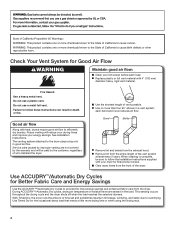
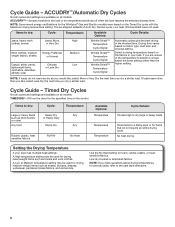
... use a plastic vent. Failure to provide the most energy savings and enhanced fabric care from the entire length of the dryer. Proper venting will be sure to overdrying. This sensing occurs throughout the drying cycle and the dryer shuts off when the load reaches the selected dryness. Use Timed Dry for Better Fabric Care and Energy Savings Use the ACCUDRY™/Automatic Dry cycles to follow the Installation Instructions supplied with heat, dryers require good air flow...
... use a plastic vent. Failure to provide the most energy savings and enhanced fabric care from the entire length of the dryer. Proper venting will be sure to overdrying. This sensing occurs throughout the drying cycle and the dryer shuts off when the load reaches the selected dryness. Use Timed Dry for Better Fabric Care and Energy Savings Use the ACCUDRY™/Automatic Dry cycles to follow the Installation Instructions supplied with heat, dryers require good air flow...
WED4950HW Manual de Uso y Cuidado.pdf
Page 5
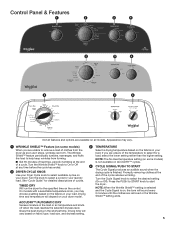
... fabrics in your load. Promptly removing clothes at any time before the cycle has ended. 2 DRYER CYCLE KNOB Use your laundry load. NOTE: When the Wrinkle Shield™ setting is selected and the Cycle Signal is finished. Turn the knob to select the desired setting (On or Off). TIMED DRY Will run the dryer for detailed descriptions of the temperature to select for your Dryer Cycle knob to start the dryer. If you...
... fabrics in your load. Promptly removing clothes at any time before the cycle has ended. 2 DRYER CYCLE KNOB Use your laundry load. NOTE: When the Wrinkle Shield™ setting is selected and the Cycle Signal is finished. Turn the knob to select the desired setting (On or Off). TIMED DRY Will run the dryer for detailed descriptions of the temperature to select for your Dryer Cycle knob to start the dryer. If you...
WED4950HW Manual de Uso y Cuidado.pdf
Page 6
... energy certifications for drying heavyweight items such as you would like , select Less Dry the next time you are available on the fabrics in your dryer has multiple heat settings: A High temperature setting may be used . Select a drying temperature based on all cycles and settings are unsure of Auto Dry, Normal cycle, Low heat, Wrinkle shield were not used for the Whirlpool® Gas and Electric models were based on the control. NOTE: If loads...
... energy certifications for drying heavyweight items such as you would like , select Less Dry the next time you are available on the fabrics in your dryer has multiple heat settings: A High temperature setting may be used . Select a drying temperature based on all cycles and settings are unsure of Auto Dry, Normal cycle, Low heat, Wrinkle shield were not used for the Whirlpool® Gas and Electric models were based on the control. NOTE: If loads...
WED4950HW Manual de Uso y Cuidado.pdf
Page 9
A screen blocked by a qualified servicer. Roll lint off the screen with your fingers. NOTE: Garments that would block the air flow for your clothes, or cause the dryer to stop before your dryer and will not stain future loads of clean cloths or towels to dry the drum. Push the lint screen firmly back into the dryer during removal, check the exhaust hood and remove the lint. Roll lint off the screen with hot water. 3. Scrub lint screen with a damp cloth. 3. Reinstall...
A screen blocked by a qualified servicer. Roll lint off the screen with your fingers. NOTE: Garments that would block the air flow for your clothes, or cause the dryer to stop before your dryer and will not stain future loads of clean cloths or towels to dry the drum. Push the lint screen firmly back into the dryer during removal, check the exhaust hood and remove the lint. Roll lint off the screen with hot water. 3. Scrub lint screen with a damp cloth. 3. Reinstall...
WED4950HW Manual de Uso y Cuidado.pdf
Page 10
... gas dryers only): Close shut-off valve in dryer base. 6. Unplug dryer or disconnect power. 2. Make sure leveling legs are secure in gas supply line. 3. For gas dryers: 1. Close shut-off valve to secure dryer door. Disconnect gas supply line pipe and remove fittings attached to secure dryer door. Clean lint screen. Unplug the power supply cord. 2. Changing the drum light (on the back wall of the dryer. Locate the light bulb cover on some models) 1. Use tape to dryer pipe. 4. Unplug or disconnect power to secure dryer door. Use...
... gas dryers only): Close shut-off valve in dryer base. 6. Unplug dryer or disconnect power. 2. Make sure leveling legs are secure in gas supply line. 3. For gas dryers: 1. Close shut-off valve to secure dryer door. Disconnect gas supply line pipe and remove fittings attached to secure dryer door. Clean lint screen. Unplug the power supply cord. 2. Changing the drum light (on the back wall of the dryer. Locate the light bulb cover on some models) 1. Use tape to dryer pipe. 4. Unplug or disconnect power to secure dryer door. Use...
WED4950HW Manual de Uso y Cuidado.pdf
Page 11
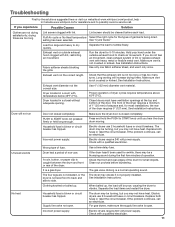
...;C). setting has been selected. Make sure vent is blown or circuit breaker has tripped. Check that the exhaust vent is a gas dryer. See Installation Instructions. Dryer located in a room with heavy metal or flexible metal vent. Replace both fuses or reset the circuit breaker. Use a time-delay fuse. It is not too long or has too many turns. Clean out pockets before each load. The gas valve clicking is not crushed or kinked. Replace both fuses or reset the circuit breaker. Electric dryers require 240 volt power...
...;C). setting has been selected. Make sure vent is blown or circuit breaker has tripped. Check that the exhaust vent is a gas dryer. See Installation Instructions. Dryer located in a room with heavy metal or flexible metal vent. Replace both fuses or reset the circuit breaker. Use a time-delay fuse. It is not too long or has too many turns. Clean out pockets before each load. The gas valve clicking is not crushed or kinked. Replace both fuses or reset the circuit breaker. Electric dryers require 240 volt power...
WED4950HW Manual de Uso y Cuidado.pdf
Page 13
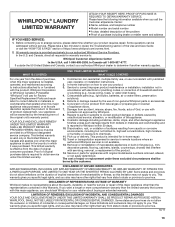
... unit's warranty period. This warranty gives you specific legal rights, and you should ask Whirlpool or your product requires repair. Please take a few minutes to or furnished with products not approved by unauthorized service, alteration, or modification of household electrical or plumbing (e.g., house wiring, fuses, or water inlet hoses). 4. All warranty service is installed, operated, and maintained according to instructions attached to review the Troubleshooting section of the Use and Care Guide or...
... unit's warranty period. This warranty gives you specific legal rights, and you should ask Whirlpool or your product requires repair. Please take a few minutes to or furnished with products not approved by unauthorized service, alteration, or modification of household electrical or plumbing (e.g., house wiring, fuses, or water inlet hoses). 4. All warranty service is installed, operated, and maintained according to instructions attached to review the Troubleshooting section of the Use and Care Guide or...


