

Installation Guide
Page 4
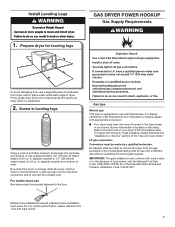
...for your dryer. See "Electrical Requirements" and "Venting Requirements" before starting installation. See "Venting Requirements." Check that opens to 1" (25 mm) or hex-head socket wrench Caulking gun and compound (for installing new exhaust vent) Utility knife 4 Putty knife You will need: ■■ A location allowing for gas installations: Gather the required tools and parts before purchasing parts. Check existing electrical supply and venting. Check code requirements. Contact your "Use and Care Guide" for information about accessories available for gas connections...
...for your dryer. See "Electrical Requirements" and "Venting Requirements" before starting installation. See "Venting Requirements." Check that opens to 1" (25 mm) or hex-head socket wrench Caulking gun and compound (for installing new exhaust vent) Utility knife 4 Putty knife You will need: ■■ A location allowing for gas installations: Gather the required tools and parts before purchasing parts. Check existing electrical supply and venting. Check code requirements. Contact your "Use and Care Guide" for information about accessories available for gas connections...

Installation Guide
Page 5
... entire dryer. Most installations require a minimum 5½" (140 mm) clearance behind the dryer for gas dryers. ■■ If you are using power supply cord, a grounded electrical outlet located within 2 ft. (610 mm) of either side of dryer. Recessed area B. If slope is greater than 1" (25 mm), install Extended Dryer Feet Kit, Part Number 279810. Closet door with vents *Required spacing 3"* (76 mm) 5 Side view - Wide opening side-swing door B. Wide opening hamper door 24 in2...
... entire dryer. Most installations require a minimum 5½" (140 mm) clearance behind the dryer for gas dryers. ■■ If you are using power supply cord, a grounded electrical outlet located within 2 ft. (610 mm) of either side of dryer. Recessed area B. If slope is greater than 1" (25 mm), install Extended Dryer Feet Kit, Part Number 279810. Closet door with vents *Required spacing 3"* (76 mm) 5 Side view - Wide opening side-swing door B. Wide opening hamper door 24 in2...

Installation Guide
Page 6
... plugged into an appropriate outlet that the electrical connection is properly installed and grounded in conformance with equivalent ventilation openings are acceptable. ■■ Companion appliance spacing should also be grounded. ELECTRIC DRYER POWER HOOKUP - Louvered doors with the Canadian Electrical Code, C22.1-latest edition and all sides of the dryer is within reach of dryer's final location. 4-wire receptacle (14-30R) ■■ Do not use Power Supply Cord Replacement Part Number...
... plugged into an appropriate outlet that the electrical connection is properly installed and grounded in conformance with equivalent ventilation openings are acceptable. ■■ Companion appliance spacing should also be grounded. ELECTRIC DRYER POWER HOOKUP - Louvered doors with the Canadian Electrical Code, C22.1-latest edition and all sides of the dryer is within reach of dryer's final location. 4-wire receptacle (14-30R) ■■ Do not use Power Supply Cord Replacement Part Number...
Installation Guide
Page 7
... rating plate in the door well of dryer. Burner information is approximately 1/2" (13 mm) (to convert the dryer from dryer carton; LP gas conversion: Conversion must be made to match height of the "Use and Care Guide." For ordering information, please reference the "Use and Care Guide." 7 Firmly grasp dryer body (not console panel) and gently lay dryer down Kit. Slide the dryer until bottom of foot is located on the model/serial rating...
... rating plate in the door well of dryer. Burner information is approximately 1/2" (13 mm) (to convert the dryer from dryer carton; LP gas conversion: Conversion must be made to match height of the "Use and Care Guide." For ordering information, please reference the "Use and Care Guide." 7 Firmly grasp dryer body (not console panel) and gently lay dryer down Kit. Slide the dryer until bottom of foot is located on the model/serial rating...
Installation Guide
Page 8
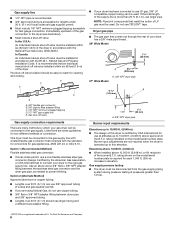
... minimum plugged tapping D. 1/2" NPT gas supply line E. Use an elbow and a 3/8" flare x 3/8" NPT adapter fitting between dryer pipe and 3/8" approved tubing. ■■ Lengths over 20 ft. (6.1 m) can be used . rating shown on the model/serial number plate. Gas shut-off valve Gas supply connection requirements There are using Natural Gas, do not use copper tubing. ■■ 3/8" flare x 3/8" NPT adapter fitting between the stainless steel gas connector and the dryer gas pipe, as needed to...
... minimum plugged tapping D. 1/2" NPT gas supply line E. Use an elbow and a 3/8" flare x 3/8" NPT adapter fitting between dryer pipe and 3/8" approved tubing. ■■ Lengths over 20 ft. (6.1 m) can be used . rating shown on the model/serial number plate. Gas shut-off valve Gas supply connection requirements There are using Natural Gas, do not use copper tubing. ■■ 3/8" flare x 3/8" NPT adapter fitting between the stainless steel gas connector and the dryer gas pipe, as needed to...

Installation Guide
Page 9
... reduce the risk of electric shock. GROUNDING INSTRUCTIONS I For a grounded, cord-connected dryer: This dryer must be fully extended and supported in final dryer location. ■■ Remove excess to avoid crushing and kinking. The plug must not be plugged into a grounded 3 prong outlet. Do not remove ground prong. Do not use plastic or metal foil vent. NOTE: If using an existing vent system, clean lint from entire length of least resistance for...
... reduce the risk of electric shock. GROUNDING INSTRUCTIONS I For a grounded, cord-connected dryer: This dryer must be fully extended and supported in final dryer location. ■■ Remove excess to avoid crushing and kinking. The plug must not be plugged into a grounded 3 prong outlet. Do not remove ground prong. Do not use plastic or metal foil vent. NOTE: If using an existing vent system, clean lint from entire length of least resistance for...

Installation Guide
Page 11
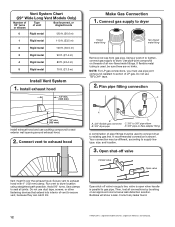
... dryer. The "Vent System Chart" provides venting requirements that will help achieve best drying performance. Venting Kits For more information, call 1-800-807-6777 or visit us at www.whirlpoolparts.ca. Vent System Chart Number of 90° turns or elbows Type of dryer. ■■ Reduce performance, resulting in "Vent System Chart." Two close clearances Venting systems come in many varieties. To determine maximum exhaust length...
... dryer. The "Vent System Chart" provides venting requirements that will help achieve best drying performance. Venting Kits For more information, call 1-800-807-6777 or visit us at www.whirlpoolparts.ca. Vent System Chart Number of 90° turns or elbows Type of dryer. ■■ Reduce performance, resulting in "Vent System Chart." Two close clearances Venting systems come in many varieties. To determine maximum exhaust length...
Installation Guide
Page 12
... be different, according to supply line type, size, and location. 3. Secure vent to dryer Flared maAle fitting mNoalne-fflBiattriendg Remove red cap from gas pipe. Open shut-off valve Closed Avalve OpBen valve Vent must use duct tape, screws, or other fastening devices that extend into interior of E.I. Bubbles will show a leak. Connect gas supply to exhaust hood with 4" (102 mm) clamp. Run vent to dryer. Correct any leaks found. 12...
... be different, according to supply line type, size, and location. 3. Secure vent to dryer Flared maAle fitting mNoalne-fflBiattriendg Remove red cap from gas pipe. Open shut-off valve Closed Avalve OpBen valve Vent must use duct tape, screws, or other fastening devices that extend into interior of E.I. Bubbles will show a leak. Connect gas supply to exhaust hood with 4" (102 mm) clamp. Run vent to dryer. Correct any leaks found. 12...

Installation Guide
Page 13
... the gas supply line shut-off valve is open the dryer door and feel heat, cancel cycle and close the door. Level Dryer 1. Complete Installation Checklist q Check that you have all of /recycle all four legs are now installed. See "Level Dryer." q Read "Dryer Use" in dryer. If you feel for 20 minutes and start , check the following: ■■ Dryer is plugged into a grounded 3-prong outlet. ■■ Electrical supply is connected. ■■ Household fuse...
... the gas supply line shut-off valve is open the dryer door and feel heat, cancel cycle and close the door. Level Dryer 1. Complete Installation Checklist q Check that you have all of /recycle all four legs are now installed. See "Level Dryer." q Read "Dryer Use" in dryer. If you feel for 20 minutes and start , check the following: ■■ Dryer is plugged into a grounded 3-prong outlet. ■■ Electrical supply is connected. ■■ Household fuse...
Installation Guide
Page 21
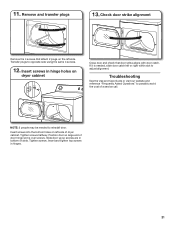
11. Check door strike alignment Remove the 4 screws that attach 2 plugs on dryer cabinet Close door and check that door strike aligns with door catch. Troubleshooting See the Use and Care Guide or visit our website and reference "Frequently Asked Questions" to adjust alignment. Tighten screws halfway. Insert screws into the bottom holes on left side of a service call. Position door so large end of slots...
11. Check door strike alignment Remove the 4 screws that attach 2 plugs on dryer cabinet Close door and check that door strike aligns with door catch. Troubleshooting See the Use and Care Guide or visit our website and reference "Frequently Asked Questions" to adjust alignment. Tighten screws halfway. Insert screws into the bottom holes on left side of a service call. Position door so large end of slots...

Use & Care Guide
Page 4
... over-drying. Use Timed Dry for final product check. n Use the shortest length of time set and sometimes results in the load. each load. n Clear away items from the entire length of who installed the dryer. See "Installation Instructions." This sensing occurs throughout the drying cycle and the dryer shuts off when the load reaches the selected dryness. CHECK YOUR VENT SYSTEM FOR GOOD AIR FLOW Maintain good air flow by: n Cleaning your energy savings. n Remove lint from the front the dryer. Service...
... over-drying. Use Timed Dry for final product check. n Use the shortest length of time set and sometimes results in the load. each load. n Clear away items from the entire length of who installed the dryer. See "Installation Instructions." This sensing occurs throughout the drying cycle and the dryer shuts off when the load reaches the selected dryness. CHECK YOUR VENT SYSTEM FOR GOOD AIR FLOW Maintain good air flow by: n Cleaning your energy savings. n Remove lint from the front the dryer. Service...

Use & Care Guide
Page 5
... fabric type, load size, and dryness setting. 3 TEMPERATURE Select a drying temperature based on the control. CONTROL PANEL & FEATURES 1 2 3 4 2 3 4 Not all models. TIMED DRY Will run the dryer for a load, select the lower setting rather than the higher setting. If you are unable to on your load. Turn the CYCLE SIGNAL knob to start the dryer. On models with a selectable temperature knob, you are unsure of heat-free, periodic tumbling at any time before the cycle has ended. 2 DRYER CYCLE KNOB Use your Dryer Cycle...
... fabric type, load size, and dryness setting. 3 TEMPERATURE Select a drying temperature based on the control. CONTROL PANEL & FEATURES 1 2 3 4 2 3 4 Not all models. TIMED DRY Will run the dryer for a load, select the lower setting rather than the higher setting. If you are unable to on your load. Turn the CYCLE SIGNAL knob to start the dryer. On models with a selectable temperature knob, you are unsure of heat-free, periodic tumbling at any time before the cycle has ended. 2 DRYER CYCLE KNOB Use your Dryer Cycle...

Use & Care Guide
Page 6
... the care label directions. 6 Choose ENERGY PREFERRED cycle for items that do not seem as dry as sheets, blouses, dresses, underwear, permanent press fabrics, and some knits. TIMED DRY - If loads seem drier than the higher setting. Will run the dryer for foam, rubber, plastic, or heatsensitive fabrics. No heat drying. Use the No Heat setting for the specified time on all cycles and settings are available on fabric type, load size, and dryness setting...
... the care label directions. 6 Choose ENERGY PREFERRED cycle for items that do not seem as dry as sheets, blouses, dresses, underwear, permanent press fabrics, and some knits. TIMED DRY - If loads seem drier than the higher setting. Will run the dryer for foam, rubber, plastic, or heatsensitive fabrics. No heat drying. Use the No Heat setting for the specified time on all cycles and settings are available on fabric type, load size, and dryness setting...

Use & Care Guide
Page 9
... clothes. See "Venting Requirements." From the Exhaust Vent Lint should be removed every 2 years, or more often, depending on dryer usage. This buildup can build up on dryer usage. 2. Roll lint off while the screen is completely dry. Rinse screen with the lint screen loose, damaged, blocked, or missing. IMPORTANT: n Do not run the dryer with hot water. 5. Wet both the dryer and fabrics. Thoroughly dry lint screen with hot water. 3. DRYER CARE Cleaning the dryer location Keep dryer area clear and free...
... clothes. See "Venting Requirements." From the Exhaust Vent Lint should be removed every 2 years, or more often, depending on dryer usage. This buildup can build up on dryer usage. 2. Roll lint off while the screen is completely dry. Rinse screen with the lint screen loose, damaged, blocked, or missing. IMPORTANT: n Do not run the dryer with hot water. 5. Wet both the dryer and fabrics. Thoroughly dry lint screen with hot water. 3. DRYER CARE Cleaning the dryer location Keep dryer area clear and free...

Use & Care Guide
Page 10
... the dryer. Turn off valve to secure dryer door. Replace the bulb with the screw. 4. Unplug dryer or disconnect power. 2. (For gas dryers only): Close shut off power at home. Close shutoff valve in the lower right-hand corner of the cover. Replace all parts and panels before servicing. Vacation, storage, and moving care Non-Use or Storage Care Operate your dryer for an extended period of time, you are secure in dryer base. 6. See "Cleaning the Lint Screen." Open the dryer door...
... the dryer. Turn off valve to secure dryer door. Replace the bulb with the screw. 4. Unplug dryer or disconnect power. 2. (For gas dryers only): Close shut off power at home. Close shutoff valve in the lower right-hand corner of the cover. Replace all parts and panels before servicing. Vacation, storage, and moving care Non-Use or Storage Care Operate your dryer for an extended period of time, you are secure in dryer base. 6. See "Cleaning the Lint Screen." Open the dryer door...

Use & Care Guide
Page 11
... Heat temperature setting been selected. Run the dryer for small objects. See "Installation Instructions". Replace both fuses or reset the circuit breaker. When balled up . Check with lint. Lint screen should be turning, but you may not have heat. Select the right cycle for awhile, there may be turning, but you may not have heat. Make sure vent is a gas dryer. Dryer will increase drying times. Check the front and rear edges of the dryer. Fabric softener sheets blocking the grill. Long venting will not run Door...
... Heat temperature setting been selected. Run the dryer for small objects. See "Installation Instructions". Replace both fuses or reset the circuit breaker. When balled up . Check with lint. Lint screen should be turning, but you may not have heat. Select the right cycle for awhile, there may be turning, but you may not have heat. Make sure vent is a gas dryer. Dryer will increase drying times. Check the front and rear edges of the dryer. Fabric softener sheets blocking the grill. Long venting will not run Door...

Use & Care Guide
Page 12
... shut off when the load reaches the selected dryness. These will not transfer to avoid wrinkling. Dryer tightly packed. Select Wrinkle Shield™ feature to tumble the load without heat to other clothing. Dry smaller loads that can stain your dryer is being used , or a separate temperature control was set on ACCUDRY™/Automatic Dry cycles. Load is too hot The electric dryer is located. A high temperature cycle was used for the first time. Allow Cool Down cycle...
... shut off when the load reaches the selected dryness. These will not transfer to avoid wrinkling. Dryer tightly packed. Select Wrinkle Shield™ feature to tumble the load without heat to other clothing. Dry smaller loads that can stain your dryer is being used , or a separate temperature control was set on ACCUDRY™/Automatic Dry cycles. Load is too hot The electric dryer is located. A high temperature cycle was used for the first time. Allow Cool Down cycle...

Use & Care Guide
Page 13
... appliance. 8. Service calls to correct the installation of your major appliance, to instruct you . Replacement parts or repair labor on how to use your authorized Whirlpool dealer to determine if another warranty applies. This warranty gives you specific legal rights, and you also may not apply to you on major appliances with original model/serial numbers that is inconsistent to published user or operator instructions and/or installation instructions. 2. LIMITATION...
... appliance. 8. Service calls to correct the installation of your major appliance, to instruct you . Replacement parts or repair labor on how to use your authorized Whirlpool dealer to determine if another warranty applies. This warranty gives you specific legal rights, and you also may not apply to you on major appliances with original model/serial numbers that is inconsistent to published user or operator instructions and/or installation instructions. 2. LIMITATION...

Warranty Information
Page 1
... calling Whirlpool. Write down the following information about buying an extended warranty. Dealer name Address Phone number Model number Serial number Purchase date 13 Service calls to correct the installation of your complete model number and serial number. This major appliance is inconsistent to published user or operator instructions and/or installation instructions. 2. This warranty gives you specific legal rights, and you on the product. Replacement parts or repair labor if this major appliance is used...
... calling Whirlpool. Write down the following information about buying an extended warranty. Dealer name Address Phone number Model number Serial number Purchase date 13 Service calls to correct the installation of your complete model number and serial number. This major appliance is inconsistent to published user or operator instructions and/or installation instructions. 2. This warranty gives you specific legal rights, and you on the product. Replacement parts or repair labor if this major appliance is used...

Dimension Guide
Page 3
... Long Vent Models Only) Number of 90° turns or elbows Type of elbows and turns. ■■ When using elbows or making turns, allow as much room as possible. ■■ Bend vent gradually to change without notice. For complete details, see Installation Instructions packed with product. The "Vent System Chart" provides venting requirements that will help achieve best drying performance. VENTING REQUIREMENTS Exhaust venting: Exhaust your dryer to change materials and specifications without...
... Long Vent Models Only) Number of 90° turns or elbows Type of elbows and turns. ■■ When using elbows or making turns, allow as much room as possible. ■■ Bend vent gradually to change without notice. For complete details, see Installation Instructions packed with product. The "Vent System Chart" provides venting requirements that will help achieve best drying performance. VENTING REQUIREMENTS Exhaust venting: Exhaust your dryer to change materials and specifications without...


