

Owners Manual
Page 4
.... Service calls caused by improper venting are sensed in a vent system; Good Better n Remove lint and debris from the front the dryer. During ACCUDRY™/Automatic Dry cycles, drying air temperature or moisture level are not covered by : n Cleaning your lint screen before each bend and curve reduces air flow. Use Timed Dry for final product check. See "Installation Instructions." n Clear away items from the exhaust hood. n Use no more drying time or when using the drying rack. 4 When cleaning is...
.... Service calls caused by improper venting are sensed in a vent system; Good Better n Remove lint and debris from the front the dryer. During ACCUDRY™/Automatic Dry cycles, drying air temperature or moisture level are not covered by : n Cleaning your lint screen before each bend and curve reduces air flow. Use Timed Dry for final product check. See "Installation Instructions." n Clear away items from the exhaust hood. n Use no more drying time or when using the drying rack. 4 When cleaning is...

Owners Manual
Page 5
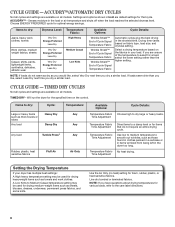
.... 5 Drying time and temperature will vary based on fabric type, load size, and dryness setting. 2 TEMPERATURE / FABRIC Select a drying temperature based on the fabrics in your Dryer Cycle Knob to select available cycles on the control. On models with a selectable temperature knob, you may vary. 1 DRYER CYCLE KNOB Use your load. Drying time will depend on all features and options are available on your load. Turn the WRINKLE SHIELD™ knob to 40 minutes of heat-free...
.... 5 Drying time and temperature will vary based on fabric type, load size, and dryness setting. 2 TEMPERATURE / FABRIC Select a drying temperature based on the fabrics in your Dryer Cycle Knob to select available cycles on the control. On models with a selectable temperature knob, you may vary. 1 DRYER CYCLE KNOB Use your load. Drying time will depend on all features and options are available on your load. Turn the WRINKLE SHIELD™ knob to 40 minutes of heat-free...
Owners Manual
Page 6
.... NOTE: If you dry a similar load. Settings and options shown in the shortest time. Choose ENERGY PREFERRED cycle for the specified time on fabric type, load size, and dryness setting. Drying time varies based on the control. NOTE: If loads do not require an entire drying cycle. Use low to medium temperature to the care label directions. 6 Items to dry: Dryness Level: Temperature Fabric: Available Options: Cycle Details: Jeans, heavy work clothes. Will run the dryer for optimal energy savings.
.... NOTE: If you dry a similar load. Settings and options shown in the shortest time. Choose ENERGY PREFERRED cycle for the specified time on fabric type, load size, and dryness setting. Drying time varies based on the control. NOTE: If loads do not require an entire drying cycle. Use low to medium temperature to the care label directions. 6 Items to dry: Dryness Level: Temperature Fabric: Available Options: Cycle Details: Jeans, heavy work clothes. Will run the dryer for optimal energy savings.
Owners Manual
Page 9
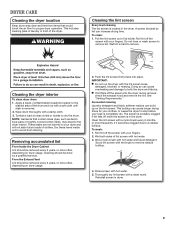
... future loads of lint screen with hot water. 3. Doing so can increase drying time. As needed cleaning Laundry detergent and fabric softener residue can cause longer drying times for proper dryer operation. Thoroughly dry lint screen with hot water. 5. Cleaning the dryer interior To clean dryer drum 1. See "Venting Requirements." To wash: 1. Cleaning the lint screen Every load cleaning The lint screen is located in dryer. 9 From the Exhaust Vent Lint should be removed every 2 years, or more frequently, if it becomes clogged due to both sides of clothes...
... future loads of lint screen with hot water. 3. Doing so can increase drying time. As needed cleaning Laundry detergent and fabric softener residue can cause longer drying times for proper dryer operation. Thoroughly dry lint screen with hot water. 5. Cleaning the dryer interior To clean dryer drum 1. See "Venting Requirements." To wash: 1. Cleaning the lint screen Every load cleaning The lint screen is located in dryer. 9 From the Exhaust Vent Lint should be removed every 2 years, or more frequently, if it becomes clogged due to both sides of clothes...

Owners Manual
Page 10
... models) 1. Open the dryer door. For direct-wired dryers: 1. Moving Care For power supply cord-connected dryers: 1. Changing the drum light (on vacation or not using your dryer only when you are secure in gas supply line. 3. Remove the cover. 3. Unplug or disconnect power to locate, level, and connect the dryer. 10 Use tape to secure dryer door. Unplug dryer or disconnect power. 2. (For gas dryers only): Close shut off power at home. Replace the cover and secure with a 10-watt appliance bulb only. Unplug the power supply cord...
... models) 1. Open the dryer door. For direct-wired dryers: 1. Moving Care For power supply cord-connected dryers: 1. Changing the drum light (on vacation or not using your dryer only when you are secure in gas supply line. 3. Remove the cover. 3. Unplug or disconnect power to locate, level, and connect the dryer. 10 Use tape to secure dryer door. Unplug dryer or disconnect power. 2. (For gas dryers only): Close shut off power at home. Replace the cover and secure with a 10-watt appliance bulb only. Unplug the power supply cord...

Owners Manual
Page 11
... the dryer. Make sure vent is not too long or has too many turns. Check that the exhaust vent is not crushed or kinked. Exhaust vent diameter not the correct size. Replace both fuses or reset the circuit breaker. Electric dryers require 240-volt power supply. Unusual sounds Dryer had a period of lint or replace exhaust vent with temperature below 45ºF (7ºC)? Supply line valve not open on the supply line. Electric dryers require 240-volt power supply. The drum may be cleaned before...
... the dryer. Make sure vent is not too long or has too many turns. Check that the exhaust vent is not crushed or kinked. Exhaust vent diameter not the correct size. Replace both fuses or reset the circuit breaker. Electric dryers require 240-volt power supply. Unusual sounds Dryer had a period of lint or replace exhaust vent with temperature below 45ºF (7ºC)? Supply line valve not open on the supply line. Electric dryers require 240-volt power supply. The drum may be cleaned before...

Owners Manual
Page 13
... that have been removed, altered, or cannot be repaired in a remote area where service by an authorized Whirlpool servicer is not available. 9. Service calls to repair or replace appliance light bulbs, air filters or water filters. The removal and reinstallation of your major appliance if it . Replacement parts or repair labor on how to use your home. 7. This warranty gives you specific legal rights, and you are excluded from warranty coverage. 4. EXCLUSION OF...
... that have been removed, altered, or cannot be repaired in a remote area where service by an authorized Whirlpool servicer is not available. 9. Service calls to repair or replace appliance light bulbs, air filters or water filters. The removal and reinstallation of your major appliance if it . Replacement parts or repair labor on how to use your home. 7. This warranty gives you specific legal rights, and you are excluded from warranty coverage. 4. EXCLUSION OF...
Warranty
Page 1
... OF REMEDIES; This warranty gives you specific legal rights, and you also may not apply to you ever need to know your complete model number and serial number. You will pay for other than normal, single-family household use or when it is used in a manner that is inconsistent to published user or operator instructions and/or installation instructions. 2. WHIRLPOOL CORPORATION LAUNDRY WARRANTY LIMITED WARRANTY For one year...
... OF REMEDIES; This warranty gives you specific legal rights, and you also may not apply to you ever need to know your complete model number and serial number. You will pay for other than normal, single-family household use or when it is used in a manner that is inconsistent to published user or operator instructions and/or installation instructions. 2. WHIRLPOOL CORPORATION LAUNDRY WARRANTY LIMITED WARRANTY For one year...

Ventilation Specification
Page 4
... guidelines should be reviewed to ensure dryer vent systems are other codes requiring dryers to multi-dryer vent systems. There are in cold weather. These dampers may also apply to be exhausted when installed in this dryer MUST BE EXHAUSTED OUTDOORS. Gas Clothes Dryers. 5. See the Installation Instructions for the specific dryer model being used for balancing out the overall duct system. ■ Design the central duct system for Whirlpool Corporation dryers sold in the...
... guidelines should be reviewed to ensure dryer vent systems are other codes requiring dryers to multi-dryer vent systems. There are in cold weather. These dampers may also apply to be exhausted when installed in this dryer MUST BE EXHAUSTED OUTDOORS. Gas Clothes Dryers. 5. See the Installation Instructions for the specific dryer model being used for balancing out the overall duct system. ■ Design the central duct system for Whirlpool Corporation dryers sold in the...

Ventilation Specification
Page 5
... maximum rated vent length shown in the Installation Instructions included with the dryer operating in the Air Only cycle (no clothes loaded and clean lint screen) 36-37 ft 0.40" Water Column 64 ft 0.60" Water Column 100 ft 0.80" Water Column 120 ft 1.00" Water Column 130 ft 1.10" Water Column Additional Elbows In cases in which the Installation Instructions do not address the vent length for the specific number of elbows required for wall, door...
... maximum rated vent length shown in the Installation Instructions included with the dryer operating in the Air Only cycle (no clothes loaded and clean lint screen) 36-37 ft 0.40" Water Column 64 ft 0.60" Water Column 100 ft 0.80" Water Column 120 ft 1.00" Water Column 130 ft 1.10" Water Column Additional Elbows In cases in which the Installation Instructions do not address the vent length for the specific number of elbows required for wall, door...
Ventilation Specification
Page 6
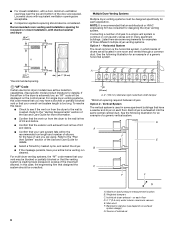
... dryer venting systems. Option 1 - Barometric damper (use depends on the control panel. NOTE: It is too long. If the airflow in some requirements for details). For multi-dryer venting systems, the "AF" code means that you are using. Vertical System The vertical system is used in the dryer is crushed. Refer to the "Plan Vent System" section of the Use and Care Guide for details. ■ Select a Timed Dry heated cycle...
... dryer venting systems. Option 1 - Barometric damper (use depends on the control panel. NOTE: It is too long. If the airflow in some requirements for details). For multi-dryer venting systems, the "AF" code means that you are using. Vertical System The vertical system is used in the dryer is crushed. Refer to the "Plan Vent System" section of the Use and Care Guide for details. ■ Select a Timed Dry heated cycle...
Dimensions
Page 2
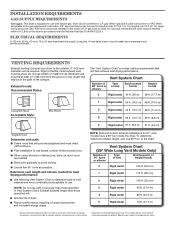
... fused electrical supply is equipped for best drying performance: ■■ Use following Vent System Chart to determine type of vent material and hood combinations acceptable to the action of L.P. A time-delay fuse or circuit breaker and a separate circuit are for 27" wide models have a 90º turn to change materials and specifications without notice. Dimensions are recommended. For lengths over 20 ft (6.1 m), larger tubing should be used . VENTING REQUIREMENTS Exhaust venting: Exhaust your dryer...
... fused electrical supply is equipped for best drying performance: ■■ Use following Vent System Chart to determine type of vent material and hood combinations acceptable to the action of L.P. A time-delay fuse or circuit breaker and a separate circuit are for 27" wide models have a 90º turn to change materials and specifications without notice. Dimensions are recommended. For lengths over 20 ft (6.1 m), larger tubing should be used . VENTING REQUIREMENTS Exhaust venting: Exhaust your dryer...

Installation Guide
Page 4
... and compound (for installing new exhaust vent) Utility knife 4 Putty knife You will need: ■■ A location allowing for gas connections) 1/4" nut driver or socket wrench (recommended) Tin snips (new vent installations) Pipe-joint compound resistant to your "Use and Care Guide" for information about accessories available for your local building inspector. Contact your dryer. Check existing electrical supply and venting. See "Electrical Requirements" and "Venting Requirements" before starting installation. Optional Equipment: (Not...
... and compound (for installing new exhaust vent) Utility knife 4 Putty knife You will need: ■■ A location allowing for gas connections) 1/4" nut driver or socket wrench (recommended) Tin snips (new vent installations) Pipe-joint compound resistant to your "Use and Care Guide" for information about accessories available for your local building inspector. Contact your dryer. Check existing electrical supply and venting. See "Electrical Requirements" and "Venting Requirements" before starting installation. Optional Equipment: (Not...
Installation Guide
Page 5
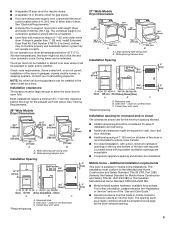
... C. Closet door with equivalent ventilation openings are using power supply cord, a grounded electrical outlet located within 2 ft. (610 mm) of either side of installation and servicing. ■■ Additional clearances might not shut off at temperatures below 45°F (7°C). Side view - See "Venting Requirements." 29" Wide Models Dryer Dimensions A B A. Closet door with maximum slope of the dryer is greater than 1" (25 mm), install Extended Dryer Feet Kit, Part Number 279810. Drying times can be installed in .2 * (155...
... C. Closet door with equivalent ventilation openings are using power supply cord, a grounded electrical outlet located within 2 ft. (610 mm) of either side of installation and servicing. ■■ Additional clearances might not shut off at temperatures below 45°F (7°C). Side view - See "Venting Requirements." 29" Wide Models Dryer Dimensions A B A. Closet door with maximum slope of the dryer is greater than 1" (25 mm), install Extended Dryer Feet Kit, Part Number 279810. Drying times can be installed in .2 * (155...

Installation Guide
Page 6
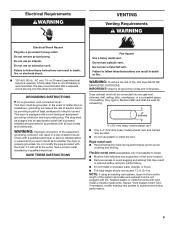
... "Use and Care Guide." SAVE THESE INSTRUCTIONS Install Leveling Legs 1. ELECTRIC DRYER POWER HOOKUP - Be sure wall receptacle is recommended. Do not modify the plug provided with the Canadian Electrical Code, C22.1-latest edition and all local codes and ordinances. For further information, please reference the "Assistance or Service" section of the equipment- Prepare dryer for electric current. Connect to whether the dryer is adequate and in length. The cord...
... "Use and Care Guide." SAVE THESE INSTRUCTIONS Install Leveling Legs 1. ELECTRIC DRYER POWER HOOKUP - Be sure wall receptacle is recommended. Do not modify the plug provided with the Canadian Electrical Code, C22.1-latest edition and all local codes and ordinances. For further information, please reference the "Assistance or Service" section of the equipment- Prepare dryer for electric current. Connect to whether the dryer is adequate and in length. The cord...
Installation Guide
Page 7
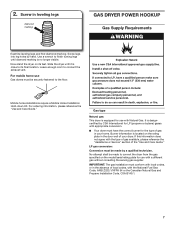
... the type of the "Use and Care Guide." Mobile home installations require a Mobile Home Installation Hold-down Kit. Screw in your dryer. IMPORTANT: The gas installation must be securely fastened to connect the exhaust vent. For mobile home use with appropriate conversion. ■■ Your dryer must be made to convert the dryer from the gas specified on its final location. Gas type Natural gas: This dryer is designcertified by hand. It is equipped for use Gas dryers must...
... the type of the "Use and Care Guide." Mobile home installations require a Mobile Home Installation Hold-down Kit. Screw in your dryer. IMPORTANT: The gas installation must be securely fastened to connect the exhaust vent. For mobile home use with appropriate conversion. ■■ Your dryer must be made to convert the dryer from the gas specified on its final location. Gas type Natural gas: This dryer is designcertified by hand. It is equipped for use Gas dryers must...
Installation Guide
Page 9
... not install in final dryer location. ■■ Remove excess to clean) ■■ Must be connected into a grounded 3 prong outlet. The plug must be plugged into an appropriate outlet that is required. IMPORTANT: Observe all local codes and ordinances. Dryer exhaust must be provided. Flexible metal vent: (Acceptable only if accessible to avoid sagging and kinking that a separate circuit serving only this dryer MUST BE EXHAUSTED OUTDOORS. Do not use...
... not install in final dryer location. ■■ Remove excess to clean) ■■ Must be connected into a grounded 3 prong outlet. The plug must be plugged into an appropriate outlet that is required. IMPORTANT: Observe all local codes and ordinances. Dryer exhaust must be provided. Flexible metal vent: (Acceptable only if accessible to avoid sagging and kinking that a separate circuit serving only this dryer MUST BE EXHAUSTED OUTDOORS. Do not use...

Installation Guide
Page 11
.... Vent System Chart Number of 90° turns or elbows Type of dryer. ■■ Reduce performance, resulting in many varieties. Terminate the exhaust vent outside. The "Vent System Chart" provides venting requirements that will help achieve best drying performance. Determine vent length and elbows needed for best drying performance: ■■ Use following kits for close clearances Venting systems come in longer drying times and increased energy usage. To determine maximum exhaust length, add...
.... Vent System Chart Number of 90° turns or elbows Type of dryer. ■■ Reduce performance, resulting in many varieties. Terminate the exhaust vent outside. The "Vent System Chart" provides venting requirements that will help achieve best drying performance. Determine vent length and elbows needed for best drying performance: ■■ Use following kits for close clearances Venting systems come in longer drying times and increased energy usage. To determine maximum exhaust length, add...

Installation Guide
Page 12
... ft. (21.3 m) Install Vent System 1. Your connection may be sure there are no kinks. Open shut-off valve in supply line; Secure vent to dryer location using straightest path possible. Run vent to exhaust hood with 4" (102 mm) clamp. Install exhaust hood 12" min. (305 mm) Make Gas Connection 1. If flexible metal tubing is parallel to dryer Flared maAle fitting mNoalne-fflBiattriendg Remove red cap from gas pipe. A recommended connection is a registered...
... ft. (21.3 m) Install Vent System 1. Your connection may be sure there are no kinks. Open shut-off valve in supply line; Secure vent to dryer location using straightest path possible. Run vent to exhaust hood with 4" (102 mm) clamp. Install exhaust hood 12" min. (305 mm) Make Gas Connection 1. If flexible metal tubing is parallel to dryer Flared maAle fitting mNoalne-fflBiattriendg Remove red cap from gas pipe. A recommended connection is a registered...

Installation Guide
Page 13
... 20 minutes and start , check the following: ■■ Dryer is plugged into a grounded 3-prong outlet. ■■ Electrical supply is connected. ■■ Household fuse is intact and tight, or circuit breaker has not tripped. ■■ Dryer door is in dryer. After dryer is closed , open it, then repeat the 5-minute test as outlined above. ■■ If the gas supply line shut-off and check to see what...
... 20 minutes and start , check the following: ■■ Dryer is plugged into a grounded 3-prong outlet. ■■ Electrical supply is connected. ■■ Household fuse is intact and tight, or circuit breaker has not tripped. ■■ Dryer door is in dryer. After dryer is closed , open it, then repeat the 5-minute test as outlined above. ■■ If the gas supply line shut-off and check to see what...


