
Dimension Guide
Page 1
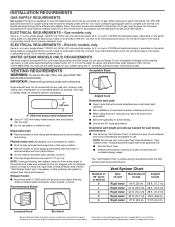
... opening side-swing door B. Gas and Electric Dryer PRODUCT MODEL NUMBERS WED4950HW, WGD4950HW, WED4850HW, WGD4850HW, YWED4850HW Installation clearances: For each arrangement, consider allowing more space for ease of installation and servicing, spacing for companion appliances, and clearances for wall, door, and floor moldings. ■■ Additional spacing of 1" (25 mm) on all sides of the dryer is installed, top and bottom air openings in door are required. Back View Dryer Dimensions...
... opening side-swing door B. Gas and Electric Dryer PRODUCT MODEL NUMBERS WED4950HW, WGD4950HW, WED4850HW, WGD4850HW, YWED4850HW Installation clearances: For each arrangement, consider allowing more space for ease of installation and servicing, spacing for companion appliances, and clearances for wall, door, and floor moldings. ■■ Additional spacing of 1" (25 mm) on all sides of the dryer is installed, top and bottom air openings in door are required. Back View Dryer Dimensions...
Dimension Guide
Page 2
... complete details, see Installation Instructions packed with rigid metal or flexible metal vents. Do not have water pressure of the system and make sure exhaust hood is not plugged with lint. Connect to the cold water faucet using the "Y" connector and short hose, which are for lengths under 20 ft (6.1 m) if local codes and gas supplier permit. WATER (STEAM MODELS ONLY) REQUIREMENTS The dryer must not be used. Do not overtighten...
... complete details, see Installation Instructions packed with rigid metal or flexible metal vents. Do not have water pressure of the system and make sure exhaust hood is not plugged with lint. Connect to the cold water faucet using the "Y" connector and short hose, which are for lengths under 20 ft (6.1 m) if local codes and gas supplier permit. WATER (STEAM MODELS ONLY) REQUIREMENTS The dryer must not be used. Do not overtighten...
W10562352B v01.indd
Page 2
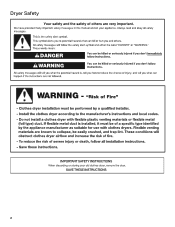
Dryer Safety 2
Dryer Safety 2

W10562352B v01.indd
Page 4
... Installation Instructions supplied with your dryer for final product check. n Replace plastic or foil vent material with heat, dryers require good air flow to provide the most energy savings and enhanced fabric care from the exhaust hood. Good air flow Along with 4" (102 mm) diameter heavy, rigid vent material. Service calls caused by improper venting are sensed in the load. n Use no more drying time or when using the drying rack. 4 This sensing occurs throughout the drying cycle...
... Installation Instructions supplied with your dryer for final product check. n Replace plastic or foil vent material with heat, dryers require good air flow to provide the most energy savings and enhanced fabric care from the exhaust hood. Good air flow Along with 4" (102 mm) diameter heavy, rigid vent material. Service calls caused by improper venting are sensed in the load. n Use no more drying time or when using the drying rack. 4 This sensing occurs throughout the drying cycle...

W10562352B v01.indd
Page 5
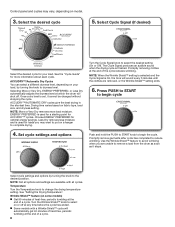
... wrinkles from the dryer as soon as it stops, wrinkles can form. Turn the Cycle Signal knob to start the dryer. Turn the knob to select for your dryer. See "Cycle Guide" for detailed descriptions of the temperature to select a cycle for a load, select the lower setting rather than the higher setting. Drying time and temperature will depend on , the tone will vary based on fabric type, load size, and dryness setting. 3 TEMPERATURE Select a drying temperature...
... wrinkles from the dryer as soon as it stops, wrinkles can form. Turn the Cycle Signal knob to start the dryer. Turn the knob to select for your dryer. See "Cycle Guide" for detailed descriptions of the temperature to select a cycle for a load, select the lower setting rather than the higher setting. Drying time and temperature will depend on , the tone will vary based on fabric type, load size, and dryness setting. 3 TEMPERATURE Select a drying temperature...

W10562352B v01.indd
Page 6
... level. Drying time varies based on the control. If loads seem drier than the higher setting. Will run the dryer for items that do not seem as dry as thick towels or robes Any load Cycle: Temperature: Heavy Dry Any or Heavy Duty Damp Dry Any Available Options: Temperature Temperature Rubber, plastic, heat sensitive fabrics Fluff Air No Heat Temperature Cycle Details: Choose High to the care label directions. 6 Setting the Drying Temperature If your load. A Low...
... level. Drying time varies based on the control. If loads seem drier than the higher setting. Will run the dryer for items that do not seem as dry as thick towels or robes Any load Cycle: Temperature: Heavy Dry Any or Heavy Duty Damp Dry Any Available Options: Temperature Temperature Rubber, plastic, heat sensitive fabrics Fluff Air No Heat Temperature Cycle Details: Choose High to the care label directions. 6 Setting the Drying Temperature If your load. A Low...

W10562352B v01.indd
Page 7
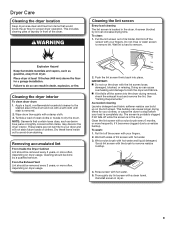
... INSTRUCTIONS before each load. clothes should be able to remove lint. Place laundry in the dryer. Do not tightly pack the dryer; Using Your Dryer WARNING: To reduce the risk of its holder. Before using your dryer, wipe the dryer drum with your fingers. Load the dryer Clean the lint screen before operating this dryer. NOTE: Your model may have drop down doors. Pull the lint screen out of fire, electric shock, or injury to remove...
... INSTRUCTIONS before each load. clothes should be able to remove lint. Place laundry in the dryer. Do not tightly pack the dryer; Using Your Dryer WARNING: To reduce the risk of its holder. Before using your dryer, wipe the dryer drum with your fingers. Load the dryer Clean the lint screen before operating this dryer. NOTE: Your model may have drop down doors. Pull the lint screen out of fire, electric shock, or injury to remove...
W10562352B v01.indd
Page 8
... shortest time. Turn the Cycle Signal knob to change the drying temperature setting. Promptly removing clothes at the end of the cycle reduces wrinkling. See "Setting the Drying Temperature". Press PUSH to START to complete drying. Use the Wrinkle Shield™ feature to avoid wrinkling when you may vary, depending on fabric type, load size, and dryness setting. Select cycle settings and options by turning the knob to select on a hanger to begin the cycle. Temperature Turn the Temperature knob...
... shortest time. Turn the Cycle Signal knob to change the drying temperature setting. Promptly removing clothes at the end of the cycle reduces wrinkling. See "Setting the Drying Temperature". Press PUSH to START to complete drying. Use the Wrinkle Shield™ feature to avoid wrinkling when you may vary, depending on fabric type, load size, and dryness setting. Select cycle settings and options by turning the knob to select on a hanger to begin the cycle. Temperature Turn the Temperature knob...
W10562352B v01.indd
Page 9
.... A screen blocked by a qualified servicer. To clean: 1. Pull the lint screen out of lint screen with a soft cloth until stain is removed. 2. Wet lint is completely dry. NOTE: Garments that would block the air flow for your clothes, or cause the dryer to a residue buildup. Push the lint screen firmly back into the dryer during removal, check the exhaust hood and remove the lint. This buildup can cause overheating and damage to dry the drum. Thoroughly dry lint screen with hot water...
.... A screen blocked by a qualified servicer. To clean: 1. Pull the lint screen out of lint screen with a soft cloth until stain is removed. 2. Wet lint is completely dry. NOTE: Garments that would block the air flow for your clothes, or cause the dryer to a residue buildup. Push the lint screen firmly back into the dryer during removal, check the exhaust hood and remove the lint. This buildup can cause overheating and damage to dry the drum. Thoroughly dry lint screen with hot water...
W10562352B v01.indd
Page 10
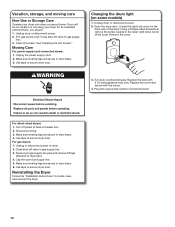
... outlet or reconnect power. Use tape to dryer. 2. Open the dryer door. Locate the light bulb cover on the back wall of the cover. Replace the bulb with the screw. 4. Close shut-off valve to gas supply line. 3. Replace the cover and secure with a 10-watt appliance bulb only. Disconnect wiring. 3. Moving Care For power supply cord-connected dryers: 1. Changing the drum light (on vacation or not using your dryer only when you should: 1. For gas dryers: 1. If you will be on some models) 1. Unplug dryer...
... outlet or reconnect power. Use tape to dryer. 2. Open the dryer door. Locate the light bulb cover on the back wall of the cover. Replace the bulb with the screw. 4. Close shut-off valve to gas supply line. 3. Replace the cover and secure with a 10-watt appliance bulb only. Disconnect wiring. 3. Moving Care For power supply cord-connected dryers: 1. Changing the drum light (on vacation or not using your dryer only when you should: 1. For gas dryers: 1. If you will be on some models) 1. Unplug dryer...

W10562352B v01.indd
Page 11
.... Fabric softener sheets blocking the grille. Proper operation of fuse. Make sure the dryer door is closed completely. Check with a qualified electrician. 11 Wrong type of dryer cycles requires temperatures above 45ºF (7ºC). A coin, button, or paper clip is a normal operating sound. Check with a qualified electrician. drying times are not installed, or the dryer is open . Replace both fuses or reset the circuit breaker. Electric dryers require 240-volt power supply. Use a time-delay fuse. The drum may not have heat. For gas dryers, make...
.... Fabric softener sheets blocking the grille. Proper operation of fuse. Make sure the dryer door is closed completely. Check with a qualified electrician. 11 Wrong type of dryer cycles requires temperatures above 45ºF (7ºC). A coin, button, or paper clip is a normal operating sound. Check with a qualified electrician. drying times are not installed, or the dryer is open . Replace both fuses or reset the circuit breaker. Electric dryers require 240-volt power supply. Use a time-delay fuse. The drum may not have heat. For gas dryers, make...

W10562352B v01.indd
Page 12
... temperature control was set on High. Drum stains are cooled slowly to reduced wrinkling and make it easier to possibly avoid a service call. Dry smaller loads that can stain your dryer is being used for the first time. Laundry items removed from forming. The new electric heating element may feel very warm. Level the dryer. Change the Dry Level setting on load Lint screen clogged. All cycles are caused by dyes in the load and shut...
... temperature control was set on High. Drum stains are cooled slowly to reduced wrinkling and make it easier to possibly avoid a service call. Dry smaller loads that can stain your dryer is being used for the first time. Laundry items removed from forming. The new electric heating element may feel very warm. Level the dryer. Change the Dry Level setting on load Lint screen clogged. All cycles are caused by dyes in the load and shut...
W10562352B v01.indd
Page 13
.... trim, decorative panels, flooring, cabinetry, islands, countertops, drywall, etc.) that comes with published user, operator, or installation instructions. 2. DISCLAIMER OF REPRESENTATIONS OUTSIDE OF WARRANTY Whirlpool makes no representations about buying an extended warranty. Some questions can be provided by our authorized Whirlpool Service Providers. If outside the 50 United States and Canada, contact your appliance will pay for appliances with original model/serial numbers removed, altered...
.... trim, decorative panels, flooring, cabinetry, islands, countertops, drywall, etc.) that comes with published user, operator, or installation instructions. 2. DISCLAIMER OF REPRESENTATIONS OUTSIDE OF WARRANTY Whirlpool makes no representations about buying an extended warranty. Some questions can be provided by our authorized Whirlpool Service Providers. If outside the 50 United States and Canada, contact your appliance will pay for appliances with original model/serial numbers removed, altered...
Specification Sheet
Page 1
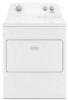
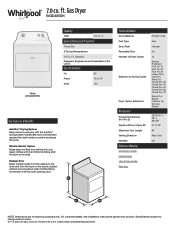
... Door Easily transfer loads from the washer to the dryer and from the dryer to change without worrying about clean clothes falling on the floor with the AutoDry™ drying system that senses when clothes have reached the right moisture content and stops the cycle. For complete details, see Installation Instructions packed with Door Open 90° Maximum Vent Length Venting Direction Ventless Reference Material Dimension Guide Install Guide Use & Care Guide Warranty Powder Coat Gas Hamper No 12 Energy...
... Door Easily transfer loads from the washer to the dryer and from the dryer to change without worrying about clean clothes falling on the floor with the AutoDry™ drying system that senses when clothes have reached the right moisture content and stops the cycle. For complete details, see Installation Instructions packed with Door Open 90° Maximum Vent Length Venting Direction Ventless Reference Material Dimension Guide Install Guide Use & Care Guide Warranty Powder Coat Gas Hamper No 12 Energy...


