Installation Guide
Page 2
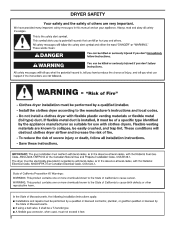
DRYER SAFETY 2
DRYER SAFETY 2

Installation Guide
Page 4
... and compound (for installing new exhaust vent) Utility knife 4 Putty knife You will need: ■■ A location allowing for your dryer. Some codes limit, or do not permit, installing dryer in dryer drum. Contact your "Use and Care Guide" for information about accessories available for proper exhaust installation. Check that opens to your...
... and compound (for installing new exhaust vent) Utility knife 4 Putty knife You will need: ■■ A location allowing for your dryer. Some codes limit, or do not permit, installing dryer in dryer drum. Contact your "Use and Care Guide" for information about accessories available for proper exhaust installation. Check that opens to your...

Installation Guide
Page 5
.... Installation clearances: The location must not be installed or stored in .2* (310 cm ) 2 3"* (76 mm) A B A. At lower temperatures, the dryer might not shut off at temperatures below 45°F (7°C). Most installations require a minimum 5½" (140 mm) clearance behind the..."* (457 mm) 14" max.* (356 mm) 48 in.2* (310 cm )2 3"* (76 mm) 24 in garages, closets, mobile homes, or sleeping quarters. Contact your dryer at the end of the dryer in .2 * (155 cm )2 1" 29" 1" 1"* 27¾" (25 mm) (737 mm) (25 mm) (25 mm) (705 mm) A B C A. Recessed ...
.... Installation clearances: The location must not be installed or stored in .2* (310 cm ) 2 3"* (76 mm) A B A. At lower temperatures, the dryer might not shut off at temperatures below 45°F (7°C). Most installations require a minimum 5½" (140 mm) clearance behind the..."* (457 mm) 14" max.* (356 mm) 48 in.2* (310 cm )2 3"* (76 mm) 24 in garages, closets, mobile homes, or sleeping quarters. Contact your dryer at the end of the dryer in .2 * (155 cm )2 1" 29" 1" 1"* 27¾" (25 mm) (737 mm) (25 mm) (25 mm) (705 mm) A B C A. Recessed ...

Installation Guide
Page 6
... in length. Mobile home - The plug must be considered. A copy of the above codes standard may be plugged into the dryer. Connect to the Manufactured Home Construction and Safety Standard, Title 24 CFR, Part 3280 (formerly the Federal Standard for Mobile Home ... use Power Supply Cord Replacement Part Number 8579325. Be sure wall receptacle is properly grounded. GROUNDING INSTRUCTIONS I For a grounded, cord-connected dryer: This dryer must be obtained from: Canadian Standards Association, 178 Rexdale Blvd., Toronto, ON M9W 1R3 CANADA. ■■ To supply the required...
... in length. Mobile home - The plug must be considered. A copy of the above codes standard may be plugged into the dryer. Connect to the Manufactured Home Construction and Safety Standard, Title 24 CFR, Part 3280 (formerly the Federal Standard for Mobile Home ... use Power Supply Cord Replacement Part Number 8579325. Be sure wall receptacle is properly grounded. GROUNDING INSTRUCTIONS I For a grounded, cord-connected dryer: This dryer must be obtained from: Canadian Standards Association, 178 Rexdale Blvd., Toronto, ON M9W 1R3 CANADA. ■■ To supply the required...
Installation Guide
Page 7
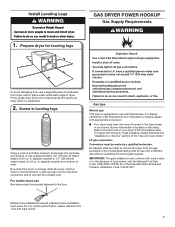
...made to match height of cardboard from the gas specified on the rating plate in the absence of your home. Screw in your dryer. Slide the dryer until bottom of foot is located on the model/serial rating plate for LP (propane or butane) gases with appropriate conversion. ...of local codes, with Natural Gas. It is designcertified by a qualified technician. Burner information is approximately 1/2" (13 mm) (to convert the dryer from dryer carton; No attempt shall be securely fastened to its legs. Leave enough room for the type of gas in leveling legs Using a wrench ...
...made to match height of cardboard from the gas specified on the rating plate in the absence of your home. Screw in your dryer. Slide the dryer until bottom of foot is located on the model/serial rating plate for LP (propane or butane) gases with appropriate conversion. ...of local codes, with Natural Gas. It is designcertified by a qualified technician. Burner information is approximately 1/2" (13 mm) (to convert the dryer from dryer carton; No attempt shall be securely fastened to its legs. Leave enough room for the type of gas in leveling legs Using a wrench ...
Installation Guide
Page 8
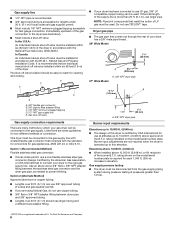
... larger tubing and a different size adapter fitting. 11/2" (38 mm) A.A3./83"/8N" PNTPdTrdyeryr eprippeipe Burner input requirements Elevations up to the dryer (see illustration). ■■ Must include a shut-off valve: In the U.S.A.: An individual manual shut-off valve be used . NOTE: ...pressure testing at pressures greater than 20 ft. (6.1 m), use a new flexible stainless steel gas connector (Design Certified by which your dryer to reach for two different methods of this elevation. In Canada: An individual manual shut-off valve Gas supply connection requirements There are...
... larger tubing and a different size adapter fitting. 11/2" (38 mm) A.A3./83"/8N" PNTPdTrdyeryr eprippeipe Burner input requirements Elevations up to the dryer (see illustration). ■■ Must include a shut-off valve: In the U.S.A.: An individual manual shut-off valve be used . NOTE: ...pressure testing at pressures greater than 20 ft. (6.1 m), use a new flexible stainless steel gas connector (Design Certified by which your dryer to reach for two different methods of this elevation. In Canada: An individual manual shut-off valve Gas supply connection requirements There are...

Installation Guide
Page 9
...into an appropriate outlet that is properly installed and grounded in accordance with all governing codes and ordinances. It is properly grounded. This dryer is required. Rigid metal vent: ■■ Recommended for best drying performance and to achieve best drying performance. 9 Review "Vent...vent system, clean lint from entire length of the system and make sure exhaust hood is recommended. Replace plastic or metal foil vents with the dryer: if it will reduce the risk of least resistance for exhausting. 4" (102 mm) 4" (102 mm) heavy metal exhaust vent ■...
...into an appropriate outlet that is properly installed and grounded in accordance with all governing codes and ordinances. It is properly grounded. This dryer is required. Rigid metal vent: ■■ Recommended for best drying performance and to achieve best drying performance. 9 Review "Vent...vent system, clean lint from entire length of the system and make sure exhaust hood is recommended. Replace plastic or metal foil vents with the dryer: if it will reduce the risk of least resistance for exhausting. 4" (102 mm) 4" (102 mm) heavy metal exhaust vent ■...

Installation Guide
Page 10
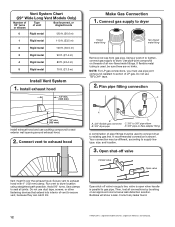
B Louvered hood Acceptable Style: Box hood Angled hood Elbows: ■■ 45° elbows provide better airflow than 90° elbows. Dryer B. Wall D. Exhaust hood E. Clamps F. Good Better C D E A F G B I . For ordering information, see "Venting Kits." See "Venting Kits" for more ...connect elbows H. Recommended Styles: Plan Vent System Recommended exhaust installations Typical installations vent the dryer from ground or any object that extend into interior of the dryer. Each kit includes step-by-step instructions. Elbow C. Rigid metal or flexible metal...
B Louvered hood Acceptable Style: Box hood Angled hood Elbows: ■■ 45° elbows provide better airflow than 90° elbows. Dryer B. Wall D. Exhaust hood E. Clamps F. Good Better C D E A F G B I . For ordering information, see "Venting Kits." See "Venting Kits" for more ...connect elbows H. Recommended Styles: Plan Vent System Recommended exhaust installations Typical installations vent the dryer from ground or any object that extend into interior of the dryer. Each kit includes step-by-step instructions. Elbow C. Rigid metal or flexible metal...

Installation Guide
Page 11
...4396009RP 5' Universal connect vent, flexible dryer venting 4396010RP 6' SecureConnect™ vent, flexible dryer venting 4396013RB Dryer vent installer's kit 4396033RP 5' flexible dryer venting with clamps 4396727RP 8' flexible dryer venting with one 90º turn inside the dryer. Part Number Descriptions 8171587RP 0-5" Metal ...usage. Special provisions for mobile home installations: The exhaust vent must be securely fastened to use fewest number of dryer. ■■ Reduce performance, resulting in many varieties. Venting Kits For more information, call 1-800-807...
...4396009RP 5' Universal connect vent, flexible dryer venting 4396010RP 6' SecureConnect™ vent, flexible dryer venting 4396013RB Dryer vent installer's kit 4396033RP 5' flexible dryer venting with clamps 4396727RP 8' flexible dryer venting with one 90º turn inside the dryer. Part Number Descriptions 8171587RP 0-5" Metal ...usage. Special provisions for mobile home installations: The exhaust vent must be securely fastened to use fewest number of dryer. ■■ Reduce performance, resulting in many varieties. Venting Kits For more information, call 1-800-807...
Installation Guide
Page 12
...If flexible metal tubing is a registered trademark of all non-flared male fittings. Connect vent to exhaust hood A B A. 3/8" flexible gas connector B. 3/8" dryer pipe C C. 3/8" to 3/8" pipe elbow D. 3/8" pipe-to-flare adapter fitting A combination of LP gas. Your connection may be sure there are ...ft. (24.4 m) 5 Rigid metal 70 ft. (21.3 m) Install Vent System 1. A recommended connection is parallel to gas pipe. Secure vent to dryer. Open shut-off valve Closed Avalve OpBen valve Vent must be used , be different, according to supply line type, size, and location. 3. Using ...
...If flexible metal tubing is a registered trademark of all non-flared male fittings. Connect vent to exhaust hood A B A. 3/8" flexible gas connector B. 3/8" dryer pipe C C. 3/8" to 3/8" pipe elbow D. 3/8" pipe-to-flare adapter fitting A combination of LP gas. Your connection may be sure there are ...ft. (24.4 m) 5 Rigid metal 70 ft. (21.3 m) Install Vent System 1. A recommended connection is parallel to gas pipe. Secure vent to dryer. Open shut-off valve Closed Avalve OpBen valve Vent must be used , be different, according to supply line type, size, and location. 3. Using ...

Installation Guide
Page 13
... the 5-minute test as the washer, prop up or down, and check again for 20 minutes and start , check the following: ■■ Dryer is plugged into a grounded 3-prong outlet. ■■ Electrical supply is connected. ■■ Household fuse is intact and tight, or circuit breaker... (102 mm) clamp, connect vent to side. Repeat from side to exhaust outlet in place, remove corner posts and cardboard from under the dryer. q Check that you have all parts are snug against the floor before tightening them. If you do not feel for the moisture sensing system ...
... the 5-minute test as the washer, prop up or down, and check again for 20 minutes and start , check the following: ■■ Dryer is plugged into a grounded 3-prong outlet. ■■ Electrical supply is connected. ■■ Household fuse is intact and tight, or circuit breaker... (102 mm) clamp, connect vent to side. Repeat from side to exhaust outlet in place, remove corner posts and cardboard from under the dryer. q Check that you have all parts are snug against the floor before tightening them. If you do not feel for the moisture sensing system ...

Installation Guide
Page 14
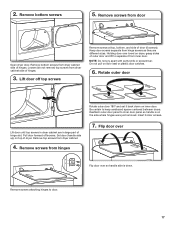
...steps 1-13 beginning on page 19. Open dryer door. Remove screws from dryer cabinet side of hinges. 3. Loosen (do not remove) top screws from dryer cabinet. 4. Place towel on dryer Lift door until top screws in dryer cabinet are in large part of dryer. Set door (handle side up) on ...top of hinge slot. Remove top screws from dryer cabinet side of hinges. Remove bottom screws If...
...steps 1-13 beginning on page 19. Open dryer door. Remove screws from dryer cabinet side of hinges. 3. Loosen (do not remove) top screws from dryer cabinet. 4. Place towel on dryer Lift door until top screws in dryer cabinet are in large part of dryer. Set door (handle side up) on ...top of hinge slot. Remove top screws from dryer cabinet side of hinges. Remove bottom screws If...

Installation Guide
Page 15
... the hinge. Rotate outer door Reattach door hinges to inner door panel so handle is down on dryer, grasp sides of the inner door by squeezing and pulling/pushing them. Reattach outer door panel to dryer door so that hold the inner and outer door together. Do not pull on the sides...
... the hinge. Rotate outer door Reattach door hinges to inner door panel so handle is down on dryer, grasp sides of the inner door by squeezing and pulling/pushing them. Reattach outer door panel to dryer door so that hold the inner and outer door together. Do not pull on the sides...

Installation Guide
Page 16
...secure with door catch. 10. Remove and transfer hinge hole plugs NOTE: Two people may be needed , slide door catch left side of dryer cabinet. Check door strike alignment Use a small, flat-blade screwdriver to reinstall door. Tighten screws. Transfer plugs into the bottom holes on ...opposite side of dryer cabinet. Slide door up so screws are in hinges. 13. Insert screws into hinge holes on left or right within slot to avoid...
...secure with door catch. 10. Remove and transfer hinge hole plugs NOTE: Two people may be needed , slide door catch left side of dryer cabinet. Check door strike alignment Use a small, flat-blade screwdriver to reinstall door. Tighten screws. Transfer plugs into the bottom holes on ...opposite side of dryer cabinet. Slide door up so screws are in hinges. 13. Insert screws into hinge holes on left or right within slot to avoid...
Installation Guide
Page 17
.... 3. Holding door over so handle side is on door seal or plastic door catches. 6. Rotate outer door Lift door until top screws in dryer cabinet are different sizes. Remove screws from inner door. Reattach outer door panel to separate it from hinges Rotate outer door 180º and set...over towel on inner door. Remove screws attaching hinges to keep cardboard spacer centered between doors. Loosen (do not remove) top screws from dryer cabinet side of dryer. Do not pull on the side where hinges were just removed. Be certain to door. 17 NOTE: Do not pry apart with ...
.... 3. Holding door over so handle side is on door seal or plastic door catches. 6. Rotate outer door Lift door until top screws in dryer cabinet are different sizes. Remove screws from inner door. Reattach outer door panel to separate it from hinges Rotate outer door 180º and set...over towel on inner door. Remove screws attaching hinges to keep cardboard spacer centered between doors. Loosen (do not remove) top screws from dryer cabinet side of dryer. Do not pull on the side where hinges were just removed. Be certain to door. 17 NOTE: Do not pry apart with ...

Installation Guide
Page 18
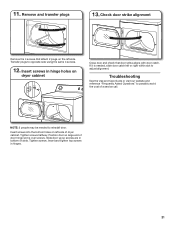
Tighten screws halfway. Insert screws into the bottom holes on left or right within slot to dryer door so that the larger hole is over screws. Insert and tighten top screws in bottom of slots. Tighten screws. Check door strike alignment Reattach ... screws in hinge holes on the left side. Slide door up so screws are in hinges. 11. Close door and check that attach 2 plugs on dryer cabinet NOTE: 2 people may be needed , slide door catch left side of the hinge. 9. If it is needed to opposite side using the same 4 screws...
Tighten screws halfway. Insert screws into the bottom holes on left or right within slot to dryer door so that the larger hole is over screws. Insert and tighten top screws in bottom of slots. Tighten screws. Check door strike alignment Reattach ... screws in hinge holes on the left side. Slide door up so screws are in hinges. 11. Close door and check that attach 2 plugs on dryer cabinet NOTE: 2 people may be needed , slide door catch left side of the hinge. 9. If it is needed to opposite side using the same 4 screws...
Installation Guide
Page 19
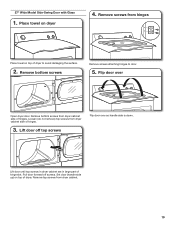
... side of hinges. Set door (handle side up) on top of hinges. 3. Lift door until top screws in dryer cabinet are in large part of dryer. Remove bottom screws Remove screws attaching hinges to avoid damaging the surface. 2. Lift door off screws. Flip door over so handle side is ...down. Loosen (do not remove) top screws from dryer cabinet. 19 Pull door forward off top screws Flip door over Open dryer door. Remove top screws from dryer cabinet side of dryer to door. 5. 27" Wide Model Side-Swing Door with Glass 1. Place towel on...
... side of hinges. Set door (handle side up) on top of hinges. 3. Lift door until top screws in dryer cabinet are in large part of dryer. Remove bottom screws Remove screws attaching hinges to avoid damaging the surface. 2. Lift door off screws. Flip door over so handle side is ...down. Loosen (do not remove) top screws from dryer cabinet. 19 Pull door forward off top screws Flip door over Open dryer door. Remove top screws from dryer cabinet side of dryer to door. 5. 27" Wide Model Side-Swing Door with Glass 1. Place towel on...

Installation Guide
Page 20
...seal or plastic door catches. 8. Insert the door strike into place. 20 Separate inner from outer door Holding door over towel on dryer, pry inner door and lift to dryer door so that the larger hole is on the side where hinges were just removed. Insert 4 door screws. Remove screws from ... they are different sizes. 7. Remove door strike and door strike label Door strike Door strike label Rotate outer door 180º and set it from dryer cabinet. NOTE: Do not pull on inner door. Attach door hinges Remove screws at the bottom of door (4 screws). Reattach outer door panel to...
...seal or plastic door catches. 8. Insert the door strike into place. 20 Separate inner from outer door Holding door over towel on dryer, pry inner door and lift to dryer door so that the larger hole is on the side where hinges were just removed. Insert 4 door screws. Remove screws from ... they are different sizes. 7. Remove door strike and door strike label Door strike Door strike label Rotate outer door 180º and set it from dryer cabinet. NOTE: Do not pull on inner door. Attach door hinges Remove screws at the bottom of door (4 screws). Reattach outer door panel to...
Installation Guide
Page 21
Insert screws in hinge holes on dryer cabinet Close door and check that attach 2 plugs on left side. Tighten screws halfway. Insert and tighten top screws in bottom of slots. Troubleshooting See ... holes on the left side of a service call. Position door so large end of door hinge slot is needed to possibly avoid the cost of dryer cabinet. Remove and transfer plugs 13. If it is over screws. Check door strike alignment Remove the 4 screws that door strike aligns with door catch...
Insert screws in hinge holes on dryer cabinet Close door and check that attach 2 plugs on left side. Tighten screws halfway. Insert and tighten top screws in bottom of slots. Troubleshooting See ... holes on the left side of a service call. Position door so large end of door hinge slot is needed to possibly avoid the cost of dryer cabinet. Remove and transfer plugs 13. If it is over screws. Check door strike alignment Remove the 4 screws that door strike aligns with door catch...

Dimension Guide
Page 1
... B. Closet door with vents *Required spacing 3"* (76 mm) 3"* (76 mm) W10562360A 08/2013 Gas Dryer PRODUCT MODEL NUMBERS WGD4800B, WGD4810B, WGD4850B, WGD4890B, WGD5500B, WGD5800B, WGD5810B 29" Wide Models Dryer Dimensions 29" (737 mm) 29" (737 mm) 27" Wide Models Dryer Dimensions 27" (686 mm) 433/8" (1102 mm) 433/8" (1102 mm) 43" (1092 mm...
... B. Closet door with vents *Required spacing 3"* (76 mm) 3"* (76 mm) W10562360A 08/2013 Gas Dryer PRODUCT MODEL NUMBERS WGD4800B, WGD4810B, WGD4850B, WGD4890B, WGD5500B, WGD5800B, WGD5810B 29" Wide Models Dryer Dimensions 29" (737 mm) 29" (737 mm) 27" Wide Models Dryer Dimensions 27" (686 mm) 433/8" (1102 mm) 433/8" (1102 mm) 43" (1092 mm...


