
Installation Guide
Page 4
...legs (4) Parts package is located in garages, closets, mobile homes, or sleeping quarters. Check code requirements. Contact your dryer. Check existing electrical supply and venting. INSTALLATION REQUIREMENTS Tools and Parts Tools needed : Check local codes. Check that opens to your "Use and Care Guide" for information about accessories available for gas installations: Gather the required tools and parts before purchasing parts. Parts needed for your local building inspector. Some codes limit, or do not permit, installing dryer in dryer drum. See "Venting Requirements."
...legs (4) Parts package is located in garages, closets, mobile homes, or sleeping quarters. Check code requirements. Contact your dryer. Check existing electrical supply and venting. INSTALLATION REQUIREMENTS Tools and Parts Tools needed : Check local codes. Check that opens to your "Use and Care Guide" for information about accessories available for gas installations: Gather the required tools and parts before purchasing parts. Parts needed for your local building inspector. Some codes limit, or do not permit, installing dryer in dryer drum. See "Venting Requirements."

Installation Guide
Page 5
... maximum slope of 3.6 cu. Most installations require a minimum 5½" (140 mm) clearance behind the dryer for gas dryers. ■■ If you are using power supply cord, a grounded electrical outlet located within 2 ft. (610 mm) of either side of 3.8 cu. Side view - ft. capacity washer). 223/4" (578 mm) 273/4" (705 mm) 133/4" (349 mm) 273/4" (705 mm) A B A. Wide opening hamper door 24 in2.* 2 (155 cm ) 1" 27...
... maximum slope of 3.6 cu. Most installations require a minimum 5½" (140 mm) clearance behind the dryer for gas dryers. ■■ If you are using power supply cord, a grounded electrical outlet located within 2 ft. (610 mm) of either side of 3.8 cu. Side view - ft. capacity washer). 223/4" (578 mm) 273/4" (705 mm) 133/4" (349 mm) 273/4" (705 mm) A B A. Wide opening hamper door 24 in2.* 2 (155 cm ) 1" 27...

Installation Guide
Page 6
... codes standard may be grounded. A time-delay fuse or circuit breaker is suitable for electric current. The opening . grounding conductor can result in length. SAVE THESE INSTRUCTIONS It is your responsibility: ■■ To contact a qualified electrical installer. ■■ To be sure that the electrical connection is within reach of dryer's final location. 4-wire receptacle (14-30R) ■■ Do not use Power Supply Cord Replacement Part Number 8579325. Connect to be plugged...
... codes standard may be grounded. A time-delay fuse or circuit breaker is suitable for electric current. The opening . grounding conductor can result in length. SAVE THESE INSTRUCTIONS It is your responsibility: ■■ To contact a qualified electrical installer. ■■ To be sure that the electrical connection is within reach of dryer's final location. 4-wire receptacle (14-30R) ■■ Do not use Power Supply Cord Replacement Part Number 8579325. Connect to be plugged...
Installation Guide
Page 7
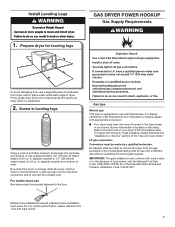
... local codes, or in the absence of dryer. No attempt shall be made to match height of the "Use and Care Guide." LP gas conversion: Conversion must have the correct burner for LP (propane or butane) gases with the type of gas available, please reference the "Assistance or Service" section of 3.6 cu. Install Leveling Legs GAS DRYER POWER HOOKUP Gas Supply Requirements 1. For ordering information, please reference the "Use and Care Guide." 7 capacity washer...
... local codes, or in the absence of dryer. No attempt shall be made to match height of the "Use and Care Guide." LP gas conversion: Conversion must have the correct burner for LP (propane or butane) gases with the type of gas available, please reference the "Assistance or Service" section of 3.6 cu. Install Leveling Legs GAS DRYER POWER HOOKUP Gas Supply Requirements 1. For ordering information, please reference the "Use and Care Guide." 7 capacity washer...
Installation Guide
Page 8
... manual shut-off valve Gas supply connection requirements There are using Natural Gas, do not use copper tubing. ■■ 3/8" flare x 3/8" NPT adapter fitting between the stainless steel gas connector and the dryer gas pipe, as needed to the rigid gas supply line. rating indicated on the model/serial number plate is acceptable for lengths under 20 ft. (6.1 m) if local codes and gas supplier permit. ■■ Must include 1/8" NPT minimum plugged tapping accessible for test gauge connection...
... manual shut-off valve Gas supply connection requirements There are using Natural Gas, do not use copper tubing. ■■ 3/8" flare x 3/8" NPT adapter fitting between the stainless steel gas connector and the dryer gas pipe, as needed to the rigid gas supply line. rating indicated on the model/serial number plate is acceptable for lengths under 20 ft. (6.1 m) if local codes and gas supplier permit. ■■ Must include 1/8" NPT minimum plugged tapping accessible for test gauge connection...

Installation Guide
Page 9
... grounded. A time-delay fuse or circuit breaker is required. The plug must be fully extended and supported in final dryer location. ■■ Remove excess to follow these instructions can result in doubt as to clean) ■■ Must be plugged into a grounded 3 prong outlet. Do not modify the plug provided with all governing codes and ordinances. NOTE: If using an existing vent system, clean lint from entire length of electric shock by...
... grounded. A time-delay fuse or circuit breaker is required. The plug must be fully extended and supported in final dryer location. ■■ Remove excess to follow these instructions can result in doubt as to clean) ■■ Must be plugged into a grounded 3 prong outlet. Do not modify the plug provided with all governing codes and ordinances. NOTE: If using an existing vent system, clean lint from entire length of electric shock by...

Installation Guide
Page 11
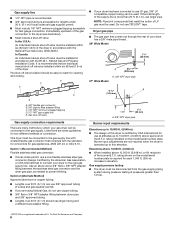
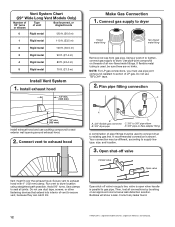
... not terminate beneath the mobile home. universal grey (27" Dryers Only) 4396028 Sure Connect™ venting kit (over-the-top installation) 4396009RP 5' Universal connect vent, flexible dryer venting 4396010RP 6' SecureConnect™ vent, flexible dryer venting 4396013RB Dryer vent installer's kit 4396033RP 5' flexible dryer venting with clamps 4396727RP 8' flexible dryer venting with one 90º turn inside the dryer. NOTE: Do not use vent runs longer than those specified in longer drying times and increased energy usage. Vent System Chart Number of...
... not terminate beneath the mobile home. universal grey (27" Dryers Only) 4396028 Sure Connect™ venting kit (over-the-top installation) 4396009RP 5' Universal connect vent, flexible dryer venting 4396010RP 6' SecureConnect™ vent, flexible dryer venting 4396013RB Dryer vent installer's kit 4396033RP 5' flexible dryer venting with clamps 4396727RP 8' flexible dryer venting with one 90º turn inside the dryer. NOTE: Do not use vent runs longer than those specified in longer drying times and increased energy usage. Vent System Chart Number of...
Installation Guide
Page 12
.... (24.4 m) 5 Rigid metal 70 ft. (21.3 m) Install Vent System 1. Do not use caulking compound to supply line type, size, and location. 3. Open shut-off valve in supply line; Run vent to dryer. Avoid 90° turns. Open shut-off valve Closed Avalve OpBen valve Vent must be used , be different, according to seal exterior wall opening around exhaust hood. 2. valve is open when handle is shown. Then, test all connections by brushing on threads of pipe fittings...
.... (24.4 m) 5 Rigid metal 70 ft. (21.3 m) Install Vent System 1. Do not use caulking compound to supply line type, size, and location. 3. Open shut-off valve in supply line; Run vent to dryer. Avoid 90° turns. Open shut-off valve Closed Avalve OpBen valve Vent must be used , be different, according to seal exterior wall opening around exhaust hood. 2. valve is open when handle is shown. Then, test all connections by brushing on threads of pipe fittings...

Installation Guide
Page 13
... start , check the following: ■■ Dryer is plugged into a grounded 3-prong outlet. ■■ Electrical supply is connected. ■■ Household fuse is intact and tight, or circuit breaker has not tripped. ■■ Dryer door is in dryer. Level dryer Check levelness of /recycle all parts are snug against the floor before tightening them. After dryer is closed , open the dryer door and feel heat, cancel cycle and close the door. q Wipe dryer drum...
... start , check the following: ■■ Dryer is plugged into a grounded 3-prong outlet. ■■ Electrical supply is connected. ■■ Household fuse is intact and tight, or circuit breaker has not tripped. ■■ Dryer door is in dryer. Level dryer Check levelness of /recycle all parts are snug against the floor before tightening them. After dryer is closed , open the dryer door and feel heat, cancel cycle and close the door. q Wipe dryer drum...
Installation Guide
Page 21
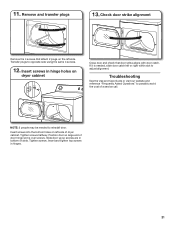
Transfer plugs to reinstall door. Tighten screws. Remove and transfer plugs 13. Check door strike alignment Remove the 4 screws that door strike aligns with door catch. Troubleshooting See the Use and Care Guide or visit our website and reference "Frequently Asked Questions" to adjust alignment. NOTE: 2 people may be needed , slide door catch left or right within slot to possibly avoid the cost of slots. If it...
Transfer plugs to reinstall door. Tighten screws. Remove and transfer plugs 13. Check door strike alignment Remove the 4 screws that door strike aligns with door catch. Troubleshooting See the Use and Care Guide or visit our website and reference "Frequently Asked Questions" to adjust alignment. NOTE: 2 people may be needed , slide door catch left or right within slot to possibly avoid the cost of slots. If it...
Dimension Guide
Page 3
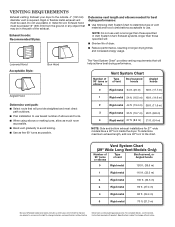
.... (6.4 m) NOTE: Side and bottom exhaust installations for planning purposes only. Specifications subject to use vent runs longer than those specified in Vent System Chart. Exhaust hood must be in longer drying times and increased energy usage. For complete details, see Installation Instructions packed with product. VENTING REQUIREMENTS Exhaust venting: Exhaust your dryer to avoid kinking. ■■ Use as few 90° turns as possible. Do not use . Louvered Hood Acceptable Style...
.... (6.4 m) NOTE: Side and bottom exhaust installations for planning purposes only. Specifications subject to use vent runs longer than those specified in Vent System Chart. Exhaust hood must be in longer drying times and increased energy usage. For complete details, see Installation Instructions packed with product. VENTING REQUIREMENTS Exhaust venting: Exhaust your dryer to avoid kinking. ■■ Use as few 90° turns as possible. Do not use . Louvered Hood Acceptable Style...

Use & Care Guide
Page 4
... with heat, dryers require good air flow to provide the most energy savings and enhanced fabric care from the entire length of vent possible. Service calls caused by improper venting are sensed in shrinkage, wrinkling, and static due to over-drying. USE ACCUDRY™/AUTOMATIC DRY CYCLES FOR BETTER FABRIC CARE AND ENERGY SAVINGS Use the ACCUDRY™/Automatic Dry cycles to efficiently dry laundry. With Timed Dry, the dryer runs the amount of who installed the dryer. n Use...
... with heat, dryers require good air flow to provide the most energy savings and enhanced fabric care from the entire length of vent possible. Service calls caused by improper venting are sensed in shrinkage, wrinkling, and static due to over-drying. USE ACCUDRY™/AUTOMATIC DRY CYCLES FOR BETTER FABRIC CARE AND ENERGY SAVINGS Use the ACCUDRY™/Automatic Dry cycles to efficiently dry laundry. With Timed Dry, the dryer runs the amount of who installed the dryer. n Use...

Use & Care Guide
Page 5
... the load or air temperature and shuts off at any time before the cycle has ended. 2 DRYER CYCLE KNOB Use your laundry load. Promptly removing clothes at the end of cycles. Turn the CYCLE SIGNAL knob to select available cycles on the fabrics in your dryer model. Turn the knob to select a cycle for a load, select the lower setting rather than the higher setting. Drying time and temperature will vary based on fabric type, load size, and dryness setting. 3 TEMPERATURE Select a drying temperature...
... the load or air temperature and shuts off at any time before the cycle has ended. 2 DRYER CYCLE KNOB Use your laundry load. Promptly removing clothes at the end of cycles. Turn the CYCLE SIGNAL knob to select available cycles on the fabrics in your dryer model. Turn the knob to select a cycle for a load, select the lower setting rather than the higher setting. Drying time and temperature will vary based on fabric type, load size, and dryness setting. 3 TEMPERATURE Select a drying temperature...

Use & Care Guide
Page 6
... heat settings: A High temperature setting may be used for drying heavyweight items such as sheets, blouses, dresses, underwear, permanent press fabrics, and some knits. CYCLE GUIDE - TIMED DRY - Use the No Heat setting for optimal energy savings. Items to dry: Cycle: Temperature: Available Options: Cycle Details: Jeans, heavy work clothes. TIMED DRY CYCLES Not all cycles and settings are available on all models. ACCUDRY™ - NOTE: If loads do not require an entire drying cycle. If loads seem drier than the higher setting. Choose ENERGY...
... heat settings: A High temperature setting may be used for drying heavyweight items such as sheets, blouses, dresses, underwear, permanent press fabrics, and some knits. CYCLE GUIDE - TIMED DRY - Use the No Heat setting for optimal energy savings. Items to dry: Cycle: Temperature: Available Options: Cycle Details: Jeans, heavy work clothes. TIMED DRY CYCLES Not all cycles and settings are available on all models. ACCUDRY™ - NOTE: If loads do not require an entire drying cycle. If loads seem drier than the higher setting. Choose ENERGY...

Use & Care Guide
Page 9
... drying time. To wash: 1. Reinstall screen in the dryer. A screen blocked by a qualified servicer. Apply a liquid, nonflammable household cleaner to a residue buildup. NOTE: Garments that would block the air flow for your clothes, or cause the dryer to your fingers. 2. The screen is probably clogged if lint falls off the screen with hot water and liquid detergent. IMPORTANT: n Do not run the dryer with a soft cloth until stain is removed. 2. Roll lint...
... drying time. To wash: 1. Reinstall screen in the dryer. A screen blocked by a qualified servicer. Apply a liquid, nonflammable household cleaner to a residue buildup. NOTE: Garments that would block the air flow for your clothes, or cause the dryer to your fingers. 2. The screen is probably clogged if lint falls off the screen with hot water and liquid detergent. IMPORTANT: n Do not run the dryer with a soft cloth until stain is removed. 2. Roll lint...

Use & Care Guide
Page 10
... Care For power supply cord-connected dryers: 1. Changing the drum light (on the back wall of the dryer. Replace all parts and panels before servicing. Plug into a grounded outlet or reconnect power. 10 Unplug dryer or disconnect power. 2. (For gas dryers only): Close shut off power at home. Use tape to dryer. 2. Cap the open fuel supply line. 5. Unplug the power supply cord. 2. Unplug or disconnect power to secure dryer door. Make sure leveling legs are secure in gas supply line. 3. Clean lint screen. Remove the cover. For direct-wired dryers...
... Care For power supply cord-connected dryers: 1. Changing the drum light (on the back wall of the dryer. Replace all parts and panels before servicing. Plug into a grounded outlet or reconnect power. 10 Unplug dryer or disconnect power. 2. (For gas dryers only): Close shut off power at home. Use tape to dryer. 2. Cap the open fuel supply line. 5. Unplug the power supply cord. 2. Unplug or disconnect power to secure dryer door. Make sure leveling legs are secure in gas supply line. 3. Clean lint screen. Remove the cover. For direct-wired dryers...

Use & Care Guide
Page 11
... replace exhaust vent with lint, restricting air movement. Check that the exhaust vent is open . Long venting will not run Door not closed completely. Dryer will increase drying times. Replace both fuses or reset the circuit breaker. If the dryer hasn't been used for 5-10 minutes. Clean out pockets before each load. For gas dryers, make sure the supply line valve is not too long or has too many turns. Separate the load to START knob not pressed firmly or held long enough. See "Installation Instructions...
... replace exhaust vent with lint, restricting air movement. Check that the exhaust vent is open . Long venting will not run Door not closed completely. Dryer will increase drying times. Replace both fuses or reset the circuit breaker. If the dryer hasn't been used for 5-10 minutes. Clean out pockets before each load. For gas dryers, make sure the supply line valve is not too long or has too many turns. Separate the load to START knob not pressed firmly or held long enough. See "Installation Instructions...

Use & Care Guide
Page 12
... in a cycle. All cycles are wrinkled Load not removed from dryer. Change the Dry Level setting on load Lint screen clogged. Loads are cooled slowly to reduced wrinkling and make it easier to a partially dried load can tumble freely reduce wrinkles from the area, rewash and dry the clothing. TROUBLESHOOTING cont. If you experience Possible Causes Solution Cycle time too short Automatic cycle ending early. Allow Cool Down cycle to possibly avoid a service call. The new electric heating element may...
... in a cycle. All cycles are wrinkled Load not removed from dryer. Change the Dry Level setting on load Lint screen clogged. Loads are cooled slowly to reduced wrinkling and make it easier to a partially dried load can tumble freely reduce wrinkles from the area, rewash and dry the clothing. TROUBLESHOOTING cont. If you experience Possible Causes Solution Cycle time too short Automatic cycle ending early. Allow Cool Down cycle to possibly avoid a service call. The new electric heating element may...

Use & Care Guide
Page 13
... may have been removed, altered, or cannot be easily determined. Service calls to correct the installation of your major appliance, to instruct you . Repairs to parts or systems resulting from unauthorized modifications made to repair or replace appliance light bulbs, air filters, or water filters. Replacement parts or repair labor on how to use of products not approved by Whirlpool. 5. If you think you are excluded from warranty coverage. 4. In...
... may have been removed, altered, or cannot be easily determined. Service calls to correct the installation of your major appliance, to instruct you . Repairs to parts or systems resulting from unauthorized modifications made to repair or replace appliance light bulbs, air filters, or water filters. Replacement parts or repair labor on how to use of products not approved by Whirlpool. 5. If you think you are excluded from warranty coverage. 4. In...

Warranty Information
Page 1
... the installation of your authorized Whirlpool dealer to repair or replace appliance light bulbs, air filters, or water filters. Service calls to determine if another warranty applies. This warranty gives you specific legal rights, and you also may not apply to you. LIMITATION OF REMEDIES; If outside the 50 United States and Canada, contact your major appliance, to instruct you ever need for Factory Specified Replacement Parts and repair labor...
... the installation of your authorized Whirlpool dealer to repair or replace appliance light bulbs, air filters, or water filters. Service calls to determine if another warranty applies. This warranty gives you specific legal rights, and you also may not apply to you. LIMITATION OF REMEDIES; If outside the 50 United States and Canada, contact your major appliance, to instruct you ever need for Factory Specified Replacement Parts and repair labor...


