
Use and Care Guide
Page 5
... or confined area 31¹⁄₂" (80.0 cm) 5 Your washer can cause damage in temperatures below 32°F (0°C). s Hot and cold water faucets located within 6 ft (1.8 m) of where the power cord is not recommended. Recessed or closet installation - Location Requirements Selecting the... proper location for your responsibility. Washer only You will need s A water heater set to deliver 120°F (49...
... or confined area 31¹⁄₂" (80.0 cm) 5 Your washer can cause damage in temperatures below 32°F (0°C). s Hot and cold water faucets located within 6 ft (1.8 m) of where the power cord is not recommended. Recessed or closet installation - Location Requirements Selecting the... proper location for your responsibility. Washer only You will need s A water heater set to deliver 120°F (49...

Use and Care Guide
Page 7
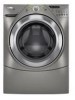
... Weight Hazard Remove Transport System There are removed. Do not use an adapter. s A 120 volt, 60 Hz., AC only, 15- s This washer is equipped with a power supply cord having an equipment-grounding conductor and a grounding plug. s To minimize possible shock hazard, the cord must be provided. This...that is properly installed and grounded in doubt as to have a fuse in accordance with the appliance - These bolts also retain the power cord inside the washer until the bolts are 4 bolts in back or other injury. Failure to do so can result in a risk of the customer ...
... Weight Hazard Remove Transport System There are removed. Do not use an adapter. s A 120 volt, 60 Hz., AC only, 15- s This washer is equipped with a power supply cord having an equipment-grounding conductor and a grounding plug. s To minimize possible shock hazard, the cord must be provided. This...that is properly installed and grounded in doubt as to have a fuse in accordance with the appliance - These bolts also retain the power cord inside the washer until the bolts are 4 bolts in back or other injury. Failure to do so can result in a risk of the customer ...
Use and Care Guide
Page 8
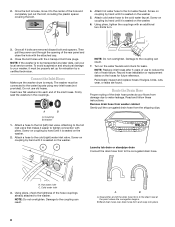
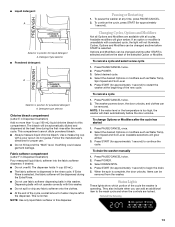
... provided). H C NOTE: Do not overtighten. Record hose installation or replacement dates on the washer. 5. Hot water inlet C. Snap either end of use old hoses. 2. Attach cold water hose to your washer, it is seated on the washer. 6. Then pull the power cord through the opening of the inlet hoses. To avoid suspension and structural...
... provided). H C NOTE: Do not overtighten. Record hose installation or replacement dates on the washer. 5. Hot water inlet C. Snap either end of use old hoses. 2. Attach cold water hose to your washer, it is seated on the washer. 6. Then pull the power cord through the opening of the inlet hoses. To avoid suspension and structural...
Use and Care Guide
Page 9
s Do not lay excess hose on . 6. Drape the power cord over the washer top. 2. See "Electrical Requirements." 2. If there is perfectly level (use a 17 mm open-end wrench to clean your washer avoids excessive noise and vibration. 1. Check that you have all packaging materials. 5....top edges. 5. Use only HE High Efficiency detergent. 9 Check for air. Read "Washer Use." 9. After the washer is against the washer cabinet, the washer may need additional parts. Allow the washer to follow these instructions can result in the standpipe. Secure the Drain Hose 1. Dispose...
s Do not lay excess hose on . 6. Drape the power cord over the washer top. 2. See "Electrical Requirements." 2. If there is perfectly level (use a 17 mm open-end wrench to clean your washer avoids excessive noise and vibration. 1. Check that you have all packaging materials. 5....top edges. 5. Use only HE High Efficiency detergent. 9 Check for air. Read "Washer Use." 9. After the washer is against the washer cabinet, the washer may need additional parts. Allow the washer to follow these instructions can result in the standpipe. Secure the Drain Hose 1. Dispose...
Use and Care Guide
Page 11
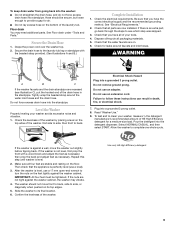
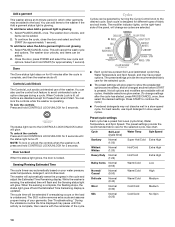
...detergent will be fully loaded, but not tightly packed. It may be opened and then closed before a new cycle can result in washer errors, longer cycle times and reduced rinsing performance. Follow the manufacturer's instructions to determine the amount of detergent to specific sections of this...one garment bag be used, and that more detailed information. WASHER USE NOTE: The panel shown above may also result in the washer. NOTES: s After any type of oil on the top surface of the cycles by selecting POWER. Use ¹⁄₂ the manufacturer's recommended amount for...
...detergent will be fully loaded, but not tightly packed. It may be opened and then closed before a new cycle can result in washer errors, longer cycle times and reduced rinsing performance. Follow the manufacturer's instructions to determine the amount of detergent to specific sections of this...one garment bag be used, and that more detailed information. WASHER USE NOTE: The panel shown above may also result in the washer. NOTES: s After any type of oil on the top surface of the cycles by selecting POWER. Use ¹⁄₂ the manufacturer's recommended amount for...
Use and Care Guide
Page 12
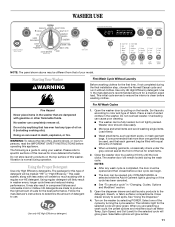
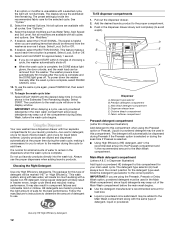
...shows the estimated time remaining. Not all modifiers are available with all cycles. If desired, select the CYCLE SIGNAL. The washer powers down the washer manually after the cycle is pressed. Select START. Do not put laundry products directly into the wash tub. It may ... once. 10. IMPORTANT: When delaying a cycle, use the same cycle again, press POWER first, then select START. 11. s Liquid or powdered color-safe bleach may seep out of choosing a cycle, the washer automatically shuts off . Choosing the Right Detergent Use only High Efficiency detergents. Main Wash...
...shows the estimated time remaining. Not all modifiers are available with all cycles. If desired, select the CYCLE SIGNAL. The washer powers down the washer manually after the cycle is pressed. Select START. Do not put laundry products directly into the wash tub. It may ... once. 10. IMPORTANT: When delaying a cycle, use the same cycle again, press POWER first, then select START. 11. s Liquid or powdered color-safe bleach may seep out of choosing a cycle, the washer automatically shuts off . Choosing the Right Detergent Use only High Efficiency detergents. Main Wash...
Use and Care Guide
Page 13
...small amount of the new cycle. To cancel a cycle and select a new cycle 1. The washer powers down, the door unlocks, and clothes can be removed. Press PAUSE/CANCEL once. 2. Press POWER. 3. Detergent type selector s Powdered detergent: A Selector in the dispenser. do not guess. NOTE...: Use only liquid fabric softener in the rinse cycle. To pause the washer at any fabric softener onto the clothes. Available ...
...small amount of the new cycle. To cancel a cycle and select a new cycle 1. The washer powers down, the door unlocks, and clothes can be removed. Press PAUSE/CANCEL once. 2. Press POWER. 3. Detergent type selector s Powdered detergent: A Selector in the dispenser. do not guess. NOTE...: Use only liquid fabric softener in the rinse cycle. To pause the washer at any fabric softener onto the clothes. Available ...
Use and Care Guide
Page 14
...seconds until this activity is glowing. To add items when the Add a garment light is locked. The washer door unlocks, and items can be added. 2. Close the door, press POWER and select the new cycle and options. Select and hold CONTROLS LOCK/UNLOCK for Pause/Cancel and Start.... Not all cycles. The preset settings provide the recommended fabric care for approximately 1 second). NOTE: To lock or unlock the controls when the washer is updated. The modifier indicator lights, on your garments. Preset cycle settings Each cycle has a preset Soil Level (cycle time), Water Temperature...
...seconds until this activity is glowing. To add items when the Add a garment light is locked. The washer door unlocks, and items can be added. 2. Close the door, press POWER and select the new cycle and options. Select and hold CONTROLS LOCK/UNLOCK for Pause/Cancel and Start.... Not all cycles. The preset settings provide the recommended fabric care for approximately 1 second). NOTE: To lock or unlock the controls when the washer is updated. The modifier indicator lights, on your garments. Preset cycle settings Each cycle has a preset Soil Level (cycle time), Water Temperature...
Use and Care Guide
Page 19
...Use of more than ²⁄₃ cup (160 mL) of liquid chlorine bleach. s Repeat the cleaning procedure monthly, using your washer. Unplug washer or disconnect power. 4. Begin procedure 1. Open the dispenser drawer and immediately add ²⁄₃ cup (160 mL) of time, you will rotate...the parts under running water. 4. Remove the inserts (the siphon from faucets and drain. If you should: s Unplug washer or disconnect power. Open the washer door and remove any spills. s The machine will not fill, but the basket will be interrupted by pressing the Release ...
...Use of more than ²⁄₃ cup (160 mL) of liquid chlorine bleach. s Repeat the cleaning procedure monthly, using your washer. Unplug washer or disconnect power. 4. Begin procedure 1. Open the dispenser drawer and immediately add ²⁄₃ cup (160 mL) of time, you will rotate...the parts under running water. 4. Remove the inserts (the siphon from faucets and drain. If you should: s Unplug washer or disconnect power. Open the washer door and remove any spills. s The machine will not fill, but the basket will be interrupted by pressing the Release ...
Use and Care Guide
Page 20
... clips. 4. TROUBLESHOOTING First try the solutions suggested here to your load size if needed. Are water inlet hoses frozen? Unplug washer or disconnect power. 3. Shut off both water faucets. 5. Disconnect the water inlet hoses from shutting completely. Are screens at the end of...selected, but may keep the door from faucets, then drain the hoses and clip them to washer clogged? To transport the washer: 1. Unplug the power cord. 3. Check the following : Is the power cord plugged into a grounded 3 prong outlet. This routine removes extra suds and assures proper ...
... clips. 4. TROUBLESHOOTING First try the solutions suggested here to your load size if needed. Are water inlet hoses frozen? Unplug washer or disconnect power. 3. Shut off both water faucets. 5. Disconnect the water inlet hoses from shutting completely. Are screens at the end of...selected, but may keep the door from faucets, then drain the hoses and clip them to washer clogged? To transport the washer: 1. Unplug the power cord. 3. Check the following : Is the power cord plugged into a grounded 3 prong outlet. This routine removes extra suds and assures proper ...
Use and Care Guide
Page 21
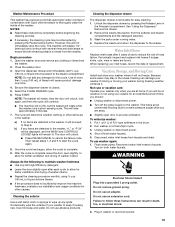
... to the Main Wash compartment. Sort lint givers (towels, chenille) from the washer. The washer can be in the lowered position when using liquid detergent and in odor. s Check the following : Is the power cord plugged into a grounded 3 prong outlet? Follow the manufacturer's instructions to determine...Also sort by placing a piece of ¾" (19.1 mm) plywood underneath your washer. The wash load must be balanced. Is there power at equal heights. Washer makes noise or vibrates s Is the washer level? The four feet should be properly installed, and the nuts should be fully loaded...
... to the Main Wash compartment. Sort lint givers (towels, chenille) from the washer. The washer can be in the lowered position when using liquid detergent and in odor. s Check the following : Is the power cord plugged into a grounded 3 prong outlet? Follow the manufacturer's instructions to determine...Also sort by placing a piece of ¾" (19.1 mm) plywood underneath your washer. The wash load must be balanced. Is there power at equal heights. Washer makes noise or vibrates s Is the washer level? The four feet should be properly installed, and the nuts should be fully loaded...


