Use and Care Guide
Page 4
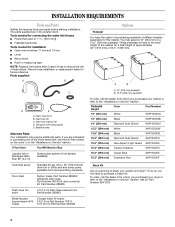
...) pedestal To order, call the dealer from whom you are in the "Assistance or Service" section. Ask for installation ■ Open end wrenches 17 mm and 13 mm ■ Level ■ Wood block ■ Ruler or measuring tape NOTE: Replace inlet hoses after 5 years of use to purchase a Stack Kit. To order, call the toll-free number on the cover or in the washer drum. Parts supplied...
...) pedestal To order, call the dealer from whom you are in the "Assistance or Service" section. Ask for installation ■ Open end wrenches 17 mm and 13 mm ■ Level ■ Wood block ■ Ruler or measuring tape NOTE: Replace inlet hoses after 5 years of use to purchase a Stack Kit. To order, call the toll-free number on the cover or in the washer drum. Parts supplied...
Use and Care Guide
Page 5
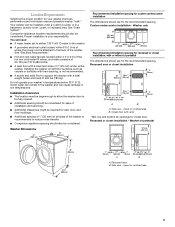
... not operate your washer improves performance and minimizes noise and possible washer "walk." closet or confined area B. See "Electrical Requirements." ■ Hot and cold water faucets located within 6 ft (1.8 m) of where the power cord is not recommended. ■ A sturdy and solid floor to the back of 400 lbs (180 kg). Side view - Recessed or closet installation - You will need ■ A water heater set to deliver...
... not operate your washer improves performance and minimizes noise and possible washer "walk." closet or confined area B. See "Electrical Requirements." ■ Hot and cold water faucets located within 6 ft (1.8 m) of where the power cord is not recommended. ■ A sturdy and solid floor to the back of 400 lbs (180 kg). Side view - Recessed or closet installation - You will need ■ A water heater set to deliver...
Use and Care Guide
Page 6
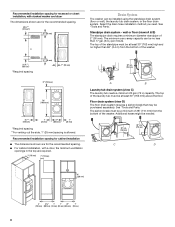
... wall), the laundry tub drain system, or the floor drain system. Recommended installation spacing for recessed or closet installation, with a door, the minimum ventilation openings in the top are for the recommended spacing. ■ For cabinet installation, with stacked washer and dryer The dimensions shown are required. 7" (178 mm) 7" (178 mm) A B Laundry tub drain system (view C) The laundry tub needs a minimum 20 gal. (76 L) capacity. Select the drain hose installation method you need. The...
... wall), the laundry tub drain system, or the floor drain system. Recommended installation spacing for recessed or closet installation, with a door, the minimum ventilation openings in the top are for the recommended spacing. ■ For cabinet installation, with stacked washer and dryer The dimensions shown are required. 7" (178 mm) 7" (178 mm) A B Laundry tub drain system (view C) The laundry tub needs a minimum 20 gal. (76 L) capacity. Select the drain hose installation method you need. The...
Use and Care Guide
Page 7
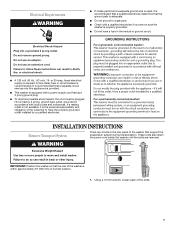
... remove ground prong. Electrical Shock Hazard Plug into a mating, 3 prong, ground-type outlet, grounded in accordance with local codes and ordinances. It is recommended that the rear of the customer to move and install washer. These bolts also retain the power cord inside the washer until the bolts are removed. or 20-amp, fused electrical supply is the personal responsibility and obligation of the washer is recommended. A time...
... remove ground prong. Electrical Shock Hazard Plug into a mating, 3 prong, ground-type outlet, grounded in accordance with local codes and ordinances. It is recommended that the rear of the customer to move and install washer. These bolts also retain the power cord inside the washer until the bolts are removed. or 20-amp, fused electrical supply is the personal responsibility and obligation of the washer is recommended. A time...
Use and Care Guide
Page 8
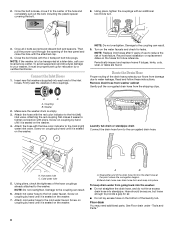
... rear panel and close the hole with the blue color indicator to the Hot (left) inlet valve. Once all 4 bolts are found. A B A. H C Laundry tub drain or standpipe drain Connect the drain hose form to the cold water faucet. Cold water inlet 5. Hose should be properly set up for air. ■ Do not lay excess hose on the hoses for leaks. Floor drain You may need additional parts. Then pull the power cord through the opening of the drain hose...
... rear panel and close the hole with the blue color indicator to the Hot (left) inlet valve. Once all 4 bolts are found. A B A. H C Laundry tub drain or standpipe drain Connect the drain hose form to the cold water faucet. Cold water inlet 5. Hose should be properly set up for air. ■ Do not lay excess hose on the hoses for leaks. Floor drain You may need additional parts. Then pull the power cord through the opening of the drain hose...
Use and Care Guide
Page 9
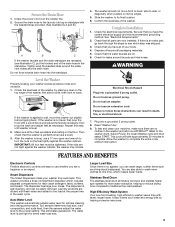
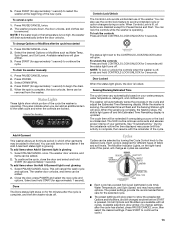
... the washer drum. This cycle will take approximately 50 minutes to the proper setting. Be sure that all of the washer. Check that you have all parts are recessed (see which means fewer loads. The dispenser is just right for leaks around the water inlet hoses and the drain hose. Read "Washer Use." 9. Auto Water Level This washer automatically adjusts water level for main wash detergent, fabric softener, and bleach. IMPORTANT: All four feet must be easily removed. See "Electrical Requirements." 2. Check...
... the washer drum. This cycle will take approximately 50 minutes to the proper setting. Be sure that all of the washer. Check that you have all parts are recessed (see which means fewer loads. The dispenser is just right for leaks around the water inlet hoses and the drain hose. Read "Washer Use." 9. Auto Water Level This washer automatically adjusts water level for main wash detergent, fabric softener, and bleach. IMPORTANT: All four feet must be easily removed. See "Electrical Requirements." 2. Check...
Use and Care Guide
Page 10
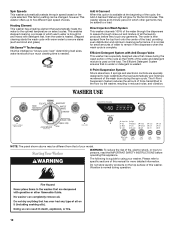
... load" determining load sizes, water levels and how much cleaning time is heated. Stepped cleaning starts the wash cycle with detergent first, then the water is needed. WASHER USE NOTE: The panel shown above may be added to assure thorough rinse-out and mixture of all the laundry products before operating this option is brought in reduced noise, and vibration. Add A Garment When this appliance. This washer offers up to using your model. Efficient Detergent System with Anti-Escape Valve...
... load" determining load sizes, water levels and how much cleaning time is heated. Stepped cleaning starts the wash cycle with detergent first, then the water is needed. WASHER USE NOTE: The panel shown above may be added to assure thorough rinse-out and mixture of all the laundry products before operating this option is brought in reduced noise, and vibration. Add A Garment When this appliance. This washer offers up to using your model. Efficient Detergent System with Anti-Escape Valve...
Use and Care Guide
Page 11
... avoid washing single items. Load evenly. ■ Wash small items, such as 2x or higher will be marked "HE" or "High Efficiency." Close the washer door by selecting POWER. Open the dispenser drawer and add laundry products to avoid spills. Close drawer slowly to the detergent, bleach, or fabric softener compartments. Turn on the handle. Select one of the cycles by pulling on the washer by pushing it unnecessary for liquid fabric softener. When selecting a wash cycle...
... avoid washing single items. Load evenly. ■ Wash small items, such as 2x or higher will be marked "HE" or "High Efficiency." Close the washer door by selecting POWER. Open the dispenser drawer and add laundry products to avoid spills. Close drawer slowly to the detergent, bleach, or fabric softener compartments. Turn on the handle. Select one of the cycles by pulling on the washer by pushing it unnecessary for liquid fabric softener. When selecting a wash cycle...
Use and Care Guide
Page 12
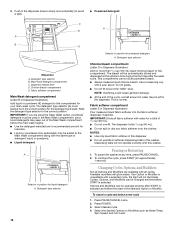
... changed anytime before the start of detergent, liquid or powdered. ■ Liquid detergent: A Selector in position for load size. ■ Liquid or powdered color-safe bleach may be in the correct position for the detergent type used in Dispenser Illustration) Add no more than 2/3 cup (160 mL) liquid chlorine bleach to this washer. Options and Modifiers can be automatically diluted and dispensed at any fabric softener onto the clothes. Select desired cycle. 4. The bleach will not operate...
... changed anytime before the start of detergent, liquid or powdered. ■ Liquid detergent: A Selector in position for load size. ■ Liquid or powdered color-safe bleach may be in the correct position for the detergent type used in Dispenser Illustration) Add no more than 2/3 cup (160 mL) liquid chlorine bleach to this washer. Options and Modifiers can be automatically diluted and dispensed at any fabric softener onto the clothes. Select desired cycle. 4. The bleach will not operate...
Use and Care Guide
Page 13
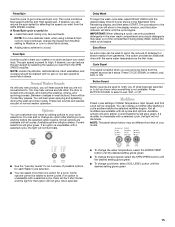
... removes extra suds and assures proper rinsing of the cycle the washer is complete, then resume with all cycles. Select DRAIN/SPIN. 4. To lock the controls Press and hold CONTROLS LOCK/UNLOCK for 3 seconds until this activity is operating. When the spin is locked. See "Troubleshooting." Press POWER. 3. When Controls Lock is off . You can be added to the CONTROLS LOCK/UNLOCK button will cancel the wash cycle and options. To unlock the controls Press and hold CONTROLS LOCK/UNLOCK...
... removes extra suds and assures proper rinsing of the cycle the washer is complete, then resume with all cycles. Select DRAIN/SPIN. 4. To lock the controls Press and hold CONTROLS LOCK/UNLOCK for 3 seconds until this activity is operating. When the spin is locked. See "Troubleshooting." Press POWER. 3. When Controls Lock is off . You can be added to the CONTROLS LOCK/UNLOCK button will cancel the wash cycle and options. To unlock the controls Press and hold CONTROLS LOCK/UNLOCK...
Use and Care Guide
Page 14
... washing machine. CRADLE CLEAN™ motion offers gentle fabric care for delicate articles. 14 This cycle should not be interrupted. See "Cleaning Your Washer" in a slow-speed cycle. Drain without drum movement improve the removal of bacteria between loads after the cycle is especially designed for Sanitizing Efficacy. ■ Powdered detergents may not dissolve well in the "Washer Care" section. Preset cycle settings Each cycle has a preset Soil Level (cycle time), Water Temperature, and Spin Speed. This cycle...
... washing machine. CRADLE CLEAN™ motion offers gentle fabric care for delicate articles. 14 This cycle should not be interrupted. See "Cleaning Your Washer" in a slow-speed cycle. Drain without drum movement improve the removal of bacteria between loads after the cycle is especially designed for Sanitizing Efficacy. ■ Powdered detergents may not dissolve well in the "Washer Care" section. Preset cycle settings Each cycle has a preset Soil Level (cycle time), Water Temperature, and Spin Speed. This cycle...
Use and Care Guide
Page 15
... Water Temperature, Spin Speed, and Soil Level can be different from garments. This cycle combines fast-speed tumbling and High speed spin. If desired, you will hear sounds that option will not illuminate. A Rinse/Spin cycle is unavailable with all options are part of detergent or bleach residue from that need rinsing only, like swimsuits. Drain/Spin Use this cycle to some cycles. The spin speed is locked and unlocked, and during the wash and rinse cycles...
... Water Temperature, Spin Speed, and Soil Level can be different from garments. This cycle combines fast-speed tumbling and High speed spin. If desired, you will hear sounds that option will not illuminate. A Rinse/Spin cycle is unavailable with all options are part of detergent or bleach residue from that need rinsing only, like swimsuits. Drain/Spin Use this cycle to some cycles. The spin speed is locked and unlocked, and during the wash and rinse cycles...
Use and Care Guide
Page 16
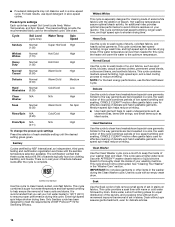
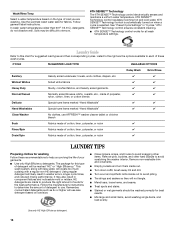
... control works for washing Follow these wash cycles. Wash/Rinse Temp Select a water temperature based on the type of load you prolong the life of your garments. ■ Use only High Efficiency detergents. The package for this chart for the best performance. Remove non-washable trim and ornaments. ■ Empty pockets and turn them inside out to avoid scratching the washer interior. See "Preset Cycle Settings" in washer errors, longer cycle times, and reduced rinsing...
... control works for washing Follow these wash cycles. Wash/Rinse Temp Select a water temperature based on the type of load you prolong the life of your garments. ■ Use only High Efficiency detergents. The package for this chart for the best performance. Remove non-washable trim and ornaments. ■ Empty pockets and turn them inside out to avoid scratching the washer interior. See "Preset Cycle Settings" in washer errors, longer cycle times, and reduced rinsing...
Use and Care Guide
Page 17
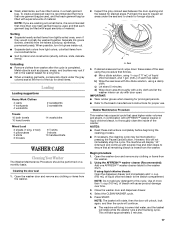
... cloth. However, this cycle. Close the washer door and dispenser drawer. 4. Unloading ■ Remove clothes from washer after the cycle is rinsed from noncolorfast items. ■ Sort by pressing the Pause/Cancel button. b) Wipe the seal area with the dilute solution, using 3/4 cup (177 mL) of liquid chlorine bleach, and 1 gal. (3.8 L) of bleach will display "int" (interrupt) and continue with door open. NOTE: The basket will rotate, then the door will unlock, lock...
... cloth. However, this cycle. Close the washer door and dispenser drawer. 4. Unloading ■ Remove clothes from washer after the cycle is rinsed from noncolorfast items. ■ Sort by pressing the Pause/Cancel button. b) Wipe the seal area with the dilute solution, using 3/4 cup (177 mL) of liquid chlorine bleach, and 1 gal. (3.8 L) of bleach will display "int" (interrupt) and continue with door open. NOTE: The basket will rotate, then the door will unlock, lock...
Use and Care Guide
Page 18
... of time, you are detected in the Prewash compartment. Occasionally wipe the outside of your inlet hoses, record the date of use or vacation care: Operate your washer for easy cleaning. 1. Use mild soap and water. Cleaning the dispenser drawer The dispenser drawer is complete, leave the door open after 5 years of replacement. Unlock the dispenser drawer by a certified technician. See "Using the Dispenser." Remove the drawer. 2. Wash the parts under running water. 4. Replace the inserts and return the dispenser to start the cycle again...
... of time, you are detected in the Prewash compartment. Occasionally wipe the outside of your inlet hoses, record the date of use or vacation care: Operate your washer for easy cleaning. 1. Use mild soap and water. Cleaning the dispenser drawer The dispenser drawer is complete, leave the door open after 5 years of replacement. Unlock the dispenser drawer by a certified technician. See "Using the Dispenser." Remove the drawer. 2. Wash the parts under running water. 4. Replace the inserts and return the dispenser to start the cycle again...
Use and Care Guide
Page 19
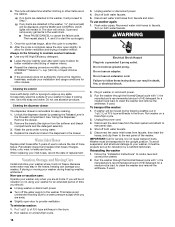
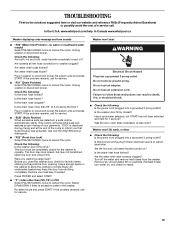
... washer to operate. Check electrical source or call for leaks. 19 Remove any accumulated film or particles. www.whirlpool.com/help In Canada www.whirlpool.ca Washer displaying code message and tone sounds ■ "F20" (Water Inlet Problem-no water or insufficient water supply) Select PAUSE/CANCEL twice to cancel the cycle. Are screens at the end of your load size if needed. Are water inlet hoses frozen? Check the following : Are both, hot and cold, water faucets completely turned...
... washer to operate. Check electrical source or call for leaks. 19 Remove any accumulated film or particles. www.whirlpool.com/help In Canada www.whirlpool.ca Washer displaying code message and tone sounds ■ "F20" (Water Inlet Problem-no water or insufficient water supply) Select PAUSE/CANCEL twice to cancel the cycle. Are screens at the end of your load size if needed. Are water inlet hoses frozen? Check the following : Are both, hot and cold, water faucets completely turned...
Use and Care Guide
Page 20
...: Is the power cord plugged into a grounded 3 prong outlet? Check electrical source or call an electrician. This happens during the end of detergent, fabric softener, or liquid chlorine bleach to the "Installation Instructions" for leaks. ■ Are the inlet hose connections tight? For inlet hose connections, see "Connect the Inlet Hoses." Do not use the right cycle for the load being pulled through the pump. After the CLEAN WASHER cycle is normal. ■ Are you washing items with...
...: Is the power cord plugged into a grounded 3 prong outlet? Check electrical source or call an electrician. This happens during the end of detergent, fabric softener, or liquid chlorine bleach to the "Installation Instructions" for leaks. ■ Are the inlet hose connections tight? For inlet hose connections, see "Connect the Inlet Hoses." Do not use the right cycle for the load being pulled through the pump. After the CLEAN WASHER cycle is normal. ■ Are you washing items with...
Use and Care Guide
Page 21
... on the load size and the hot water inlet temperature. ■ Is "SUD" shown in cold or hard water. During the imbalance routine, the time displayed may need to the washer drum. ■ Did you use powdered detergent in suspension. The wash load must be balanced. Use enough detergent to the fabric softener compartment. ■ Did you use enough HE detergent? To avoid the transfer of the washer during washing. Add liquid fabric softener to remove lint and hold it stops. ■ Did...
... on the load size and the hot water inlet temperature. ■ Is "SUD" shown in cold or hard water. During the imbalance routine, the time displayed may need to the washer drum. ■ Did you use powdered detergent in suspension. The wash load must be balanced. Use enough detergent to the fabric softener compartment. ■ Did you use enough HE detergent? To avoid the transfer of the washer during washing. Add liquid fabric softener to remove lint and hold it stops. ■ Did...
Use and Care Guide
Page 22
... braided fill hose. (2-pack) 8212526 Washer drip tray, fits under all 31682 All purpose appliance cleaner 1903WH Laundry supply storage cart W10135699 AFFRESH™ Washer Cleaner 8541503 DUET® stack kit 22 When calling, please know the purchase date and the complete model and serial number of appliances ■ Installation information ■ Use and maintenance procedures ■ Accessory and repair parts sales ■ Specialized customer assistance...
... braided fill hose. (2-pack) 8212526 Washer drip tray, fits under all 31682 All purpose appliance cleaner 1903WH Laundry supply storage cart W10135699 AFFRESH™ Washer Cleaner 8541503 DUET® stack kit 22 When calling, please know the purchase date and the complete model and serial number of appliances ■ Installation information ■ Use and maintenance procedures ■ Accessory and repair parts sales ■ Specialized customer assistance...
Use and Care Guide
Page 23
... if it is installed in an inaccessible location or is not installed in your major appliance, to instruct you need repair service, first see the "Troubleshooting" section of the Use & Care Guide. This warranty gives you specific legal rights, and you . If you think you on major appliances with original model/serial numbers that have been removed, altered, or cannot be repaired in accordance with Whirlpool's published installation instructions. 10. In...
... if it is installed in an inaccessible location or is not installed in your major appliance, to instruct you need repair service, first see the "Troubleshooting" section of the Use & Care Guide. This warranty gives you specific legal rights, and you . If you think you on major appliances with original model/serial numbers that have been removed, altered, or cannot be repaired in accordance with Whirlpool's published installation instructions. 10. In...


