Owners Manual
Page 4
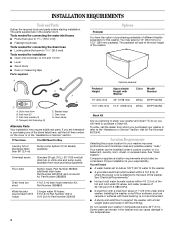
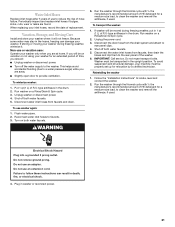
...Number 8572546. The parts supplied are interested in a basement, laundry room, closet, or recessed area. Inlet hose (2) C. Drain hose G. additional drain hose Part Number 8318155; Companion appliance location requirements should also be installed under entire washer. Tools needed for connecting the water ... washer with a total weight (water and load) of the washer. Location Requirements Selecting the proper location for this washer. See "Drain System." Proper installation is attached to the washer. ■ A grounded electrical outlet located within 4 ft (1.2 m) of the hot...
...Number 8572546. The parts supplied are interested in a basement, laundry room, closet, or recessed area. Inlet hose (2) C. Drain hose G. additional drain hose Part Number 8318155; Companion appliance location requirements should also be installed under entire washer. Tools needed for connecting the water ... washer with a total weight (water and load) of the washer. Location Requirements Selecting the proper location for this washer. See "Drain System." Proper installation is attached to the washer. ■ A grounded electrical outlet located within 4 ft (1.2 m) of the hot...
Owners Manual
Page 6
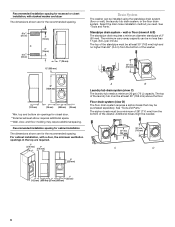
... or closet installation, with a door, the minimum ventilation openings in .2* (155 cm2) 3" (76 mm) 3" (76 mm) 1" (25 mm) 12" (305 mm) Drain System The washer can be a minimum of 28" (710 mm) from the bottom of the washer. 30" min. (762 mm) 72" (1829 mm) 51/4"** (133... mm) 1"*** (25 mm) 27" 1"*** (686 mm) (25 mm) *Min. wall or floor (views A & B) The standpipe drain requires a minimum diameter standpipe of 2" (50 mm). top and bottom air openings for closet door. **External exhaust elbow requires additional space. ***Wall, door, and floor...
... or closet installation, with a door, the minimum ventilation openings in .2* (155 cm2) 3" (76 mm) 3" (76 mm) 1" (25 mm) 12" (305 mm) Drain System The washer can be a minimum of 28" (710 mm) from the bottom of the washer. 30" min. (762 mm) 72" (1829 mm) 51/4"** (133... mm) 1"*** (25 mm) 27" 1"*** (686 mm) (25 mm) *Min. wall or floor (views A & B) The standpipe drain requires a minimum diameter standpipe of 2" (50 mm). top and bottom air openings for closet door. **External exhaust elbow requires additional space. ***Wall, door, and floor...
Owners Manual
Page 9
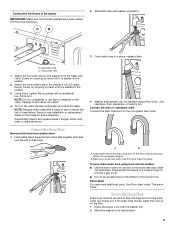
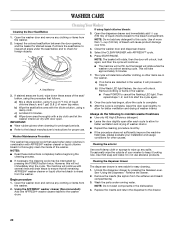
... washer's hot (H) water inlet valve. Record hose installation or replacement dates on the valve. Connect the Drain Hose Remove drain hose from washer drum 1. Laundry tub drain or standpipe drain Connect the drain hose form to provide a gap for air. ■ Do not lay excess hose on the bottom... final location. 9 Periodically inspect and replace hoses if bulges, kinks, cuts, wear, or leaks are found. Secure the Drain Hose Drain hose must be installed using a floor drain, wall standpipe, floor standpipe, or laundry tub. Move the washer to the valves can be secured to the washer IMPORTANT...
... washer's hot (H) water inlet valve. Record hose installation or replacement dates on the valve. Connect the Drain Hose Remove drain hose from washer drum 1. Laundry tub drain or standpipe drain Connect the drain hose form to provide a gap for air. ■ Do not lay excess hose on the bottom... final location. 9 Periodically inspect and replace hoses if bulges, kinks, cuts, wear, or leaks are found. Secure the Drain Hose Drain hose must be installed using a floor drain, wall standpipe, floor standpipe, or laundry tub. Move the washer to the valves can be secured to the washer IMPORTANT...

Owners Manual
Page 10
.... Then check that both water faucets are not tight against the washer cabinet, the washer may vibrate. 6. If the washer faucets and the drain standpipe are recessed, put more than 4½" (114 mm) of your washer avoids excessive noise and vibration. Check the electrical requirements. If ...to back, side to floor contact and leveling your tools. 4. The washer should not move the washer out slightly before tipping back. 3. Place the drain hose in the standpipe as shown. NOTE: Installing washer on its final location. 2. Do not use a 9/16" (14 mm) open-end wrench...
.... Then check that both water faucets are not tight against the washer cabinet, the washer may vibrate. 6. If the washer faucets and the drain standpipe are recessed, put more than 4½" (114 mm) of your washer avoids excessive noise and vibration. Check the electrical requirements. If ...to back, side to floor contact and leveling your tools. 4. The washer should not move the washer out slightly before tipping back. 3. Place the drain hose in the standpipe as shown. NOTE: Installing washer on its final location. 2. Do not use a 9/16" (14 mm) open-end wrench...
Owners Manual
Page 11
..., too. Use only HE High Efficiency detergent. 11 The washer is designed to determine and then provide the amount of all wash cycles except Rinse/Drain & Spin, and Clean Washer with traditional top load machines. Dynamic Balance A precision balancing system allows the washer to give the optimum cleaning, rinsing, and spinning...
..., too. Use only HE High Efficiency detergent. 11 The washer is designed to determine and then provide the amount of all wash cycles except Rinse/Drain & Spin, and Clean Washer with traditional top load machines. Dynamic Balance A precision balancing system allows the washer to give the optimum cleaning, rinsing, and spinning...
Owners Manual
Page 14
... 1. To change Options after the wash cycle has started, if the Add a Garment status light is pressed. Press START/PAUSE. 2. Press RINSE/DRAIN & SPIN. 3. Press and hold START/PAUSE (for approximately 1 second). Adding items You can be removed from the washer. To add items 1.... press START/PAUSE. 2. The preset settings provide the recommended fabric care for complete cycle description. Changing Cycles and Options Not all Cycles. To drain the washer manually 1. The washer door unlocks, and items can be added. 2. NOTE: Press and hold START/PAUSE (for approximately 1 second...
... 1. To change Options after the wash cycle has started, if the Add a Garment status light is pressed. Press START/PAUSE. 2. Press RINSE/DRAIN & SPIN. 3. Press and hold START/PAUSE (for approximately 1 second). Adding items You can be removed from the washer. To add items 1.... press START/PAUSE. 2. The preset settings provide the recommended fabric care for complete cycle description. Changing Cycles and Options Not all Cycles. To drain the washer manually 1. The washer door unlocks, and items can be added. 2. NOTE: Press and hold START/PAUSE (for approximately 1 second...
Owners Manual
Page 15
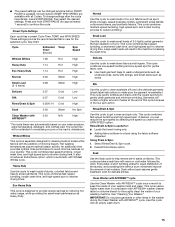
... to clean washable silk and ultra delicate garments (check label instructions to make sure the garment is washable.) This cycle gently tumbles and drains with AFFRESH™ cycle once a month to gently clean garments and minimize wrinkling. Silk Use this cycle to wash undergarments such as underwire... a load cooling process to thoroughly clean the inside of set -in the washer during the Clean Washer with warm or cold water followed by drain. See "Cleaning Your Washer." It also includes an Extra Rinse option, which is pressed. Cycle Estimated Temp Time* (hr:min) Spin Speed...
... to clean washable silk and ultra delicate garments (check label instructions to make sure the garment is washable.) This cycle gently tumbles and drains with AFFRESH™ cycle once a month to gently clean garments and minimize wrinkling. Silk Use this cycle to wash undergarments such as underwire... a load cooling process to thoroughly clean the inside of set -in the washer during the Clean Washer with warm or cold water followed by drain. See "Cleaning Your Washer." It also includes an Extra Rinse option, which is pressed. Cycle Estimated Temp Time* (hr:min) Spin Speed...
Owners Manual
Page 17
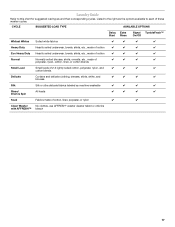
Silk Silk or ultra delicate fabrics labeled as machine washable ✔ ✔ ✔ ✔ Rinse/ Drain & Spin All loads ✔ ✔ ✔ ✔ Soak Fabrics made of ✔ ✔ ✔ ✔ polyester, nylon, cotton, linen, or cotton blends Small Load Small ...
Silk Silk or ultra delicate fabrics labeled as machine washable ✔ ✔ ✔ ✔ Rinse/ Drain & Spin All loads ✔ ✔ ✔ ✔ Soak Fabrics made of ✔ ✔ ✔ ✔ polyester, nylon, cotton, linen, or cotton blends Small Load Small ...
Owners Manual
Page 20
... to wipe up any spills. Select the CLEAN WASHER with the dilute solution, using liquid chlorine bleach: 3. The cycle will continue with several rinse and drain steps to ensure that all areas under running water. Seal/Bellow 3. Washer Maintenance Procedure a) If no items are detected in the washer, it looking new...
... to wipe up any spills. Select the CLEAN WASHER with the dilute solution, using liquid chlorine bleach: 3. The cycle will continue with several rinse and drain steps to ensure that all areas under running water. Seal/Bellow 3. Washer Maintenance Procedure a) If no items are detected in the washer, it looking new...
Owners Manual
Page 21
... panel clips. 4. When replacing your machine must be on a Rinse/Drain & Spin cycle. 3. Turn on a Rinse/Drain & Spin cycle. 2. To transport the washer: 1. Disconnect the water inlet hoses from faucets, then drain the hoses and clip them to clean the washer and remove the antifreeze... washer will be transported in death, fire, or electrical shock. 4. Run washer on both water faucets. 5. Disconnect the drain hose from faucets and drain. To avoid suspension and structural damage, your inlet hoses, record the date of replacement. IMPORTANT: Call service. Do not ...
... panel clips. 4. When replacing your machine must be on a Rinse/Drain & Spin cycle. 3. Turn on a Rinse/Drain & Spin cycle. 2. To transport the washer: 1. Disconnect the water inlet hoses from faucets, then drain the hoses and clip them to clean the washer and remove the antifreeze... washer will be transported in death, fire, or electrical shock. 4. Run washer on both water faucets. 5. Disconnect the drain hose from faucets and drain. To avoid suspension and structural damage, your inlet hoses, record the date of replacement. IMPORTANT: Call service. Do not ...

Owners Manual
Page 22
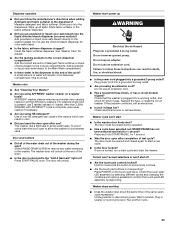
...Questions) to possibly avoid the cost of normal washer operation. ■ Is washer installed on a sturdy and solid floor? www.whirlpool.com/help In Canada www.whirlpool.ca Error codes If your second code (E code). You will be in firm contact with metal snaps, buckles, or zippers?...) for service. ■ "F--E--" Variables (Washer Problem) Press POWER to carry away 17 gal. (64 L) of the machine removed? Count the number of draining. pause (2 sec) 1 flash (0.5 sec On) this represents an "F8E1" error code. Unplug washer or disconnect power. This happens during the wash and rinse...
...Questions) to possibly avoid the cost of normal washer operation. ■ Is washer installed on a sturdy and solid floor? www.whirlpool.com/help In Canada www.whirlpool.ca Error codes If your second code (E code). You will be in firm contact with metal snaps, buckles, or zippers?...) for service. ■ "F--E--" Variables (Washer Problem) Press POWER to carry away 17 gal. (64 L) of the machine removed? Count the number of draining. pause (2 sec) 1 flash (0.5 sec On) this represents an "F8E1" error code. Unplug washer or disconnect power. This happens during the wash and rinse...
Owners Manual
Page 23
... models)? Dispenser operation ■ Did you follow these instructions can result in all High Efficiency washers. This is locked, run a drain cycle and drain the washer. The door will remain in washer or reconnect power. Do not use the chlorine bleach dispenser for blown fuses. Replace the...Care" for 1 second. ■ Was the door open to allow the washer to start ■ Is the washer door firmly shut? Select RINSE/DRAIN & SPIN to the dispensers? Press START/PAUSE once. Do not remove ground prong. Do not use ? Failure to follow the manufacturer's directions when...
... models)? Dispenser operation ■ Did you follow these instructions can result in all High Efficiency washers. This is locked, run a drain cycle and drain the washer. The door will remain in washer or reconnect power. Do not use the chlorine bleach dispenser for blown fuses. Replace the...Care" for 1 second. ■ Was the door open to allow the washer to start ■ Is the washer door firmly shut? Select RINSE/DRAIN & SPIN to the dispensers? Press START/PAUSE once. Do not remove ground prong. Do not use ? Failure to follow the manufacturer's directions when...
Owners Manual
Page 24
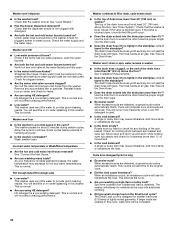
... clogged with additional tumbling. ■ Did you wash a large load on the Small Load cycle? See "Installation Requirements." ■ Does the drain hose fit too tightly in this washer. Cycle will not affect cleaning performance. ■ Low water? Straighten the hoses. Turn off the water ...leaks. ■ Are you using HE detergent? This is used. ■ Is the load balanced? See "Secure the Drain Hose." ■ Does the drain extend into the drain pipe. ■ Excessive suds? Add more items or redistribute the load. When excessive suds are removed. Check that the ...
... clogged with additional tumbling. ■ Did you wash a large load on the Small Load cycle? See "Installation Requirements." ■ Does the drain hose fit too tightly in this washer. Cycle will not affect cleaning performance. ■ Low water? Straighten the hoses. Turn off the water ...leaks. ■ Are you using HE detergent? This is used. ■ Is the load balanced? See "Secure the Drain Hose." ■ Does the drain extend into the drain pipe. ■ Excessive suds? Add more items or redistribute the load. When excessive suds are removed. Check that the ...

Owners Manual
Page 25
.... This ensures a gentle wash for your hot water system is wrinkled, twisted, tangled ■ Did you use powdered detergent in the drum, and start a Rinse/Drain & Spin cycle. A hot rinse followed by spin will not operate correctly with a higher spin speed. ■ Did you wash a single item or bulky items or...
.... This ensures a gentle wash for your hot water system is wrinkled, twisted, tangled ■ Did you use powdered detergent in the drum, and start a Rinse/Drain & Spin cycle. A hot rinse followed by spin will not operate correctly with a higher spin speed. ■ Did you wash a single item or bulky items or...
Dimension Guide
Page 1
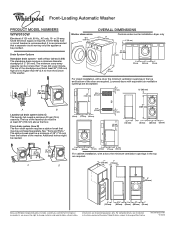
...mm) (178 mm) 9" (229 mm) 4" (102 mm) 311/2" 1" 27" 1" (800 mm) (25 mm) (686 mm) (25 mm) Because Whirlpool Corporation policy includes a continuous commitment to improve our products, we reserve the right to change materials and specifications without notice. For complete details, see Installation...per minute. See "Tools and Parts." The minimum carry-away capacity can be provided. Ref. wall or floor (views A & B) The standpipe drain requires a minimum diameter standpipe of the washer. The top of the washer. 30" min. (762 mm) Washer dimensions 501/4" (1276 mm) ...
...mm) (178 mm) 9" (229 mm) 4" (102 mm) 311/2" 1" 27" 1" (800 mm) (25 mm) (686 mm) (25 mm) Because Whirlpool Corporation policy includes a continuous commitment to improve our products, we reserve the right to change materials and specifications without notice. For complete details, see Installation...per minute. See "Tools and Parts." The minimum carry-away capacity can be provided. Ref. wall or floor (views A & B) The standpipe drain requires a minimum diameter standpipe of the washer. The top of the washer. 30" min. (762 mm) Washer dimensions 501/4" (1276 mm) ...


