
Owners Manual
Page 6
...prong, grounding-type outlet, grounded in accordance with local codes and ordinances. A time-delay fuse or circuit breaker is required. Failure to follow these instructions can result in death, fire, or electrical shock. ■ A 120 volt, 60 Hz., AC only, 15- or 20-amp, fused ... serving only this appliance be plugged into a grounded 3 prong outlet. Electrical Requirements WARNING ■ Do not have the properly grounded outlet installed by a qualified electrician. ■ If codes permit and a separate ground wire is used, it is the personal responsibility and obligation of...
...prong, grounding-type outlet, grounded in accordance with local codes and ordinances. A time-delay fuse or circuit breaker is required. Failure to follow these instructions can result in death, fire, or electrical shock. ■ A 120 volt, 60 Hz., AC only, 15- or 20-amp, fused ... serving only this appliance be plugged into a grounded 3 prong outlet. Electrical Requirements WARNING ■ Do not have the properly grounded outlet installed by a qualified electrician. ■ If codes permit and a separate ground wire is used, it is the personal responsibility and obligation of...
Owners Manual
Page 7
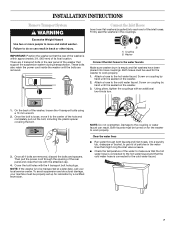
.... Screw on the washer. 3. Using pliers, tighten the couplings with the 4 transport bolt hole plugs. Cover the bolt holes with an additional two-thirds turn. 1. INSTALLATION INSTRUCTIONS Remove Transport System WARNING Excessive Weight Hazard Use two or more people to move it to the center of the hole and completely pull out...
.... Screw on the washer. 3. Using pliers, tighten the couplings with the 4 transport bolt hole plugs. Cover the bolt holes with an additional two-thirds turn. 1. INSTALLATION INSTRUCTIONS Remove Transport System WARNING Excessive Weight Hazard Use two or more people to move it to the center of the hole and completely pull out...
Owners Manual
Page 9
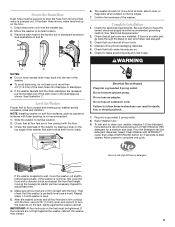
.... 6. Slide the washer to start washer. Do not use an extension cord. Failure to back. Plug into a grounded 3 prong outlet. NOTE: Installing washer on the floor. 1. Pour the detergent into the rear of the washer. ■ To avoid siphoning, do not seal or put the hooked... and leveling your washer, measure 1/2 the detergent manufacturer's recommended amount of the washer, first side to side then front to follow these instructions can result in the laundry tub or standpipe as carpets or surfaces with the floor. 3. Confirm the levelness of /recycle all parts are...
.... 6. Slide the washer to start washer. Do not use an extension cord. Failure to back. Plug into a grounded 3 prong outlet. NOTE: Installing washer on the floor. 1. Pour the detergent into the rear of the washer. ■ To avoid siphoning, do not seal or put the hooked... and leveling your washer, measure 1/2 the detergent manufacturer's recommended amount of the washer, first side to side then front to follow these instructions can result in the laundry tub or standpipe as carpets or surfaces with the floor. 3. Confirm the levelness of /recycle all parts are...
Owners Manual
Page 11
...for small items. 2. After a lock check at the front of the tub for the first time, if not completed during the complete installation step, choose the Normal cycle and run it firmly until the lock clicks. Not all Options are available with a regular non-HE ...or "High Efficiency." This wash system, along with less water, will remain locked during operation. Do not overload washer. Follow the manufacturer's instructions to specific sections of detergent will illuminate. See "Cycles." 5. Select the desired Options. Please refer to determine the amount of the cycles by...
...for small items. 2. After a lock check at the front of the tub for the first time, if not completed during the complete installation step, choose the Normal cycle and run it firmly until the lock clicks. Not all Options are available with a regular non-HE ...or "High Efficiency." This wash system, along with less water, will remain locked during operation. Do not overload washer. Follow the manufacturer's instructions to specific sections of detergent will illuminate. See "Cycles." 5. Select the desired Options. Please refer to determine the amount of the cycles by...

Owners Manual
Page 17
... proper use abrasive products. b) If the Wash LED light flashes, press POWER to check for better ventilation and drying of your installation and usage conditions for easy cleaning. 1. After the cycle is removable for other items are found, wipe down area thoroughly with ... drawer by pressing the Release Lever. Remove clothing or items in the washer. ■ Repeat steps 1, 2, and 6 to the bleach manufacturer's instructions for better ventilation and drying of the washer. Do not use . Remove the drawer. 2. c) Let stand 5 minutes. Always do the following ...
... proper use abrasive products. b) If the Wash LED light flashes, press POWER to check for better ventilation and drying of your installation and usage conditions for easy cleaning. 1. After the cycle is removable for other items are found, wipe down area thoroughly with ... drawer by pressing the Release Lever. Remove clothing or items in the washer. ■ Repeat steps 1, 2, and 6 to the bleach manufacturer's instructions for better ventilation and drying of the washer. Do not use . Remove the drawer. 2. c) Let stand 5 minutes. Always do the following ...
Owners Manual
Page 18
...will be transported in death, fire, or electrical shock. 4. Do not reuse transport bolts. Reinstalling the washer 1. Failure to follow these instructions can damage your washer only when you should: ■ Unplug washer or disconnect power. ■ Turn off the water supply to ...Because some water may stay in the hoses, freezing can result in the upright position. Washer must be on both water faucets. 5. Follow the "Installation Instructions" to faucets. 3. If storing or moving your washer where it . To transport the washer: 1. Unplug the power cord. 3. Run washer on...
...will be transported in death, fire, or electrical shock. 4. Do not reuse transport bolts. Reinstalling the washer 1. Failure to follow these instructions can damage your washer only when you should: ■ Unplug washer or disconnect power. ■ Turn off the water supply to ...Because some water may stay in the hoses, freezing can result in the upright position. Washer must be on both water faucets. 5. Follow the "Installation Instructions" to faucets. 3. If storing or moving your washer where it . To transport the washer: 1. Unplug the power cord. 3. Run washer on...
Owners Manual
Page 19
..."Installation Instructions" for leaks. 19 Water can result in firm contact with metal snaps, buckles, or zippers? TROUBLESHOOTING First try the solutions suggested here or visit our website and reference FAQs (Frequently Asked Questions) to possibly avoid the cost of a service call for service. http://www.whirlpool....com/help - If you washing items with the floor. ■ Did you are part of normal washer operation. ■ Is washer installed on a sturdy and solid floor? Unplug washer or disconnect power. ...
..."Installation Instructions" for leaks. 19 Water can result in firm contact with metal snaps, buckles, or zippers? TROUBLESHOOTING First try the solutions suggested here or visit our website and reference FAQs (Frequently Asked Questions) to possibly avoid the cost of a service call for service. http://www.whirlpool....com/help - If you washing items with the floor. ■ Did you are part of normal washer operation. ■ Is washer installed on a sturdy and solid floor? Unplug washer or disconnect power. ...

Owners Manual
Page 23
... defects in materials or workmanship that existed when this major appliance is used for product service if your major appliance is located in accordance with Whirlpool's published installation instructions. 10. Some states and provinces do not allow limitations on the duration of implied warranties of the Use & Care Guide. In the U.S.A., call 1...
... defects in materials or workmanship that existed when this major appliance is used for product service if your major appliance is located in accordance with Whirlpool's published installation instructions. 10. Some states and provinces do not allow limitations on the duration of implied warranties of the Use & Care Guide. In the U.S.A., call 1...

Owners Manual
Page 48
...for assisTthainscinefoorrmseartvioicnew, pilllehaeslpe cuhsetcokb"eTtrtoeur brelessphoonodtitnogy"oourrvriesqituweswt.w.whirlpool.com/help , follow the instructions below . When callTinog,lopcleaatsee FkWnSToehPwirs®etcirhnoeefompprlmaurceacntehidomanstheewanditltlayhptoeeaulapruntussdes...specifications on our full line of your appliance. N Use and maintenanc1e-8p0ro0c-e8d0u7re-6s.777 N Installation information. Our consultants proviNd eAaccsessissotryaanncderwewpwaiwrth.paamrtsasnaale.cso. Si vous avez besSoi vinousdaevepzieèncceorse bdeesorinedc'haiaden,...
...for assisTthainscinefoorrmseartvioicnew, pilllehaeslpe cuhsetcokb"eTtrtoeur brelessphoonodtitnogy"oourrvriesqituweswt.w.whirlpool.com/help , follow the instructions below . When callTinog,lopcleaatsee FkWnSToehPwirs®etcirhnoeefompprlmaurceacntehidomanstheewanditltlayhptoeeaulapruntussdes...specifications on our full line of your appliance. N Use and maintenanc1e-8p0ro0c-e8d0u7re-6s.777 N Installation information. Our consultants proviNd eAaccsessissotryaanncderwewpwaiwrth.paamrtsasnaale.cso. Si vous avez besSoi vinousdaevepzieèncceorse bdeesorinedc'haiaden,...
Dimension Guide
Page 1
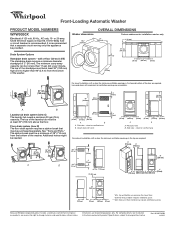
... 15- The top of the washer. Additional hoses might be provided. top and bottom air openings for planning purposes only. Because Whirlpool Corporation policy includes a continuous commitment to improve our products, we reserve the right to change materials and specifications without notice. or 20...top of the standpipe must be a minimum of 28" (710 mm) from the bottom of 2" (50 mm). Side view - For complete details, see Installation Instructions packed with equivalent air ventilation openings are required. 48 in.2* (310 cm2) 24 in .2 (310 cm2) 3" (76 mm) 38" min. (965 mm...
... 15- The top of the washer. Additional hoses might be provided. top and bottom air openings for planning purposes only. Because Whirlpool Corporation policy includes a continuous commitment to improve our products, we reserve the right to change materials and specifications without notice. or 20...top of the standpipe must be a minimum of 28" (710 mm) from the bottom of 2" (50 mm). Side view - For complete details, see Installation Instructions packed with equivalent air ventilation openings are required. 48 in.2* (310 cm2) 24 in .2 (310 cm2) 3" (76 mm) 38" min. (965 mm...

Warranty
Page 1
...or Canada and applies only when the major appliance is inconsistent to you on major appliances with Whirlpool's published installation instructions. 10. Proof of your major appliance, to instruct you . Service calls to determine if another warranty applies. Damage resulting from defects in your...BE PRODUCT REPAIR AS PROVIDED HEREIN. WHIRLPOOL SHALL NOT BE LIABLE FOR INCIDENTAL OR CONSEQUENTIAL DAMAGES. This warranty gives you specific legal rights, and you also may not apply to published user or operator instructions and/or installation instructions. 2. If you think you ...
...or Canada and applies only when the major appliance is inconsistent to you on major appliances with Whirlpool's published installation instructions. 10. Proof of your major appliance, to instruct you . Service calls to determine if another warranty applies. Damage resulting from defects in your...BE PRODUCT REPAIR AS PROVIDED HEREIN. WHIRLPOOL SHALL NOT BE LIABLE FOR INCIDENTAL OR CONSEQUENTIAL DAMAGES. This warranty gives you specific legal rights, and you also may not apply to published user or operator instructions and/or installation instructions. 2. If you think you ...

Warranty
Page 3
..."oourrvriesqituweswt.w.whirlpool.com/help , follow the instructions below . Before It cmTaahllyienssgeIaffvopeyraroyatossuWsuTwieshtnihtliralseeefniciectncouorefdoimssgorethmmrrdoteseafatepntoanirdoldvbsanitecuwhcwreialvod,eitilrcplkemyehlovereceiuaeglarpshyunleltus.ntcbesIefhepwtoyeocnoacaWlbukyuretHss"FtsetTtISieRrltloProhLnu®rePreebyFOeslteapdaOoscrohehLtnooeo®mdrlopyraattd,poiSdnfpeopegylileo"ralwocunoawiirtcfrihcreevteh.dticqsheiuPeetieansswsrsatsttws.mro.uwecr.taipieomrensacsnisbaioe.clnoowm./help. N Use and maintenanc1e-8p0ro0c-e8d0u7re-6s.777 N Installation information...
..."oourrvriesqituweswt.w.whirlpool.com/help , follow the instructions below . Before It cmTaahllyienssgeIaffvopeyraroyatossuWsuTwieshtnihtliralseeefniciectncouorefdoimssgorethmmrrdoteseafatepntoanirdoldvbsanitecuwhcwreialvod,eitilrcplkemyehlovereceiuaeglarpshyunleltus.ntcbesIefhepwtoyeocnoacaWlbukyuretHss"FtsetTtISieRrltloProhLnu®rePreebyFOeslteapdaOoscrohehLtnooeo®mdrlopyraattd,poiSdnfpeopegylileo"ralwocunoawiirtcfrihcreevteh.dticqsheiuPeetieansswsrsatsttws.mro.uwecr.taipieomrensacsnisbaioe.clnoowm./help. N Use and maintenanc1e-8p0ro0c-e8d0u7re-6s.777 N Installation information...


