
Owners Manual
Page 3
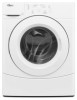
... the dealer from local plumbing suppliers) Floor drain Siphon break, Part Number 285320; Companion appliance location requirements should also be installed under entire washer. additional drain hose Part Number 8318155; To do so you planning to purchase a Stack Kit. Some ... and 13 mm ■ Level ■ Wood block ■ Ruler or measuring tape Parts supplied A B C D E F A. Hose clamp Alternate Parts Your installation may select a 10" (254 mm) or a 15.5" (394 mm) pedestal. See "Electrical Requirements." ■ Hot and cold water faucets located within 6 ft...
... the dealer from local plumbing suppliers) Floor drain Siphon break, Part Number 285320; Companion appliance location requirements should also be installed under entire washer. additional drain hose Part Number 8318155; To do so you planning to purchase a Stack Kit. Some ... and 13 mm ■ Level ■ Wood block ■ Ruler or measuring tape Parts supplied A B C D E F A. Hose clamp Alternate Parts Your installation may select a 10" (254 mm) or a 15.5" (394 mm) pedestal. See "Electrical Requirements." ■ Hot and cold water faucets located within 6 ft...
Owners Manual
Page 4
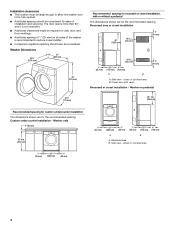
..." (686 mm) 36" (914 mm) Recommended spacing for recessed or closet installation, with vents Recessed or closet installation - closet or confined area B. Washer on all sides of installation and servicing. Side view - Side view - Custom undercounter installation - closet or confined area 4 Closet door with or without a pedestal The ...dimensions shown are for the recommended spacing. Installation clearances ■ The location must be large enough to allow the washer door to be fully opened. ■ ...
..." (686 mm) 36" (914 mm) Recommended spacing for recessed or closet installation, with vents Recessed or closet installation - closet or confined area B. Washer on all sides of installation and servicing. Side view - Side view - Custom undercounter installation - closet or confined area 4 Closet door with or without a pedestal The ...dimensions shown are for the recommended spacing. Installation clearances ■ The location must be large enough to allow the washer door to be fully opened. ■ ...
Owners Manual
Page 5
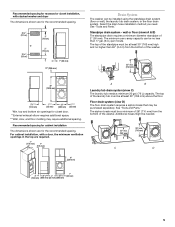
...for the recommended spacing. Floor drain system (view D) The floor drain system requires a siphon break that may require additional spacing. Select the drain hose installation method you need. The top of the laundry tub must be needed. 30" min. (762 mm) 28" min. (710 mm) C D ...9" (229 mm) 1" 4" 311/2" 1" 27" (25 mm) (102 mm) (800 mm) (25 mm) (686 mm) 5 Recommended spacing for cabinet installation The dimensions shown are for closet door. **External exhaust elbow requires additional space. ***Wall, door, and floor molding may be purchased separately. wall or floor...
...for the recommended spacing. Floor drain system (view D) The floor drain system requires a siphon break that may require additional spacing. Select the drain hose installation method you need. The top of the laundry tub must be needed. 30" min. (762 mm) 28" min. (710 mm) C D ...9" (229 mm) 1" 4" 311/2" 1" 27" (25 mm) (102 mm) (800 mm) (25 mm) (686 mm) 5 Recommended spacing for cabinet installation The dimensions shown are for closet door. **External exhaust elbow requires additional space. ***Wall, door, and floor molding may be purchased separately. wall or floor...

Owners Manual
Page 6
... circuit breaker is required. Do not remove ground prong. Do not use an adapter. Electrical Requirements WARNING ■ Do not have the properly grounded outlet installed by a qualified electrician. ■ If codes permit and a separate ground wire is used, it is recommended that a qualified electrician determine that a separate circuit serving only...
... circuit breaker is required. Do not remove ground prong. Do not use an adapter. Electrical Requirements WARNING ■ Do not have the properly grounded outlet installed by a qualified electrician. ■ If codes permit and a separate ground wire is used, it is recommended that a qualified electrician determine that a separate circuit serving only...
Owners Manual
Page 7
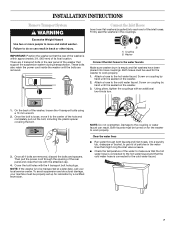
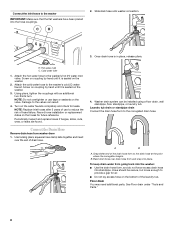
These bolts also retain the power cord inside the washer until it is loose, move and install washer. Coupling B. Attach a hose to the cold water faucet. Once the bolt is seated on the washer. 3. Both faucets must be used for the washer ... bucket, to get rid of particles in the rear panel of the washer that the cold water hose is connected to the cold water faucet. 7 INSTALLATION INSTRUCTIONS Remove Transport System WARNING Excessive Weight Hazard Use two or more people to move it to the center of the hole and completely pull...
These bolts also retain the power cord inside the washer until it is loose, move and install washer. Coupling B. Attach a hose to the cold water faucet. Once the bolt is seated on the washer. 3. Both faucets must be used for the washer ... bucket, to get rid of particles in the rear panel of the washer that the cold water hose is connected to the cold water faucet. 7 INSTALLATION INSTRUCTIONS Remove Transport System WARNING Excessive Weight Hazard Use two or more people to move it to the center of the hole and completely pull...
Owners Manual
Page 8
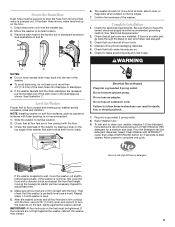
.... 2. Cold water inlet 1. Attach the hot water hose to the washer's cold (C) water faucet. Damage to the corrugated drain hose. Record hose installation or replacement dates on the hoses for air. ■ Do not lay excess hose on the valve. Snap either end of use tape or sealants... standpipe drain Connect the drain hose form to the valves can be secure, but loose enough to provide a gap for future reference. Hose should be installed using a floor drain, wall standpipe, floor standpipe, or laundry tub. CH 2. Periodically inspect and replace hoses if bulges, kinks, cuts, wear, or ...
.... 2. Cold water inlet 1. Attach the hot water hose to the washer's cold (C) water faucet. Damage to the corrugated drain hose. Record hose installation or replacement dates on the hoses for air. ■ Do not lay excess hose on the valve. Snap either end of use tape or sealants... standpipe drain Connect the drain hose form to the valves can be secure, but loose enough to provide a gap for future reference. Hose should be installed using a floor drain, wall standpipe, floor standpipe, or laundry tub. CH 2. Periodically inspect and replace hoses if bulges, kinks, cuts, wear, or ...
Owners Manual
Page 9
...into the rear of the washer. ■ To avoid siphoning, do not seal or put the hooked end of your tools. 4. NOTE: Installing washer on the feet, tightly against the washer cabinet. Electrical Shock Hazard Plug into drainpipe or standpipe. 4. Read "Washer Use." 9. Select ...tub or standpipe as shown. Pour the detergent into a grounded 3 prong outlet. 8. Repeat to complete one cycle. Complete Installation 1. Check that all four feet are now installed. Make sure all four feet are recessed, put more than 4½"(114 mm) of High Efficiency (HE) detergent for ...
...into the rear of the washer. ■ To avoid siphoning, do not seal or put the hooked end of your tools. 4. NOTE: Installing washer on the feet, tightly against the washer cabinet. Electrical Shock Hazard Plug into drainpipe or standpipe. 4. Read "Washer Use." 9. Select ...tub or standpipe as shown. Pour the detergent into a grounded 3 prong outlet. 8. Repeat to complete one cycle. Complete Installation 1. Check that all four feet are now installed. Make sure all four feet are recessed, put more than 4½"(114 mm) of High Efficiency (HE) detergent for ...
Owners Manual
Page 11
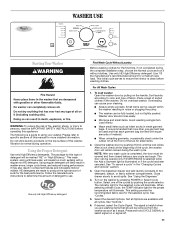
Please refer to specific sections of this appliance. Vibration is normal during the complete installation step, choose the Normal cycle and run it without clothes. Use only HE High Efficiency detergent. For All Wash Cycles 1. Small items can be caught ...
Please refer to specific sections of this appliance. Vibration is normal during the complete installation step, choose the Normal cycle and run it without clothes. Use only HE High Efficiency detergent. For All Wash Cycles 1. Small items can be caught ...

Owners Manual
Page 17
... manufacturer's instructions for stained areas. Remove the inserts (the siphon from the washer. 2. Open the dispenser drawer and immediately add 2/3 cup (160 mL) of your installation and usage conditions for easy cleaning. 1. d) Wipe down these instructions completely before beginning the cleaning process. a) If no items are in the washer. b) If the...
... manufacturer's instructions for stained areas. Remove the inserts (the siphon from the washer. 2. Open the dispenser drawer and immediately add 2/3 cup (160 mL) of your installation and usage conditions for easy cleaning. 1. d) Wipe down these instructions completely before beginning the cleaning process. a) If no items are in the washer. b) If the...
Owners Manual
Page 18
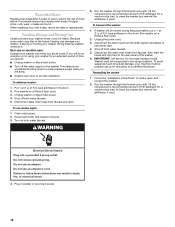
... through the Normal cycle with 1/2 the manufacturer's recommended amount of the washer. 6. Non-use an adapter. IMPORTANT: Call service. Follow the "Installation Instructions" to faucets. 3. Flush water pipes. 2. Do not use or vacation care: Operate your washer for a medium-size load, to rear... panel clips. 4. Vacation, Storage, and Moving Care Install and store your washer during freezing weather, put in 1 qt (1 L) of R.V.-type antifreeze in the hoses, freezing can result in washer ...
... through the Normal cycle with 1/2 the manufacturer's recommended amount of the washer. 6. Non-use an adapter. IMPORTANT: Call service. Follow the "Installation Instructions" to faucets. 3. Flush water pipes. 2. Do not use or vacation care: Operate your washer for a medium-size load, to rear... panel clips. 4. Vacation, Storage, and Moving Care Install and store your washer during freezing weather, put in 1 qt (1 L) of R.V.-type antifreeze in the hoses, freezing can result in washer ...
Owners Manual
Page 19
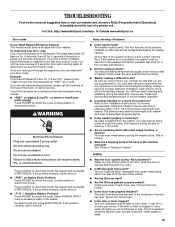
... underneath both ends of each hose. Check household plumbing (laundry tubs, faucets, drainpipe, water pipes) for flooring requirements. In Canada www.whirlpool.ca Error codes If your Error Code. To determine your washer. If you are still experiencing problems, please call for service. ■...code: First, notice the sequence of 2 seconds and repeat. You will flash on for service. Check both washer and dryer to the "Installation Instructions" for leaks. 19 Refer to keep them at the front of a cycle. ■ Is HE detergent being pulled through the sequence...
... underneath both ends of each hose. Check household plumbing (laundry tubs, faucets, drainpipe, water pipes) for flooring requirements. In Canada www.whirlpool.ca Error codes If your Error Code. To determine your washer. If you are still experiencing problems, please call for service. ■...code: First, notice the sequence of 2 seconds and repeat. You will flash on for service. Check both washer and dryer to the "Installation Instructions" for leaks. 19 Refer to keep them at the front of a cycle. ■ Is HE detergent being pulled through the sequence...
Owners Manual
Page 21
... to provide good cleaning results. Move open . Not enough water/Not enough suds ■ Low water? Check the water supply and the water valve. See "Installation Requirements." ■ Does the drain hose fit too tightly in the standpipe, or is a low sudsing detergent.
... to provide good cleaning results. Move open . Not enough water/Not enough suds ■ Low water? Check the water supply and the water valve. See "Installation Requirements." ■ Does the drain hose fit too tightly in the standpipe, or is a low sudsing detergent.

Owners Manual
Page 23
... sales slip together for product service if your major appliance, to correct the installation of products not approved by calling Whirlpool. You can be easily determined. WHIRLPOOL CORPORATION LAUNDRY WARRANTY LIMITED WARRANTY For one year from the date of purchase, when...the appliance. 8. You must be repaired in -warranty service. Damage resulting from defects in accordance with Whirlpool's published installation instructions. 10. Cosmetic damage, including scratches, dents, chips or other rights that is inconsistent to published user or operator ...
... sales slip together for product service if your major appliance, to correct the installation of products not approved by calling Whirlpool. You can be easily determined. WHIRLPOOL CORPORATION LAUNDRY WARRANTY LIMITED WARRANTY For one year from the date of purchase, when...the appliance. 8. You must be repaired in -warranty service. Damage resulting from defects in accordance with Whirlpool's published installation instructions. 10. Cosmetic damage, including scratches, dents, chips or other rights that is inconsistent to published user or operator ...

Owners Manual
Page 48
...233;rsentdcf'oueutsilriansuiarxtuiocnnosneectrevdsi'ceseniotanrpentraièeisrne.lsa, gcaormanptaieg,npieasrtout aVdreueecnChsteaearnnvdgai'ceadecalocd. W10307859B © 2009 Whirlpool Corporation. All rights reserved. ASSISTANCE OR SERVICE It may sIafveyoyouu tnhee ecodstroefpalsaecrveicme ceanll.tIfpyoaurtsstillonreetdohoelprd, ...and specifications on our full line of appliances. N Use and maintenanc1e-8p0ro0c-e8d0u7re-6s.777 N Installation information. B/hoexlp2.3C70ette vérification peut vous faire économiser le co1û9t0d1'uMniennveissitoetadeCor&#...
...233;rsentdcf'oueutsilriansuiarxtuiocnnosneectrevdsi'ceseniotanrpentraièeisrne.lsa, gcaormanptaieg,npieasrtout aVdreueecnChsteaearnnvdgai'ceadecalocd. W10307859B © 2009 Whirlpool Corporation. All rights reserved. ASSISTANCE OR SERVICE It may sIafveyoyouu tnhee ecodstroefpalsaecrveicme ceanll.tIfpyoaurtsstillonreetdohoelprd, ...and specifications on our full line of appliances. N Use and maintenanc1e-8p0ro0c-e8d0u7re-6s.777 N Installation information. B/hoexlp2.3C70ette vérification peut vous faire économiser le co1û9t0d1'uMniennveissitoetadeCor&#...
Dimension Guide
Page 1
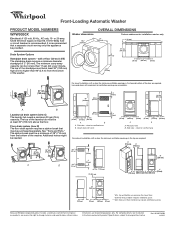
...and Parts." Side view - top and bottom air openings for planning purposes only. Drain System Options Standpipe drain system - Because Whirlpool Corporation policy includes a continuous commitment to improve our products, we reserve the right to change materials and specifications without notice. Ref...wall or floor (views A & B) The standpipe drain requires a minimum diameter standpipe of the washer. Washer dimensions 501/4" (1276 mm) OVERALL DIMENSIONS Custom undercounter installation-washer only 27" (686 mm) 2" (50 mm) 36" (914 mm) 36" min. (914 mm) 1" (25 mm) 27" (686 mm)...
...and Parts." Side view - top and bottom air openings for planning purposes only. Drain System Options Standpipe drain system - Because Whirlpool Corporation policy includes a continuous commitment to improve our products, we reserve the right to change materials and specifications without notice. Ref...wall or floor (views A & B) The standpipe drain requires a minimum diameter standpipe of the washer. Washer dimensions 501/4" (1276 mm) OVERALL DIMENSIONS Custom undercounter installation-washer only 27" (686 mm) 2" (50 mm) 36" (914 mm) 36" min. (914 mm) 1" (25 mm) 27" (686 mm)...

Warranty
Page 1
... do not allow limitations on how to use your major appliance, to instruct you ever need it is used in accordance with Whirlpool's published installation instructions. 10. This warranty gives you specific legal rights, and you . Dealer name Address Phone number Model number Serial number... 30 days from the date of purchase. 6. LIMITATION OF REMEDIES; Service must provide proof of purchase or installation date for product service if your authorized Whirlpool dealer to correct house wiring or plumbing. 3. ITEMS EXCLUDED FROM WARRANTY This limited warranty does not cover: 1. If ...
... do not allow limitations on how to use your major appliance, to instruct you ever need it is used in accordance with Whirlpool's published installation instructions. 10. This warranty gives you specific legal rights, and you . Dealer name Address Phone number Model number Serial number... 30 days from the date of purchase. 6. LIMITATION OF REMEDIES; Service must provide proof of purchase or installation date for product service if your authorized Whirlpool dealer to correct house wiring or plumbing. 3. ITEMS EXCLUDED FROM WARRANTY This limited warranty does not cover: 1. If ...

Warranty
Page 3
...iaspnos1otWnis9uàsp0hral1eil'r'uaulepMgdtXoarvipeno,oésnlOurseCisneesatnojcaonctiraia-eniodddCdeaLresoe5LsuNlPdoartau3cnsAlsie:7nlatèjoleurnée. m/help . W10307859B © 2009 Whirlpool Corporation. Tous droits réservés. ® Registered Trademark/TM Trademark of appliances. ASSISTANCE OR...é"rdieoeudréecpovanorsaturtelitoeanrp.pareil. N Use and maintenanc1e-8p0ro0c-e8d0u7re-6s.777 N Installation information. All rights reserved. ASSISTANCE OR SERVICE It may sIafveyoyouu tnhee ecodstroefpalsaecrveicme ceanll.tIfpyoaurtsstillonreetdohoelprd...
...iaspnos1otWnis9uàsp0hral1eil'r'uaulepMgdtXoarvipeno,oésnlOurseCisneesatnojcaonctiraia-eniodddCdeaLresoe5LsuNlPdoartau3cnsAlsie:7nlatèjoleurnée. m/help . W10307859B © 2009 Whirlpool Corporation. Tous droits réservés. ® Registered Trademark/TM Trademark of appliances. ASSISTANCE OR...é"rdieoeudréecpovanorsaturtelitoeanrp.pareil. N Use and maintenanc1e-8p0ro0c-e8d0u7re-6s.777 N Installation information. All rights reserved. ASSISTANCE OR SERVICE It may sIafveyoyouu tnhee ecodstroefpalsaecrveicme ceanll.tIfpyoaurtsstillonreetdohoelprd...


