
Cycle Guide
Page 1
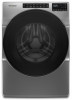
... Medium Steam Clean X X X X Additional Options Extra Rinse PreSoak Wash & Dry Load & Go™ X X X X X X X X X X X X X X X 1 Selecting "What to persons, read and follow fabric care labels and laundry product instructions. "How to Wash" Cycle Selection: Regular/Normal Normal With fewer wrinkles Intense cleaning Wrinkle Control Heavy Duty Eliminate 99.9% of fire, electric shock, or injury to Wash" will not rinse well or spin correctly if tightly packed. The "What to Wash" "How to Wash" layout guides...
... Medium Steam Clean X X X X Additional Options Extra Rinse PreSoak Wash & Dry Load & Go™ X X X X X X X X X X X X X X X 1 Selecting "What to persons, read and follow fabric care labels and laundry product instructions. "How to Wash" Cycle Selection: Regular/Normal Normal With fewer wrinkles Intense cleaning Wrinkle Control Heavy Duty Eliminate 99.9% of fire, electric shock, or injury to Wash" will not rinse well or spin correctly if tightly packed. The "What to Wash" "How to Wash" layout guides...
Cycle Guide
Page 2
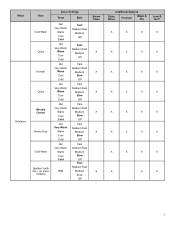
... some models) Basic Settings Temp Spin Hot Very Warm Warm Cool Cold Hot Very Warm Warm Cool Cold Hot Very Warm Warm Cool Cold Hot Very Warm Warm Cool Cold Hot Very Warm Warm Cool Cold Hot Very Warm Warm Cool Cold Hot Very Warm Warm Cool Cold Hot Fast ... Off Fast Medium Fast Medium Slow Off Steam Clean X X X X X X Additional Options Extra Rinse PreSoak Wash & Dry Load & Go™ X X X X X X X X X X X X X X X X X X X X X X X X X X X X X X X 2 What Delicates How Cold Wash Quick Normal Quick Wrinkle Control Heavy Duty Cold Wash Sanitize* (with Oxi -
... some models) Basic Settings Temp Spin Hot Very Warm Warm Cool Cold Hot Very Warm Warm Cool Cold Hot Very Warm Warm Cool Cold Hot Very Warm Warm Cool Cold Hot Very Warm Warm Cool Cold Hot Very Warm Warm Cool Cold Hot Very Warm Warm Cool Cold Hot Fast ... Off Fast Medium Fast Medium Slow Off Steam Clean X X X X X X Additional Options Extra Rinse PreSoak Wash & Dry Load & Go™ X X X X X X X X X X X X X X X X X X X X X X X X X X X X X X X 2 What Delicates How Cold Wash Quick Normal Quick Wrinkle Control Heavy Duty Cold Wash Sanitize* (with Oxi -
Cycle Guide
Page 4
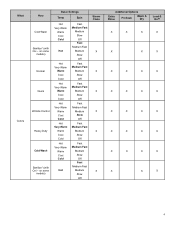
... models) Normal Quick Wrinkle Control Heavy Duty Cold Wash Sanitize* (with Oxi - on some models) Basic Settings Temp Spin Hot Very Warm Warm Cool Cold Hot Hot Very Warm Warm Cool Cold Hot Very Warm Warm Cool Cold Hot Very Warm Warm Cool Cold Hot Very Warm Warm Cool Cold Hot Very Warm Warm Cool Cold Hot ... Slow Off Fast Medium Fast Medium Slow Off Steam Clean X X X X X X Additional Options Extra Rinse PreSoak Wash & Dry Load & Go™ X X X X X X X X X X X X X X X X X X X X X X X X X X X X X X 4 What Colors How Cold Wash Sanitize* (with Oxi -
... models) Normal Quick Wrinkle Control Heavy Duty Cold Wash Sanitize* (with Oxi - on some models) Basic Settings Temp Spin Hot Very Warm Warm Cool Cold Hot Hot Very Warm Warm Cool Cold Hot Very Warm Warm Cool Cold Hot Very Warm Warm Cool Cold Hot Very Warm Warm Cool Cold Hot Very Warm Warm Cool Cold Hot ... Slow Off Fast Medium Fast Medium Slow Off Steam Clean X X X X X X Additional Options Extra Rinse PreSoak Wash & Dry Load & Go™ X X X X X X X X X X X X X X X X X X X X X X X X X X X X X X 4 What Colors How Cold Wash Sanitize* (with Oxi -

Cycle Guide
Page 5
... Off Steam Clean X X Additional Options Extra Rinse PreSoak Wash & Dry Load & Go™ X X X X X X Wrinkle Control Heavy Duty Cold Wash Sanitize* (with affresh® Washer Cleaner tablet or liquid chlorine bleach to keep the inside of your items and use the amount of the most common bacteria found in clothes, sheets, and towels. This cycle uses a higher water level. The settings as an Adaptive, Automatic Water Fill Control System clothes washer. See "Washer Care" in the drum...
... Off Steam Clean X X Additional Options Extra Rinse PreSoak Wash & Dry Load & Go™ X X X X X X Wrinkle Control Heavy Duty Cold Wash Sanitize* (with affresh® Washer Cleaner tablet or liquid chlorine bleach to keep the inside of your items and use the amount of the most common bacteria found in clothes, sheets, and towels. This cycle uses a higher water level. The settings as an Adaptive, Automatic Water Fill Control System clothes washer. See "Washer Care" in the drum...
Cycle Guide
Page 6
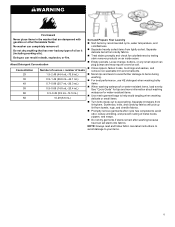
WARNING Fire Hazard Never place items in death, explosion, or fire. About Detergent Concentration Concentration 2X 3X 4X 5X 6X 8X Number of ounces ÷ number of oil on it (including cooking oils). Doing so can completely remove oil. No washer can result in the washer that has ever had any type of loads 1.5-2.49 (44.4 mL-73.6 mL) 0.9-1.49 (26.6 mL-44.1 mL) 0.7-0.89 (20.7 mL-26.3 mL) 0.5-0.69 (14.8 mL-20.4 mL) 0.3-0.49 (8.9 mL-14.5 mL) Do not dry anything that are dampened with gasoline or other flammable fluids.
WARNING Fire Hazard Never place items in death, explosion, or fire. About Detergent Concentration Concentration 2X 3X 4X 5X 6X 8X Number of ounces ÷ number of oil on it (including cooking oils). Doing so can completely remove oil. No washer can result in the washer that has ever had any type of loads 1.5-2.49 (44.4 mL-73.6 mL) 0.9-1.49 (26.6 mL-44.1 mL) 0.7-0.89 (20.7 mL-26.3 mL) 0.5-0.69 (14.8 mL-20.4 mL) 0.3-0.49 (8.9 mL-14.5 mL) Do not dry anything that are dampened with gasoline or other flammable fluids.
Owners Manual
Page 2
... not use an open flame during servicing. We have not been recommended by the manufacturer (e.g. All safety messages will release any servicing unless specifically recommended in the usermaintenance instructions or in the appliance. Always read and obey all hot-water faucets and let the water flow from service or discarded, remove the door. � Do not reach into the appliance if the tub or agitator...
... not use an open flame during servicing. We have not been recommended by the manufacturer (e.g. All safety messages will release any servicing unless specifically recommended in the usermaintenance instructions or in the appliance. Always read and obey all hot-water faucets and let the water flow from service or discarded, remove the door. � Do not reach into the appliance if the tub or agitator...
Owners Manual
Page 3
... isotropically radiated power (e.i.r.p.) is not more than that came with any other users, the antenna type and its gain should be on a circuit different from that may only operate using an antenna of a type and maximum (or lesser) gain approved for the transmitter by the party responsible for compliance could void the user's authority to change. Once installed, launch...
... isotropically radiated power (e.i.r.p.) is not more than that came with any other users, the antenna type and its gain should be on a circuit different from that may only operate using an antenna of a type and maximum (or lesser) gain approved for the transmitter by the party responsible for compliance could void the user's authority to change. Once installed, launch...

Owners Manual
Page 4
... not use fabric softener sheets, as High Efficiency are closed completely (on some models): This compartment holds up to produce the right amount of the washer. Do not go over time, buildup of liquid HE detergent allowing you use color-safe bleach or Oxi in suspension so it is disabled (on some models): Open the dispenser drawer by pulling on some models) or off. Do not use one of fabric softener...
... not use fabric softener sheets, as High Efficiency are closed completely (on some models): This compartment holds up to produce the right amount of the washer. Do not go over time, buildup of liquid HE detergent allowing you use color-safe bleach or Oxi in suspension so it is disabled (on some models): Open the dispenser drawer by pulling on some models) or off. Do not use one of fabric softener...
Owners Manual
Page 5
... located on some models). Adding HE detergent to Help Keep Your Washer Clean and Performing at right) with HE liquid detergent or liquid fabric softener (1-liter dispenser only). Add directly to the high position. Cleaning the Door Seal 1. Inspect the gray-colored seal between uses to the low position. Push down the selector to help dry out the washer and prevent the buildup of HE detergent into place. Periodically inspect and replace inlet hoses...
... located on some models). Adding HE detergent to Help Keep Your Washer Clean and Performing at right) with HE liquid detergent or liquid fabric softener (1-liter dispenser only). Add directly to the high position. Cleaning the Door Seal 1. Inspect the gray-colored seal between uses to the low position. Push down the selector to help dry out the washer and prevent the buildup of HE detergent into place. Periodically inspect and replace inlet hoses...

Owners Manual
Page 6
... washer door and the dispenser drawer. Select the Clean Washer with an affresh® Machine Cleaning Wipe or a damp cloth, and towel dry. f. The Clean Washer with water. a. Touch Power to the washer drum. Use an all -purpose surface cleaner, if needed . Wipe the outside dispenser surface with affresh® cycle. Let stand 5 minutes. Open the washer door and remove any clothing or items. b. Do not add the affresh® Washer Cleaner tablet to the bleach manufacturer's instructions...
... washer door and the dispenser drawer. Select the Clean Washer with an affresh® Machine Cleaning Wipe or a damp cloth, and towel dry. f. The Clean Washer with water. a. Touch Power to the washer drum. Use an all -purpose surface cleaner, if needed . Wipe the outside dispenser surface with affresh® cycle. Let stand 5 minutes. Open the washer door and remove any clothing or items. b. Do not add the affresh® Washer Cleaner tablet to the bleach manufacturer's instructions...

Owners Manual
Page 7
... pull straight out to run 30 wash cycles. Use an affresh® Machine Cleaning Wipe or a soft, damp cloth or sponge to remove the dispenser. 3. The Clean Washer with affresh® cycle is a reminder to remove the dispenser. Pull dispenser drawer out until it stops. 2. then slide dispenser back into slot. Position cover panel back onto posts on dispenser. 2. If the Clean Washer with affresh® message will again flash at the end of...
... pull straight out to run 30 wash cycles. Use an affresh® Machine Cleaning Wipe or a soft, damp cloth or sponge to remove the dispenser. 3. The Clean Washer with affresh® cycle is a reminder to remove the dispenser. Pull dispenser drawer out until it stops. 2. then slide dispenser back into slot. Position cover panel back onto posts on dispenser. 2. If the Clean Washer with affresh® message will again flash at the end of...
Owners Manual
Page 8
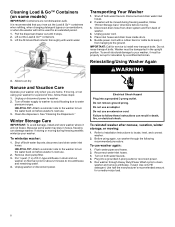
..., or moving during freezing weather, follow these steps: 1. Refer to Installation Instructions to air dry. Before using your washer only when you rinse out the Load & Go™ containers when refilling, when changing detergent types or concentrations, or when the washer will not freeze. Reconnect water-inlet hoses. 3. Turn on some water may stay in drum and run washer through Heavy Duty/Power Wash cycle to follow "Winter Storage Care" directions before washer's next use . 2.
..., or moving during freezing weather, follow these steps: 1. Refer to Installation Instructions to air dry. Before using your washer only when you rinse out the Load & Go™ containers when refilling, when changing detergent types or concentrations, or when the washer will not freeze. Reconnect water-inlet hoses. 3. Turn on some water may stay in drum and run washer through Heavy Duty/Power Wash cycle to follow "Winter Storage Care" directions before washer's next use . 2.
Owners Manual
Page 9
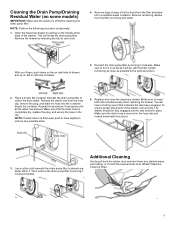
... the clip. Remove the drawer by rinsing with the textured side of the drawer, pull out fully. Make sure to turn it in a suitable waste container. Make sure to collect the drain water. To ensure proper placement of an affresh® Machine Cleaning Wipe. 9 Make sure the drain hose is off before cleaning the drain pump filter. Additional Cleaning Gently pull back the rubber door seal and clean any stained...
... the clip. Remove the drawer by rinsing with the textured side of the drawer, pull out fully. Make sure to turn it in a suitable waste container. Make sure to collect the drain water. To ensure proper placement of an affresh® Machine Cleaning Wipe. 9 Make sure the drain hose is off before cleaning the drain pump filter. Additional Cleaning Gently pull back the rubber door seal and clean any stained...
Owners Manual
Page 10
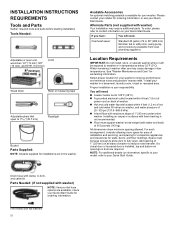
....9-689.6 kPa). � A level floor with washer) NOTE: Various inlet hose options are required. INSTALLATION INSTRUCTIONS REQUIREMENTS Tools and Parts Gather required tools and parts before starting installation. Install your responsibility. Drain hose with clamp, U-form, and cable tie Parts Needed: (if not supplied with maximum slope of hot and cold water fill valves on your Quick Start Guide. To order, please refer to your Quick Start Guide. Select proper location for your washer. You will be...
....9-689.6 kPa). � A level floor with washer) NOTE: Various inlet hose options are required. INSTALLATION INSTRUCTIONS REQUIREMENTS Tools and Parts Gather required tools and parts before starting installation. Install your responsibility. Drain hose with clamp, U-form, and cable tie Parts Needed: (if not supplied with maximum slope of hot and cold water fill valves on your Quick Start Guide. To order, please refer to your Quick Start Guide. Select proper location for your washer. You will be...
Owners Manual
Page 11
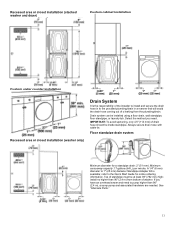
... carry-away capacity: 17 gallons (64 L) per minute. install no higher than 96" (2.4 m), a sump pump and associated hardware are needed. Top of washer. Recessed area or closet installation (stacked washer and dryer) Custom cabinet installation Custom under counter installation Recessed area or closet installation (washer only) Drain System It is available; Always secure drain hose with cable tie. IMPORTANT: To avoid siphoning, only 4.5" (114 mm) of o leaking from bottom...
... carry-away capacity: 17 gallons (64 L) per minute. install no higher than 96" (2.4 m), a sump pump and associated hardware are needed. Top of washer. Recessed area or closet installation (stacked washer and dryer) Custom cabinet installation Custom under counter installation Recessed area or closet installation (washer only) Drain System It is available; Always secure drain hose with cable tie. IMPORTANT: To avoid siphoning, only 4.5" (114 mm) of o leaking from bottom...

Owners Manual
Page 12
... run with a power supply cord having an equipment-grounding conductor and a grounding plug. SAVE THESE INSTRUCTIONS Wall standpipe drain system Electrical Requirements WARNING See requirements in a risk of electric shock. Laundry tub drain system minimum Minimum capacity: 20 gallons (76 L). GROUNDING INSTRUCTIONS For a grounded, cord-connected appliance: This appliance must be grounded. minimum Floor drain system Floor drain system requires a Siphon Break Kit, 2 Connector Kits, and an Extension Drain Hose...
... run with a power supply cord having an equipment-grounding conductor and a grounding plug. SAVE THESE INSTRUCTIONS Wall standpipe drain system Electrical Requirements WARNING See requirements in a risk of electric shock. Laundry tub drain system minimum Minimum capacity: 20 gallons (76 L). GROUNDING INSTRUCTIONS For a grounded, cord-connected appliance: This appliance must be grounded. minimum Floor drain system Floor drain system requires a Siphon Break Kit, 2 Connector Kits, and an Extension Drain Hose...
Owners Manual
Page 13
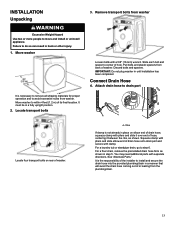
... Parts." It is the responsibility of the installer to avoid excessive noise from washer Loosen bolts with pliers and slide it over end of hose, centering it between the ribs, as shown in back or other injury. 1. Move washer to center of washer. Locate transport bolts Locate four transport bolts on elbow end of drain hose onto drain port and secure with separate directions. For a laundry tub or...
... Parts." It is the responsibility of the installer to avoid excessive noise from washer Loosen bolts with pliers and slide it over end of hose, centering it between the ribs, as shown in back or other injury. 1. Move washer to center of washer. Locate transport bolts Locate four transport bolts on elbow end of drain hose onto drain port and secure with separate directions. For a laundry tub or...

Owners Manual
Page 14
... attaching to the Quick Start Guide. 6. do not force excess hose into standpipe (shown in attaching hoses to work properly. Do not use hoses without washers. 7. You may need to hot water faucet. Repeat this step with separate directions; Drain hose form must be inside standpipe; Remove drain hose form (floor drain installations only) 8. refer to faucets or washer. IMPORTANT: 4.5" (114 mm) of laundry tub. Connect inlet hoses to water faucets For floor drain installations, you will cross...
... attaching to the Quick Start Guide. 6. do not force excess hose into standpipe (shown in attaching hoses to work properly. Do not use hoses without washers. 7. You may need to hot water faucet. Repeat this step with separate directions; Drain hose form must be inside standpipe; Remove drain hose form (floor drain installations only) 8. refer to faucets or washer. IMPORTANT: 4.5" (114 mm) of laundry tub. Connect inlet hoses to water faucets For floor drain installations, you will cross...
Owners Manual
Page 15
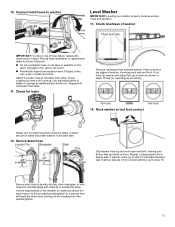
... hot water inlet valve. Attach hot water hose to washer Level Washer IMPORTANT: Leveling your washer properly reduces excess noise and vibration. 13. Secure drain hose to the valves can result. � Periodically inspect and replace hoses if bulges, kinks, cuts, wear, or leaks are found. Damage to laundry tub leg, drain standpipe, or inlet hoses for leaks. Use adjustable pliers to check for wall standpipe with cable tie or beaded tie strap. Rock washer to test foot contact Slowly turn...
... hot water inlet valve. Attach hot water hose to washer Level Washer IMPORTANT: Leveling your washer properly reduces excess noise and vibration. 13. Secure drain hose to the valves can result. � Periodically inspect and replace hoses if bulges, kinks, cuts, wear, or leaks are found. Damage to laundry tub leg, drain standpipe, or inlet hoses for leaks. Use adjustable pliers to check for wall standpipe with cable tie or beaded tie strap. Rock washer to test foot contact Slowly turn...
Owners Manual
Page 16
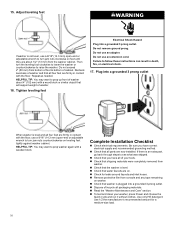
... the washer. Recheck levelness of your washer, press Power and choose the Quick cycle and run it without clothes. Plug into a grounded 3 prong outlet. If there is level and all parts are on. � Check for a medium-size load. 16 Do not use an adapter. Failure to follow these instructions can result in contact with a wooden block. Do not remove ground prong. Use only HE detergent. Then turn the leveling foot...
... the washer. Recheck levelness of your washer, press Power and choose the Quick cycle and run it without clothes. Plug into a grounded 3 prong outlet. If there is level and all parts are on. � Check for a medium-size load. 16 Do not use an adapter. Failure to follow these instructions can result in contact with a wooden block. Do not remove ground prong. Use only HE detergent. Then turn the leveling foot...


