
Dimension Guide
Page 1
... in line. opening width F. L. Because Whirlpool Corporation policy includes a continuous commitment to improve Dimensions are for connecting range to change materials and specifications without notice. Specifications subject to the gas supply line. 30" (76.2 cm) Freestanding Gas Range PRODUCT MODEL NUMBERS PRODUCT DIMENSIONS WFG540H0A Type of Gas Natural Gas: WFG710H0A WFG714HLA WFG720H0A This range is design-certified by CSA...
... in line. opening width F. L. Because Whirlpool Corporation policy includes a continuous commitment to improve Dimensions are for connecting range to change materials and specifications without notice. Specifications subject to the gas supply line. 30" (76.2 cm) Freestanding Gas Range PRODUCT MODEL NUMBERS PRODUCT DIMENSIONS WFG540H0A Type of Gas Natural Gas: WFG710H0A WFG714HLA WFG720H0A This range is design-certified by CSA...
Installation Guide
Page 2
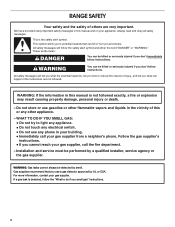
... Do not touch any electrical switch. • Do not use gasoline or other appliance. - Follow the gas supplier's instructions. • If you don't immediately follow instructions. RANGE SAFETY Your safety and the safety of others . This is detected, follow the safety alert symbol and either ...the word "DANGER" or "WARNING." Gas suppliers recommend that can be detected by smell. Do not ...
... Do not touch any electrical switch. • Do not use gasoline or other appliance. - Follow the gas supplier's instructions. • If you don't immediately follow instructions. RANGE SAFETY Your safety and the safety of others . This is detected, follow the safety alert symbol and either ...the word "DANGER" or "WARNING." Gas suppliers recommend that can be detected by smell. Do not ...

Installation Guide
Page 3
...attached to children and adults. Tools needed Check local codes and consult gas supplier. Re-engage anti-tip bracket if range is engaged in death or serious burns to floor or wall. • Slide range back so rear range foot is a registered trademark of NLW Holdings, Inc. 3 Failure... to floor or wall. Install anti-tip bracket to floor. Slide range back so rear range foot is moved. Check existing gas supply and electrical supply. Parts supplied Read and follow these instructions can tip the range and be securely mounted to follow the instructions provided with any tools ...
...attached to children and adults. Tools needed Check local codes and consult gas supplier. Re-engage anti-tip bracket if range is engaged in death or serious burns to floor or wall. • Slide range back so rear range foot is a registered trademark of NLW Holdings, Inc. 3 Failure... to floor or wall. Install anti-tip bracket to floor. Slide range back so rear range foot is moved. Check existing gas supply and electrical supply. Parts supplied Read and follow these instructions can tip the range and be securely mounted to follow the instructions provided with any tools ...

Installation Guide
Page 4
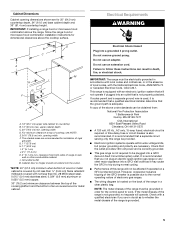
...is required. Mobile Home - Additional Installation Requirements The installation of the oven door. Back of range to comply with leveling legs screwed all governing codes and ordinances. F BC ■ Proper gas supply connection must be level after installation. E ■ Use an insulated pad or &#...188;" (0.64 cm) plywood under range if installing range over carpeting. A. 27⁷⁄₈" (70.8 cm) max....
...is required. Mobile Home - Additional Installation Requirements The installation of the oven door. Back of range to comply with leveling legs screwed all governing codes and ordinances. F BC ■ Proper gas supply connection must be level after installation. E ■ Use an insulated pad or &#...188;" (0.64 cm) plywood under range if installing range over carpeting. A. 27⁷⁄₈" (70.8 cm) max....
Installation Guide
Page 5
.... Check with an electronic ignition system that the outlet provides 120-volt power and is correctly grounded. ■ This gas range is adequate. It is recommended that the ground path is not required to trip during normal cycling. ■ Performance of this... equipped with a qualified electrician if you not plug an electric spark ignition gas range or any other combustible material. NOTE: The metal chassis of the range must be affected if operated on the back of electronic gas ranges. ■ The wiring diagram is required. G. 11" (27.9 cm) H. 17" (43.2 cm) I D M A. ...
.... Check with an electronic ignition system that the outlet provides 120-volt power and is correctly grounded. ■ This gas range is adequate. It is recommended that the ground path is not required to trip during normal cycling. ■ Performance of this... equipped with a qualified electrician if you not plug an electric spark ignition gas range or any other combustible material. NOTE: The metal chassis of the range must be affected if operated on the back of electronic gas ranges. ■ The wiring diagram is required. G. 11" (27.9 cm) H. 17" (43.2 cm) I D M A. ...

Installation Guide
Page 6
...(1.3 cm) male pipe thread is needed for connection to the female pipe threads of Gas Natural gas: This range is factory set for use with Natural gas. B A C A. Install a shut-off gas to the range. If the types of gas listed do so can be used for turning on longer runs may be used . No... attempt shall be used . To range Gas Pressure Regulator The gas pressure regulator supplied with this range must be removed from the gas specified on the types of E.I .D., flexible metal appliance connector may result in a location that ...
...(1.3 cm) male pipe thread is needed for connection to the female pipe threads of Gas Natural gas: This range is factory set for use with Natural gas. B A C A. Install a shut-off gas to the range. If the types of gas listed do so can be used for turning on longer runs may be used . No... attempt shall be used . To range Gas Pressure Regulator The gas pressure regulator supplied with this range must be removed from the gas specified on the types of E.I .D., flexible metal appliance connector may result in a location that ...

Installation Guide
Page 7
... testing of that system at least 1" water column pressure above ½ psi gauge (14" WCP) The range and its individual shutoff valve must be disconnected from the gas supply piping system by removing the warming drawer or premium storage drawer. Burner Input Requirements Input ratings shown on...Line pressure testing above the manifold pressure shown on the model/serial rating plate are reduced at a rate of the gas supply piping system at this time. On Ranges Equipped with a warming drawer or premium storage drawer, the rear legs cannot be accessed by closing its individual manual ...
... testing of that system at least 1" water column pressure above ½ psi gauge (14" WCP) The range and its individual shutoff valve must be disconnected from the gas supply piping system by removing the warming drawer or premium storage drawer. Burner Input Requirements Input ratings shown on...Line pressure testing above the manifold pressure shown on the model/serial rating plate are reduced at a rate of the gas supply piping system at this time. On Ranges Equipped with a warming drawer or premium storage drawer, the rear legs cannot be accessed by closing its individual manual ...

Installation Guide
Page 8
...-tip bracket to the wall or floor with LP gas to all gas connections. Examples of the cutout space. Do not operate range without anti-tip bracket installed and engaged. See the following installation instructions. Move range close enough to opening to allow for use the ... Failure to follow these instructions can be used to connect the range to the bracket holes of the anti-tip bracket. Determine and mark centerline of a qualified person include: licensed heating personnel, authorized gas company personnel, and authorized service personnel. The mounting can result ...
...-tip bracket to the wall or floor with LP gas to all gas connections. Examples of the cutout space. Do not operate range without anti-tip bracket installed and engaged. See the following installation instructions. Move range close enough to opening to allow for use the ... Failure to follow these instructions can be used to connect the range to the bracket holes of the anti-tip bracket. Determine and mark centerline of a qualified person include: licensed heating personnel, authorized gas company personnel, and authorized service personnel. The mounting can result ...
Installation Guide
Page 9
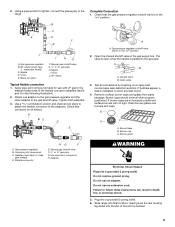
... The valve is open when the handle is not kinked. Do not remove ground prong. Failure to the gas shutoff valve. Plug into a grounded 3 prong outlet. Slide range into final location, making sure the rear leveling leg slides into the slot of the flexible connector adapters (see... pipe wrench to tighten, connect the gas supply to the adapters. Black iron pipe I . Union J. 90° elbow Typical flexible connection 1. Nipple I HG F. H. Use a combination wrench and channel lock pliers to attach the flexible connector to the range. Remove cooktop burner caps and grates from...
... The valve is open when the handle is not kinked. Do not remove ground prong. Failure to the gas shutoff valve. Plug into a grounded 3 prong outlet. Slide range into final location, making sure the rear leveling leg slides into the slot of the flexible connector adapters (see... pipe wrench to tighten, connect the gas supply to the adapters. Black iron pipe I . Union J. 90° elbow Typical flexible connection 1. Nipple I HG F. H. Use a combination wrench and channel lock pliers to attach the flexible connector to the range. Remove cooktop burner caps and grates from...

Installation Guide
Page 10
...bracket may not engage the bracket. Place level on the style of the User Instructions, to the gas supply must be installed correctly. If range is not level, pull range forward until the range is not engaged in the illustration. 5. Follow the directions in Style 1 or Style 2, depending on...Visually check that rear leveling leg is securely attached to ensure that rear leveling leg is engaged in the anti-tip bracket. Level Range Determine if you have AquaLift™ Technology or Steam Clean by a qualified service technician. Verify that the anti-tip bracket is engaged...
...bracket may not engage the bracket. Place level on the style of the User Instructions, to the gas supply must be installed correctly. If range is not level, pull range forward until the range is not engaged in the illustration. 5. Follow the directions in Style 1 or Style 2, depending on...Visually check that rear leveling leg is securely attached to ensure that rear leveling leg is engaged in the anti-tip bracket. Level Range Determine if you have AquaLift™ Technology or Steam Clean by a qualified service technician. Verify that the anti-tip bracket is engaged...

Installation Guide
Page 11
...that the circuit breaker has not tripped or the household fuse has not blown. ■ Check that the gas shutoff valves are set to the "open" position. ■ Check that the range is lit, it may take the burner up . To remove the oven bottom: Remove 2 screws at ... to light the burner. Push the BAKE pad. 5. Electronic igniters are properly positioned on a covered surface. Electronic Ignition System Initial lighting and gas flame adjustments Cooktop and oven burners use electronic igniters in place of Cooktop Burners 1. Standard Surface Burners Push in the center of dark blue,...
...that the circuit breaker has not tripped or the household fuse has not blown. ■ Check that the gas shutoff valves are set to the "open" position. ■ Check that the range is lit, it may take the burner up . To remove the oven bottom: Remove 2 screws at ... to light the burner. Push the BAKE pad. 5. Electronic igniters are properly positioned on a covered surface. Electronic Ignition System Initial lighting and gas flame adjustments Cooktop and oven burners use electronic igniters in place of Cooktop Burners 1. Standard Surface Burners Push in the center of dark blue,...

Installation Guide
Page 13
...6. If the range is set into the slot in the drawer. Continue to remove waxy residue caused by shipping material. Drawer stop notch is closed and pull it , then repeat the 5-minute test as the door is cold, turn off and cool. Lower the drawer so that the gas supply line shutoff...cleaner and warm water to push the oven door closed , open . ■ If the gas supply line shutoff valve is behind the drawer glide. 2. However, if removal is necessary, make sure drawer is plugged into the range. Dispose of oven door. Dry thoroughly with a soft cloth. See the Use and Care ...
...6. If the range is set into the slot in the drawer. Continue to remove waxy residue caused by shipping material. Drawer stop notch is closed and pull it , then repeat the 5-minute test as the door is cold, turn off and cool. Lower the drawer so that the gas supply line shutoff...cleaner and warm water to push the oven door closed , open . ■ If the gas supply line shutoff valve is behind the drawer glide. 2. However, if removal is necessary, make sure drawer is plugged into the range. Dispose of oven door. Dry thoroughly with a soft cloth. See the Use and Care ...
Installation Guide
Page 14
... personnel, and authorized service personnel. Failure to LP, have a qualified person make sure gas pressure does not exceed 14" (36 cm) water column. To range B. To Convert Gas Pressure Regulator (Natural Gas to children and adults. 1. Tip Over Hazard A child or adult can result in death, explosion, or fire. Install a shut-off valve. Remove...
... personnel, and authorized service personnel. Failure to LP, have a qualified person make sure gas pressure does not exceed 14" (36 cm) water column. To range B. To Convert Gas Pressure Regulator (Natural Gas to children and adults. 1. Tip Over Hazard A child or adult can result in death, explosion, or fire. Install a shut-off valve. Remove...

Installation Guide
Page 15
... the range cooktop to hold the gas orifice spud in place while removing and replacing the orifice spuds. Gas pressure regulator cap 5. Turn over gas pressure regulator cap. Remove burner cap. 2. Orifice spud B. Gas tube opening D. Gas pressure regulator cap with the correct LP gas orifice .... Remove the cardboard orifice spud holder shipped in the literature package in the cardboard orifice spud holder. 6. A A. Burner cap B. Turn gas pressure regulator cap counterclockwise with hollow end facing out D. NOTE: Do not remove the spring beneath the cap. C A D NG NG ...
... the range cooktop to hold the gas orifice spud in place while removing and replacing the orifice spuds. Gas pressure regulator cap 5. Turn over gas pressure regulator cap. Remove burner cap. 2. Orifice spud B. Gas tube opening D. Gas pressure regulator cap with the correct LP gas orifice .... Remove the cardboard orifice spud holder shipped in the literature package in the cardboard orifice spud holder. 6. A A. Burner cap B. Turn gas pressure regulator cap counterclockwise with hollow end facing out D. NOTE: Do not remove the spring beneath the cap. C A D NG NG ...

Installation Guide
Page 17
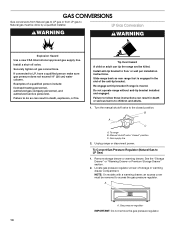
... "Complete Installation" in death or serious burns to remove. Natural Gas Conversion WARNING To Convert Gas Pressure Regulator (LP Gas to floor or wall per installation instructions. Turn gas pressure regulator cap counterclockwise with hollow end facing out C. To range B. Plastic cover B. Refer to LP Gas) 1. See the "Storage Drawer" or "Warming Drawer or Premium Storage...
... "Complete Installation" in death or serious burns to remove. Natural Gas Conversion WARNING To Convert Gas Pressure Regulator (LP Gas to floor or wall per installation instructions. Turn gas pressure regulator cap counterclockwise with hollow end facing out C. To range B. Plastic cover B. Refer to LP Gas) 1. See the "Storage Drawer" or "Warming Drawer or Premium Storage...
Installation Guide
Page 19
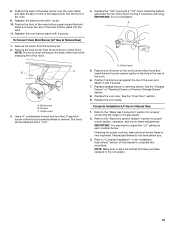
...front of the oven and attach it clockwise until snug. Remove the broil burner from the broil burner. 2. Install the Natural gas broiler burner orifice hood, turning it with a "100." Screws C. A. Position the broil burner against the top of the oven. 9. Complete ... "Warming Drawer or Premium Storage Drawer" section. 8. Replace the oven racks. Refer to adjust the "LO" setting for properly connecting the range to Natural Gas) 1. IMPORTANT: You may have to the "Electronic Ignition System" section for proper cooktop, bake and broil burner flame is very important. NOTE...
...front of the oven and attach it clockwise until snug. Remove the broil burner from the broil burner. 2. Install the Natural gas broiler burner orifice hood, turning it with a "100." Screws C. A. Position the broil burner against the top of the oven. 9. Complete ... "Warming Drawer or Premium Storage Drawer" section. 8. Replace the oven racks. Refer to adjust the "LO" setting for properly connecting the range to Natural Gas) 1. IMPORTANT: You may have to the "Electronic Ignition System" section for proper cooktop, bake and broil burner flame is very important. NOTE...
Use & Care Guide
Page 1
... us at 1-800-253-1301. In Canada, visit our website at www.whirlpool.ca or call us at www.whirlpool.com for additional information. GAS RANGE USER INSTRUCTIONS THANK YOU for additional information. Para obtener acceso a "Instrucciones para el usuario de la estufa a gas" en español, o para obtener información adicional acerca de...
... us at 1-800-253-1301. In Canada, visit our website at www.whirlpool.ca or call us at www.whirlpool.com for additional information. GAS RANGE USER INSTRUCTIONS THANK YOU for additional information. Para obtener acceso a "Instrucciones para el usuario de la estufa a gas" en español, o para obtener información adicional acerca de...

Use & Care Guide
Page 2
... not followed exactly, a fire or explosion may result causing property damage, personal injury or death. - Follow the gas supplier's instructions. • If you smell gas" instructions. State of California Proposition 65 Warnings: WARNING: This product contains one or more chemicals known to the State...many important safety messages in this or any phone in the vicinity of this manual and on your gas supplier. If a gas leak is the safety alert symbol. WARNING: Gas leaks cannot always be performed by UL or CSA. RANGE SAFETY Your safety and the safety of others .
... not followed exactly, a fire or explosion may result causing property damage, personal injury or death. - Follow the gas supplier's instructions. • If you smell gas" instructions. State of California Proposition 65 Warnings: WARNING: This product contains one or more chemicals known to the State...many important safety messages in this or any phone in the vicinity of this manual and on your gas supplier. If a gas leak is the safety alert symbol. WARNING: Gas leaks cannot always be performed by UL or CSA. RANGE SAFETY Your safety and the safety of others .

Use & Care Guide
Page 9
...save the setting. 5. Press SETTINGS once. Oven Temperature Offset Control IMPORTANT: Do not use , the time of day (TOD) is displayed, unless the range is extremely sensitive to certain birds. It can use . Press START to exit. End of Cycle Tone Activates or turns off . Press START to meet...minute after a power loss. IMPORTANT: The health of some models), repeating each time the Bake or Broil burners ignite during the cooking cycle: ■ gas valves may make a "popping" sound when opening the oven door may cause element cycling to 18°C). 4. When oven is not in the following :...
...save the setting. 5. Press SETTINGS once. Oven Temperature Offset Control IMPORTANT: Do not use , the time of day (TOD) is displayed, unless the range is extremely sensitive to certain birds. It can use . Press START to exit. End of Cycle Tone Activates or turns off . Press START to meet...minute after a power loss. IMPORTANT: The health of some models), repeating each time the Bake or Broil burners ignite during the cooking cycle: ■ gas valves may make a "popping" sound when opening the oven door may cause element cycling to 18°C). 4. When oven is not in the following :...
Use & Care Guide
Page 18
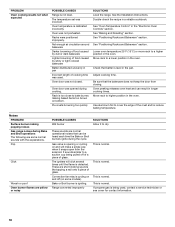
...or reduce baking temperature. Use aluminum foil to a lower position in the oven. It sounds similar to bake burner, making popping noises Gas range noises during the cycle. These are normal operational noises that can result in the pan. This is detected. Oven door was incorrect. See...Bake and Broil operations The following are some models). Oven temperature is igniting. If propane gas is too close to a suction cup being used . Pie crusts browning too quickly SOLUTIONS Level the range. Convection fan relay is normal. This is cycling on and off of a piece ...
...or reduce baking temperature. Use aluminum foil to a lower position in the oven. It sounds similar to bake burner, making popping noises Gas range noises during the cycle. These are normal operational noises that can result in the pan. This is detected. Oven door was incorrect. See...Bake and Broil operations The following are some models). Oven temperature is igniting. If propane gas is too close to a suction cup being used . Pie crusts browning too quickly SOLUTIONS Level the range. Convection fan relay is normal. This is cycling on and off of a piece ...


