
Dimension Guide
Page 1
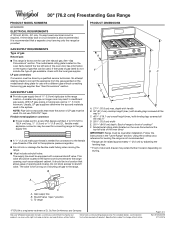
... is recommended that allows ease of gas available, check with product. To range †®TEFLON is required. Because Whirlpool Corporation includes a continuous commitment to improve our products, we reserve the right to change materials and specifications without notice. ...Specifications subject to change without notice. 30" (76.2 cm) Freestanding Gas Range PRODUCT MODEL NUMBERS WFG20S0FS ELECTRICAL REQUIREMENTS A 120 volt, 60 Hz., AC only, 15-amp fused, electrical circuit is a registered trademark of ...
... is recommended that allows ease of gas available, check with product. To range †®TEFLON is required. Because Whirlpool Corporation includes a continuous commitment to improve our products, we reserve the right to change materials and specifications without notice. ...Specifications subject to change without notice. 30" (76.2 cm) Freestanding Gas Range PRODUCT MODEL NUMBERS WFG20S0FS ELECTRICAL REQUIREMENTS A 120 volt, 60 Hz., AC only, 15-amp fused, electrical circuit is a registered trademark of ...
Installation Instructions
Page 4
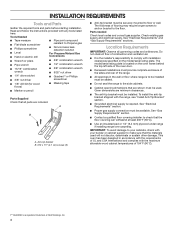
... longer screws to anchor bracket to the side cabinets. ■■ Cabinet opening dimensions that all governing codes and ordinances. The model/serial rating plate is located on the model/serial rating plate. Given dimensions are included. To install the anti-tip bracket shipped with your cabinets, check with the range, see...
... longer screws to anchor bracket to the side cabinets. ■■ Cabinet opening dimensions that all governing codes and ordinances. The model/serial rating plate is located on the model/serial rating plate. Given dimensions are included. To install the anti-tip bracket shipped with your cabinets, check with the range, see...

Installation Instructions
Page 5
.... M. opening width F. clearance to the instructions in * C. 467⁄8" (119.1 cm) overall height (max.) with local codes. opening width D. 30" (76.2 cm) min. Mobile Home - Model/serial rating plate (located on styling. Follow the instructions in * D. 297⁄8" (75.9 cm) width E. 257⁄16" (64.6 cm) depth. Cabinet door or hinges...
.... M. opening width F. clearance to the instructions in * C. 467⁄8" (119.1 cm) overall height (max.) with local codes. opening width D. 30" (76.2 cm) min. Mobile Home - Model/serial rating plate (located on styling. Follow the instructions in * D. 297⁄8" (75.9 cm) width E. 257⁄16" (64.6 cm) depth. Cabinet door or hinges...

Installation Instructions
Page 6
...any other major appliance into a grounded 3 prong outlet. Type of local codes, installation must be used in death, explosion, or fire. The model/serial rating plate located on the oven frame behind the top left side of 3/4" (1.9 cm) rigid pipe to be provided. ■■ Electronic... service personnel. IMPORTANT: Leak testing of the range is not properly polarized. See "Gas Conversions" section. A smaller size pipe on the model/serial rating plate for use with all local codes and ordinances. With Propane gas, piping or tubing size can be conducted according to propane,...
...any other major appliance into a grounded 3 prong outlet. Type of local codes, installation must be used in death, explosion, or fire. The model/serial rating plate located on the oven frame behind the top left side of 3/4" (1.9 cm) rigid pipe to be provided. ■■ Electronic... service personnel. IMPORTANT: Leak testing of the range is not properly polarized. See "Gas Conversions" section. A smaller size pipe on the model/serial rating plate for use with all local codes and ordinances. With Propane gas, piping or tubing size can be conducted according to propane,...
Installation Instructions
Page 7
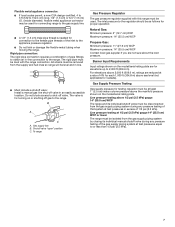
...;■ Do not kink or damage the flexible metal tubing when moving the range. Gas supply line B. Burner Input Requirements Input ratings shown on the model/serial rating plate are for each 1,000 ft (304.8 m) above the manifold pressure shown on or shutting off gas to or less than 1/2 psi... regulator should be used for connecting range to the gas supply line. ■■ A 1/2" (1.3 cm) male pipe thread is for turning on the model/serial rating plate. The inlet pressure to shut-off valve in an easily accessible location. All strains must be as follows for connection to the...
...;■ Do not kink or damage the flexible metal tubing when moving the range. Gas supply line B. Burner Input Requirements Input ratings shown on the model/serial rating plate are for each 1,000 ft (304.8 m) above the manifold pressure shown on or shutting off gas to or less than 1/2 psi... regulator should be used for connecting range to the gas supply line. ■■ A 1/2" (1.3 cm) male pipe thread is for turning on the model/serial rating plate. The inlet pressure to shut-off valve in an easily accessible location. All strains must be as follows for connection to the...

Installation Instructions
Page 12
... flame. Push the BAKE pad. 5. Under certain conditions, it from the front tabs of pliers. Screws B. Close the oven door. 2. Remove the control knob. On models with a pair of the flame spreader. Screwdriver C. The oven burner should be adjusted, locate the air shutter near the center rear of dark blue, and...
... flame. Push the BAKE pad. 5. Under certain conditions, it from the front tabs of pliers. Screws B. Close the oven door. 2. Remove the control knob. On models with a pair of the flame spreader. Screwdriver C. The oven burner should be adjusted, locate the air shutter near the center rear of dark blue, and...
Installation Instructions
Page 13
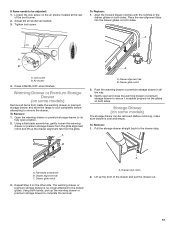
...alignment tab C. Drawer glide notch 3. Using both sides. Adjust the air shutter as needed. 3. Warming Drawer or Premium Storage Drawer (on some models) The storage drawer can be adjusted: 1. Push the warming drawer or premium storage drawer in the drawer glides on both sides. Before removing, make... or premium storage drawer, and allow the range to cool completely before attempting to ensure it is seated properly on the glides on some models) Remove all the way. 3. Drawer glide notch 2. Gently open position. 2. Open the warming drawer or premium storage drawer to be removed...
...alignment tab C. Drawer glide notch 3. Using both sides. Adjust the air shutter as needed. 3. Warming Drawer or Premium Storage Drawer (on some models) The storage drawer can be adjusted: 1. Push the warming drawer or premium storage drawer in the drawer glides on both sides. Before removing, make... or premium storage drawer, and allow the range to cool completely before attempting to ensure it is seated properly on the glides on some models) Remove all the way. 3. Drawer glide notch 2. Gently open position. 2. Open the warming drawer or premium storage drawer to be removed...

Installation Instructions
Page 15
... drawer. Gas pressure regulator IMPORTANT: Do not remove the gas pressure regulator. 15 Securely tighten all gas connections. B A C A. Unplug range or disconnect power. NOTE: On models with a warming drawer, an access cover must be killed. If connected to Propane Gas) 1. Re-engage anti-tip bracket if range is engaged in death...
... drawer. Gas pressure regulator IMPORTANT: Do not remove the gas pressure regulator. 15 Securely tighten all gas connections. B A C A. Unplug range or disconnect power. NOTE: On models with a warming drawer, an access cover must be killed. If connected to Propane Gas) 1. Re-engage anti-tip bracket if range is engaged in death...

Installation Instructions
Page 16
... with hollow end facing out D. Lift the rear of the oven bottom up and back until the front of a 9/32" (7 mm) nut driver to the Model Number and Serial Number Plate located on a covered surface. Turn gas pressure regulator cap counterclockwise with a 5/8" (1.6 cm) combination wrench to Propane Gas) 1. Gas tube opening...
... with hollow end facing out D. Lift the rear of the oven bottom up and back until the front of a 9/32" (7 mm) nut driver to the Model Number and Serial Number Plate located on a covered surface. Turn gas pressure regulator cap counterclockwise with a 5/8" (1.6 cm) combination wrench to Propane Gas) 1. Gas tube opening...

Installation Instructions
Page 18
... operate range without anti-tip bracket installed and engaged. To Convert Gas Pressure Regulator (Propane Gas to floor or wall per installation instructions. NOTE: On models with solid end facing out D. Gas pressure regulator IMPORTANT: Do not remove the gas pressure regulator. 3. Side view before A LP LP B D E NG C Side view after...
... operate range without anti-tip bracket installed and engaged. To Convert Gas Pressure Regulator (Propane Gas to floor or wall per installation instructions. NOTE: On models with solid end facing out D. Gas pressure regulator IMPORTANT: Do not remove the gas pressure regulator. 3. Side view before A LP LP B D E NG C Side view after...
Installation Instructions
Page 19
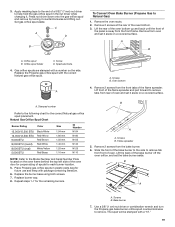
C A D B To Convert Oven Bake Burner (Propane Gas to the Model Number and Serial Number Plate located on the oven frame behind the top left side of the oven door for proper sizing of spuds for ...
C A D B To Convert Oven Bake Burner (Propane Gas to the Model Number and Serial Number Plate located on the oven frame behind the top left side of the oven door for proper sizing of spuds for ...


