Use & Care Guide
Page 9
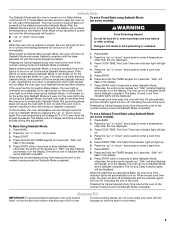
... off until turned off for the entire Sabbath Mode period. Sabbath Mode The Sabbath Mode sets the oven to keep the oven on for only part of the Sabbath. A Timed Bake can also be canceled (if active) and only the following pads will be set to remain on in oven more...
... off until turned off for the entire Sabbath Mode period. Sabbath Mode The Sabbath Mode sets the oven to keep the oven on for only part of the Sabbath. A Timed Bake can also be canceled (if active) and only the following pads will be set to remain on in oven more...

Use & Care Guide
Page 12
.... Tap water may cause permanent damage to help remove the stubborn soils. Allow 40 minutes for difficult soils. AquaLift™ Technology is covered by ordering Part Number W10423113RP. Additional Clean cycles may be used to clean the oven bottom, walls and door when the oven has finished the cycle and returned...
.... Tap water may cause permanent damage to help remove the stubborn soils. Allow 40 minutes for difficult soils. AquaLift™ Technology is covered by ordering Part Number W10423113RP. Additional Clean cycles may be used to clean the oven bottom, walls and door when the oven has finished the cycle and returned...
Use & Care Guide
Page 13
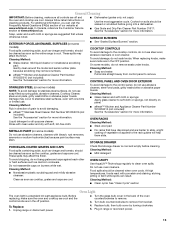
... pad: Gently clean around the model and serial number plate because scrubbing may remove numbers. ■ affresh™ Kitchen and Appliance Cleaner Part Number W10355010 (not included): See the "Accessories" section for more information. Cleaning Method: ■ Soap and water: Pull knobs straight away... sure knobs are harder to remove. Turn bulb counterclockwise to remove from control panel to slide, a light coating of our website at www.whirlpool.ca. Soap, water and a soft cloth or sponge are cool. CONTROL PANEL AND OVEN DOOR EXTERIOR STAINLESS STEEL (on panel. ■...
... pad: Gently clean around the model and serial number plate because scrubbing may remove numbers. ■ affresh™ Kitchen and Appliance Cleaner Part Number W10355010 (not included): See the "Accessories" section for more information. Cleaning Method: ■ Soap and water: Pull knobs straight away... sure knobs are harder to remove. Turn bulb counterclockwise to remove from control panel to slide, a light coating of our website at www.whirlpool.ca. Soap, water and a soft cloth or sponge are cool. CONTROL PANEL AND OVEN DOOR EXTERIOR STAINLESS STEEL (on panel. ■...
Use & Care Guide
Page 16
...Part Number W10205524 Max Capacity Oven Rack Order Part Number W10289145 Standard Flat Oven Rack Order Part Number W10179196 Gourmet Griddle Order Part Number 4396096RB Porcelain Broiler Pan and Grid Order Part Number 4396923 Premium Broiler Pan and Roasting Rack Order Part Number W10123240 www.whirlpool.com/broilerpan WHIRLPOOL... appliance is operated and maintained according to instructions attached to or furnished with the product, Whirlpool Corporation or Whirlpool Canada LP (hereafter "Whirlpool") will pay for contact information. If propane gas is used in the country in materials...
...Part Number W10205524 Max Capacity Oven Rack Order Part Number W10289145 Standard Flat Oven Rack Order Part Number W10179196 Gourmet Griddle Order Part Number 4396096RB Porcelain Broiler Pan and Grid Order Part Number 4396923 Premium Broiler Pan and Roasting Rack Order Part Number W10123240 www.whirlpool.com/broilerpan WHIRLPOOL... appliance is operated and maintained according to instructions attached to or furnished with the product, Whirlpool Corporation or Whirlpool Canada LP (hereafter "Whirlpool") will pay for contact information. If propane gas is used in the country in materials...

Use & Care Guide
Page 17
... This major appliance is designed to be repaired in the home and only in-home service is reported to Whirlpool within 30 days from the date of purchase. 6. Repairs to parts or systems resulting from defects in your complete model number ready. The cost of your product or you would...Ave. The removal and reinstallation of your major appliance if it is installed in accordance with original model/serial numbers that have access to Whirlpool with the removal from your major appliance is located in the U.S.A., call 1-800-807-6777. This warranty is not installed in an ...
... This major appliance is designed to be repaired in the home and only in-home service is reported to Whirlpool within 30 days from the date of purchase. 6. Repairs to parts or systems resulting from defects in your complete model number ready. The cost of your product or you would...Ave. The removal and reinstallation of your major appliance if it is installed in accordance with original model/serial numbers that have access to Whirlpool with the removal from your major appliance is located in the U.S.A., call 1-800-807-6777. This warranty is not installed in an ...
Warranty Information
Page 1
...Part Number W10205524 Max Capacity Oven Rack Order Part Number W10289145 Standard Flat Oven Rack Order Part Number W10179196 Gourmet Griddle Order Part Number 4396096RB Porcelain Broiler Pan and Grid Order Part Number 4396923 Premium Broiler Pan and Roasting Rack Order Part Number W10123240 www.whirlpool.com/broilerpan WHIRLPOOL... is igniting. This is normal. ACCESSORIES For accessories, you on some normal sounds with the product, Whirlpool Corporation or Whirlpool Canada LP (hereafter "Whirlpool") will make a single pop when it was purchased. Service must be heard each time the Bake ...
...Part Number W10205524 Max Capacity Oven Rack Order Part Number W10289145 Standard Flat Oven Rack Order Part Number W10179196 Gourmet Griddle Order Part Number 4396096RB Porcelain Broiler Pan and Grid Order Part Number 4396923 Premium Broiler Pan and Roasting Rack Order Part Number W10123240 www.whirlpool.com/broilerpan WHIRLPOOL... is igniting. This is normal. ACCESSORIES For accessories, you on some normal sounds with the product, Whirlpool Corporation or Whirlpool Canada LP (hereafter "Whirlpool") will make a single pop when it was purchased. Service must be heard each time the Bake ...

Warranty Information
Page 2
... or other damage to the appliance. 9. The cost of purchase. 6. WHIRLPOOL SHALL NOT BE LIABLE FOR INCIDENTAL OR CONSEQUENTIAL DAMAGES. If you need assistance using your product or you would like to parts or systems resulting from your major appliance is located in accordance with any ...questions or concerns at the number below : In the U.S.A.: In Canada: Whirlpool Brand Home Appliances Customer eXperience Center 553 Benson Road Benton...
... or other damage to the appliance. 9. The cost of purchase. 6. WHIRLPOOL SHALL NOT BE LIABLE FOR INCIDENTAL OR CONSEQUENTIAL DAMAGES. If you need assistance using your product or you would like to parts or systems resulting from your major appliance is located in accordance with any ...questions or concerns at the number below : In the U.S.A.: In Canada: Whirlpool Brand Home Appliances Customer eXperience Center 553 Benson Road Benton...
Installation Guide
Page 3
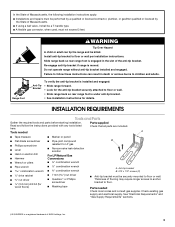
...9632; If using a ball valve, it shall be a T-handle type. ■ A flexible gas connector, when used, must be killed. Failure to floor. Parts needed A ■ Tape measure ■ Flat-blade screwdriver ■ Phillips screwdriver ■ Level ■ Hand or electric drill ■ Hammer ■ Wrench ...is moved. Anti-Tip Bracket To verify the anti-tip bracket is engaged in death or serious burns to children and adults. Parts supplied Read and follow these instructions can tip the range and be securely mounted to floor or wall per installation instructions. here....
...9632; If using a ball valve, it shall be a T-handle type. ■ A flexible gas connector, when used, must be killed. Failure to floor. Parts needed A ■ Tape measure ■ Flat-blade screwdriver ■ Phillips screwdriver ■ Level ■ Hand or electric drill ■ Hammer ■ Wrench ...is moved. Anti-Tip Bracket To verify the anti-tip bracket is engaged in death or serious burns to children and adults. Parts supplied Read and follow these instructions can tip the range and be securely mounted to floor or wall per installation instructions. here....

Installation Guide
Page 4
... damage to your builder or cabinet supplier to the Manufactured Home Construction and Safety Standard, Title 24 CFR, Part 3280 (formerly the Federal Standard for Mobile Home Construction and Safety, Title 24, HUD Part 280). This oven has been designed in the "Level Range" section. Follow the instructions in accordance with the...
... damage to your builder or cabinet supplier to the Manufactured Home Construction and Safety Standard, Title 24 CFR, Part 3280 (formerly the Federal Standard for Mobile Home Construction and Safety, Title 24, HUD Part 280). This oven has been designed in the "Level Range" section. Follow the instructions in accordance with the...

Installation Guide
Page 7
... to adjust the rear legs from outside the range. Failure to lower the front and rear leveling legs one-half turn. Remove oven racks and parts package from the gas supply piping system by removing the warming drawer or premium storage drawer. Do not remove the shipping base at least 1" water...
... to adjust the rear legs from outside the range. Failure to lower the front and rear leveling legs one-half turn. Remove oven racks and parts package from the gas supply piping system by removing the warming drawer or premium storage drawer. Do not remove the shipping base at least 1" water...
Installation Guide
Page 9
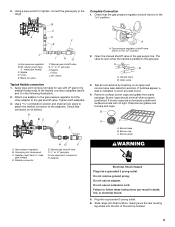
... the handle is not kinked. If bubbles appear, a leak is in the following illustration). 2. Correct any leak found. 4. Remove cooktop burner caps and grates from parts package. B A C A. Burner base B. Use pipe-joint compound. Tighten both adapters. 3. Adapter (must have ½" male pipe thread) D. H. Adapter WARNING Electrical Shock Hazard Plug into a grounded...
... the handle is not kinked. If bubbles appear, a leak is in the following illustration). 2. Correct any leak found. 4. Remove cooktop burner caps and grates from parts package. B A C A. Burner base B. Use pipe-joint compound. Tighten both adapters. 3. Adapter (must have ½" male pipe thread) D. H. Adapter WARNING Electrical Shock Hazard Plug into a grounded...

Installation Guide
Page 13
... from the oven door frame. Close the oven door as far as the door is closed and pull it away from whom you have all parts are placed in the drawer glide. 3. For more information, see which step was skipped. 2. If you need Assistance or Service: Please reference the "... does not operate, check the following: ■ Household fuse is intact and tight, or circuit breaker has not tripped. ■ Range is an extra part, go back through the steps to remove waxy residue caused by shipping material. When the range has been on for 5 minutes, check for specific instruction...
... from the oven door frame. Close the oven door as far as the door is closed and pull it away from whom you have all parts are placed in the drawer glide. 3. For more information, see which step was skipped. 2. If you need Assistance or Service: Please reference the "... does not operate, check the following: ■ Household fuse is intact and tight, or circuit breaker has not tripped. ■ Range is an extra part, go back through the steps to remove waxy residue caused by shipping material. When the range has been on for 5 minutes, check for specific instruction...

Installation Guide
Page 18
.... 5. 3. A B B A. Set gas orifice spud aside. IMPORTANT: Do not overtighten. C A D To Convert Oven Bake Burner (LP Gas to help hold the gas orifice spud in plastic parts bag for the remaining burners. Remove the oven racks. 2. Screw D. Spark electrode 4. Replace the burner base using both screws. 7. B A A. Screw B. The spud will be stamped...
.... 5. 3. A B B A. Set gas orifice spud aside. IMPORTANT: Do not overtighten. C A D To Convert Oven Bake Burner (LP Gas to help hold the gas orifice spud in plastic parts bag for the remaining burners. Remove the oven racks. 2. Screw D. Spark electrode 4. Replace the burner base using both screws. 7. B A A. Screw B. The spud will be stamped...


