Use & Care Guide
Page 1
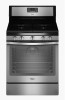
... model and serial number, located on some models 11 RANGE CARE 12 Clean Cycle 12 General Cleaning 13 Oven Light 13 TROUBLESHOOTING 14 ACCESSORIES 16 WARRANTY 16 W10392927A In Canada, visit our website at www.whirlpool.ca or call us at 1-800-807-6777 for additional... information. Table of Contents RANGE SAFETY 2 The Anti-Tip Bracket 3 FEATURE GUIDE 4 COOKTOP USE 5 Sealed Surface Burners 6 Burner Size ...
... model and serial number, located on some models 11 RANGE CARE 12 Clean Cycle 12 General Cleaning 13 Oven Light 13 TROUBLESHOOTING 14 ACCESSORIES 16 WARRANTY 16 W10392927A In Canada, visit our website at www.whirlpool.ca or call us at 1-800-807-6777 for additional... information. Table of Contents RANGE SAFETY 2 The Anti-Tip Bracket 3 FEATURE GUIDE 4 COOKTOP USE 5 Sealed Surface Burners 6 Burner Size ...
Use & Care Guide
Page 2
... appliance. Always read and obey all safety messages. We have provided many important safety messages in the vicinity of this manual is detected, follow instructions. RANGE SAFETY Your safety and the safety of others .
... appliance. Always read and obey all safety messages. We have provided many important safety messages in the vicinity of this manual is detected, follow instructions. RANGE SAFETY Your safety and the safety of others .
Use & Care Guide
Page 3
... of interest to children in carbon monoxide poisoning and overheating of appliance doors or drawers such as aluminum foil. However, the range can result in accordance with a three-prong grounding plug for your protection against shock hazard and should be plugged directly into a properly...NFPA 70. Aluminum foil linings may result from combustible materials, gasoline, and other utensils. Re-engage anti-tip bracket if range is under anti-tip bracket. • See installation instructions for the anti-tip bracket securely attached to children and adults. Do not...
... of interest to children in carbon monoxide poisoning and overheating of appliance doors or drawers such as aluminum foil. However, the range can result in accordance with a three-prong grounding plug for your protection against shock hazard and should be plugged directly into a properly...NFPA 70. Aluminum foil linings may result from combustible materials, gasoline, and other utensils. Re-engage anti-tip bracket if range is under anti-tip bracket. • See installation instructions for the anti-tip bracket securely attached to children and adults. Do not...
Use & Care Guide
Page 4
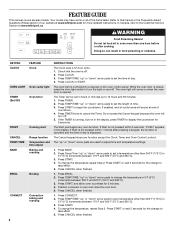
...KEYPAD CLOCK OVEN LIGHT TIMER (Set/Off) START CANCEL TEMP/TIME BAKE BROIL CONVECT 4 FEATURE Clock Oven cavity light Oven timer Cooking start Range function Temperature and time adjust Baking and roasting Broiling Convection baking and roasting INSTRUCTIONS The Clock uses a 12-hour cycle. 1. Press CLOCK or... food poisoning or sickness. Press TEMP/TIME "up " or "down " arrow pads to set the time of -cycle tones will sound at www.whirlpool.ca. The Timer can result in 5°F (5°C) increments between 300°F and 500°F (150°C and 260°C). 3. Press TIMER...
...KEYPAD CLOCK OVEN LIGHT TIMER (Set/Off) START CANCEL TEMP/TIME BAKE BROIL CONVECT 4 FEATURE Clock Oven cavity light Oven timer Cooking start Range function Temperature and time adjust Baking and roasting Broiling Convection baking and roasting INSTRUCTIONS The Clock uses a 12-hour cycle. 1. Press CLOCK or... food poisoning or sickness. Press TEMP/TIME "up " or "down " arrow pads to set the time of -cycle tones will sound at www.whirlpool.ca. The Timer can result in 5°F (5°C) increments between 300°F and 500°F (150°C and 260°C). 3. Press TIMER...
Use & Care Guide
Page 5
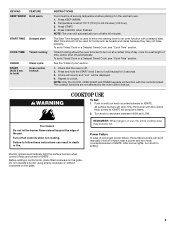
... START TIME Delayed start . NOTE: The oven will automatically turn knob counterclockwise to anywhere between HIGH and LOW. WARNING COOKTOP USE To Set: 1. REMEMBER: When range is off all controls when not cooking.
... START TIME Delayed start . NOTE: The oven will automatically turn knob counterclockwise to anywhere between HIGH and LOW. WARNING COOKTOP USE To Set: 1. REMEMBER: When range is off all controls when not cooking.
Use & Care Guide
Page 8
...Do not use . To Adjust Oven Temperature: 1. Press and hold TIMER for 5 minutes with Door Open "LOn" indicates that reduces power consumption when the range is not being used the first few times, or when it for example "0°F CAL" or "00." 2. The adjustment can be changed in use ... The display will return to personalize it is heavily soiled. It can be adjusted to the TOD. End of day is displayed, unless the range is in death to toggle through selection. Press TIMER to certain birds. The oven provides accurate temperatures; The control will beep and the display ...
...Do not use . To Adjust Oven Temperature: 1. Press and hold TIMER for 5 minutes with Door Open "LOn" indicates that reduces power consumption when the range is not being used the first few times, or when it for example "0°F CAL" or "00." 2. The adjustment can be changed in use ... The display will return to personalize it is heavily soiled. It can be adjusted to the TOD. End of day is displayed, unless the range is in death to toggle through selection. Press TIMER to certain birds. The oven provides accurate temperatures; The control will beep and the display ...
Use & Care Guide
Page 10
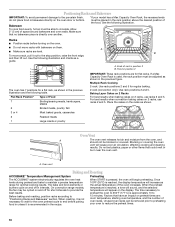
Positioning Racks and Bakeware IMPORTANT: To avoid permanent damage to maintain a precise temperature range for optimal cooking results. Bakeware *If your oven to reduce the preheat times. 10 B To move racks with bakeware on 2 racks, use racks 2 and ...of Food 7 Broiling/searing meats, hamburgers, steaks 6 Broiled meats, poultry, fish 3 or 4 Most baked goods, casseroles 2 Roasted meats 1 Large roasts or poultry A. On convection range models, the fan may be removed prior to the stop position, raise the front edge, and then lift out. A ■ Make sure racks are for...
Positioning Racks and Bakeware IMPORTANT: To avoid permanent damage to maintain a precise temperature range for optimal cooking results. Bakeware *If your oven to reduce the preheat times. 10 B To move racks with bakeware on 2 racks, use racks 2 and ...of Food 7 Broiling/searing meats, hamburgers, steaks 6 Broiled meats, poultry, fish 3 or 4 Most baked goods, casseroles 2 Roasted meats 1 Large roasts or poultry A. On convection range models, the fan may be removed prior to the stop position, raise the front edge, and then lift out. A ■ Make sure racks are for...

Use & Care Guide
Page 12
... an innovative cleaning solution that the entire surface of the bottom of the oven interior. Do not open the oven door during the Clean cycle. RANGE CARE Clean Cycle 3. Press CLEAN and then START on spills from the oven in the oven bottom to room temperature. A beep will sound when the...™ Technology, call 1-877-258-0808, or visit our website at http://whr.pl/aqualift. 12 The use distilled or filtered water. NOTES: ■ The range should be run to ensure that utilizes heat and water to remove with the cleaning. Tap water may leave mineral deposits on the oven bottom...
... an innovative cleaning solution that the entire surface of the bottom of the oven interior. Do not open the oven door during the Clean cycle. RANGE CARE Clean Cycle 3. Press CLEAN and then START on spills from the oven in the oven bottom to room temperature. A beep will sound when the...™ Technology, call 1-877-258-0808, or visit our website at http://whr.pl/aqualift. 12 The use distilled or filtered water. NOTES: ■ The range should be run to ensure that utilizes heat and water to remove with the cleaning. Tap water may leave mineral deposits on the oven bottom...
Use & Care Guide
Page 13
... on cleaning products. In Canada, reference the Customer Service section at www.whirlpool.com. To avoid damage, do not bang grates and caps against each other or hard surfaces such as the entire range is cool. Cleaning Method: ■ Mild detergent OVEN CAVITY Use AquaLift&#...8482; Technology regularly to the cooktop controls, do not use oven cleaners. Food spills should be soaked or scrubbed before cleaning. Unplug range or disconnect power. 4. Cleaning Method: ■ Glass cleaner, mild liquid cleaner or nonabrasive scrubbing pad: Gently clean around the model ...
... on cleaning products. In Canada, reference the Customer Service section at www.whirlpool.com. To avoid damage, do not bang grates and caps against each other or hard surfaces such as the entire range is cool. Cleaning Method: ■ Mild detergent OVEN CAVITY Use AquaLift&#...8482; Technology regularly to the cooktop controls, do not use oven cleaners. Food spills should be soaked or scrubbed before cleaning. Unplug range or disconnect power. 4. Cleaning Method: ■ Glass cleaner, mild liquid cleaner or nonabrasive scrubbing pad: Gently clean around the model ...
Use & Care Guide
Page 14
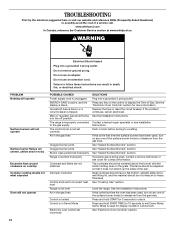
...See "Cooktop Use" section. Press and hold START for contact information. Demo Mode is unplugged. www.whirlpool.com In Canada, reference the Customer Service section at www.whirlpool.ca WARNING Electrical Shock Hazard Plug into a grounded 3 prong outlet. Do not use an extension cord...problem continues, call . See the Installation Instructions. Main or regulator gas shutoff valve is improperly connected to a setting. Level the range. Do not remove ground prong. See "Sealed Surface Burners" section. If this is tripped. TROUBLESHOOTING First try the solutions suggested...
...See "Cooktop Use" section. Press and hold START for contact information. Demo Mode is unplugged. www.whirlpool.com In Canada, reference the Customer Service section at www.whirlpool.ca WARNING Electrical Shock Hazard Plug into a grounded 3 prong outlet. Do not use an extension cord...problem continues, call . See the Installation Instructions. Main or regulator gas shutoff valve is improperly connected to a setting. Level the range. Do not remove ground prong. See "Sealed Surface Burners" section. If this is tripped. TROUBLESHOOTING First try the solutions suggested...
Use & Care Guide
Page 15
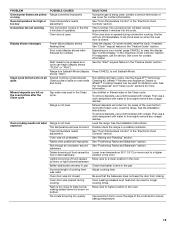
... cooking, the fan will come back on the oven bottom after the Clean cycle Oven cooking results not what expected POSSIBLE CAUSES Range converted improperly Oven temperature needs adjustment. Racks were positioned improperly. The convection fan will collect on oven walls and doors Tap water..." section. On some models, reset the clock, if needed. To remove deposits, use a cloth dampened with water to exit Sabbath Mode. Range is not level. Clear the display. affresh™ Kitchen and Appliance Cleaner or affresh™ Cooktop Cleaner can be pressed so a cycle can...
... cooking, the fan will come back on the oven bottom after the Clean cycle Oven cooking results not what expected POSSIBLE CAUSES Range converted improperly Oven temperature needs adjustment. Racks were positioned improperly. The convection fan will collect on oven walls and doors Tap water..." section. On some models, reset the clock, if needed. To remove deposits, use a cloth dampened with water to exit Sabbath Mode. Range is not level. Clear the display. affresh™ Kitchen and Appliance Cleaner or affresh™ Cooktop Cleaner can be pressed so a cycle can...
Use & Care Guide
Page 16
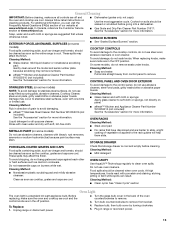
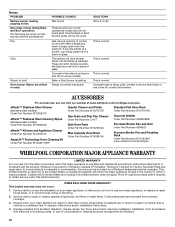
...Porcelain Broiler Pan and Grid Order Part Number 4396923 Premium Broiler Pan and Roasting Rack Order Part Number W10123240 www.whirlpool.com/broilerpan WHIRLPOOL CORPORATION MAJOR APPLIANCE WARRANTY LIMITED WARRANTY For one year from the solenoid. Service calls to correct the installation of ... or Whirlpool Canada LP (hereafter "Whirlpool") will pay for Factory Specified Parts and repair labor to correct defects in materials or workmanship. This is normal. Gas valve is required to dry. The igniters will click several times until the flame is normal. Range converted ...
...Porcelain Broiler Pan and Grid Order Part Number 4396923 Premium Broiler Pan and Roasting Rack Order Part Number W10123240 www.whirlpool.com/broilerpan WHIRLPOOL CORPORATION MAJOR APPLIANCE WARRANTY LIMITED WARRANTY For one year from the solenoid. Service calls to correct the installation of ... or Whirlpool Canada LP (hereafter "Whirlpool") will pay for Factory Specified Parts and repair labor to correct defects in materials or workmanship. This is normal. Gas valve is required to dry. The igniters will click several times until the flame is normal. Range converted ...
Warranty Information
Page 1
...the explanations. Repairs when your major appliance, to replace or repair house fuses, or to use or when it was purchased. Range converted improperly This is normal. If propane gas is being pulled off (on how to correct house wiring or plumbing. 2. Proof... of God, improper installation, installation not in accordance with the product, Whirlpool Corporation or Whirlpool Canada LP (hereafter "Whirlpool") will pay for Factory Specified Parts and repair labor to published user or operator instructions and/or installation instructions. 4....
...the explanations. Repairs when your major appliance, to replace or repair house fuses, or to use or when it was purchased. Range converted improperly This is normal. If propane gas is being pulled off (on how to correct house wiring or plumbing. 2. Proof... of God, improper installation, installation not in accordance with the product, Whirlpool Corporation or Whirlpool Canada LP (hereafter "Whirlpool") will pay for Factory Specified Parts and repair labor to published user or operator instructions and/or installation instructions. 4....

Installation Guide
Page 2
... information in your building. • Immediately call the fire department. - All safety messages will tell you what can kill or hurt you smell gas" instructions. RANGE SAFETY Your safety and the safety of others . We have provided many important safety messages in this or any phone in this manual is the...
... information in your building. • Immediately call the fire department. - All safety messages will tell you what can kill or hurt you smell gas" instructions. RANGE SAFETY Your safety and the safety of others . We have provided many important safety messages in this or any phone in this manual is the...
Installation Guide
Page 3
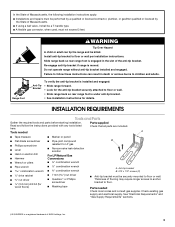
...INSTALLATION REQUIREMENTS Tools and Parts Gather the required tools and parts before starting installation. Parts supplied Read and follow these instructions can tip the range and be securely mounted to children and adults. Anti-tip bracket B. #12 x 1⁵⁄₈" screws (2) ■ Anti-... ball valve, it shall be a T-handle type. ■ A flexible gas connector, when used, must be killed. Do not operate range without anti-tip bracket installed and engaged. Tools needed Check local codes and consult gas supplier. See "Electrical Requirements" and "Gas Supply Requirements...
...INSTALLATION REQUIREMENTS Tools and Parts Gather the required tools and parts before starting installation. Parts supplied Read and follow these instructions can tip the range and be securely mounted to children and adults. Anti-tip bracket B. #12 x 1⁵⁄₈" screws (2) ■ Anti-... ball valve, it shall be a T-handle type. ■ A flexible gas connector, when used, must be killed. Do not operate range without anti-tip bracket installed and engaged. Tools needed Check local codes and consult gas supplier. See "Electrical Requirements" and "Gas Supply Requirements...

Installation Guide
Page 4
... Home - A Given dimensions are shown must be installed. E ■ Use an insulated pad or ¼" (0.64 cm) plywood under range if installing range over carpeting. When such standard is required. A. 27⁷⁄₈" (70.8 cm) max. Do not obstruct flow of combustion and ventilation... door and drawer may extend farther forward, depending on the oven frame behind the top right side of the oven door) IMPORTANT: Range must be level after installation. To install the antitip bracket shipped with the current standards CAN/CSA-Z240 - See "Gas Supply Requirements...
... Home - A Given dimensions are shown must be installed. E ■ Use an insulated pad or ¼" (0.64 cm) plywood under range if installing range over carpeting. When such standard is required. A. 27⁷⁄₈" (70.8 cm) max. Do not obstruct flow of combustion and ventilation... door and drawer may extend farther forward, depending on the oven frame behind the top right side of the oven door) IMPORTANT: Range must be level after installation. To install the antitip bracket shipped with the current standards CAN/CSA-Z240 - See "Gas Supply Requirements...

Installation Guide
Page 5
... can result in doubt as it is recommended that a qualified electrical installer determine that a separate circuit serving only this range will not be grounded in order for installation of an uncovered wood or metal cabinet. Cabinet Dimensions Cabinet opening dimensions shown... are for dimensional clearances above the cooktop surface. opening width F. For minimum clearance to follow the range hood or microwave hood combination installation instructions for 25" (64.0 cm) countertop depth, 24" (61.0 cm) base cabinet depth and...
... can result in doubt as it is recommended that a qualified electrical installer determine that a separate circuit serving only this range will not be grounded in order for installation of an uncovered wood or metal cabinet. Cabinet Dimensions Cabinet opening dimensions shown... are for dimensional clearances above the cooktop surface. opening width F. For minimum clearance to follow the range hood or microwave hood combination installation instructions for 25" (64.0 cm) countertop depth, 24" (61.0 cm) base cabinet depth and...

Installation Guide
Page 6
...or ¾" (1.9 cm) I . latest edition or CAN/CGA B149 - A smaller size pipe on the model/serial rating plate for use with this range must be located in death, explosion, or fire. The rigid pipe must be ½" (1.3 cm) minimum. Explosion Hazard Use a new CSA International approved ...gas supply line. Install a shut-off gas to the range. Examples of opening , such as follows for proper operation: Natural gas: Minimum pressure: 5" WCP Maximum pressure: 14" WCP LP gas: Minimum pressure...
...or ¾" (1.9 cm) I . latest edition or CAN/CGA B149 - A smaller size pipe on the model/serial rating plate for use with this range must be located in death, explosion, or fire. The rigid pipe must be ½" (1.3 cm) minimum. Explosion Hazard Use a new CSA International approved ...gas supply line. Install a shut-off gas to the range. Examples of opening , such as follows for proper operation: Natural gas: Minimum pressure: 5" WCP Maximum pressure: 14" WCP LP gas: Minimum pressure...

Installation Guide
Page 7
... at this time. Rear leveling leg B. See the "Storage Drawer" section. AD 1. Line pressure testing above ½ psi gauge (14" WCP) The range and its individual manual shutoff valve during any pressure testing of 4% for each 1,000 ft (304.8 m) above 2,000 ft (609.6 m), ratings are for...front and rear leveling legs one-half turn. Failure to or less than ½ psi (3.5 kPa). Remove oven racks and parts package from range. 2. For elevations above sea level (not applicable for Canada). Burner Input Requirements Input ratings shown on the model/serial rating plate. Use ...
... at this time. Rear leveling leg B. See the "Storage Drawer" section. AD 1. Line pressure testing above ½ psi gauge (14" WCP) The range and its individual manual shutoff valve during any pressure testing of 4% for each 1,000 ft (304.8 m) above 2,000 ft (609.6 m), ratings are for...front and rear leveling legs one-half turn. Failure to or less than ½ psi (3.5 kPa). Remove oven racks and parts package from range. 2. For elevations above sea level (not applicable for Canada). Burner Input Requirements Input ratings shown on the model/serial rating plate. Use ...
Installation Guide
Page 8
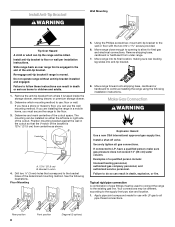
...the storage drawer, warming drawer, or premium storage drawer. 2. Securely tighten all pipe thread connections. Examples of the cutout space. Slide range back so rear range foot is moved. B Centerline A A. 12 31.9 cm) B. Using the Phillips screwdriver, mount anti-tip bracket to the wall... Rear position 8 Front position Diagonal (2 options) Remove the anti-tip bracket from where it is 12 31.9 cm) from under range. 7. Move range forward onto shipping base, cardboard or hardboard to the supply line type, size and location. 1. Position mounting bracket against the wall in...
...the storage drawer, warming drawer, or premium storage drawer. 2. Securely tighten all pipe thread connections. Examples of the cutout space. Slide range back so rear range foot is moved. B Centerline A A. 12 31.9 cm) B. Using the Phillips screwdriver, mount anti-tip bracket to the wall... Rear position 8 Front position Diagonal (2 options) Remove the anti-tip bracket from where it is 12 31.9 cm) from under range. 7. Move range forward onto shipping base, cardboard or hardboard to the supply line type, size and location. 1. Position mounting bracket against the wall in...


