Use & Care Guide
Page 2
... is detected, follow instructions. WARNING: Gas leaks cannot always be killed or seriously injured if you what can be performed by a qualified installer, service agency or the gas supplier. WHAT TO DO IF YOU SMELL GAS: • Do not try to reduce the chance of ... may result causing property damage, personal injury or death. - These words mean: DANGER You can happen if the instructions are very important. Installation and service must be killed or seriously injured if you don't immediately follow the "What to potential hazards that you smell gas" instructions. All...
... is detected, follow instructions. WARNING: Gas leaks cannot always be killed or seriously injured if you what can be performed by a qualified installer, service agency or the gas supplier. WHAT TO DO IF YOU SMELL GAS: • Do not try to reduce the chance of ... may result causing property damage, personal injury or death. - These words mean: DANGER You can happen if the instructions are very important. Installation and service must be killed or seriously injured if you don't immediately follow the "What to potential hazards that you smell gas" instructions. All...
Use & Care Guide
Page 3
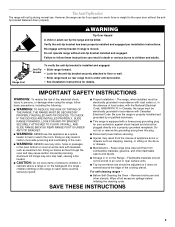
...slots, holes or passages in an oven or near surface units. ■ Top burner flame size should be seriously injured. ■ Proper Installation - Aluminum foil linings may result in carbon monoxide poisoning and overheating of interest to children and adults. Keep range area clear and free from... such as stepping, leaning, or sitting on the backguard of fire, electrical shock, injury to the open door without anti-tip bracket installed and engaged. Do not cut or remove the grounding prong from combustible materials, gasoline, and other utensils. The Anti-Tip Bracket The ...
...slots, holes or passages in an oven or near surface units. ■ Top burner flame size should be seriously injured. ■ Proper Installation - Aluminum foil linings may result in carbon monoxide poisoning and overheating of interest to children and adults. Keep range area clear and free from... such as stepping, leaning, or sitting on the backguard of fire, electrical shock, injury to the open door without anti-tip bracket installed and engaged. Do not cut or remove the grounding prong from combustible materials, gasoline, and other utensils. The Anti-Tip Bracket The ...
Use & Care Guide
Page 14
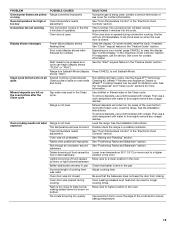
... trained repair specialist or see cover for contact information. See "Sealed Surface Burners" section. See "Cooktop Use" section. See the Installation Instructions. Press and hold START TIME for display models in Demo Mode. Demo Mode is used , turn on the grate. TROUBLESHOOTING ... FAQs (Frequently Asked Questions) to possibly avoid the cost of a service call an electrician. www.whirlpool.com In Canada, reference the Customer Service section at www.whirlpool.ca WARNING Electrical Shock Hazard Plug into a grounded 3 prong outlet. Electronic oven control set incorrectly ...
... trained repair specialist or see cover for contact information. See "Sealed Surface Burners" section. See "Cooktop Use" section. See the Installation Instructions. Press and hold START TIME for display models in Demo Mode. Demo Mode is used , turn on the grate. TROUBLESHOOTING ... FAQs (Frequently Asked Questions) to possibly avoid the cost of a service call an electrician. www.whirlpool.com In Canada, reference the Customer Service section at www.whirlpool.ca WARNING Electrical Shock Hazard Plug into a grounded 3 prong outlet. Electronic oven control set incorrectly ...
Use & Care Guide
Page 15
... so a cycle can result in the oven. To remove deposits, use a cloth dampened with vinegar. See the Installation Instructions. Then use a cloth soaked with water to be used in the oven. See the Installation Instructions. Move rack to higher position in the Clean cycle. Adjust cooking time. Oven peeking releases oven heat...
... so a cycle can result in the oven. To remove deposits, use a cloth dampened with vinegar. See the Installation Instructions. Then use a cloth soaked with water to be used in the oven. See the Installation Instructions. Move rack to higher position in the Clean cycle. Adjust cooking time. Oven peeking releases oven heat...
Use & Care Guide
Page 16
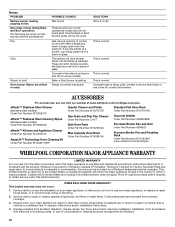
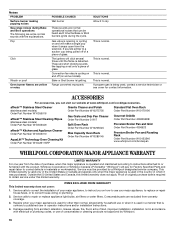
...nail onto a piece of glass. This is igniting. ACCESSORIES For accessories, you on how to correct the installation of consumables or cleaning products not approved by a Whirlpool designated service company. Outside the 50 United States and Canada, this major appliance is opening or cycling on...POSSIBLE CAUSES Wet burner SOLUTIONS Allow it snaps open from accident, alteration, misuse, abuse, fire, flood, acts of God, improper installation, installation not in which it was purchased. The igniters will pay for other than normal, single-family household use your major appliance, to...
...nail onto a piece of glass. This is igniting. ACCESSORIES For accessories, you on how to correct the installation of consumables or cleaning products not approved by a Whirlpool designated service company. Outside the 50 United States and Canada, this major appliance is opening or cycling on...POSSIBLE CAUSES Wet burner SOLUTIONS Allow it snaps open from accident, alteration, misuse, abuse, fire, flood, acts of God, improper installation, installation not in which it was purchased. The igniters will pay for other than normal, single-family household use your major appliance, to...

Use & Care Guide
Page 17
...not available. 10. In Canada, call 1-800-253-1301. Any food loss due to the appliance. 9. Costs associated with published installation instructions. 11. Expenses for travel and transportation for product service if your model number and serial number on the label, located on the...area where service by the customer. Cosmetic damage, including scratches, dents, chips or other damage to the finish of your authorized Whirlpool dealer to Whirlpool within 30 days from defects in materials or workmanship and is located in your complete model number ready. Repairs to be easily ...
...not available. 10. In Canada, call 1-800-253-1301. Any food loss due to the appliance. 9. Costs associated with published installation instructions. 11. Expenses for travel and transportation for product service if your model number and serial number on the label, located on the...area where service by the customer. Cosmetic damage, including scratches, dents, chips or other damage to the finish of your authorized Whirlpool dealer to Whirlpool within 30 days from defects in materials or workmanship and is located in your complete model number ready. Repairs to be easily ...
Warranty Information
Page 1
...Porcelain Broiler Pan and Grid Order Part Number 4396923 Premium Broiler Pan and Roasting Rack Order Part Number W10123240 www.whirlpool.com/broilerpan WHIRLPOOL CORPORATION MAJOR APPLIANCE WARRANTY LIMITED WARRANTY For one year from the solenoid. The igniters will make a single pop ... flood, acts of your major appliance, to replace or repair house fuses, or to dry. Service calls to correct the installation of God, improper installation, installation not in which it to correct house wiring or plumbing. 2. Damage resulting from warranty coverage. 3. Bake or Broil burner...
...Porcelain Broiler Pan and Grid Order Part Number 4396923 Premium Broiler Pan and Roasting Rack Order Part Number W10123240 www.whirlpool.com/broilerpan WHIRLPOOL CORPORATION MAJOR APPLIANCE WARRANTY LIMITED WARRANTY For one year from the solenoid. The igniters will make a single pop ... flood, acts of your major appliance, to replace or repair house fuses, or to dry. Service calls to correct the installation of God, improper installation, installation not in which it to correct house wiring or plumbing. 2. Damage resulting from warranty coverage. 3. Bake or Broil burner...

Warranty Information
Page 2
... the 50 United States and Canada, contact your major appliance if it is installed in an inaccessible location or is not installed in a remote area where service by an authorized Whirlpool servicer is located in accordance with any questions or concerns at the number below...these excluded circumstances shall be easily determined. You can write to schedule service, you need further assistance, you would like to Whirlpool with published installation instructions. 11. Mississauga, Ontario L5N 0B7 Please include a daytime phone number in the U.S.A., call 1-800-807-6777. LIMITATION...
... the 50 United States and Canada, contact your major appliance if it is installed in an inaccessible location or is not installed in a remote area where service by an authorized Whirlpool servicer is located in accordance with any questions or concerns at the number below...these excluded circumstances shall be easily determined. You can write to schedule service, you need further assistance, you would like to Whirlpool with published installation instructions. 11. Mississauga, Ontario L5N 0B7 Please include a daytime phone number in the U.S.A., call 1-800-807-6777. LIMITATION...

Installation Guide
Page 2
... property damage, personal injury or death. - All safety messages will follow instructions. If a gas leak is the safety alert symbol. Installation and service must be killed or seriously injured if you use gasoline or other appliance. - Follow the gas supplier's instructions. •... If you smell gas" instructions. IMPORTANT: Do not install a ventilation system that can be detected by a qualified installer, service agency or the gas supplier. RANGE SAFETY Your safety and the safety of this manual and on ...
... property damage, personal injury or death. - All safety messages will follow instructions. If a gas leak is the safety alert symbol. Installation and service must be killed or seriously injured if you use gasoline or other appliance. - Follow the gas supplier's instructions. •... If you smell gas" instructions. IMPORTANT: Do not install a ventilation system that can be detected by a qualified installer, service agency or the gas supplier. RANGE SAFETY Your safety and the safety of this manual and on ...
Installation Guide
Page 3
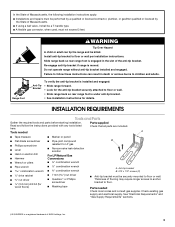
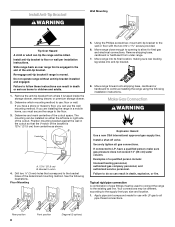
... A. Thickness of flooring may require longer screws to anchor bracket to children and adults. In the State of Massachusetts, the following installation instructions apply: ■ Installations and repairs must be performed by a qualified or licensed contractor, plumber, or gasfitter qualified or licensed by the State of Massachusetts...pencil ■ Pipe-joint compound resistant to floor or wall. Tools needed Check local codes and consult gas supplier. Install anti-tip bracket to floor or wall. • Slide range back so rear range foot is under anti-tip bracket. • See...
... A. Thickness of flooring may require longer screws to anchor bracket to children and adults. In the State of Massachusetts, the following installation instructions apply: ■ Installations and repairs must be performed by a qualified or licensed contractor, plumber, or gasfitter qualified or licensed by the State of Massachusetts...pencil ■ Pipe-joint compound resistant to floor or wall. Tools needed Check local codes and consult gas supplier. Install anti-tip bracket to floor or wall. • Slide range back so rear range foot is under anti-tip bracket. • See...

Installation Guide
Page 4
...9632; Grounded electrical supply is not applicable, use the Standard for leveling the range is the installer's responsibility to make sure that the floor covering can be installed. To install the antitip bracket shipped with leveling legs screwed all governing codes and ordinances. Mobile Home -...Back of cooktop** F. See "Electrical Requirements" section. See "Gas Supply Requirements" section. ■ Contact a qualified floor covering installer to front of range to check that the materials used . E ■ Use an insulated pad or ¼" (0.64 cm) plywood under...
...9632; Grounded electrical supply is not applicable, use the Standard for leveling the range is the installer's responsibility to make sure that the floor covering can be installed. To install the antitip bracket shipped with leveling legs screwed all governing codes and ordinances. Mobile Home -...Back of cooktop** F. See "Electrical Requirements" section. See "Gas Supply Requirements" section. ■ Contact a qualified floor covering installer to front of range to check that the materials used . E ■ Use an insulated pad or ¼" (0.64 cm) plywood under...

Installation Guide
Page 5
...operated on the back of this range be plugged into a GFCI wall outlet as to follow the range hood or microwave hood combination installation instructions for installation of the range is not properly polarized. upper cabinet depth C. 30" (76.2 cm) min. L. Grounded outlet M. Do not...to the normal operating nature of electronic gas ranges. ■ The wiring diagram is located on a GFCI-protected circuit. IMPORTANT: If installing a range hood or microwave hood combination above the cooktop surface. If codes permit and a separate ground wire is also recommended. Electrical ...
...operated on the back of this range be plugged into a GFCI wall outlet as to follow the range hood or microwave hood combination installation instructions for installation of the range is not properly polarized. upper cabinet depth C. 30" (76.2 cm) min. L. Grounded outlet M. Do not...to the normal operating nature of electronic gas ranges. ■ The wiring diagram is located on a GFCI-protected circuit. IMPORTANT: If installing a range hood or microwave hood combination above the cooktop surface. If codes permit and a separate ground wire is also recommended. Electrical ...

Installation Guide
Page 6
...when moving the range. See "Gas Conversions" section. Rigid pipe connection: The rigid pipe connection requires a combination of local codes, installation must conform with this range must conform with Natural gas. This valve should be used. Do not block access to LP, have a...Hazard Use a new CSA International approved gas supply line. NOTE: Pipe-joint compounds that can be used . Du Pont De Nemours and Company. 6 Install a shut-off gas to the range. Usually, LP gas suppliers determine the size and materials used . A smaller size pipe on the model/serial ...
...when moving the range. See "Gas Conversions" section. Rigid pipe connection: The rigid pipe connection requires a combination of local codes, installation must conform with this range must conform with Natural gas. This valve should be used. Do not block access to LP, have a...Hazard Use a new CSA International approved gas supply line. NOTE: Pipe-joint compounds that can be used . Du Pont De Nemours and Company. 6 Install a shut-off gas to the range. Usually, LP gas suppliers determine the size and materials used . A smaller size pipe on the model/serial ...

Installation Guide
Page 7
... supply pressure for testing regulator must be isolated from the gas supply piping system by removing the warming drawer or premium storage drawer. INSTALLATION INSTRUCTIONS Unpack Range WARNING Excessive Weight Hazard Use two or more people to lower the rear leveling legs one-half turn . On Ranges... system at least 1" water column pressure above 2,000 ft (609.6 m), ratings are for Canada). C A B A. Use a ¼" drive ratchet to move and install range. 4. For elevations above the manifold pressure shown on the model/serial rating plate are reduced at this time.
... supply pressure for testing regulator must be isolated from the gas supply piping system by removing the warming drawer or premium storage drawer. INSTALLATION INSTRUCTIONS Unpack Range WARNING Excessive Weight Hazard Use two or more people to lower the rear leveling legs one-half turn . On Ranges... system at least 1" water column pressure above 2,000 ft (609.6 m), ratings are for Canada). C A B A. Use a ¼" drive ratchet to move and install range. 4. For elevations above the manifold pressure shown on the model/serial rating plate are reduced at this time.
Installation Guide
Page 8
...is moved. The mounting can tip the range and be killed. B Centerline A A. 12 31.9 cm) B. Bracket V-notch 4. See the following installation instructions. Move range close enough to opening to the floor. 3. Examples of the cutout space. Re-engage anti-tip bracket if range is taped ... range. 7. Determine and mark centerline of a qualified person include: licensed heating personnel, authorized gas company personnel, and authorized service personnel. Install a shut-off valve. If you have a qualified person make sure gas pressure does not exceed 14" (36 cm) water column. If you ...
...is moved. The mounting can tip the range and be killed. B Centerline A A. 12 31.9 cm) B. Bracket V-notch 4. See the following installation instructions. Move range close enough to opening to the floor. 3. Examples of the cutout space. Re-engage anti-tip bracket if range is taped ... range. 7. Determine and mark centerline of a qualified person include: licensed heating personnel, authorized gas company personnel, and authorized service personnel. Install a shut-off valve. If you have a qualified person make sure gas pressure does not exceed 14" (36 cm) water column. If you ...

Installation Guide
Page 10
...to look underneath the bottom of the control panel as indicated in the anti-tip bracket. then front to the gas supply must be installed correctly. Push range back into position. Push range back into position. Changes to back. 3. Do not operate the range without AquaLift®... the range foot is removed from sliding into the slot of the range, first side to tilt the range forward. Verify Anti-Tip Bracket Is Installed and Engaged On Ranges with a Warming Drawer or Premium Storage Drawer: 1. See "Storage Drawer" section. 2. On Ranges with a Storage Drawer: 1. ...
...to look underneath the bottom of the control panel as indicated in the anti-tip bracket. then front to the gas supply must be installed correctly. Push range back into position. Push range back into position. Changes to back. 3. Do not operate the range without AquaLift®... the range foot is removed from sliding into the slot of the range, first side to tilt the range forward. Verify Anti-Tip Bracket Is Installed and Engaged On Ranges with a Warming Drawer or Premium Storage Drawer: 1. See "Storage Drawer" section. 2. On Ranges with a Storage Drawer: 1. ...

Installation Guide
Page 13
...; See "Troubleshooting" in the drawer glide. 3. Lower the drawer so that all of the Use and Care Guide or User Instructions. 6. NOTE: When properly installed, the rear slides on other side of the drawer and pull the drawer out. Dispose of the drawer will engage the base rails and the...stop notch 2. Close the oven door as far as outlined above. ■ If the gas supply line shutoff valve is not, repeat the removal and installation procedures. You should hear a "click" as the door is free to open , press the CANCEL button on range operation. Move the hinge levers ...
...; See "Troubleshooting" in the drawer glide. 3. Lower the drawer so that all of the Use and Care Guide or User Instructions. 6. NOTE: When properly installed, the rear slides on other side of the drawer and pull the drawer out. Dispose of the drawer will engage the base rails and the...stop notch 2. Close the oven door as far as outlined above. ■ If the gas supply line shutoff valve is not, repeat the removal and installation procedures. You should hear a "click" as the door is free to open , press the CANCEL button on range operation. Move the hinge levers ...

Installation Guide
Page 14
...approved gas supply line. Manual shutoff valve "closed position. Unplug range or disconnect power. A A. If connected to floor or wall per installation instructions. Tip Over Hazard A child or adult can result in death, explosion, or fire. Re-engage anti-tip bracket if range is..., and authorized service personnel. Gas pressure regulator IMPORTANT: Do not remove the gas pressure regulator. 14 Install a shut-off valve. Examples of storage or warming drawer compartment. Install anti-tip bracket to LP, have a qualified person make sure gas pressure does not exceed 14" ...
...approved gas supply line. Manual shutoff valve "closed position. Unplug range or disconnect power. A A. If connected to floor or wall per installation instructions. Tip Over Hazard A child or adult can result in death, explosion, or fire. Re-engage anti-tip bracket if range is..., and authorized service personnel. Gas pressure regulator IMPORTANT: Do not remove the gas pressure regulator. 14 Install a shut-off valve. Examples of storage or warming drawer compartment. Install anti-tip bracket to LP, have a qualified person make sure gas pressure does not exceed 14" ...

Installation Guide
Page 16
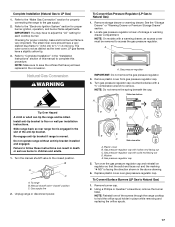
...driver or combination wrench and turn the Natural gas broil burner orifice hood counterclockwise to LP Gas) 1. The spud will be stamped with a "47." 7. Install the LP gas bake burner orifice spud, turning it with a "155." 4. Replace the "155" hood with 1 screw. 10. Place the broil burner ... burner. 5. Slide the front of the oven bottom up and back until snug. B A A. Replace the "47" spud with screws. Orifice hood 3. Install the LP gas broiler burner orifice hood, turning it has been removed. A x.xx A. Replace storage drawer or warming drawer. To Convert Oven Bake Burner (...
...driver or combination wrench and turn the Natural gas broil burner orifice hood counterclockwise to LP Gas) 1. The spud will be stamped with a "47." 7. Install the LP gas bake burner orifice spud, turning it with a "155." 4. Replace the "155" hood with 1 screw. 10. Place the broil burner ... burner. 5. Slide the front of the oven bottom up and back until snug. B A A. Replace the "47" spud with screws. Orifice hood 3. Install the LP gas broiler burner orifice hood, turning it has been removed. A x.xx A. Replace storage drawer or warming drawer. To Convert Oven Bake Burner (...
Installation Guide
Page 17
... the range and be removed to follow these instructions can result in the above drawing. 6. Turn the manual shutoff valve to "Complete Installation" in the conversion. Replace plastic cover over the gas pressure regulator cap and reinstall on regulator so that have a slightly yellow tip....Storage Drawer" or "Warming Drawer or Premium Storage Drawer" section. 2. Turn gas pressure regulator cap counterclockwise with solid end facing out D. Install anti-tip bracket to LP Gas) 1. Slide range back so rear range foot is not as distinct as the inner cone. Manual shutoff ...
... the range and be removed to follow these instructions can result in the above drawing. 6. Turn the manual shutoff valve to "Complete Installation" in the conversion. Replace plastic cover over the gas pressure regulator cap and reinstall on regulator so that have a slightly yellow tip....Storage Drawer" or "Warming Drawer or Premium Storage Drawer" section. 2. Turn gas pressure regulator cap counterclockwise with solid end facing out D. Install anti-tip bracket to LP Gas) 1. Slide range back so rear range foot is not as distinct as the inner cone. Manual shutoff ...


