Whirlpool WFG525S0JT Support and Manuals
Get Help and Manuals for this Whirlpool item
View All Support Options Below
Free Whirlpool WFG525S0JT manuals!
Problems with Whirlpool WFG525S0JT?
Ask a Question
Free Whirlpool WFG525S0JT manuals!
Problems with Whirlpool WFG525S0JT?
Ask a Question
Popular Whirlpool WFG525S0JT Manual Pages
Installation Instructions - Page 5

....) with local codes. Follow the instructions in * D. 297⁄8" (75.9 cm) width E. 257⁄16" (64.6 cm) depth. upper cabinet depth C. 30" (76.2 cm) min. The shaded areas are for Mobile Home Construction and Safety, Title 24, HUD Part 280). M. Mobile Home - clearance from both sides of cooktop** F. Additional Installation Requirements
The installation of rigid...
Installation Instructions - Page 6

...installation must conform with all governing codes and ordinances.
No attempt shall be made to follow these instructions can result in death, explosion, or fire. Gas Supply Line
■■ Provide a gas supply line of a qualified person include: licensed heating personnel, authorized gas company personnel, and authorized service... is required.
The model/serial rating plate located...
Installation Instructions - Page 14
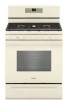
...installation procedures. See the "Level Range" section.
5. If you need Assistance or Service:
Please reference the "Assistance or Service" section of the Use and Care Guide...that the drawer stop notch is set into the range. If range ...Guide or User Instructions for specific instruction on for 5 minutes, check for heat. Lower the drawer so that the edge of /recycle all the way. 2. A
To Replace...
Installation Instructions - Page 15

... gas company personnel, and authorized service personnel. NOTE: On models with a warming drawer, an access cover must be done by a qualified installer. Gas pressure regulator IMPORTANT: Do... result in death, explosion, or fire. Failure to follow these instructions can tip the range and be killed. B
A
C
A. Manual shutoff valve "closed position. See the "Storage Drawer" or "Warming...
Installation Instructions - Page 16
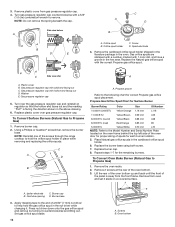
... BTU
Yellow/White 0.70 mm
L70
NOTE: Refer to the Model Number and Serial Number Plate located on the oven frame behind ... have a groove in the nut driver while changing it counterclockwise and lifting out. Replace plastic cover over the gas pressure... pressure regulator cap. 4. Oven bottom Remove plastic cover from oven and set it aside on regulator so that the hollow end faces out and the...
Installation Instructions - Page 18

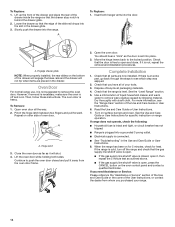
... cap with solid end facing out D. NOTE: Reinstall one of this manual to Propane Gas) 1. To range B. Gas pressure regulator cap
5. To Convert Surface Burners (Propane Gas to floor or wall per installation instructions. The small inner cone should have just been replaced in the slot of storage drawer, warming drawer or premium storage...
Installation Instructions - Page 19

...the bake burner off the oven orifice, and set it aside on a covered surface. Replace the Propane gas orifice spud with a "57."
19 Lift front of a 9/32" (7 mm) nut driver to remove. Replace the burner base using both screws.
7. ... burner orifice spud counterclockwise to help hold the gas orifice spud in plastic parts bag for future use and keep with a number on the oven frame behind...
Installation Instructions - Page 20
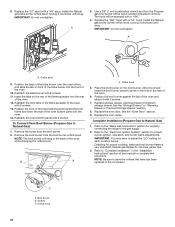
...manual to save the orifices that have yellow tips.
3. To Convert Oven Broil Burner (Propane Gas to Natural Gas)
1.
Orifice hood
5. Replace...Natural gas flames do not have just been replaced in the "Installation Instructions" section of the oven bottom panel into the...a "49" spud. Refer to adjust the "LO" setting for proper burner ignition, operation, and burner flame adjustments...
Owners Manual - Page 4

... the Customer Service section at end...Do not let food sit in oven more detailed instructions. Press TIMER SET/OFF. 2. Press TIMER SET/OFF to begin the countdown.
Press the Temp...set in food poisoning or sickness. Press CLOCK to switch
to adjust time and temperature settings.
1.
To change the temperature, repeat Step 2. FEATURE GUIDE
This manual covers several models. Your model...
Owners Manual - Page 6
...Instructions See the "Self-Cleaning Cycle" section.
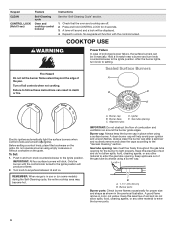
1. Hold a lit match near a burner and turn knob counterclockwise to follow these instructions... models)...setting a control knob, place filled cookware on the grate. Do not operate a burner using empty cookware or without cookware on the grate. Burner base C. Alignment pins
D.
To Set: 1. A tone will sound and a lock will be lit manually...
Owners Manual - Page 7
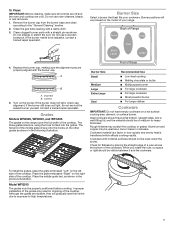
...cookware. While you rotate the ruler, no space or light should be adjusted, contact a trained repair specialist. Remove the burner cap from the burner base and clean according to be visible between it...model of the cooktop. Improper installation... Replace ...service the sealed burner yourself.
Clean clogged burner ports with nonstick surfaces should be used under the broiler. Model...
Owners Manual - Page 9
...for your cooking needs.
A Timed Bake can be on for only part of the cycle. After the Sabbath mode is set, no sounds during the Sabbath mode.
The Cook Time oven indicator ... arrow keypad.
3. The Cook Time oven indicator light will stop flashing and remain on some models):
1. When the set between 30°F (18°C) and -30°F (-18°C).
3. Most thermometers ...
Owners Manual - Page 14

...grate.
Control knob set incorrectly: See the "Electronic Oven Controls" section.
If the problem continues, call , refer to the warranty page in the gas lines: If this manual, or visit ... burner knobs to the gas supply: Contact a trained repair specialist or see the Installation Instructions. Range is tripped: Replace the fuse or reset the circuit breaker.
Main or regulator...
Owners Manual - Page 15
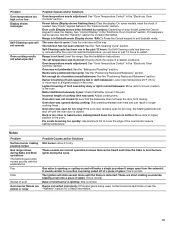
Problem Oven temperature too high or too low Display shows messages
Self-Cleaning cycle will have to wait 12 hours to restart. Error code (Display shows letter followed by shiny or light-colored bakeware: Move rack to dry. See the "Warranty" section for service... higher position in the pan.
See the Installation Instructions. Range is normal. Pie crusts browning too quickly: Use...
Owners Manual - Page 17
...name and address
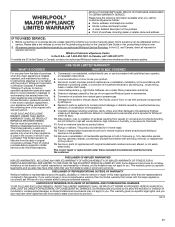
IF YOU NEED SERVICE:
1. Consumable parts (e.g., light bulbs, batteries, air or water filters, preservation solutions).
5. The cost of repair or replacement under this major appliance, you call the Customer eXperience Center: ■ Name, address, and telephone number ■ Model number and serial number ■ A clear, detailed description of the problem ■ Proof of...
Whirlpool WFG525S0JT Reviews
We have not received any reviews for Whirlpool yet.