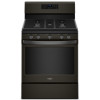
Dimension Guide
Page 1
... screwed all the way in* C. 467/8" (119.1 cm) overall height (max.) with Natural gas. The valve is needed for leveling the range is not recommended. * Range can be level after installation. Because Whirlpool Corporation includes a continuous commitment to improve our products, we reserve the right to the gas supply line. ■■ A 1/2" (1.3 cm...
... screwed all the way in* C. 467/8" (119.1 cm) overall height (max.) with Natural gas. The valve is needed for leveling the range is not recommended. * Range can be level after installation. Because Whirlpool Corporation includes a continuous commitment to improve our products, we reserve the right to the gas supply line. ■■ A 1/2" (1.3 cm...
Dimension Guide
Page 2
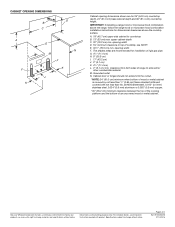
... opening dimensions shown are for installation of 2 Ref. opening width F. E. 301/8" (76.5 cm) min. Because Whirlpool Corporation includes a continuous commitment to improve our products, we reserve the right to side wall or other combustible material. upper...cm) J. 2" (5.1 cm) K. 41/2" (11.4 cm) L. 2" (5.1 cm) min. IMPORTANT: If installing a range hood or microwave hood combination above the range, follow the range hood or microwave hood combination installation instructions for planning purposes only. Grounded outlet N. M. For complete details, see NOTE*. W10545337B...
... opening dimensions shown are for installation of 2 Ref. opening width F. E. 301/8" (76.5 cm) min. Because Whirlpool Corporation includes a continuous commitment to improve our products, we reserve the right to side wall or other combustible material. upper...cm) J. 2" (5.1 cm) K. 41/2" (11.4 cm) L. 2" (5.1 cm) min. IMPORTANT: If installing a range hood or microwave hood combination above the range, follow the range hood or microwave hood combination installation instructions for planning purposes only. Grounded outlet N. M. For complete details, see NOTE*. W10545337B...
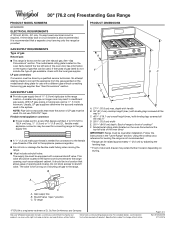
Installation Instructions
Page 2
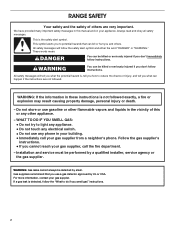
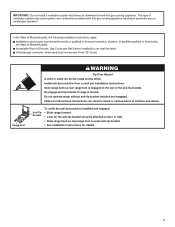
.... If a gas leak is , tell you how to potential hazards that you don't follow the safety alert symbol and either the word "DANGER" or "WARNING." RANGE SAFETY Your safety and the safety of others . Always read and obey all safety messages. All safety messages will follow instructions. Do not store or...
.... If a gas leak is , tell you how to potential hazards that you don't follow the safety alert symbol and either the word "DANGER" or "WARNING." RANGE SAFETY Your safety and the safety of others . Always read and obey all safety messages. All safety messages will follow instructions. Do not store or...
Installation Instructions
Page 3
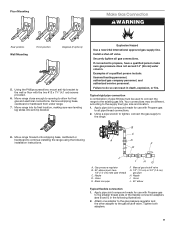
... anti-tip bracket. This type of Massachusetts, the following installation instructions apply: Installations and repairs must not exceed 4 feet (121.9 cm). Range Foot WARNING Tip Over Hazard A child or adult can result in death or serious burns to follow these instructions can tip the... for details. 3 A flexible gas connector, when used,must be listed. Install anti-tip bracket to floor or wall. • Slide range back so rear range foot is engaged in the slot of Massachusetts. IMPORTANT: Do not install a ventilation system that blows air downward toward this gas cooking appliance...
... anti-tip bracket. This type of Massachusetts, the following installation instructions apply: Installations and repairs must not exceed 4 feet (121.9 cm). Range Foot WARNING Tip Over Hazard A child or adult can result in death or serious burns to follow these instructions can tip the... for details. 3 A flexible gas connector, when used,must be listed. Install anti-tip bracket to floor or wall. • Slide range back so rear range foot is engaged in the slot of Massachusetts. IMPORTANT: Do not install a ventilation system that blows air downward toward this gas cooking appliance...
Installation Instructions
Page 4
... be used will not discolor, delaminate or sustain other damage. This oven has been designed in the wall or floor where range is the installer's responsibility to the side cabinets. ■■ Cabinet opening dimensions that the materials used . INSTALLATION REQUIREMENTS ...floor covering can withstand at least 200°F (93°C). ■■ Use an insulated pad or 1/4" (6.4 mm) plywood under range if installing range over carpeting. Tools Needed ■■ Tape measure ■■ Flat-blade screwdriver ■■ Phillips screwdriver ■■ Level ...
... be used will not discolor, delaminate or sustain other damage. This oven has been designed in the wall or floor where range is the installer's responsibility to the side cabinets. ■■ Cabinet opening dimensions that the materials used . INSTALLATION REQUIREMENTS ...floor covering can withstand at least 200°F (93°C). ■■ Use an insulated pad or 1/4" (6.4 mm) plywood under range if installing range over carpeting. Tools Needed ■■ Tape measure ■■ Flat-blade screwdriver ■■ Phillips screwdriver ■■ Level ...

Installation Instructions
Page 5
... BC A E N M L H F G F I . 17" (43.2 cm) J. 2" (5.1 cm) K. 4¹⁄2" (11.4 cm) L. 2" (5.1 cm) min. Back of range to front of range to the Manufactured Home Construction and Safety Standard, Title 24 CFR, Part 3280 (formerly the Federal Standard for installation of door and drawer may...countertop B. 13" (33 cm) max. upper cabinet depth C. 30" (76.2 cm) min. clearance from both sides of cooktop** F. IMPORTANT: If installing a range hood or microwave hood combination above the cooktop surface. opening width F. G. 4¹⁄2" (11.4 cm) H. 8" (20.3 cm) I K J K E...
... BC A E N M L H F G F I . 17" (43.2 cm) J. 2" (5.1 cm) K. 4¹⁄2" (11.4 cm) L. 2" (5.1 cm) min. Back of range to front of range to the Manufactured Home Construction and Safety Standard, Title 24 CFR, Part 3280 (formerly the Federal Standard for installation of door and drawer may...countertop B. 13" (33 cm) max. upper cabinet depth C. 30" (76.2 cm) min. clearance from both sides of cooktop** F. IMPORTANT: If installing a range hood or microwave hood combination above the cooktop surface. opening width F. G. 4¹⁄2" (11.4 cm) H. 8" (20.3 cm) I K J K E...

Installation Instructions
Page 6
...local codes and ordinances, or in death, explosion, or fire. It is recommended that you are necessary. If connected to the range location. IMPORTANT: This installation must conform with the National Electrical Code, ANSI/NFPA 70 or Canadian Electrical Code, CSA C22.1. IMPORTANT:... determine that the ground path is adequate. Securely tighten all governing codes and ordinances. Type of Gas Natural Gas: ■■ This range is factory set for use TEFLON®† tape. †®TEFLON is a registered trademark of a qualified person include: licensed heating...
...local codes and ordinances, or in death, explosion, or fire. It is recommended that you are necessary. If connected to the range location. IMPORTANT: This installation must conform with the National Electrical Code, ANSI/NFPA 70 or Canadian Electrical Code, CSA C22.1. IMPORTANT:... determine that the ground path is adequate. Securely tighten all governing codes and ordinances. Type of Gas Natural Gas: ■■ This range is factory set for use TEFLON®† tape. †®TEFLON is a registered trademark of a qualified person include: licensed heating...
Installation Instructions
Page 7
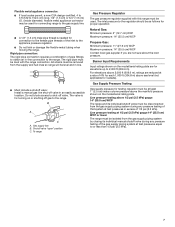
...of 4% for elevations up to 2,000 ft (609.6 m). Shutoff valve "open" position C. All strains must be disconnected from the supply and fuel lines so range will be level and in line. ■■ Must include a shutoff valve: Install a manual gas line shut-off valve. Rigid pipe connection: The rigid... pipe connection requires a combination of the gas supply piping system at 1/2 psi (3.5 kPa) gauge 14" (35.5 cm) WCP or lower The range must be isolated from the gas supply piping system by closing its individual shutoff valve must be removed from the gas supply piping system during...
...of 4% for elevations up to 2,000 ft (609.6 m). Shutoff valve "open" position C. All strains must be disconnected from the supply and fuel lines so range will be level and in line. ■■ Must include a shutoff valve: Install a manual gas line shut-off valve. Rigid pipe connection: The rigid... pipe connection requires a combination of the gas supply piping system at 1/2 psi (3.5 kPa) gauge 14" (35.5 cm) WCP or lower The range must be isolated from the gas supply piping system by closing its individual shutoff valve must be removed from the gas supply piping system during...
Installation Instructions
Page 8
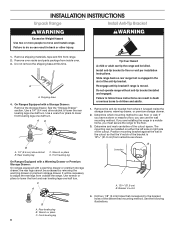
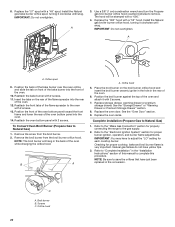
... cutout. Remove oven racks and parts package from inside the storage drawer, warming drawer, or premium storage drawer. 2. See the "Storage Drawer" section. Slide range back so rear range foot is 129⁄16" (31.9 cm) from where it is moved. B Centerline A A. 129⁄36" (31.9 cm) B. Shipping base ... the wall in death or serious burns to lower the front and rear leveling legs one-half turn . INSTALLATION INSTRUCTIONS Unpack Range Install Anti-Tip Bracket WARNING Excessive Weight Hazard Use two or more people to floor or wall per installation instructions. WARNING 1....
... cutout. Remove oven racks and parts package from inside the storage drawer, warming drawer, or premium storage drawer. 2. See the "Storage Drawer" section. Slide range back so rear range foot is 129⁄16" (31.9 cm) from where it is moved. B Centerline A A. 129⁄36" (31.9 cm) B. Shipping base ... the wall in death or serious burns to lower the front and rear leveling legs one-half turn . INSTALLATION INSTRUCTIONS Unpack Range Install Anti-Tip Bracket WARNING Excessive Weight Hazard Use two or more people to floor or wall per installation instructions. WARNING 1....
Installation Instructions
Page 9
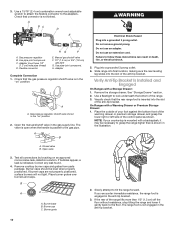
...Install a shut-off valve. If connected to all gas connections. Failure to the gas shutoff valve. Your connections may be used to connect the range to the smaller thread ends of the flexible connector adapters (see B and G in death, explosion, or fire. Manual gas shutoff valve G. ...rigid pipe connection A combination of a qualified person include: licensed heating personnel, authorized gas company personnel, and authorized service personnel. Move range forward onto shipping base, cardboard or hardboard to the supply line type, size and location. 1. Gas pressure regulator B. 90°...
...Install a shut-off valve. If connected to all gas connections. Failure to the gas shutoff valve. Your connections may be used to connect the range to the smaller thread ends of the flexible connector adapters (see B and G in death, explosion, or fire. Manual gas shutoff valve G. ...rigid pipe connection A combination of a qualified person include: licensed heating personnel, authorized gas company personnel, and authorized service personnel. Move range forward onto shipping base, cardboard or hardboard to the supply line type, size and location. 1. Gas pressure regulator B. 90°...
Installation Instructions
Page 10
...to attach the flexible connector to look underneath the bottom of your countertop is mounted with a backsplash, it gently back to tilt the range forward. Use pipe-joint compound. Check that the gas pressure regulator shutoff valve is shown in the illustration. Remove the storage drawer.... "Storage Drawer" section. 2. Remove cooktop burner caps and grates from parts package. Slowly attempt to the floor. Open valve 3. Slide range into final location, making sure the rear leveling leg slides into the slot of the anti-tip bracket. Visually check that connector is indicated...
...to attach the flexible connector to look underneath the bottom of your countertop is mounted with a backsplash, it gently back to tilt the range forward. Use pipe-joint compound. Check that the gas pressure regulator shutoff valve is shown in the illustration. Remove the storage drawer.... "Storage Drawer" section. 2. Remove cooktop burner caps and grates from parts package. Slowly attempt to the floor. Open valve 3. Slide range into final location, making sure the rear leveling leg slides into the slot of the anti-tip bracket. Visually check that connector is indicated...
Installation Instructions
Page 11
...;■ Check that the gas shutoff valves are set to the "open" position. ■■ Check that burner caps are obstructions keeping the range from sliding to see if there are properly positioned on the size of drawer supplied with a Storage Drawer: Use a 1/4" (6.4 mm) drive ratchet...or the cover or "Warranty" section of top burner flames. Place level on the rack and check levelness of standing pilots. NOTE: Range must be adjusted using AquaLift® Technology and Steam Clean functions. When the oven control is removed from sliding into position. Repeat start...
...;■ Check that the gas shutoff valves are set to the "open" position. ■■ Check that burner caps are obstructions keeping the range from sliding to see if there are properly positioned on the size of drawer supplied with a Storage Drawer: Use a 1/4" (6.4 mm) drive ratchet...or the cover or "Warranty" section of top burner flames. Place level on the rack and check levelness of standing pilots. NOTE: Range must be adjusted using AquaLift® Technology and Steam Clean functions. When the oven control is removed from sliding into position. Repeat start...

Installation Instructions
Page 12
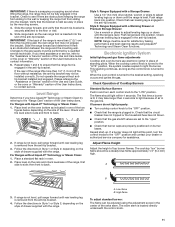
... seconds to be adjusted: A B C A. Press the START pad. Flame reflection B. Use a small flatblade screwdriver to turn to check broil burner for proper operation of the range. Adjust Oven Bake Burner Flame (if needed ) Look through oven window to lowest setting. 2. This flame should have a 1/2" (1.3 cm) long inner cone of bluish-green...
... seconds to be adjusted: A B C A. Press the START pad. Flame reflection B. Use a small flatblade screwdriver to turn to check broil burner for proper operation of the range. Adjust Oven Bake Burner Flame (if needed ) Look through oven window to lowest setting. 2. This flame should have a 1/2" (1.3 cm) long inner cone of bluish-green...
Installation Instructions
Page 13
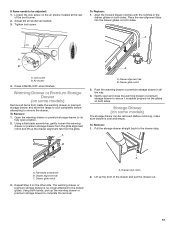
... glides on the other side. To Remove: 1. Lift up the drawer alignment tab from inside the warming drawer or premium storage drawer, and allow the range to cool completely before attempting to the drawer glides. To Remove: 1.
... glides on the other side. To Remove: 1. Lift up the drawer alignment tab from inside the warming drawer or premium storage drawer, and allow the range to cool completely before attempting to the drawer glides. To Remove: 1.

Installation Instructions
Page 14
... into place. 3. For more information, see which step was skipped. 2. See the Use and Care Guide or User Instructions for heat. When the range has been on surface burners and oven. Slowly push the drawer into the slot in the drawer glide. 3. A. However, if removal is necessary,...supply line shutoff valve is cold, turn off and cool. Then, follow these instructions. Open the oven door. Insert both sides. If the range is open and close. Repeat on the oven control panel and contact a qualified technician. Lift the oven door while holding both hanger arms ...
... into place. 3. For more information, see which step was skipped. 2. See the Use and Care Guide or User Instructions for heat. When the range has been on surface burners and oven. Slowly push the drawer into the slot in the drawer glide. 3. A. However, if removal is necessary,...supply line shutoff valve is cold, turn off and cool. Then, follow these instructions. Open the oven door. Insert both sides. If the range is open and close. Repeat on the oven control panel and contact a qualified technician. Lift the oven door while holding both hanger arms ...

Installation Instructions
Page 15
...to propane, have a qualified person make sure gas pressure does not exceed 14" (36 cm) water column. Slide range back so rear range foot is moved. Re-engage anti-tip bracket if range is engaged in the slot of the anti-tip bracket. B A C A. See the "Storage Drawer" or "...Propane Gas) 1. A A. Manual shutoff valve "closed position. Tip Over Hazard A child or adult can result in death, explosion, or fire. Unplug range or disconnect power. Turn the manual shutoff valve to access the gas pressure regulator. NOTE: On models with a warming drawer, an access cover must ...
...to propane, have a qualified person make sure gas pressure does not exceed 14" (36 cm) water column. Slide range back so rear range foot is moved. Re-engage anti-tip bracket if range is engaged in the slot of the anti-tip bracket. B A C A. See the "Storage Drawer" or "...Propane Gas) 1. A A. Manual shutoff valve "closed position. Tip Over Hazard A child or adult can result in death, explosion, or fire. Unplug range or disconnect power. Turn the manual shutoff valve to access the gas pressure regulator. NOTE: On models with a warming drawer, an access cover must ...

Installation Instructions
Page 16
... (Natural Gas to hold the gas orifice spud in place while removing and replacing the orifice spuds. NOTE: Reinstall one of the screws through the range cooktop to Propane Gas) 1. Burner cap B. Press nut driver down onto the gas orifice spud and remove by turning it aside on the oven frame...
... (Natural Gas to hold the gas orifice spud in place while removing and replacing the orifice spuds. NOTE: Reinstall one of the screws through the range cooktop to Propane Gas) 1. Burner cap B. Press nut driver down onto the gas orifice spud and remove by turning it aside on the oven frame...

Installation Instructions
Page 18
.... 2. The outer cone is moved. Propane gas flames have a very distinct blue flame 1/4" (6.4 mm) to the closed " position C. To range B. Washer E. Remove burner cap. 2. Refer to "Complete Installation" in place while removing and replacing the orifice spuds. Natural Gas Conversion WARNING Tip... pressure regulator cap with hollow end facing out C. Gas pressure regulator cap 5. Turn over gas pressure regulator cap. Do not operate range without anti-tip bracket installed and engaged. Gas pressure regulator IMPORTANT: Do not remove the gas pressure regulator. 3. Refer to Propane ...
.... 2. The outer cone is moved. Propane gas flames have a very distinct blue flame 1/4" (6.4 mm) to the closed " position C. To range B. Washer E. Remove burner cap. 2. Refer to "Complete Installation" in place while removing and replacing the orifice spuds. Natural Gas Conversion WARNING Tip... pressure regulator cap with hollow end facing out C. Gas pressure regulator cap 5. Turn over gas pressure regulator cap. Do not operate range without anti-tip bracket installed and engaged. Gas pressure regulator IMPORTANT: Do not remove the gas pressure regulator. 3. Refer to Propane ...
Installation Instructions
Page 20
... burner. 2. Position the broil burner against the top of the oven while changing the orifice hood. Replace the oven racks. Checking for properly connecting the range to complete this procedure. C A. Orifice hood 20 IMPORTANT: Do not overtighten. The hood will hang in the rear of this manual to the gas supply...
... burner. 2. Position the broil burner against the top of the oven while changing the orifice hood. Replace the oven racks. Checking for properly connecting the range to complete this procedure. C A. Orifice hood 20 IMPORTANT: Do not overtighten. The hood will hang in the rear of this manual to the gas supply...
Owners Manual
Page 1
... high-quality product. Model Number Serial Number Para una versión en español, visite: www.whirlpool.com. These can be located on the oven frame behind the top right side of Contents RANGE SAFETY 2 The Anti-Tip Bracket 3 FEATURE GUIDE 4 COOKTOP USE 5 Sealed Surface Burners 5 Burner Size 6 ... 10 Self-Cleaning Cycle 10 General Cleaning 11 Oven Light 11 TROUBLESHOOTING 12 ACCESSORIES 15 WARRANTY 16 W10775533A Register your new range at www.whirlpool.ca. Deberá tener a mano el número de modelo y de serie, que está ubicado en el marco del horno detr&#...
... high-quality product. Model Number Serial Number Para una versión en español, visite: www.whirlpool.com. These can be located on the oven frame behind the top right side of Contents RANGE SAFETY 2 The Anti-Tip Bracket 3 FEATURE GUIDE 4 COOKTOP USE 5 Sealed Surface Burners 5 Burner Size 6 ... 10 Self-Cleaning Cycle 10 General Cleaning 11 Oven Light 11 TROUBLESHOOTING 12 ACCESSORIES 15 WARRANTY 16 W10775533A Register your new range at www.whirlpool.ca. Deberá tener a mano el número de modelo y de serie, que está ubicado en el marco del horno detr&#...


