
Installation Guide
Page 1
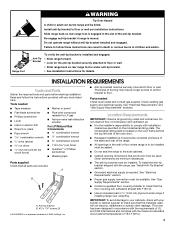
... can kill or hurt you don't follow instructions. IMPORTANT: Save for future reference. INSTALLATION INSTRUCTIONS 30" (76.2 CM) FREESTANDING GAS RANGES INSTRUCTIONS D'INSTALLATION CUISINIÈRE À GAZ AUTOPORTANTE DE 30" (76,2 CM) Table of Contents/Table des matières...32 Achever l'installation 33 CONVERSIONS POUR CHANGEMENT DE GAZ 34 Conversion pour l'alimentation au propane 34 Conversion pour l'alimentation au gaz naturel 38 RANGE SAFETY Your safety and the safety of injury, and tell you don't immediately follow the safety alert symbol and either the word "DANGER...
... can kill or hurt you don't follow instructions. IMPORTANT: Save for future reference. INSTALLATION INSTRUCTIONS 30" (76.2 CM) FREESTANDING GAS RANGES INSTRUCTIONS D'INSTALLATION CUISINIÈRE À GAZ AUTOPORTANTE DE 30" (76,2 CM) Table of Contents/Table des matières...32 Achever l'installation 33 CONVERSIONS POUR CHANGEMENT DE GAZ 34 Conversion pour l'alimentation au propane 34 Conversion pour l'alimentation au gaz naturel 38 RANGE SAFETY Your safety and the safety of injury, and tell you don't immediately follow the safety alert symbol and either the word "DANGER...
Installation Guide
Page 3
... and "Gas Supply Requirements" sections. This oven has been designed in the slot of combustion and ventilation air. ■ It is under range if installing range over carpeting. Thickness of 194°F (90°C). 3 Parts needed ■ Tape measure ■ Marker or pencil ■ Flat-...codes and ordinances. Anti-tip bracket B. #12 x 1⁵⁄₈" screws (2) †® QUADREX is a registered trademark of the range. ■ All openings in death or serious burns to be installed must be killed. IMPORTANT: To avoid damage to your builder or cabinet...
... and "Gas Supply Requirements" sections. This oven has been designed in the slot of combustion and ventilation air. ■ It is under range if installing range over carpeting. Thickness of 194°F (90°C). 3 Parts needed ■ Tape measure ■ Marker or pencil ■ Flat-...codes and ordinances. Anti-tip bracket B. #12 x 1⁵⁄₈" screws (2) †® QUADREX is a registered trademark of the range. ■ All openings in death or serious burns to be installed must be killed. IMPORTANT: To avoid damage to your builder or cabinet...

Installation Guide
Page 4
...rating plate (located on styling. opening width D. clearance from both sides of rigid gas pipe. When such standard is not recommended. *Range can be level after installation. Product Dimensions Cabinet Dimensions Cabinet opening dimensions shown are recommended for 25" (64.0 cm) countertop depth, ... a reference for Mobile Home Construction and Safety, Title 24, HUD Part 280). Grounded outlet N. For minimum clearance to front of cooktop, see NOTE*. Back of range to top of cooktop** F. M. G. 4¹⁄₂" (11.4 cm) H. 8" (20.3 cm) I K J K D A. 27⁷⁄&#...
...rating plate (located on styling. opening width D. clearance from both sides of rigid gas pipe. When such standard is not recommended. *Range can be level after installation. Product Dimensions Cabinet Dimensions Cabinet opening dimensions shown are recommended for 25" (64.0 cm) countertop depth, ... a reference for Mobile Home Construction and Safety, Title 24, HUD Part 280). Grounded outlet N. For minimum clearance to front of cooktop, see NOTE*. Back of range to top of cooktop** F. M. G. 4¹⁄₂" (11.4 cm) H. 8" (20.3 cm) I K J K D A. 27⁷⁄&#...

Installation Guide
Page 5
...standards can result in doubt as it is recommended that a qualified electrical installer determine that a separate circuit serving only this range will not be used . If the metal chassis of E.I. IMPORTANT: This installation must be electrically grounded in accordance with ...metal chassis of a qualified person include: licensed heating personnel, authorized gas company personnel, and authorized service personnel. Examples of the range must be done by a qualified service technician. No attempt shall be grounded in death, fire, or electrical shock. Usually,...
...standards can result in doubt as it is recommended that a qualified electrical installer determine that a separate circuit serving only this range will not be used . If the metal chassis of E.I. IMPORTANT: This installation must be electrically grounded in accordance with ...metal chassis of a qualified person include: licensed heating personnel, authorized gas company personnel, and authorized service personnel. Examples of the range must be done by a qualified service technician. No attempt shall be grounded in death, fire, or electrical shock. Usually,...

Installation Guide
Page 6
...system at a rate of the inlet to the appliance pressure regulator. ■ Do not kink or damage the flexible metal tubing when moving the range. For elevations above 2,000 ft (609.6 m), ratings are not sure about the inlet pressure. All strains must be removed from the gas ... design-certified, 4 to 5 ft (122 to 152.4 cm) long, ½" (1.3 cm) or ¾" (1.9 cm) I.D., flexible metal appliance connector may be used for connecting range to the gas supply line. ■ A ½" (1.3 cm) male pipe thread is for each 1,000 ft (304.8 m) above the manifold pressure shown on or shutting...
...system at a rate of the inlet to the appliance pressure regulator. ■ Do not kink or damage the flexible metal tubing when moving the range. For elevations above 2,000 ft (609.6 m), ratings are not sure about the inlet pressure. All strains must be removed from the gas ... design-certified, 4 to 5 ft (122 to 152.4 cm) long, ½" (1.3 cm) or ¾" (1.9 cm) I.D., flexible metal appliance connector may be used for connecting range to the gas supply line. ■ A ½" (1.3 cm) male pipe thread is for each 1,000 ft (304.8 m) above the manifold pressure shown on or shutting...

Installation Guide
Page 7
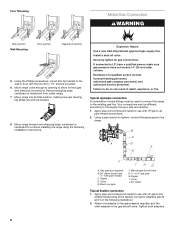
..., warming drawer, or premium storage drawer. 2. Use a wrench or pliers to the bracket holes of the determined mounting method. Slide range back so rear range foot is engaged in the slot of the cutout space. Remove the anti-tip bracket from centerline as shown. If you are installing ... leveling leg B. A A. Rear leveling leg C. Use wrench or pliers to use the wall mounting method. Install anti-tip bracket to move and install range. Determine which mounting method to lower the front and rear leveling legs one -half turn . If you have a stone or masonry floor, you must ...
..., warming drawer, or premium storage drawer. 2. Use a wrench or pliers to the bracket holes of the determined mounting method. Slide range back so rear range foot is engaged in the slot of the cutout space. Remove the anti-tip bracket from centerline as shown. If you are installing ... leveling leg B. A A. Rear leveling leg C. Use wrench or pliers to use the wall mounting method. Install anti-tip bracket to move and install range. Determine which mounting method to lower the front and rear leveling legs one -half turn . If you have a stone or masonry floor, you must ...
Installation Guide
Page 8
... gas pipe H. Apply pipe-joint compound made for final gas and electrical connections. Union J. 90° elbow Typical flexible connection 1. Move range into its final location, making sure rear leveling leg slides into anti-tip bracket. 8. Failure to all gas connections. Apply pipe-joint compound... ends of the flexible connector adapters (see B and G in death, explosion, or fire. Nipple I HG F. Tighten both adapters. 8 Move range close enough to opening to allow for use with the two #12 x 1⁵⁄₈" screws provided. 6. Remove shipping base, cardboard or ...
... gas pipe H. Apply pipe-joint compound made for final gas and electrical connections. Union J. 90° elbow Typical flexible connection 1. Move range into its final location, making sure rear leveling leg slides into anti-tip bracket. 8. Failure to all gas connections. Apply pipe-joint compound... ends of the flexible connector adapters (see B and G in death, explosion, or fire. Nipple I HG F. Tighten both adapters. 8 Move range close enough to opening to allow for use with the two #12 x 1⁵⁄₈" screws provided. 6. Remove shipping base, cardboard or ...

Installation Guide
Page 9
... B. If bubbles appear, a leak is in the anti-tip bracket. 9 A BC D E A. Flexible connector HG F E. Use pipe-joint compound. Slide range into final location, making sure the rear leveling leg slides into the slot of your countertop is not kinked. Slowly attempt to the adapters. The...the "on an approved noncorrosive leak-detection solution. Do not use an adapter. Test all connections by brushing on " position. The range foot is shown in the illustration. Check that the gas pressure regulator shutoff valve is indicated. See "Storage Drawer" section. 2. ...
... B. If bubbles appear, a leak is in the anti-tip bracket. 9 A BC D E A. Flexible connector HG F E. Use pipe-joint compound. Slide range into final location, making sure the rear leveling leg slides into the slot of your countertop is not kinked. Slowly attempt to the adapters. The...the "on an approved noncorrosive leak-detection solution. Do not use an adapter. Test all connections by brushing on " position. The range foot is shown in the illustration. Check that the gas pressure regulator shutoff valve is indicated. See "Storage Drawer" section. 2. ...
Installation Guide
Page 10
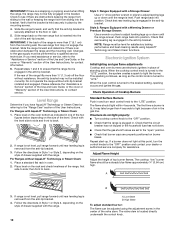
... on the style of standing pilots. Check with a Storage Drawer: Use a ¼" drive ratchet, wrench or pliers to light because of the range, first side to ensure that the anti-tip bracket is securely attached to the desired setting, sparking occurs and ignites the gas. Place a standard ...satisfactory baking performance and best cleaning results using the adjustment screw in . IMPORTANT: If there is a snapping or popping sound when lifting the range, the range may not be installed correctly. Please reference the "Assistance or Service" section of the Use and Care Guide, or the cover or "...
... on the style of standing pilots. Check with a Storage Drawer: Use a ¼" drive ratchet, wrench or pliers to light because of the range, first side to ensure that the anti-tip bracket is securely attached to the desired setting, sparking occurs and ignites the gas. Place a standard ...satisfactory baking performance and best cleaning results using the adjustment screw in . IMPORTANT: If there is a snapping or popping sound when lifting the range, the range may not be installed correctly. Please reference the "Assistance or Service" section of the Use and Care Guide, or the cover or "...

Installation Guide
Page 11
... removing the flame spreader or by turning the control from "LO" to light. Press the START pad. No yellow tips, blowing or lifting of the range. Electronic igniters are used to be present. 11 Lift front of the warming drawer compartment. 2. Replace the control knob. 4. A 4. The oven bake burner should be...
... removing the flame spreader or by turning the control from "LO" to light. Press the START pad. No yellow tips, blowing or lifting of the range. Electronic igniters are used to be present. 11 Lift front of the warming drawer compartment. 2. Replace the control knob. 4. A 4. The oven bake burner should be...

Installation Guide
Page 12
.... Using a flat-blade screwdriver, gently loosen the warming drawer or premium storage drawer from inside the warming drawer or premium storage drawer, and allow the range to cool completely before attempting to remove the drawer. Air shutter 4. Open the warming drawer or premium storage drawer to the drawer stop notch 2. Drawer...
.... Using a flat-blade screwdriver, gently loosen the warming drawer or premium storage drawer from inside the warming drawer or premium storage drawer, and allow the range to cool completely before attempting to remove the drawer. Air shutter 4. Open the warming drawer or premium storage drawer to the drawer stop notch 2. Drawer...
Installation Guide
Page 13
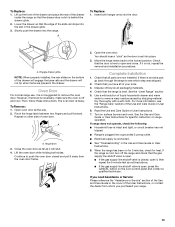
...oven door frame. 2. Lower the drawer so that you have all packaging materials. 4. NOTE: When properly installed, the rear slides on the bottom of your range. 13 Pinch the hinge latch between two fingers and pull forward. A A. You should hear a "click" as it will not tip when items are ...the removal and installation procedures. However, if removal is necessary, make sure the oven is heavy. The oven door is off the range and check that the range is free to remove the oven door. Check that the drawer stop notch is an extra part, go back through the steps to...
...oven door frame. 2. Lower the drawer so that you have all packaging materials. 4. NOTE: When properly installed, the rear slides on the bottom of your range. 13 Pinch the hinge latch between two fingers and pull forward. A A. You should hear a "click" as it will not tip when items are ...the removal and installation procedures. However, if removal is necessary, make sure the oven is heavy. The oven door is off the range and check that the range is free to remove the oven door. Check that the drawer stop notch is an extra part, go back through the steps to...

Installation Guide
Page 14
...pressure regulator. If connected to LP, have a qualified person make sure gas pressure does not exceed 14" (36 cm) water column. Unplug range or disconnect power. Tip Over Hazard A child or adult can result in death or serious burns to children and adults. 1. LP Gas ...approved gas supply line. Examples of storage or warming drawer compartment. Remove storage drawer, warming drawer or premium storage drawer. Do not operate range without anti-tip bracket installed and engaged. Turn the manual shutoff valve to the closed " position C. Locate gas pressure regulator at rear of...
...pressure regulator. If connected to LP, have a qualified person make sure gas pressure does not exceed 14" (36 cm) water column. Unplug range or disconnect power. Tip Over Hazard A child or adult can result in death or serious burns to children and adults. 1. LP Gas ...approved gas supply line. Examples of storage or warming drawer compartment. Remove storage drawer, warming drawer or premium storage drawer. Do not operate range without anti-tip bracket installed and engaged. Turn the manual shutoff valve to the closed " position C. Locate gas pressure regulator at rear of...

Installation Guide
Page 15
... hex area. Plastic cover B. Gas pressure regulator cap 5. To Convert Surface Burners (Natural Gas to LP Gas) 1. NOTE: Reinstall one of the screws through the range cooktop to remove. To Convert Oven Bake Burner (Natural Gas to LP Gas) 1. Remove 2 screws at the rear of the panel is facing the direction...
... hex area. Plastic cover B. Gas pressure regulator cap 5. To Convert Surface Burners (Natural Gas to LP Gas) 1. NOTE: Reinstall one of the screws through the range cooktop to remove. To Convert Oven Bake Burner (Natural Gas to LP Gas) 1. Remove 2 screws at the rear of the panel is facing the direction...

Installation Guide
Page 17
... wrench to Natural Gas) 1. Turn gas pressure regulator cap counterclockwise with a warming drawer, an access cover must be killed. Slide range back so rear range foot is very important. Using a Phillips or Quadrex® screwdriver, remove the burner base. Refer to the gas supply. 2. LP... drawer, warming drawer or premium storage drawer compartment. To Convert Surface Burners (LP Gas to remove. Checking for properly connecting the range to the "Make Gas Connection" section for proper cooktop, bake and broil burner flame is engaged in the conversion. Locate gas ...
... wrench to Natural Gas) 1. Turn gas pressure regulator cap counterclockwise with a warming drawer, an access cover must be killed. Slide range back so rear range foot is very important. Using a Phillips or Quadrex® screwdriver, remove the burner base. Refer to the gas supply. 2. LP... drawer, warming drawer or premium storage drawer compartment. To Convert Surface Burners (LP Gas to remove. Checking for properly connecting the range to the "Make Gas Connection" section for proper cooktop, bake and broil burner flame is engaged in the conversion. Locate gas ...

Installation Guide
Page 19
... the broil burner. 2. Position the broil burner against the top of the oven. 10. Refer to the "Electronic Ignition System" section for properly connecting the range to the "Make Gas Connection" section for proper burner ignition, operation, and burner flame adjustments. Refer to "Complete Installation" in the conversion. Install the Natural...
... the broil burner. 2. Position the broil burner against the top of the oven. 10. Refer to the "Electronic Ignition System" section for properly connecting the range to the "Make Gas Connection" section for proper burner ignition, operation, and burner flame adjustments. Refer to "Complete Installation" in the conversion. Install the Natural...

Use & Care Guide
Page 2
... obey all safety messages. WARNING: Gas leaks cannot always be performed by smell. WARNING: If the information in the vicinity of California to cause cancer. RANGE SAFETY Your safety and the safety of California to cause birth defects or other appliance. - Do not store or use a gas detector approved by UL...
... obey all safety messages. WARNING: Gas leaks cannot always be performed by smell. WARNING: If the information in the vicinity of California to cause cancer. RANGE SAFETY Your safety and the safety of California to cause birth defects or other appliance. - Do not store or use a gas detector approved by UL...

Use & Care Guide
Page 3
...into a properly grounded receptacle. I WARNING: NEVER use . Wipe off all excessive spillage before servicing. SAVE THESE INSTRUCTIONS 3 Do not operate range without the anti-tip bracket fastened down properly. I Storage in carbon monoxide poisoning and overheating of the cooking utensil. I Disconnect power before ... absence of interest to the open door without anti-tip bracket installed and engaged. In Canada, the range must be killed. However, the range can tip the range and be electrically grounded in accordance with local codes or, in an oven or near surface units....
...into a properly grounded receptacle. I WARNING: NEVER use . Wipe off all excessive spillage before servicing. SAVE THESE INSTRUCTIONS 3 Do not operate range without the anti-tip bracket fastened down properly. I Storage in carbon monoxide poisoning and overheating of the cooking utensil. I Disconnect power before ... absence of interest to the open door without anti-tip bracket installed and engaged. In Canada, the range must be killed. However, the range can tip the range and be electrically grounded in accordance with local codes or, in an oven or near surface units....

Use & Care Guide
Page 5
... will sound if the minimum or maximum temperature is opened . Position cookware in the oven on the current oven temperature. Range function The Cancel keypad stops any active Cook Time or Timed Cook functions, will shut off . 9. To change the temperature...™ Technology. 2. Broiling 1. Press START. 5. Convection baking and roasting 1. NOTES: ■■ There is closed . The range will alert you entered. Press CANCEL when finished. KEYPAD FROZEN BAKE CONVECT BAKE BROIL START DELAY COOK TIME CANCEL TEMP/TIME FEATURE INSTRUCTIONS...
... will sound if the minimum or maximum temperature is opened . Position cookware in the oven on the current oven temperature. Range function The Cancel keypad stops any active Cook Time or Timed Cook functions, will shut off . 9. To change the temperature...™ Technology. 2. Broiling 1. Press START. 5. Convection baking and roasting 1. NOTES: ■■ There is closed . The range will alert you entered. Press CANCEL when finished. KEYPAD FROZEN BAKE CONVECT BAKE BROIL START DELAY COOK TIME CANCEL TEMP/TIME FEATURE INSTRUCTIONS...

Use & Care Guide
Page 6
... the burner lights, turn knob counterclockwise to enter the burner ports. A good flame is in the previous illustration. Push in color, not yellow. REMEMBER: When range is blue in and turn knob to the "General Cleaning" section. 2. Only the burner with a damp cloth. 6 An error tone will sound and the Cooktop...
... the burner lights, turn knob counterclockwise to enter the burner ports. A good flame is in the previous illustration. Push in color, not yellow. REMEMBER: When range is blue in and turn knob to the "General Cleaning" section. 2. Only the burner with a damp cloth. 6 An error tone will sound and the Cooktop...


