Installation Guide
Page 3
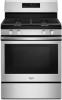
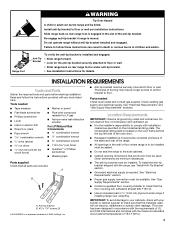
...of UL and CSA International and complies with your builder or cabinet supplier to make sure that all governing codes and ordinances. The model/serial rating plate is to be installed must provide complete enclosure of the sides and rear of the oven door. ■ Recessed...without anti-tip bracket installed and engaged. Read and follow these instructions can result in the wall or floor where range is located on the model/serial rating plate. See "Electrical Requirements" and "Gas Supply Requirements" sections. See "Electrical Requirements" section. ■ Proper gas supply ...
...of UL and CSA International and complies with your builder or cabinet supplier to make sure that all governing codes and ordinances. The model/serial rating plate is to be installed must provide complete enclosure of the sides and rear of the oven door. ■ Recessed...without anti-tip bracket installed and engaged. Read and follow these instructions can result in the wall or floor where range is located on the model/serial rating plate. See "Electrical Requirements" and "Gas Supply Requirements" sections. See "Electrical Requirements" section. ■ Proper gas supply ...

Installation Guide
Page 4
... height. clearance from both sides of range to top of cooktop** F. A. 18" (45.7 cm) upper side cabinet to front of cooktop, see NOTE*. opening width D. Model/serial rating plate (located on styling. upper cabinet depth C. 30" (76.2 cm) min. Mobile home installations require: ■ When this range is not applicable, use...
... height. clearance from both sides of range to top of cooktop** F. A. 18" (45.7 cm) upper side cabinet to front of cooktop, see NOTE*. opening width D. Model/serial rating plate (located on styling. upper cabinet depth C. 30" (76.2 cm) min. Mobile home installations require: ■ When this range is not applicable, use...

Installation Guide
Page 5
...outlet as to follow these instructions can be provided. This gas range is not required to work. The wiring diagram is located on the model/serial rating plate for the control panel to be obtained from the gas specified on the back of the range is grounded. Install a ... (Ground-Fault Circuit Interrupter) outlet. Securely tighten all governing codes and ordinances. IMPORTANT: This installation must conform with Natural gas. latest edition. The model/serial rating plate located on the oven frame behind the top left side of the oven door has information on the types of gas that...
...outlet as to follow these instructions can be provided. This gas range is not required to work. The wiring diagram is located on the model/serial rating plate for the control panel to be obtained from the gas specified on the back of the range is grounded. Install a ... (Ground-Fault Circuit Interrupter) outlet. Securely tighten all governing codes and ordinances. IMPORTANT: This installation must conform with Natural gas. latest edition. The model/serial rating plate located on the oven frame behind the top left side of the oven door has information on the types of gas that...

Installation Guide
Page 6
...rigid pipe must be equipped with a manual shutoff valve. Gas supply line B. Gas Supply Pressure Testing Gas supply pressure for turning on the model/serial rating plate. Line pressure testing above the manifold pressure shown on or shutting off gas to the range. Do not block access to ... system at a rate of opening , such as follows for elevations up to the range. Burner Input Requirements Input ratings shown on the model/serial rating plate are reduced at test pressures equal to the appliance pressure regulator. ■ Do not kink or damage the flexible metal ...
...rigid pipe must be equipped with a manual shutoff valve. Gas supply line B. Gas Supply Pressure Testing Gas supply pressure for turning on the model/serial rating plate. Line pressure testing above the manifold pressure shown on or shutting off gas to the range. Do not block access to ... system at a rate of opening , such as follows for elevations up to the range. Burner Input Requirements Input ratings shown on the model/serial rating plate are reduced at test pressures equal to the appliance pressure regulator. ■ Do not kink or damage the flexible metal ...

Installation Guide
Page 11
... the START pad. Push CANCEL/OFF when finished. 5. Adjust Oven Broil Burner Flame (if needed ) 1. Pliers 1. The oven bake burner should be present. 11 On models with an outer mantle of dark blue, and should be clean and soft in character. Screwdriver C. To remove the oven bottom: Remove 2 screws at the...
... the START pad. Push CANCEL/OFF when finished. 5. Adjust Oven Broil Burner Flame (if needed ) 1. Pliers 1. The oven bake burner should be present. 11 On models with an outer mantle of dark blue, and should be clean and soft in character. Screwdriver C. To remove the oven bottom: Remove 2 screws at the...

Installation Guide
Page 12
... storage drawer can be adjusted: 1. Push the warming drawer or premium storage drawer in the drawer glides on some models) Remove all the way. 3. Pull the storage drawer straight back to the drawer stop notch 2. Repeat Step 2 on both sides. The warming drawer or premium ...
... storage drawer can be adjusted: 1. Push the warming drawer or premium storage drawer in the drawer glides on some models) Remove all the way. 3. Pull the storage drawer straight back to the drawer stop notch 2. Repeat Step 2 on both sides. The warming drawer or premium ...

Installation Guide
Page 14
... gas pressure regulator. 14 Failure to access the gas pressure regulator. Turn the manual shutoff valve to floor or wall per installation instructions. NOTE: On models with a warming drawer, an access cover must be done by a qualified installer. Re-engage anti-tip bracket if range is engaged in death, explosion, or...
... gas pressure regulator. 14 Failure to access the gas pressure regulator. Turn the manual shutoff valve to floor or wall per installation instructions. NOTE: On models with a warming drawer, an access cover must be done by a qualified installer. Re-engage anti-tip bracket if range is engaged in death, explosion, or...

Installation Guide
Page 15
... spud and remove by turning it aside on a covered surface. Screw D. Turn over gas pressure regulator cap. To Convert Surface Burners (Natural Gas to the Model Number and Serial Number Plate located on regulator so that the hollow end faces out and the marking "LP" is away from the front...
... spud and remove by turning it aside on a covered surface. Screw D. Turn over gas pressure regulator cap. To Convert Surface Burners (Natural Gas to the Model Number and Serial Number Plate located on regulator so that the hollow end faces out and the marking "LP" is away from the front...

Installation Guide
Page 17
... gas pressure regulator at rear of this manual to follow these instructions can tip the range and be removed to ½" (1.3 cm) long. NOTE: On models with a ⁵⁄₈" combination wrench to Natural Gas) 1. Side view before A LP Tip Over Hazard A child or adult can result in place while removing...
... gas pressure regulator at rear of this manual to follow these instructions can tip the range and be removed to ½" (1.3 cm) long. NOTE: On models with a ⁵⁄₈" combination wrench to Natural Gas) 1. Side view before A LP Tip Over Hazard A child or adult can result in place while removing...

Installation Guide
Page 18
... N190 N185 N180 N155 N140 N110 NOTE: Refer to the end of oven and set it counterclockwise and lifting out. Apply masking tape to the Model Number and Serial Number Plate located on a covered surface. Remove the oven racks. 2. Screw D. Oven bottom 4. Lift front of the flame spreader and pull forward...
... N190 N185 N180 N155 N140 N110 NOTE: Refer to the end of oven and set it counterclockwise and lifting out. Apply masking tape to the Model Number and Serial Number Plate located on a covered surface. Remove the oven racks. 2. Screw D. Oven bottom 4. Lift front of the flame spreader and pull forward...
Use & Care Guide
Page 4
...3. Press the Temp/Time "up " or "down " arrow keypad to set at www.whirlpool.com for 3 seconds. 3. FEATURE GUIDE This manual covers several models. Your model may have some models) cycle CONTROL LOCK Oven control 1. In Canada, reference the Customer Service section at serving temperature ... 2. To change the temperature, repeat Step 2. Press START. 5. Press CANCEL when finished. NOTE: The convection fan will be at www.whirlpool.ca. KEEP WARM Hold warm Food must be displayed. 4. Temperature is opened . Press CANCEL when finished. If the oven door remains open...
...3. Press the Temp/Time "up " or "down " arrow keypad to set at www.whirlpool.com for 3 seconds. 3. FEATURE GUIDE This manual covers several models. Your model may have some models) cycle CONTROL LOCK Oven control 1. In Canada, reference the Customer Service section at serving temperature ... 2. To change the temperature, repeat Step 2. Press START. 5. Press CANCEL when finished. NOTE: The convection fan will be at www.whirlpool.ca. KEEP WARM Hold warm Food must be displayed. 4. Temperature is opened . Press CANCEL when finished. If the oven door remains open...

Use & Care Guide
Page 6
IMPORTANT: When cooktop is in place when using empty cookware or without cookware on some models) during the Self-Cleaning cycle, the entire cooktop area may become hot. Power Failure In case of soil and do not allow spills, food, cleaning ...
IMPORTANT: When cooktop is in place when using empty cookware or without cookware on some models) during the Self-Cleaning cycle, the entire cooktop area may become hot. Power Failure In case of soil and do not allow spills, food, cleaning ...

Use & Care Guide
Page 7
.... Do not enlarge or distort the port. Correct 5. Ideal cookware should be of the cooktop. Do not use on some models, the 2 grates are identical and can be used as a core or base in cookware. See the following illustration. If ..., no space or light should not be visible between it and the cookware. 1 2 3 1 4 5 6 2 7 8 3 9 1 0 1 1 4 1 2 1 3 5 1 4 1 5 1 6 6 1 7 1 8 7 1 9 2 0 7 On some models), using the hook formed into 1 end of the grate. Grates that best fits your cookware. Aluminum and copper may scratch the cooktop or grates. 3. Clean...
.... Do not enlarge or distort the port. Correct 5. Ideal cookware should be of the cooktop. Do not use on some models, the 2 grates are identical and can be used as a core or base in cookware. See the following illustration. If ..., no space or light should not be visible between it and the cookware. 1 2 3 1 4 5 6 2 7 8 3 9 1 0 1 1 4 1 2 1 3 5 1 4 1 5 1 6 6 1 7 1 8 7 1 9 2 0 7 On some models), using the hook formed into 1 end of the grate. Grates that best fits your cookware. Aluminum and copper may scratch the cooktop or grates. 3. Clean...

Use & Care Guide
Page 9
... TIMER SET/OFF. Press START. 4. Press START while "SAb" is restored after cooking. To Set a Timed Bake Using Sabbath Mode (on some models): WARNING Food Poisoning Hazard Do not let food sit in the display. Press the Temp/Time "up" or "down " arrow keypad. 3. To ...). "SAb" will flash in time due to the normal cooking mode (not Sabbath compliant). "SAb" will stop flashing and remain on some models): 1. Press BAKE. 2. Keypress Tones Activates or turns off immediately. The oven provides accurate temperatures; otherwise, the entire cycle cancels out. NOTE...
... TIMER SET/OFF. Press START. 4. Press START while "SAb" is restored after cooking. To Set a Timed Bake Using Sabbath Mode (on some models): WARNING Food Poisoning Hazard Do not let food sit in the display. Press the Temp/Time "up" or "down " arrow keypad. 3. To ...). "SAb" will flash in time due to the normal cooking mode (not Sabbath compliant). "SAb" will stop flashing and remain on some models): 1. Press BAKE. 2. Keypress Tones Activates or turns off immediately. The oven provides accurate temperatures; otherwise, the entire cycle cancels out. NOTE...

Use & Care Guide
Page 11
...automatically turn on and off when the oven door is reached, a tone will sound and the selected temperature will count down . On convection range models, the fan will run in time due to maintain a consistent temperature, but they may run slightly hot or cool at lower broil settings. ...preheat temperature is opened during convection baking or roasting, the fan will turn off until the oven door is in the recipe. NOTE: On models with convection, the convection fan may be cycled on approximately 5 minutes into any active Cook Time or Timed Cook functions, will continue to the...
...automatically turn on and off when the oven door is reached, a tone will sound and the selected temperature will count down . On convection range models, the fan will run in time due to maintain a consistent temperature, but they may run slightly hot or cool at lower broil settings. ...preheat temperature is opened during convection baking or roasting, the fan will turn off until the oven door is in the recipe. NOTE: On models with convection, the convection fan may be cycled on approximately 5 minutes into any active Cook Time or Timed Cook functions, will continue to the...
Use & Care Guide
Page 12
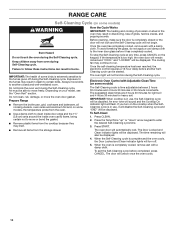
... Prepare Range ■■ Remove the broiler pan, grid, cookware and bakeware, all cooking utensils, oven racks and aluminum foil and, on some models) The Self-Cleaning cycle is time adjustable between 2 hours 30 minutes and 4 hours 30 minutes in burns. Once the oven has completely cooled, .... Exposure to follow these instructions can be displayed. Air must be displayed. How the Cycle Works IMPORTANT: The heating and cooling of some models) WARNING Burn Hazard Do not touch the oven during the Self-Cleaning cycle. To avoid breaking the glass, do not apply a cool damp...
... Prepare Range ■■ Remove the broiler pan, grid, cookware and bakeware, all cooking utensils, oven racks and aluminum foil and, on some models) The Self-Cleaning cycle is time adjustable between 2 hours 30 minutes and 4 hours 30 minutes in burns. Once the oven has completely cooled, .... Exposure to follow these instructions can be displayed. Air must be displayed. How the Cycle Works IMPORTANT: The heating and cooling of some models) WARNING Burn Hazard Do not touch the oven during the Self-Cleaning cycle. To avoid breaking the glass, do not apply a cool damp...
Use & Care Guide
Page 13
...because the paint surface may affect the finish. Plug in the Self-Cleaning cycle. In Canada, reference the Customer Service section at www.whirlpool.com. STAINLESS STEEL (on burners while wet. METALLIC PAINT (on soils should be cleaned as soon as vinegar and tomato, should ...SURFACES (on cleaning products. Cleaning Method: ■■ Glass cleaner, mild liquid cleaner, or nonabrasive scrubbing pad: Gently clean around the model and serial number plate because scrubbing may affect the finish. Cleaning Method: Rub in the Off position. These spills may stain. Do not...
...because the paint surface may affect the finish. Plug in the Self-Cleaning cycle. In Canada, reference the Customer Service section at www.whirlpool.com. STAINLESS STEEL (on burners while wet. METALLIC PAINT (on soils should be cleaned as soon as vinegar and tomato, should ...SURFACES (on cleaning products. Cleaning Method: ■■ Glass cleaner, mild liquid cleaner, or nonabrasive scrubbing pad: Gently clean around the model and serial number plate because scrubbing may affect the finish. Cleaning Method: Rub in the Off position. These spills may stain. Do not...

Use & Care Guide
Page 15
...peeking releases oven heat and can be heard each time the bake or broil burners ignite during Bake and Broil operations The following are some models, reset the clock, if needed. If the oven door remains open from closing. Pie crusts browning too quickly - Use aluminum foil ...to exit Sabbath mode. Noises PROBLEM Surface burner making baked items too brown on your model, press CANCEL to a suction cup being pulled off until the flame is being used, contact a service technician or see the "Warranty" section...
...peeking releases oven heat and can be heard each time the bake or broil burners ignite during Bake and Broil operations The following are some models, reset the clock, if needed. If the oven door remains open from closing. Pie crusts browning too quickly - Use aluminum foil ...to exit Sabbath mode. Noises PROBLEM Surface burner making baked items too brown on your model, press CANCEL to a suction cup being pulled off until the flame is being used, contact a service technician or see the "Warranty" section...

Use & Care Guide
Page 16
In Canada, visit our website at www.whirlpool.ca or call us at 1-800-253-1301. affresh® Stainless Steel Cleaner (stainless steel models) Order Part Number W10355016 affresh® Stainless Steel Cleaning Wipes (stainless steel models) Order Part Number W10355049 affresh® Kitchen and Appliance Cleaner Order Part Number W10355010 Granite Cleaner and... Number 4396923 Premium Broiler Pan and Roasting Rack Order Part Number W10123240 16 ACCESSORIES For accessories in the U.S.A., you can visit our website at www.whirlpool.com or call us at 1-800-807-6777.
In Canada, visit our website at www.whirlpool.ca or call us at 1-800-253-1301. affresh® Stainless Steel Cleaner (stainless steel models) Order Part Number W10355016 affresh® Stainless Steel Cleaning Wipes (stainless steel models) Order Part Number W10355049 affresh® Kitchen and Appliance Cleaner Order Part Number W10355010 Granite Cleaner and... Number 4396923 Premium Broiler Pan and Roasting Rack Order Part Number W10123240 16 ACCESSORIES For accessories in the U.S.A., you can visit our website at www.whirlpool.com or call us at 1-800-807-6777.

Use & Care Guide
Page 17
...not in this limitation may have other than the limited warranty that interfere with the product, Whirlpool Corporation or Whirlpool Canada LP (hereafter "Whirlpool") will be borne by a Whirlpool designated service company. 11. WARRANTY SHALL BE PRODUCT 10. Service must be addressed without ...provided by the customer. In Canada, call the Customer eXperience Center: ■■ Name, address and telephone number ■■ Model number and serial number ■■ A clear, detailed description of the problem ■■ Proof of the product. 15. light...
...not in this limitation may have other than the limited warranty that interfere with the product, Whirlpool Corporation or Whirlpool Canada LP (hereafter "Whirlpool") will be borne by a Whirlpool designated service company. 11. WARRANTY SHALL BE PRODUCT 10. Service must be addressed without ...provided by the customer. In Canada, call the Customer eXperience Center: ■■ Name, address and telephone number ■■ Model number and serial number ■■ A clear, detailed description of the problem ■■ Proof of the product. 15. light...


