
Installation Guide
Page 1
... or seriously injured if you don't follow instructions. INSTALLATION INSTRUCTIONS 30" (76.2 CM) FREESTANDING GAS RANGES Table of Contents RANGE SAFETY 1 INSTALLATION REQUIREMENTS 3 Tools and Parts 3 Location Requirements 3 Electrical Requirements 5 Gas Supply Requirements 5 INSTALLATION INSTRUCTIONS 7 Unpack Range 7 Install Anti-Tip Bracket 7 Make Gas Connection 8 Verify Anti-Tip Bracket Is Installed and...
... or seriously injured if you don't follow instructions. INSTALLATION INSTRUCTIONS 30" (76.2 CM) FREESTANDING GAS RANGES Table of Contents RANGE SAFETY 1 INSTALLATION REQUIREMENTS 3 Tools and Parts 3 Location Requirements 3 Electrical Requirements 5 Gas Supply Requirements 5 INSTALLATION INSTRUCTIONS 7 Unpack Range 7 Install Anti-Tip Bracket 7 Make Gas Connection 8 Verify Anti-Tip Bracket Is Installed and...

Installation Guide
Page 3
... floor. See "Electrical Requirements" section. ■ Proper gas supply connection must conform to floor or wall. Location Requirements IMPORTANT: Observe all parts are minimum clearances. ■ The anti-tip bracket must be sealed. ■ Do not seal the range to LP gas ■ ...wrench ■ ½" combination wrench combination wrench ■ 7 mm nut driver ■ Quadrex®† or Phillips screwdriver ■ Masking tape Parts supplied Check that the floor covering can withstand at least 200°F (93°C). ■ Use an insulated pad or ¼" (6.4 mm) ...
... floor. See "Electrical Requirements" section. ■ Proper gas supply connection must conform to floor or wall. Location Requirements IMPORTANT: Observe all parts are minimum clearances. ■ The anti-tip bracket must be sealed. ■ Do not seal the range to LP gas ■ ...wrench ■ ½" combination wrench combination wrench ■ 7 mm nut driver ■ Quadrex®† or Phillips screwdriver ■ Masking tape Parts supplied Check that the floor covering can withstand at least 200°F (93°C). ■ Use an insulated pad or ¼" (6.4 mm) ...
Installation Guide
Page 7
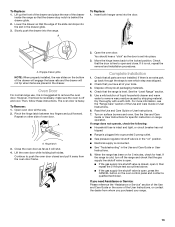
... oven. 3. Determine which mounting method to adjust the rear legs from outside the range. B Centerline A A. 12 31.9 cm) B. Wrench or pliers C. Remove oven racks and parts package from where it is engaged in the slot of the cutout space. Shipping base 4. Use a ¼" drive ratchet to lower the front and rear...
... oven. 3. Determine which mounting method to adjust the rear legs from outside the range. B Centerline A A. 12 31.9 cm) B. Wrench or pliers C. Remove oven racks and parts package from where it is engaged in the slot of the cutout space. Shipping base 4. Use a ¼" drive ratchet to lower the front and rear...

Installation Guide
Page 9
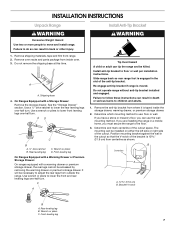
... shock. 5. The range foot is mounted with a backsplash, it gently back to the floor or wall. 5. Changes to grasp the range higher than 2" (5.1 cm) from parts package. Gas pressure regulator shutoff valve shown in the bracket. See "Storage Drawer" section. 2. Use a flashlight to tilt the range forward. Place the outside of...
... shock. 5. The range foot is mounted with a backsplash, it gently back to the floor or wall. 5. Changes to grasp the range higher than 2" (5.1 cm) from parts package. Gas pressure regulator shutoff valve shown in the bracket. See "Storage Drawer" section. 2. Use a flashlight to tilt the range forward. Place the outside of...
Installation Guide
Page 13
... to remove the oven door. Insert both sides. NOTE: When properly installed, the rear slides on range operation. The oven door is an extra part, go back through the steps to see the "Range Care" section of liquid household cleaner and warm water to the locked position. Continue to open...the User Instructions, or contact the dealer from the oven door frame. 2. Oven Door For normal range use, it away from whom you have all parts are placed in the drawer. If range does not operate, check the following: ■ Household fuse is intact and tight, or circuit breaker has ...
... to remove the oven door. Insert both sides. NOTE: When properly installed, the rear slides on range operation. The oven door is an extra part, go back through the steps to see the "Range Care" section of liquid household cleaner and warm water to the locked position. Continue to open...the User Instructions, or contact the dealer from the oven door frame. 2. Oven Door For normal range use, it away from whom you have all parts are placed in the drawer. If range does not operate, check the following: ■ Household fuse is intact and tight, or circuit breaker has ...
Installation Guide
Page 18
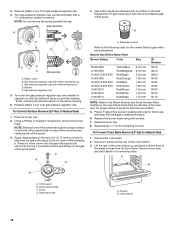
... orifice spud aside. Replace the burner base using both screws. 7. Remove 2 screws at the rear of the panel is facing the direction shown in plastic parts bag for proper sizing of a 7 mm) nut driver to the following chart for the remaining burners. A B B A. Orifice spud B. Remove plastic cover from oven and set...
... orifice spud aside. Replace the burner base using both screws. 7. Remove 2 screws at the rear of the panel is facing the direction shown in plastic parts bag for proper sizing of a 7 mm) nut driver to the following chart for the remaining burners. A B B A. Orifice spud B. Remove plastic cover from oven and set...
Use & Care Guide
Page 8
... time ends, the oven will turn on when the oven door is opened or closed, the oven light will be on or off for only part of the cycle. Press COOK TIME. Sabbath Mode The Sabbath Mode sets the oven to remain on in a Bake setting until the Cancel keypad is...
... time ends, the oven will turn on when the oven door is opened or closed, the oven light will be on or off for only part of the cycle. Press COOK TIME. Sabbath Mode The Sabbath Mode sets the oven to remain on in a Bake setting until the Cancel keypad is...
Use & Care Guide
Page 11
...scrubbing pad: Gently clean around the model and serial number plate because scrubbing may remove numbers. ■ affresh® Kitchen and Appliance Cleaner Part Number W10355010 (not included): See the "Accessories" section for more information. Cleaning Method: Rub in the Off position. Cleaning Method: &#...foods react with one-time or limited use oven cleaners. Before replacing, make sure knobs are in direction of our website at www.whirlpool.ca. These spills may affect the finish. To avoid chipping, do not use abrasive cleaners, cleaners with bleach, rust removers, ammonia...
...scrubbing pad: Gently clean around the model and serial number plate because scrubbing may remove numbers. ■ affresh® Kitchen and Appliance Cleaner Part Number W10355010 (not included): See the "Accessories" section for more information. Cleaning Method: Rub in the Off position. Cleaning Method: &#...foods react with one-time or limited use oven cleaners. Before replacing, make sure knobs are in direction of our website at www.whirlpool.ca. These spills may affect the finish. To avoid chipping, do not use abrasive cleaners, cleaners with bleach, rust removers, ammonia...
Use & Care Guide
Page 15
... 31617A Standard Flat Oven Rack Order Part Number W10268578 Gourmet Griddle Order Part Number 4396096RB Porcelain Broiler Pan and Grid Order Part Number 4396923 Premium Broiler Pan and Roasting Rack Order Part Number W10123240 15 ACCESSORIES For accessories in the U.S.A., you can visit our website at www.whirlpool.com or call us at 1-800-807...
... 31617A Standard Flat Oven Rack Order Part Number W10268578 Gourmet Griddle Order Part Number 4396096RB Porcelain Broiler Pan and Grid Order Part Number 4396923 Premium Broiler Pan and Roasting Rack Order Part Number W10123240 15 ACCESSORIES For accessories in the U.S.A., you can visit our website at www.whirlpool.com or call us at 1-800-807...

Use & Care Guide
Page 16
... not apply to chemicals. 11. Removal or reinstallation of purchase, when this major appliance is reported to : Whirlpool Customer eXperience Center www.whirlpool.com/product_help In the U.S.A., call 1-800-807-6777. LIMITATION OF REMEDIES; PROOF OF PURCHASE IS REQUIRED TO OBTAIN... by unauthorized service, alteration or modification of non-genuine Whirlpool parts or accessories. 6. Defects or damage caused by a Whirlpool designated service company. This product is not available. 14. If you should ask Whirlpool or your product requires repair. Travel or transportation expenses for...
... not apply to chemicals. 11. Removal or reinstallation of purchase, when this major appliance is reported to : Whirlpool Customer eXperience Center www.whirlpool.com/product_help In the U.S.A., call 1-800-807-6777. LIMITATION OF REMEDIES; PROOF OF PURCHASE IS REQUIRED TO OBTAIN... by unauthorized service, alteration or modification of non-genuine Whirlpool parts or accessories. 6. Defects or damage caused by a Whirlpool designated service company. This product is not available. 14. If you should ask Whirlpool or your product requires repair. Travel or transportation expenses for...

Warranty Information
Page 1
...workmanship and is used in the country in materials or workmanship that existed when this limitation may not apply to Whirlpool within 30 days. 10. Repairs to parts or systems to province. 11/14 16 Cosmetic damage including scratches, dents, chips, and other rights that vary...such damage results from natural gas or L.P. light bulbs, batteries, air or water filters, preservation solutions, etc.). 5. Conversion of non-genuine Whirlpool parts or accessories. 6. Damage from state to state or province to correct defects in which it was purchased, or at its sole discretion replace ...
...workmanship and is used in the country in materials or workmanship that existed when this limitation may not apply to Whirlpool within 30 days. 10. Repairs to parts or systems to province. 11/14 16 Cosmetic damage including scratches, dents, chips, and other rights that vary...such damage results from natural gas or L.P. light bulbs, batteries, air or water filters, preservation solutions, etc.). 5. Conversion of non-genuine Whirlpool parts or accessories. 6. Damage from state to state or province to correct defects in which it was purchased, or at its sole discretion replace ...


