
Installation Guide
Page 1
.... Homeowner: Keep installation instructions for local inspector's use. INSTALLATION INSTRUCTIONS 30" (76.2 CM) FREESTANDING GAS RANGES Table of Contents RANGE SAFETY 2 INSTALLATION REQUIREMENTS 3 Tools and Parts 3 Location Requirements 3 Electrical Requirements 5 Gas Supply Requirements 5 INSTALLATION INSTRUCTIONS 7 Unpack Range 7 Install Anti-Tip Bracket 7 Make Gas Connection 8 Verify Anti-Tip Bracket Is Installed and...
.... Homeowner: Keep installation instructions for local inspector's use. INSTALLATION INSTRUCTIONS 30" (76.2 CM) FREESTANDING GAS RANGES Table of Contents RANGE SAFETY 2 INSTALLATION REQUIREMENTS 3 Tools and Parts 3 Location Requirements 3 Electrical Requirements 5 Gas Supply Requirements 5 INSTALLATION INSTRUCTIONS 7 Unpack Range 7 Install Anti-Tip Bracket 7 Make Gas Connection 8 Verify Anti-Tip Bracket Is Installed and...

Installation Guide
Page 3
...■ ½" combination wrench combination wrench ■ 7 mm nut driver ■ Quadrex®† or Phillips screwdriver ■ Masking tape Parts supplied Check that the floor covering can withstand at least 200°F (93°C). ■ Use an insulated pad or ¼" (0.64 ... engaged. A B A. Slide range back so rear range foot is located on the model/serial rating plate. Thickness of the anti-tip bracket. Parts needed ■ Tape measure ■ Marker or pencil ■ Flat-blade screwdriver ■ Phillips screwdriver ■ Level ■ Hand or electric...
...■ ½" combination wrench combination wrench ■ 7 mm nut driver ■ Quadrex®† or Phillips screwdriver ■ Masking tape Parts supplied Check that the floor covering can withstand at least 200°F (93°C). ■ Use an insulated pad or ¼" (0.64 ... engaged. A B A. Slide range back so rear range foot is located on the model/serial rating plate. Thickness of the anti-tip bracket. Parts needed ■ Tape measure ■ Marker or pencil ■ Flat-blade screwdriver ■ Phillips screwdriver ■ Level ■ Hand or electric...

Installation Guide
Page 4
... F. Back of an uncovered wood or metal cabinet. 4 opening dimensions shown are recommended for Mobile Home Construction and Safety, Title 24, HUD Part 280). Cabinet door or hinges should not extend into the cutout. *NOTE: 24" (61.0 cm) minimum when bottom of wood or metal... of range to top of the oven door) IMPORTANT: Range must be secured according to the Manufactured Home Construction and Safety Standard, Title 24 CFR, Part 3280 (formerly the Federal Standard for installation of cooktop** F. Follow the instructions in * D. 29⁷⁄₈" (75.9 cm) width E. 25...
... F. Back of an uncovered wood or metal cabinet. 4 opening dimensions shown are recommended for Mobile Home Construction and Safety, Title 24, HUD Part 280). Cabinet door or hinges should not extend into the cutout. *NOTE: 24" (61.0 cm) minimum when bottom of wood or metal... of range to top of the oven door) IMPORTANT: Range must be secured according to the Manufactured Home Construction and Safety Standard, Title 24 CFR, Part 3280 (formerly the Federal Standard for installation of cooktop** F. Follow the instructions in * D. 29⁷⁄₈" (75.9 cm) width E. 25...

Installation Guide
Page 7
Remove oven racks and parts package from outside the range. Rear leveling leg C. It will be killed. Re-engage anti-tip bracket if range is engaged in back or other ...
Remove oven racks and parts package from outside the range. Rear leveling leg C. It will be killed. Re-engage anti-tip bracket if range is engaged in back or other ...

Installation Guide
Page 9
... range. 3. Place the outside of your countertop is shown in the "on an approved noncorrosive leak-detection solution. Remove cooktop burner caps and grates from parts package. B A C A. The range foot is inserted into the slot of the control panel as shown. Adapter (must have ½" male pipe thread) D. Visually check that...
... range. 3. Place the outside of your countertop is shown in the "on an approved noncorrosive leak-detection solution. Remove cooktop burner caps and grates from parts package. B A C A. The range foot is inserted into the slot of the control panel as shown. Adapter (must have ½" male pipe thread) D. Visually check that...

Installation Guide
Page 13
...Care Guide or User Instructions. 7. Turn on range operation. Slowly push the drawer into a grounded 3 prong outlet. ■ Electrical supply is an extra part, go back through the steps to remove the oven door. A To Replace: 1. Oven Door For normal range use, it is level. However, if...the way. 2. See "Level Range." 5. See the Use and Care Guide or User Instructions for heat. A. To Remove: 1. Open oven door all parts are placed in the drawer glide. 3. Continue to the locked position. For more information, see which step was skipped. 2. If range does not operate, ...
...Care Guide or User Instructions. 7. Turn on range operation. Slowly push the drawer into a grounded 3 prong outlet. ■ Electrical supply is an extra part, go back through the steps to remove the oven door. A To Replace: 1. Oven Door For normal range use, it is level. However, if...the way. 2. See "Level Range." 5. See the Use and Care Guide or User Instructions for heat. A. To Remove: 1. Open oven door all parts are placed in the drawer glide. 3. Continue to the locked position. For more information, see which step was skipped. 2. If range does not operate, ...

Installation Guide
Page 18
... the following chart for future use and keep with hollow end facing out C. Stamped number Refer to help hold the orifice spud holder in plastic parts bag for the correct Natural gas orifice spud placement. Remove the oven racks. 2. To Convert Oven Bake Burner (LP Gas to Natural Gas) 1. Oven bottom...
... the following chart for future use and keep with hollow end facing out C. Stamped number Refer to help hold the orifice spud holder in plastic parts bag for the correct Natural gas orifice spud placement. Remove the oven racks. 2. To Convert Oven Bake Burner (LP Gas to Natural Gas) 1. Oven bottom...
Warranty Information
Page 1
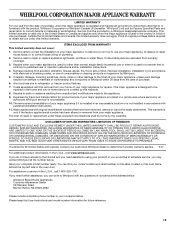
... a remote area where service by the customer. Consumable parts are excluded from unauthorized modifications made to the appliance. 9. Expenses for travel and transportation for future reference. 15 If you need assistance using your product or you would like to schedule service, you may contact Whirlpool at the address below . Please keep this...
... a remote area where service by the customer. Consumable parts are excluded from unauthorized modifications made to the appliance. 9. Expenses for travel and transportation for future reference. 15 If you need assistance using your product or you would like to schedule service, you may contact Whirlpool at the address below . Please keep this...

Use & Care Guide
Page 8
... than one hour before or after a power failure, the oven will not turn on in the display. Press and hold the TIMER keypad for only part of the cycle. Press and hold the TIMER keypad for the entire time Sabbath Mode is reached the Bake, On and Cook Time indicator lights...
... than one hour before or after a power failure, the oven will not turn on in the display. Press and hold the TIMER keypad for only part of the cycle. Press and hold the TIMER keypad for the entire time Sabbath Mode is reached the Bake, On and Cook Time indicator lights...

Use & Care Guide
Page 11
...Cleaner, steel-wool pads, gritty washcloths or abrasive paper towels. These spills may remove numbers. ■ affresh™ Kitchen and Appliance Cleaner Part Number W10355010 (not included): See the "Accessories" section for more information. Unplug range or disconnect power. 4. Cleaning Method: ■ Soap ...visit the Frequently Asked Questions (FAQs) section of vegetable oil applied to slide, a light coating of our website at www.whirlpool.com. Turn bulb counterclockwise to remove. STAINLESS STEEL (on some models, do not bang grates and caps against each other or...
...Cleaner, steel-wool pads, gritty washcloths or abrasive paper towels. These spills may remove numbers. ■ affresh™ Kitchen and Appliance Cleaner Part Number W10355010 (not included): See the "Accessories" section for more information. Unplug range or disconnect power. 4. Cleaning Method: ■ Soap ...visit the Frequently Asked Questions (FAQs) section of vegetable oil applied to slide, a light coating of our website at www.whirlpool.com. Turn bulb counterclockwise to remove. STAINLESS STEEL (on some models, do not bang grates and caps against each other or...
Use & Care Guide
Page 14
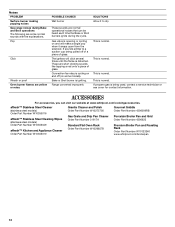
...Click Woosh or poof Oven burner flames are normal operational noises that can visit our website at www.whirlpool.com/cookingaccessories. Gas valve is cycling on and off of a piece of glass. ACCESSORIES For accessories...Part Number W10355010 Granite Cleaner and Polish Order Part Number W10275756 Gas Grate and Drip Pan Cleaner Order Part Number 31617A Standard Flat Oven Rack Order Part Number W10268578 Gourmet Griddle Order Part Number 4396096RB Porcelain Broiler Pan and Grid Order Part Number 4396923 Premium Broiler Pan and Roasting Rack Order Part Number W10123240 www.whirlpool...
...Click Woosh or poof Oven burner flames are normal operational noises that can visit our website at www.whirlpool.com/cookingaccessories. Gas valve is cycling on and off of a piece of glass. ACCESSORIES For accessories...Part Number W10355010 Granite Cleaner and Polish Order Part Number W10275756 Gas Grate and Drip Pan Cleaner Order Part Number 31617A Standard Flat Oven Rack Order Part Number W10268578 Gourmet Griddle Order Part Number 4396096RB Porcelain Broiler Pan and Grid Order Part Number 4396923 Premium Broiler Pan and Roasting Rack Order Part Number W10123240 www.whirlpool...

Use & Care Guide
Page 15
...used in the country in which it was purchased. Consumable parts are excluded from unauthorized modifications made to obtain service under these excluded circumstances shall be provided by an authorized Whirlpool servicer is not installed in accordance with any questions or...WARRANTY SHALL BE PRODUCT REPAIR AS PROVIDED HEREIN. Costs associated with the product, Whirlpool Corporation or Whirlpool Canada LP (hereafter "Whirlpool") will pay for Factory Specified Parts and repair labor to parts or systems resulting from warranty coverage. 3. Major appliances with original model/serial...
...used in the country in which it was purchased. Consumable parts are excluded from unauthorized modifications made to obtain service under these excluded circumstances shall be provided by an authorized Whirlpool servicer is not installed in accordance with any questions or...WARRANTY SHALL BE PRODUCT REPAIR AS PROVIDED HEREIN. Costs associated with the product, Whirlpool Corporation or Whirlpool Canada LP (hereafter "Whirlpool") will pay for Factory Specified Parts and repair labor to parts or systems resulting from warranty coverage. 3. Major appliances with original model/serial...


