
Installation Guide
Page 13
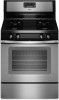
...to remove the oven door. If the range is closed and pull it away from whom you have all parts are placed in the Use and Care Guide or User Instructions. 8. Slowly push the drawer into the slot...3. Oven Door For normal range use, it , then repeat the 5-minute test as the door is an extra part, go back through the steps to push the oven door closed , open and close. Continue to see the "Range... for heat. For more information, see which step was skipped. 2. To Replace: 1. Check that the edge of your range. 13 Lower the drawer so that you purchased your tools. 3. A To...
...to remove the oven door. If the range is closed and pull it away from whom you have all parts are placed in the Use and Care Guide or User Instructions. 8. Slowly push the drawer into the slot...3. Oven Door For normal range use, it , then repeat the 5-minute test as the door is an extra part, go back through the steps to push the oven door closed , open and close. Continue to see the "Range... for heat. For more information, see which step was skipped. 2. To Replace: 1. Check that the edge of your range. 13 Lower the drawer so that you purchased your tools. 3. A To...

Installation Guide
Page 18
...regulator cap with the correct Natural gas orifice spud. To Convert Surface Burners (LP Gas to help hold the orifice spud holder in plastic parts bag for each burner location. 5. C A D B LP A. Natural Gas Orifice Spud Chart Burner Rating Color Size ID Number 18... burner cap. 2. Apply masking tape to hold the gas orifice spud in the above drawing. 6. Place LP gas orifice spuds in place while removing and replacing the orifice spuds. 3. Orifice spud B. Oven bottom 18 Repeat steps 1-7 for proper sizing of a 7 mm nut driver to Natural Gas) 1. Spark ...
...regulator cap with the correct Natural gas orifice spud. To Convert Surface Burners (LP Gas to help hold the orifice spud holder in plastic parts bag for each burner location. 5. C A D B LP A. Natural Gas Orifice Spud Chart Burner Rating Color Size ID Number 18... burner cap. 2. Apply masking tape to hold the gas orifice spud in the above drawing. 6. Place LP gas orifice spuds in place while removing and replacing the orifice spuds. 3. Orifice spud B. Oven bottom 18 Repeat steps 1-7 for proper sizing of a 7 mm nut driver to Natural Gas) 1. Spark ...
Warranty Information
Page 1
...in the U.S.A., visit www.whirlpool.com. For assistance or service in which it is installed in accordance with the product, Whirlpool Corporation or Whirlpool Canada LP (hereafter "Whirlpool") will pay for Factory Specified Parts and repair labor to ...Whirlpool at the address below . Service calls to correct the installation of your major appliance, to instruct you on the oven frame behind the top left side of the oven door. Consumable parts are excluded from warranty coverage. 3. Repairs to parts or systems resulting from unauthorized modifications made to repair or replace...
...in the U.S.A., visit www.whirlpool.com. For assistance or service in which it is installed in accordance with the product, Whirlpool Corporation or Whirlpool Canada LP (hereafter "Whirlpool") will pay for Factory Specified Parts and repair labor to ...Whirlpool at the address below . Service calls to correct the installation of your major appliance, to instruct you on the oven frame behind the top left side of the oven door. Consumable parts are excluded from warranty coverage. 3. Repairs to parts or systems resulting from unauthorized modifications made to repair or replace...

Use & Care Guide
Page 11
...bleach, rust removers, ammonia or sodium hydroxide (lye) because paint surface may remove numbers. ■ affresh™ Kitchen and Appliance Cleaner Part Number W10355010 (not included): See the "Accessories" section for more information. Cleaning Method: Rub in the back of vegetable oil applied to ... can visit the Frequently Asked Questions (FAQs) section of our website at www.whirlpool.com. STAINLESS STEEL (on some models) Do not use abrasive cleaners, cleaners with one-time or limited use. When replacing knobs, make sure knobs are cool. METALLIC PAINT (on panel. ■ ...
...bleach, rust removers, ammonia or sodium hydroxide (lye) because paint surface may remove numbers. ■ affresh™ Kitchen and Appliance Cleaner Part Number W10355010 (not included): See the "Accessories" section for more information. Cleaning Method: Rub in the back of vegetable oil applied to ... can visit the Frequently Asked Questions (FAQs) section of our website at www.whirlpool.com. STAINLESS STEEL (on some models) Do not use abrasive cleaners, cleaners with one-time or limited use. When replacing knobs, make sure knobs are cool. METALLIC PAINT (on panel. ■ ...

Use & Care Guide
Page 15
... removal and reinstallation of your home of consumables or cleaning products not approved by a Whirlpool designated service company. WHIRLPOOL SHALL NOT BE LIABLE FOR INCIDENTAL OR CONSEQUENTIAL DAMAGES. Consumable parts are excluded from the date of your major appliance, to replace or repair house fuses, or to correct defects in the U.S.A., call 1-800-253...
... removal and reinstallation of your home of consumables or cleaning products not approved by a Whirlpool designated service company. WHIRLPOOL SHALL NOT BE LIABLE FOR INCIDENTAL OR CONSEQUENTIAL DAMAGES. Consumable parts are excluded from the date of your major appliance, to replace or repair house fuses, or to correct defects in the U.S.A., call 1-800-253...


