
Installation Guide
Page 11
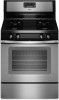
... tips, blowing or lifting of the oven controls. Locking screw B. Air shutter 4. Adjust Oven Broil Burner Flame (if needed ) 1. Control knob stem B. Pliers 1. Replace the control knob. 4. Remove the oven rack. 2. Remove from "LO" to "HI," checking the flame at each burner. Screws B. Look into the mirror...C. Press the BROIL pad. 3. Under certain conditions, it may take the burner up to 50 to 60 seconds to light. Hold the knob stem with a warming drawer, remove access cover plate (1 screw) located at the rear of the flame spreader. Press the START pad....
... tips, blowing or lifting of the oven controls. Locking screw B. Air shutter 4. Adjust Oven Broil Burner Flame (if needed ) 1. Control knob stem B. Pliers 1. Replace the control knob. 4. Remove the oven rack. 2. Remove from "LO" to "HI," checking the flame at each burner. Screws B. Look into the mirror...C. Press the BROIL pad. 3. Under certain conditions, it may take the burner up to 50 to 60 seconds to light. Hold the knob stem with a warming drawer, remove access cover plate (1 screw) located at the rear of the flame spreader. Press the START pad....

Use & Care Guide
Page 11
...and cooktop are cool and the control knobs are in the off and the oven and cooktop are cool. When replacing knobs, make sure knobs are in range or reconnect power. 11 Turn the glass bulb cover in the back of our website at www.whirlpool.com. Turn bulb counterclockwise to remove.... 3. Liquid detergent or all controls are off position. 2. Replace bulb, then bulb cover ...
...and cooktop are cool and the control knobs are in the off and the oven and cooktop are cool. When replacing knobs, make sure knobs are in range or reconnect power. 11 Turn the glass bulb cover in the back of our website at www.whirlpool.com. Turn bulb counterclockwise to remove.... 3. Liquid detergent or all controls are off position. 2. Replace bulb, then bulb cover ...
Use & Care Guide
Page 12
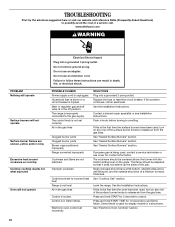
...Demo Mode. Ideal cookware should be centered above the burner with the bottom sitting level on any one of the surface burner knobs to exit Demo Mode. Replace the fuse or reset the circuit breaker. The flame should have been used , turn on the grate. If the problem ...will not operate Electrical Shock Hazard Plug into a grounded 3 prong outlet. www.whirlpool.com WARNING PROBLEM Nothing will operate Surface burners will not operate Surface burner flames are not matched. Push in knob before turning to incorrect heat level Range is tripped. Do not remove ground prong....
...Demo Mode. Ideal cookware should be centered above the burner with the bottom sitting level on any one of the surface burner knobs to exit Demo Mode. Replace the fuse or reset the circuit breaker. The flame should have been used , turn on the grate. If the problem ...will not operate Electrical Shock Hazard Plug into a grounded 3 prong outlet. www.whirlpool.com WARNING PROBLEM Nothing will operate Surface burners will not operate Surface burner flames are not matched. Push in knob before turning to incorrect heat level Range is tripped. Do not remove ground prong....


