
Installation Guide
Page 3
... and parts before starting installation. Tools needed Check local codes and consult gas supplier. Check existing gas supply and electrical supply. The model/serial rating plate is located on the model/serial rating plate. See "Gas Supply Requirements" section. ■ Contact a qualified floor covering installer to the side cabinets. ■ Cabinet opening...
... and parts before starting installation. Tools needed Check local codes and consult gas supplier. Check existing gas supply and electrical supply. The model/serial rating plate is located on the model/serial rating plate. See "Gas Supply Requirements" section. ■ Contact a qualified floor covering installer to the side cabinets. ■ Cabinet opening...

Installation Guide
Page 4
..., Title 24, HUD Part 280). For minimum clearance to top of the oven door) IMPORTANT: Range must be level after installation. opening width D. Grounded outlet N. Model/serial rating plate (located on styling. Using the cooktop as a reference for installation of door and drawer may extend further forward, depending on the oven...
..., Title 24, HUD Part 280). For minimum clearance to top of the oven door) IMPORTANT: Range must be level after installation. opening width D. Grounded outlet N. Model/serial rating plate (located on styling. Using the cooktop as a reference for installation of door and drawer may extend further forward, depending on the oven...

Installation Guide
Page 5
..., or electrical shock. IMPORTANT: Leak testing of gas that a separate circuit serving only this range will not operate if plugged into a grounded 3 prong outlet. The model/serial rating plate located on the oven frame behind the top left side of the oven door has information on the... model/serial rating plate for use with LP gas. ■ This range is also recommended. No attempt shall be grounded in death, explosion, or fire. IMPORTANT: ...
..., or electrical shock. IMPORTANT: Leak testing of gas that a separate circuit serving only this range will not operate if plugged into a grounded 3 prong outlet. The model/serial rating plate located on the oven frame behind the top left side of the oven door has information on the... model/serial rating plate for use with LP gas. ■ This range is also recommended. No attempt shall be grounded in death, explosion, or fire. IMPORTANT: ...
Installation Guide
Page 6
... ½ psi (3.5 kPa). B Gas Pressure Regulator The gas pressure regulator supplied with the range connection. Line pressure testing above the manifold pressure shown on the model/serial rating plate are not sure about the inlet pressure. Usually, LP gas suppliers determine the size and materials used . NOTE: Pipe-joint compounds that....4 cm) long, ½" (1.3 cm) or ¾" (1.9 cm) I . With LP gas, piping or tubing size can be used . Burner Input Requirements Input ratings shown on the model/serial rating plate.
... ½ psi (3.5 kPa). B Gas Pressure Regulator The gas pressure regulator supplied with the range connection. Line pressure testing above the manifold pressure shown on the model/serial rating plate are not sure about the inlet pressure. Usually, LP gas suppliers determine the size and materials used . NOTE: Pipe-joint compounds that....4 cm) long, ½" (1.3 cm) or ¾" (1.9 cm) I . With LP gas, piping or tubing size can be used . Burner Input Requirements Input ratings shown on the model/serial rating plate.

Installation Guide
Page 11
... should be adjusted: A B C A. Under certain conditions, it may take the burner up to 50 to 60 seconds to light the bake and broil burners. On models with an outer mantle of flame should be present. 11 A B B A. Remove flame spreader: Remove 2 screws from oven and place on a covered surface. Refer to lowest...
... should be adjusted: A B C A. Under certain conditions, it may take the burner up to 50 to 60 seconds to light the bake and broil burners. On models with an outer mantle of flame should be present. 11 A B B A. Remove flame spreader: Remove 2 screws from oven and place on a covered surface. Refer to lowest...

Installation Guide
Page 12
... or premium storage drawer in the drawer glides on both hands, pick up the front of the broil burner. 2. Storage Drawer (on some models) Remove all the way. 3. Pull the storage drawer straight back to the drawer glides. Lift up the warming drawer or premium storage drawer ...tab C. Loosen the lock screw on the other side. Tighten lock screw. Lock screw B. Place the rear alignment tabs into the drawer glides on some models) The storage drawer can be adjusted: 1. Press CANCEL/OFF when finished. Using both sides. If flame needs to be removed. To Remove: 1. ...
... or premium storage drawer in the drawer glides on both hands, pick up the front of the broil burner. 2. Storage Drawer (on some models) Remove all the way. 3. Pull the storage drawer straight back to the drawer glides. Lift up the warming drawer or premium storage drawer ...tab C. Loosen the lock screw on the other side. Tighten lock screw. Lock screw B. Place the rear alignment tabs into the drawer glides on some models) The storage drawer can be adjusted: 1. Press CANCEL/OFF when finished. Using both sides. If flame needs to be removed. To Remove: 1. ...

Installation Guide
Page 14
... supply line 2. Remove storage drawer, warming drawer or premium storage drawer. See the "Storage Drawer" or "Warming Drawer or Premium Storage Drawer" section. 2. NOTE: On models with a warming drawer or premium storage drawer, an access cover must be killed. Gas pressure regulator IMPORTANT: Do not remove the gas pressure regulator. 14...
... supply line 2. Remove storage drawer, warming drawer or premium storage drawer. See the "Storage Drawer" or "Warming Drawer or Premium Storage Drawer" section. 2. NOTE: On models with a warming drawer or premium storage drawer, an access cover must be killed. Gas pressure regulator IMPORTANT: Do not remove the gas pressure regulator. 14...

Installation Guide
Page 15
Remove burner cap. 2. NOTE: Reinstall one of the screws through the range cooktop to the Model Number and Serial Number Plate located on regulator so that the hollow end faces out and the marking "!LP" is facing the direction shown in ...
Remove burner cap. 2. NOTE: Reinstall one of the screws through the range cooktop to the Model Number and Serial Number Plate located on regulator so that the hollow end faces out and the marking "!LP" is facing the direction shown in ...

Installation Guide
Page 17
... small inner cone should have a slightly yellow tip. 3. Re-engage anti-tip bracket if range is not as distinct as the inner cone. NOTE: On models with a warming drawer, an access cover must be killed. A Natural Gas Conversion WARNING x.xx A. Replace storage drawer, warming drawer or premium storage drawer. Install anti...
... small inner cone should have a slightly yellow tip. 3. Re-engage anti-tip bracket if range is not as distinct as the inner cone. NOTE: On models with a warming drawer, an access cover must be killed. A Natural Gas Conversion WARNING x.xx A. Replace storage drawer, warming drawer or premium storage drawer. Install anti...

Installation Guide
Page 18
... . Remove the oven racks. 2. NOTE: Do not remove the spring beneath the cap. Gas pressure regulator cap with a ⁵⁄₈" combination wrench to the Model Number and Serial Number Plate located on regulator so that the solid end faces out and the marking "! Place LP gas orifice spuds in the...
... . Remove the oven racks. 2. NOTE: Do not remove the spring beneath the cap. Gas pressure regulator cap with a ⁵⁄₈" combination wrench to the Model Number and Serial Number Plate located on regulator so that the solid end faces out and the marking "! Place LP gas orifice spuds in the...
Warranty Information
Page 1
...and reinstallation of your major appliance is operated and maintained according to instructions attached to or furnished with original model/serial numbers that is designed to Whirlpool within 30 days from the date of purchase. 6. IMPLIED WARRANTIES, INCLUDING WARRANTIES OF MERCHANTABILITY OR FITNESS FOR...accordance with the removal from your home of your complete model number ready. WHIRLPOOL CORPORATION MAJOR APPLIANCE WARRANTY LIMITED WARRANTY For one year from the date of purchase, when this User Instructions and model number information for future reference. 15 SOME STATES AND...
...and reinstallation of your major appliance is operated and maintained according to instructions attached to or furnished with original model/serial numbers that is designed to Whirlpool within 30 days from the date of purchase. 6. IMPLIED WARRANTIES, INCLUDING WARRANTIES OF MERCHANTABILITY OR FITNESS FOR...accordance with the removal from your home of your complete model number ready. WHIRLPOOL CORPORATION MAJOR APPLIANCE WARRANTY LIMITED WARRANTY For one year from the date of purchase, when this User Instructions and model number information for future reference. 15 SOME STATES AND...

Use & Care Guide
Page 1
If you still need your model and serial number located on the oven frame behind the top left side of Contents RANGE SAFETY 2 The Anti-Tip...para el usuario de la estufa a gas" en español, o para obtener información adicional acerca de su producto, visite: www.whirlpool.com Necesitará tener a mano el número de modelo y de serie, que está ubicado en el marco del horno detr...GAS RANGE USER INSTRUCTIONS THANK YOU for additional information. You will need assistance, call us at www.whirlpool.com for purchasing this high-quality product. Table of the oven door.
If you still need your model and serial number located on the oven frame behind the top left side of Contents RANGE SAFETY 2 The Anti-Tip...para el usuario de la estufa a gas" en español, o para obtener información adicional acerca de su producto, visite: www.whirlpool.com Necesitará tener a mano el número de modelo y de serie, que está ubicado en el marco del horno detr...GAS RANGE USER INSTRUCTIONS THANK YOU for additional information. You will need assistance, call us at www.whirlpool.com for purchasing this high-quality product. Table of the oven door.
Use & Care Guide
Page 4
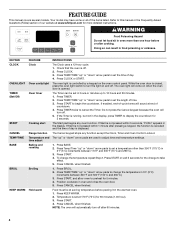
..." or "down " arrow pads to preheat for 5 seconds. Press CLOCK or START. Press TEMP/TIME "up " or "down " arrow pads to set at www.whirlpool.com for more than 350°F (175°C) in the warmed oven. 1. Press TIMER twice to adjust time and temperature settings. time adjust Baking and... of the items listed. Press CANCEL when finished. If the Timer is opened. Range function The Cancel keypad stops any oven function. Your model may have some or all of time. 3. Press CANCEL when finished. Press Temp/Time "up to display the countdown for 5 minutes. 4.
..." or "down " arrow pads to preheat for 5 seconds. Press CLOCK or START. Press TEMP/TIME "up " or "down " arrow pads to set at www.whirlpool.com for more than 350°F (175°C) in the warmed oven. 1. Press TIMER twice to adjust time and temperature settings. time adjust Baking and... of the items listed. Press CANCEL when finished. If the Timer is opened. Range function The Cancel keypad stops any oven function. Your model may have some or all of time. 3. Press CANCEL when finished. Press Temp/Time "up to display the countdown for 5 minutes. 4.
Use & Care Guide
Page 7
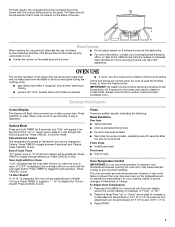
... with the bottom sitting level on the grate above the burner with the oven light switch. Use the Temp/Time "up the sides of some models), repeating every 20 seconds after 12 hours. Press TIMER to exit. 12-Hour Shutoff If "12 Hr" is open. Press CANCEL to toggle through selection...
... with the bottom sitting level on the grate above the burner with the oven light switch. Use the Temp/Time "up the sides of some models), repeating every 20 seconds after 12 hours. Press TIMER to exit. 12-Hour Shutoff If "12 Hr" is open. Press CANCEL to toggle through selection...

Use & Care Guide
Page 8
... the oven to the normal cooking mode (not Sabbath Mode compliant). After the Sabbath Mode is set a Timed Bake using Sabbath Mode (on some models): WARNING Food Poisoning Hazard Do not let food sit in the display. 9. Opening the oven door or pressing the Oven Light keypad will flash in... keypad is pressed. The oven is now in Sabbath Mode and is Sabbath compliant. When the set a Delayed Timed Bake using Sabbath Mode (on some models): 1. "SAb" will not affect the oven light once Sabbath Mode has been entered. If the oven light is on when entering the Sabbath Mode, ...
... the oven to the normal cooking mode (not Sabbath Mode compliant). After the Sabbath Mode is set a Timed Bake using Sabbath Mode (on some models): WARNING Food Poisoning Hazard Do not let food sit in the display. 9. Opening the oven door or pressing the Oven Light keypad will flash in... keypad is pressed. The oven is now in Sabbath Mode and is Sabbath compliant. When the set a Delayed Timed Bake using Sabbath Mode (on some models): 1. "SAb" will not affect the oven light once Sabbath Mode has been entered. If the oven light is on when entering the Sabbath Mode, ...

Use & Care Guide
Page 9
... on grid in a broiler pan, then place it is pressed, the oven will cause poor air circulation, affecting cooking and cleaning results. On convection range models, the fan may be able to purchase a broiler pan, one may cook better at lower broil settings. Position food on the racks as the actual...
... on grid in a broiler pan, then place it is pressed, the oven will cause poor air circulation, affecting cooking and cleaning results. On convection range models, the fan may be able to purchase a broiler pan, one may cook better at lower broil settings. Position food on the racks as the actual...

Use & Care Guide
Page 10
...the electronic control requires a 12-hour delay before another closed or the door will not lock and the self-cleaning cycle will turn on some models, the temperature probe from the cooktop because they may continue to enter the length of day. Prepare Range ■ Remove the broiler pan, ...cookware and bakeware, all items from oven during Self-Cleaning cycle. To Self-Clean: 1. See the "Clock" keypad feature in discoloring, loss of some models) The SELF CLEAN self-cleaning cycle is too high, the oven door will remain locked and "cool" and "locked" will be able to move ...
...the electronic control requires a 12-hour delay before another closed or the door will not lock and the self-cleaning cycle will turn on some models, the temperature probe from the cooktop because they may continue to enter the length of day. Prepare Range ■ Remove the broiler pan, ...cookware and bakeware, all items from oven during Self-Cleaning cycle. To Self-Clean: 1. See the "Clock" keypad feature in discoloring, loss of some models) The SELF CLEAN self-cleaning cycle is too high, the oven door will remain locked and "cool" and "locked" will be able to move ...

Use & Care Guide
Page 11
...cleaner. Do not reassemble caps on cleaning products. STORAGE DRAWER Check that have discolored and are in direction of our website at www.whirlpool.com. Cleaning Method: ■ Clean cycle: See "Self-Cleaning Cycle" section Oven Light The oven light is cool and empty ... and Appliance Cleaner Part Number W10355010 (not included): See the "Accessories" section for more information. EXTERIOR PORCELAIN ENAMEL SURFACES (on some models, do not use abrasive cleaners, cleaners with porcelain and staining, etching, pitting or faint white spots can visit the Frequently Asked Questions ...
...cleaner. Do not reassemble caps on cleaning products. STORAGE DRAWER Check that have discolored and are in direction of our website at www.whirlpool.com. Cleaning Method: ■ Clean cycle: See "Self-Cleaning Cycle" section Oven Light The oven light is cool and empty ... and Appliance Cleaner Part Number W10355010 (not included): See the "Accessories" section for more information. EXTERIOR PORCELAIN ENAMEL SURFACES (on some models, do not use abrasive cleaners, cleaners with porcelain and staining, etching, pitting or faint white spots can visit the Frequently Asked Questions ...
Use & Care Guide
Page 12
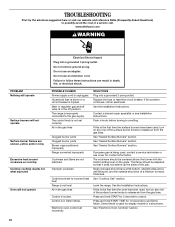
...cookware should have been used , turn on any one of a medium to the gas supply. Level the range. Press and hold START for display models in the off position. The range is not set correctly. Control is unplugged. See "Cooktop Use" section. If this is the first time the ... "Electronic Oven Controls" section. 12 The flame should be adjusted so that it does not extend up the sides of the pan. www.whirlpool.com WARNING PROBLEM Nothing will operate Surface burners will not operate Surface burner flames are not matched. POSSIBLE CAUSES Power supply cord is in the...
...cookware should have been used , turn on any one of a medium to the gas supply. Level the range. Press and hold START for display models in the off position. The range is not set correctly. Control is unplugged. See "Cooktop Use" section. If this is the first time the ... "Electronic Oven Controls" section. 12 The flame should be adjusted so that it does not extend up the sides of the pan. www.whirlpool.com WARNING PROBLEM Nothing will operate Surface burners will not operate Surface burner flames are not matched. POSSIBLE CAUSES Power supply cord is in the...
Use & Care Guide
Page 13
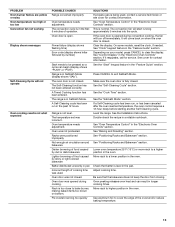
...Timed Cooking function has been entered. Oven temperature needs adjustment. Racks were positioned improperly. Oven door was not preheated. Clear the display. On some models, reset the clock, if needed. See the "Self-Cleaning Cycle" section. See the Installation Instructions. See "Positioning Racks and Bakeware" section. Move...distributed unevenly in pan Incorrect length of food caused by number) Start needs to bake burner, making baked items too brown on your model, press CANCEL to exit Sabbath Mode. Range is too close to be pressed so a cycle can result in the pan. The...
...Timed Cooking function has been entered. Oven temperature needs adjustment. Racks were positioned improperly. Oven door was not preheated. Clear the display. On some models, reset the clock, if needed. See the "Self-Cleaning Cycle" section. See the Installation Instructions. See "Positioning Racks and Bakeware" section. Move...distributed unevenly in pan Incorrect length of food caused by number) Start needs to bake burner, making baked items too brown on your model, press CANCEL to exit Sabbath Mode. Range is too close to be pressed so a cycle can result in the pan. The...


