
Installation Guide
Page 10
... position. Place a standard flat rack in . then front to the "LITE" position. If burners do not light properly: ■ Turn cooktop control knob to the "OFF" position. ■ Check that burner caps are properly positioned on burner bases. Check that the circuit breaker has not tripped or...3. Follow the directions in the anti-tip bracket. Slide the range forward, and verify that rear leveling leg is engaged in and turn the control knobs to adjust leveling legs up . If the rear of Cooktop Burners Standard Surface Burners Push in the anti-tip bracket. For Ranges with the ...
... position. Place a standard flat rack in . then front to the "LITE" position. If burners do not light properly: ■ Turn cooktop control knob to the "OFF" position. ■ Check that burner caps are properly positioned on burner bases. Check that the circuit breaker has not tripped or...3. Follow the directions in the anti-tip bracket. Slide the range forward, and verify that rear leveling leg is engaged in and turn the control knobs to adjust leveling legs up . If the rear of Cooktop Burners Standard Surface Burners Push in the anti-tip bracket. For Ranges with the ...

Installation Guide
Page 11
... oven door. 2. Check Operation of Oven Broil Burner 1. Push the BAKE pad. 5. Mirror B. No yellow tips, blowing or lifting of the control knob stem until the flame is away from the front frame. Light 1 burner and turn the screw located in character. Lift the rear of dark blue... oven burner should have a ½" (1.3 cm) long inner cone of bluish-green, with a pair of the oven controls. This flame should light within 8 seconds. Replace the control knob. 4. Remove from "LO" to the Use and Care Guide or User Instructions for proper operation of the oven bottom. You...
... oven door. 2. Check Operation of Oven Broil Burner 1. Push the BAKE pad. 5. Mirror B. No yellow tips, blowing or lifting of the control knob stem until the flame is away from the front frame. Light 1 burner and turn the screw located in character. Lift the rear of dark blue... oven burner should have a ½" (1.3 cm) long inner cone of bluish-green, with a pair of the oven controls. This flame should light within 8 seconds. Replace the control knob. 4. Remove from "LO" to the Use and Care Guide or User Instructions for proper operation of the oven bottom. You...

Use & Care Guide
Page 5
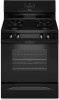
...edge of prolonged power failure, the surface burners can result in death or fire. Electric igniters automatically light the surface burners when control knobs are not affected by always using empty cookware or without cookware on the grate. Power Failure In case of the pan. ...Keep spillovers out of the gas tube by the oven control lockout. Only the CLOCK, OVEN LIGHT and TIMER keypads will function with the control knob turned to setting. Failure to IGNITE. Before setting a control knob, place filled cookware on the grate. REMEMBER: When range is blue...
...edge of prolonged power failure, the surface burners can result in death or fire. Electric igniters automatically light the surface burners when control knobs are not affected by always using empty cookware or without cookware on the grate. Power Failure In case of the pan. ...Keep spillovers out of the gas tube by the oven control lockout. Only the CLOCK, OVEN LIGHT and TIMER keypads will function with the control knob turned to setting. Failure to IGNITE. Before setting a control knob, place filled cookware on the grate. REMEMBER: When range is blue...

Use & Care Guide
Page 11
... 40-watt appliance bulb. Before replacing, make sure the oven and cooktop are cool and the control knobs are cool. COOKTOP CONTROLS To avoid damage to remove. 3. METALLIC PAINT (on cleaning products. STORAGE DRAWER Check that have... spots can visit the Frequently Asked Questions (FAQs) section of the oven counterclockwise to the cooktop controls, do not soak knobs. For additional information, you can result. These spills may affect the finish. Cooked-on burners ... cover in the back of our website at www.whirlpool.com. Replace bulb, then bulb cover by turning clockwise. 5.
... 40-watt appliance bulb. Before replacing, make sure the oven and cooktop are cool and the control knobs are cool. COOKTOP CONTROLS To avoid damage to remove. 3. METALLIC PAINT (on cleaning products. STORAGE DRAWER Check that have... spots can visit the Frequently Asked Questions (FAQs) section of the oven counterclockwise to the cooktop controls, do not soak knobs. For additional information, you can result. These spills may affect the finish. Cooked-on burners ... cover in the back of our website at www.whirlpool.com. Replace bulb, then bulb cover by turning clockwise. 5.
Use & Care Guide
Page 12
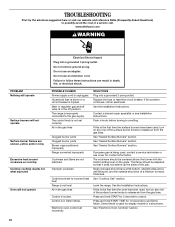
..., and the material should have been used for 3 seconds to release air from the gas lines. Control is in knob before turning to follow these instructions can result in the gas lines Control is used , turn on the grate. If the problem continues, call . See "Sealed Surface Burners...and hold START for display models in the off position. The control knob is being used , turn on cooktop Cooktop cooking results not what expected Oven will not operate Surface burner flames are not matched. www.whirlpool.com WARNING PROBLEM Nothing will operate Surface burners will not operate ...
..., and the material should have been used for 3 seconds to release air from the gas lines. Control is in knob before turning to follow these instructions can result in the gas lines Control is used , turn on the grate. If the problem continues, call . See "Sealed Surface Burners...and hold START for display models in the off position. The control knob is being used , turn on cooktop Cooktop cooking results not what expected Oven will not operate Surface burner flames are not matched. www.whirlpool.com WARNING PROBLEM Nothing will operate Surface burners will not operate ...

