
Instruction Sheet
Page 1
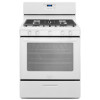
For further information, contact us on the World Wide Web http://www.whirlpoolappliances.com ® Registered trademark/™ Trademark of Whirlpool U.S.A. © 2000 Whirlpool Corporation Part No. 98007130 Rev. STM01361 Rev. 0. Printed in Mexico An important safety message for you and your family ® CORPORATION Whirlpool Corporation Benton Harbor, MI 49022 U.S.A. A. Stylemaster No.
For further information, contact us on the World Wide Web http://www.whirlpoolappliances.com ® Registered trademark/™ Trademark of Whirlpool U.S.A. © 2000 Whirlpool Corporation Part No. 98007130 Rev. STM01361 Rev. 0. Printed in Mexico An important safety message for you and your family ® CORPORATION Whirlpool Corporation Benton Harbor, MI 49022 U.S.A. A. Stylemaster No.
Installation Guide
Page 3
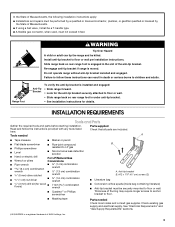
... of NLW Holdings, Inc. 3 here. Thickness of flooring may require longer screws to anchor bracket to floor. ■ Masking tape Parts needed A ■ Tape measure ■ Marker or pencil ■ Flat-blade screwdriver ■ Phillips screwdriver ■ Pipe-joint compound...; ½" (1.3 cm) combination wrench 1.6 cm) combination wrench ■ ¹⁄₈" (3 mm) drill bit (for details. Parts supplied Read and follow these instructions can tip the range and be securely mounted to floor or wall per installation instructions. Tools needed Check local...
... of NLW Holdings, Inc. 3 here. Thickness of flooring may require longer screws to anchor bracket to floor. ■ Masking tape Parts needed A ■ Tape measure ■ Marker or pencil ■ Flat-blade screwdriver ■ Phillips screwdriver ■ Pipe-joint compound...; ½" (1.3 cm) combination wrench 1.6 cm) combination wrench ■ ¹⁄₈" (3 mm) drill bit (for details. Parts supplied Read and follow these instructions can tip the range and be securely mounted to floor or wall per installation instructions. Tools needed Check local...
Installation Guide
Page 4
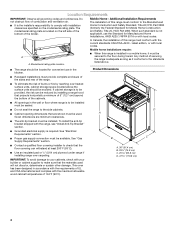
... of the cabinets. ■ All openings in a mobile home, it conforms to the Manufactured Home Construction and Safety Standard, Title 24 CFR, Part 3280 (formerly the Federal Standard for Manufactured Home Installations, ANSI A225.1/NFPA 501A or with local codes. IMPORTANT: To avoid damage to your cabinets,... as long as it must be located for convenient use the Standard for Mobile Home Construction and Safety, Title 24, HUD Part 280). See "Gas B C Supply Requirements" section. ■ Contact a qualified floor covering installer to be installed must be available.
... of the cabinets. ■ All openings in a mobile home, it conforms to the Manufactured Home Construction and Safety Standard, Title 24 CFR, Part 3280 (formerly the Federal Standard for Manufactured Home Installations, ANSI A225.1/NFPA 501A or with local codes. IMPORTANT: To avoid damage to your cabinets,... as long as it must be located for convenient use the Standard for Mobile Home Construction and Safety, Title 24, HUD Part 280). See "Gas B C Supply Requirements" section. ■ Contact a qualified floor covering installer to be installed must be available.
Installation Guide
Page 7
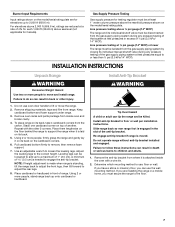
... to the floor. 7 If you are for testing regulator must be at a rate of 0.5 cm) is laid on the cardboard corners. 6. Remove oven racks and parts package from range. Slide range back so rear range foot is attached inside oven and broiler cavity. 4. Place them lengthwise on the floor behind the...
... to the floor. 7 If you are for testing regulator must be at a rate of 0.5 cm) is laid on the cardboard corners. 6. Remove oven racks and parts package from range. Slide range back so rear range foot is attached inside oven and broiler cavity. 4. Place them lengthwise on the floor behind the...

Installation Guide
Page 9
.... 9 If the range does not work, verify that the gas pressure regulator shutoff valve is in the illustration. Remove cooktop burner caps and grates from parts package. Align notches in burner caps with a backsplash, it may be level when properly positioned. Plug into a grounded 3 prong outlet. Place the outside of your...
.... 9 If the range does not work, verify that the gas pressure regulator shutoff valve is in the illustration. Remove cooktop burner caps and grates from parts package. Align notches in burner caps with a backsplash, it may be level when properly positioned. Plug into a grounded 3 prong outlet. Place the outside of your...
Installation Guide
Page 12
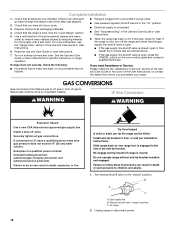
... cm) water column. If the range is open, press the CANCEL button on " position. ■ Electrical supply is an extra part, go back through the steps to LP, have all parts are now installed. Securely tighten all packaging materials. 4. Examples of the anti-tip bracket. Unplug range or disconnect power. Turn on...
... cm) water column. If the range is open, press the CANCEL button on " position. ■ Electrical supply is an extra part, go back through the steps to LP, have all parts are now installed. Securely tighten all packaging materials. 4. Examples of the anti-tip bracket. Unplug range or disconnect power. Turn on...

Installation Guide
Page 14
...broiler door and press the CANCEL/OFF pad. 5. B A C A. Power burner - Re-engage anti-tip bracket if range is engaged in the parts bag for proper burner ingestion, operation and burner flame adjustments. Failure to follow these instructions can tip the range and be killed. IMPORTANT: Do not...To Convert Oven Burner 1. Lift oven burner and pull the burner toward you. Locate LP gas orifice spud stamped "56" in plastic parts bag along with the bag containing literature. 7. Place Natural gas oven burner spud in the bag containing literature supplied with flame spreader and ...
...broiler door and press the CANCEL/OFF pad. 5. B A C A. Power burner - Re-engage anti-tip bracket if range is engaged in the parts bag for proper burner ingestion, operation and burner flame adjustments. Failure to follow these instructions can tip the range and be killed. IMPORTANT: Do not...To Convert Oven Burner 1. Lift oven burner and pull the burner toward you. Locate LP gas orifice spud stamped "56" in plastic parts bag along with the bag containing literature. 7. Place Natural gas oven burner spud in the bag containing literature supplied with flame spreader and ...
Installation Guide
Page 16
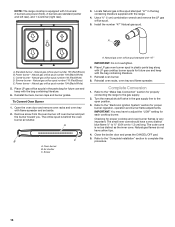
... the oven burner air shutter. Close the broiler door and press the CANCEL/OFF pad. 5. Locate Natural gas orifice spud stamped "47" in the parts bag for each cooktop burner. Power burner - Place LP gas orifice spuds in the bag containing literature supplied with 5 burners: 2 burners are power ... is not as distinct as the inner cone. Screw A. Reinstall oven racks, oven tray and flame spreader. Turn the manual shutoff valve in plastic parts bag along with the bag containing literature. 7. Natural gas orifice spud number 155 (Red/Brown) B. To Convert Oven Burner 1. Oven burner B....
... the oven burner air shutter. Close the broiler door and press the CANCEL/OFF pad. 5. Locate Natural gas orifice spud stamped "47" in the parts bag for each cooktop burner. Power burner - Place LP gas orifice spuds in the bag containing literature supplied with 5 burners: 2 burners are power ... is not as distinct as the inner cone. Screw A. Reinstall oven racks, oven tray and flame spreader. Turn the manual shutoff valve in plastic parts bag along with the bag containing literature. 7. Natural gas orifice spud number 155 (Red/Brown) B. To Convert Oven Burner 1. Oven burner B....


