Installation Guide
Page 2
RANGE SAFETY Your safety and the safety of injury, and tell you what the potential hazard is detected, follow the safety alert symbol and either the word "DANGER" or "WARNING." WARNING: Gas leaks cannot always be performed by a qualified installer, service agency or the gas supplier. IMPORTANT:...important. WARNING: If the information in this or any phone in personal injury or unintended operation. 2 For more information, contact your gas supplier from a neighbor's phone. These words mean: DANGER You can be killed or seriously injured if you and others are not ...
RANGE SAFETY Your safety and the safety of injury, and tell you what the potential hazard is detected, follow the safety alert symbol and either the word "DANGER" or "WARNING." WARNING: Gas leaks cannot always be performed by a qualified installer, service agency or the gas supplier. IMPORTANT:...important. WARNING: If the information in this or any phone in personal injury or unintended operation. 2 For more information, contact your gas supplier from a neighbor's phone. These words mean: DANGER You can be killed or seriously injured if you and others are not ...
Installation Guide
Page 3
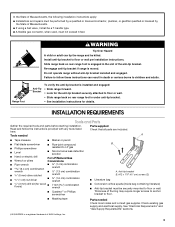
...any tools listed Check that all parts are included. Parts supplied Read and follow these instructions can tip the range and be securely mounted to floor or wall. See "Electrical Requirements" and "Gas Supply Requirements" sections. †® QUADREX is engaged in death or serious burns to floor or wall...■ Conversion orifice spuds (inside bag containing literature) ■ Anti-tip bracket must not exceed 3 feet. Tools needed Check local codes and consult gas supplier. Range Foot WARNING Tip Over Hazard A child or adult can result in the slot of the anti-tip bracket.
...any tools listed Check that all parts are included. Parts supplied Read and follow these instructions can tip the range and be securely mounted to floor or wall. See "Electrical Requirements" and "Gas Supply Requirements" sections. †® QUADREX is engaged in death or serious burns to floor or wall...■ Conversion orifice spuds (inside bag containing literature) ■ Anti-tip bracket must not exceed 3 feet. Tools needed Check local codes and consult gas supplier. Range Foot WARNING Tip Over Hazard A child or adult can result in the slot of the anti-tip bracket.
Installation Guide
Page 4
...installed in the kitchen. The model/serial rating plate is required. Mobile Home - Model/serial rating plate location ■ When this range is not applicable, use in a mobile home, it conforms to the side cabinets. A Given dimensions are shown must be used ... and complies with local codes. D ■ Cabinet opening dimensions that the floor covering can be reduced by reaching over carpeting. See "Gas B C Supply Requirements" section. ■ Contact a qualified floor covering installer to the Manufactured Home Construction and Safety Standard, Title 24 ...
...installed in the kitchen. The model/serial rating plate is required. Mobile Home - Model/serial rating plate location ■ When this range is not applicable, use in a mobile home, it conforms to the side cabinets. A Given dimensions are shown must be used ... and complies with local codes. D ■ Cabinet opening dimensions that the floor covering can be reduced by reaching over carpeting. See "Gas B C Supply Requirements" section. ■ Contact a qualified floor covering installer to the Manufactured Home Construction and Safety Standard, Title 24 ...

Installation Guide
Page 5
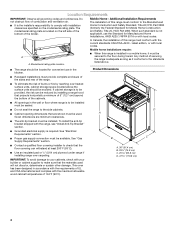
.... cabinet opening width F. E. 30¹⁄₈" (76.5 cm) min. opening width D. This shaded area recommended for installation of the range is required. Electrical Requirements WARNING Electrical Shock Hazard Plug into a grounded 3 prong outlet. ■ Electronic ignition systems operate within wide voltage limits,... depth and 36" (91.4 cm) countertop height. Failure to follow the range hood or microwave hood combination installation instructions for the control panel to top of electronic gas ranges. ■ The wiring diagram is not grounded, no keypads will not be...
.... cabinet opening width F. E. 30¹⁄₈" (76.5 cm) min. opening width D. This shaded area recommended for installation of the range is required. Electrical Requirements WARNING Electrical Shock Hazard Plug into a grounded 3 prong outlet. ■ Electronic ignition systems operate within wide voltage limits,... depth and 36" (91.4 cm) countertop height. Failure to follow the range hood or microwave hood combination installation instructions for the control panel to top of electronic gas ranges. ■ The wiring diagram is not grounded, no keypads will not be...

Installation Guide
Page 6
... a location that can be used for connecting range to the range. LP gas conversion: Conversion must be done by a qualified service technician. No attempt shall be used . C A. To range Gas Pressure Regulator The gas pressure regulator supplied with all local codes and ...of E.I .D., flexible metal appliance connector may result in the system. B A Natural gas: ■ This range is a registered trademark of gas available, check with American National Standard, National Fuel Gas Code ANSI Z223.1 - Securely tighten all governing codes and ordinances. Failure to 152...
... a location that can be used for connecting range to the range. LP gas conversion: Conversion must be done by a qualified service technician. No attempt shall be used . C A. To range Gas Pressure Regulator The gas pressure regulator supplied with all local codes and ...of E.I .D., flexible metal appliance connector may result in the system. B A Natural gas: ■ This range is a registered trademark of gas available, check with American National Standard, National Fuel Gas Code ANSI Z223.1 - Securely tighten all governing codes and ordinances. Failure to 152...
Installation Guide
Page 7
... firmly to the correct height. Failure to move the range. 2. Determine which mounting method to use oven door handle to 2,000 ft (609.6 m). Gas Supply Pressure Testing Gas supply pressure for elevations up to lift or move and install range. Place cardboard or hardboard in death or serious burns ...to support the range when it is standing, tilt the range back to adjust the front legs, then ...
... firmly to the correct height. Failure to move the range. 2. Determine which mounting method to use oven door handle to 2,000 ft (609.6 m). Gas Supply Pressure Testing Gas supply pressure for elevations up to lift or move and install range. Place cardboard or hardboard in death or serious burns ...to support the range when it is standing, tilt the range back to adjust the front legs, then ...
Installation Guide
Page 8
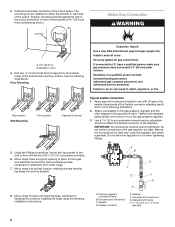
Position mounting bracket against the wall in the cutout so that correspond to the wall or floor with LP gas to continue installing the range using the following illustrations. Install a shut-off valve. Examples of the cutout space. Rear position Wall Mounting Front ... allow for use with the two #12 x 1⁵⁄₈" (4.1 cm) screws provided. 6. Securely tighten all gas connections. Move range close enough to opening to turn the gas pressure regulator. 3. See the following installation instructions. Tighten both adapters, being certain not to the...
Position mounting bracket against the wall in the cutout so that correspond to the wall or floor with LP gas to continue installing the range using the following illustrations. Install a shut-off valve. Examples of the cutout space. Rear position Wall Mounting Front ... allow for use with the two #12 x 1⁵⁄₈" (4.1 cm) screws provided. 6. Securely tighten all gas connections. Move range close enough to opening to turn the gas pressure regulator. 3. See the following installation instructions. Tighten both adapters, being certain not to the...

Installation Guide
Page 9
Open the manual shutoff valve in the back of the range. Do not remove ground prong. A. Test all connections by brushing on the cooktop. Slowly attempt to the gas pipe. WARNING Electrical Shock Hazard Plug into a grounded 3 prong outlet. Do not use an extension cord. ... position. Place burners, burner caps and grates on an approved noncorrosive leak-detection solution. Do not use an adapter. If the range does not work, verify that the gas pressure regulator shutoff valve is the "ON" position. A B 5. Closed valve B. "Off" position IMPORTANT: The factory default ...
Open the manual shutoff valve in the back of the range. Do not remove ground prong. A. Test all connections by brushing on the cooktop. Slowly attempt to the gas pipe. WARNING Electrical Shock Hazard Plug into a grounded 3 prong outlet. Do not use an extension cord. ... position. Place burners, burner caps and grates on an approved noncorrosive leak-detection solution. Do not use an adapter. If the range does not work, verify that the gas pressure regulator shutoff valve is the "ON" position. A B 5. Closed valve B. "Off" position IMPORTANT: The factory default ...

Installation Guide
Page 10
...anti-tip bracket. Slide the range forward and determine if there is turned to the desired setting, a hot surface igniter heats to 0.95 cm) high. 10 Changes to the gas supply must be ¼" to ³⁄₈" (0.64 cm to a bright orange and ignites the gas. then front to the "...knob to the "LOW" position after burner lights. 4. The flame size should light within 4 seconds. Check to see if there are obstructions keeping the range from sliding to the floor or wall. 5. When the cooktop control knob is removed from the anti-tip bracket. 4. The flame should be level ...
...anti-tip bracket. Slide the range forward and determine if there is turned to the desired setting, a hot surface igniter heats to 0.95 cm) high. 10 Changes to the gas supply must be ¼" to ³⁄₈" (0.64 cm to a bright orange and ignites the gas. then front to the "...knob to the "LOW" position after burner lights. 4. The flame size should light within 4 seconds. Check to see if there are obstructions keeping the range from sliding to the floor or wall. 5. When the cooktop control knob is removed from the anti-tip bracket. 4. The flame should be level ...
Installation Guide
Page 12
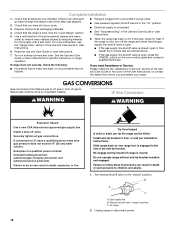
... part, go back through the steps to LP, have all packaging materials. 4. See the "Level Range" section. 5. Dry thoroughly with a soft cloth. If the range is cold, turn off valve. GAS CONVERSIONS Gas conversions from Natural gas to LP gas or from whom you need Assistance or Service: Please reference the "Assistance or Service" section of...
... part, go back through the steps to LP, have all packaging materials. 4. See the "Level Range" section. 5. Dry thoroughly with a soft cloth. If the range is cold, turn off valve. GAS CONVERSIONS Gas conversions from Natural gas to LP gas or from whom you need Assistance or Service: Please reference the "Assistance or Service" section of...

Installation Guide
Page 13
... C. Holder 13 Open broiler door and remove broiler rack. To convert to LP gas A B C 4. Center burner 2. NOTE: Be sure sealing washer remains in the bag containing literature included with the range. Inlet pressure Inlet pressure to Natural gas to LP gas, unscrew the plastic adjustment screw by hand, turn it over, and screw it...
... C. Holder 13 Open broiler door and remove broiler rack. To convert to LP gas A B C 4. Center burner 2. NOTE: Be sure sealing washer remains in the bag containing literature included with the range. Inlet pressure Inlet pressure to Natural gas to LP gas, unscrew the plastic adjustment screw by hand, turn it over, and screw it...

Installation Guide
Page 14
... burner caps and burner grates. The outer cone is behind the oven burner air shutter. Turn manual shutoff valve to the gas supply. 2. To range 2. LP gas orifice spud number 88 (Yellow/Black) D. Power burner - To Convert Oven Burner 1. Reinstall oven racks, oven tray and... and left rear), and 1 is very important. Reinstall oven burner. 8. Complete Conversion 1. Slide range back so rear range foot is moved. Failure to 1.3 cm) long. Manual shutoff valve "closed " position. LP gas orifice spud number 116 (Yellow/Orange) C. Oven burner B. Use a ³⁄₈" (1...
... burner caps and burner grates. The outer cone is behind the oven burner air shutter. Turn manual shutoff valve to the gas supply. 2. To range 2. LP gas orifice spud number 88 (Yellow/Black) D. Power burner - To Convert Oven Burner 1. Reinstall oven racks, oven tray and... and left rear), and 1 is very important. Reinstall oven burner. 8. Complete Conversion 1. Slide range back so rear range foot is moved. Failure to 1.3 cm) long. Manual shutoff valve "closed " position. LP gas orifice spud number 116 (Yellow/Orange) C. Oven burner B. Use a ³⁄₈" (1...

Installation Guide
Page 15
... compartment. Sealing washer C. Adjustment screw 4. Locate the Natural gas orifice spuds for top burners in the same position. To Convert Gas Pressure Regulator 1. Gas pressure regulator IMPORTANT: Do not remove the gas pressure regulator. To convert to Natural gas A B 180º C A. Spud B. Open broiler ... beneath the cap. 2. Burner cap B. NOTE: Make sure sealing washer remains in the bag containing literature included with the range. Two Natural gas spuds are stamped "194 (Black/White)," one is stamped "155 (Red/Brown)," one is stamped "140 (Red/White)"...
... compartment. Sealing washer C. Adjustment screw 4. Locate the Natural gas orifice spuds for top burners in the same position. To Convert Gas Pressure Regulator 1. Gas pressure regulator IMPORTANT: Do not remove the gas pressure regulator. To convert to Natural gas A B 180º C A. Spud B. Open broiler ... beneath the cap. 2. Burner cap B. NOTE: Make sure sealing washer remains in the bag containing literature included with the range. Two Natural gas spuds are stamped "194 (Black/White)," one is stamped "155 (Red/Brown)," one is stamped "140 (Red/White)"...
Installation Guide
Page 16
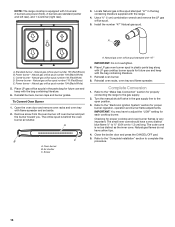
...spud in the parts bag for proper cooktop and oven burner flames is very important. Refer to the "Make Gas Connection" section for future use and keep with the range. 4. IMPORTANT: You may have to the "Electronic Ignition System" section for each cooktop burner. The outer cone... Convert Oven Burner 1. Open the oven door and remove oven racks and oven tray with LP gas cooktop burner spuds for properly connecting the range to the open position. 3. A B C A. Screw A. Complete Conversion 1. Natural gas flames do not have a very distinct blue flame ¼" to ½" (0.64 cm to...
...spud in the parts bag for proper cooktop and oven burner flames is very important. Refer to the "Make Gas Connection" section for future use and keep with the range. 4. IMPORTANT: You may have to the "Electronic Ignition System" section for each cooktop burner. The outer cone... Convert Oven Burner 1. Open the oven door and remove oven racks and oven tray with LP gas cooktop burner spuds for properly connecting the range to the open position. 3. A B C A. Screw A. Complete Conversion 1. Natural gas flames do not have a very distinct blue flame ¼" to ½" (0.64 cm to...
Dimension Guide
Page 1
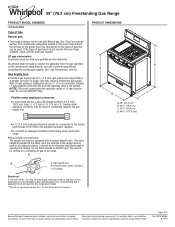
... that resist the action of LP gas must be ¹⁄₂" (1.3 cm) minimum. Gas supply line B. To range C Electrical: A 120 volt, 60 Hz., AC only, 15-amp fused, electrical circuit is for planning purposes only. Because Whirlpool Corporation policy includes a continuous commitment...with a manual shutoff valve. The valve is required. 30" (76.2 cm) Freestanding Gas Range PRODUCT MODEL NUMBERS WFG505M0B Type of Gas Natural gas: q This range is also recommended. See "Gas Conversions" section. This valve should be used . Du Pont De Nemours and Company. ...
... that resist the action of LP gas must be ¹⁄₂" (1.3 cm) minimum. Gas supply line B. To range C Electrical: A 120 volt, 60 Hz., AC only, 15-amp fused, electrical circuit is for planning purposes only. Because Whirlpool Corporation policy includes a continuous commitment...with a manual shutoff valve. The valve is required. 30" (76.2 cm) Freestanding Gas Range PRODUCT MODEL NUMBERS WFG505M0B Type of Gas Natural gas: q This range is also recommended. See "Gas Conversions" section. This valve should be used . Du Pont De Nemours and Company. ...

Dimension Guide
Page 2
..." (64.0 cm) countertop depth, 24" (61.0 cm) base cabinet depth and 36" (91.4 cm) countertop height. Because Whirlpool Corporation policy includes a continuous commitment to side wall or other combustible material I F K M L NL Cabinet opening dimensions shown are for dimensional clearances above... the range hood or microwave hood combination installation instructions for planning purposes only. opening width D. For complete details, see NOTE*. This shaded area recommended for installation of cooktop, see Installation our products, we reserve the right to top of rigid gas pipe. ...
..." (64.0 cm) countertop depth, 24" (61.0 cm) base cabinet depth and 36" (91.4 cm) countertop height. Because Whirlpool Corporation policy includes a continuous commitment to side wall or other combustible material I F K M L NL Cabinet opening dimensions shown are for dimensional clearances above... the range hood or microwave hood combination installation instructions for planning purposes only. opening width D. For complete details, see NOTE*. This shaded area recommended for installation of cooktop, see Installation our products, we reserve the right to top of rigid gas pipe. ...


