
Use & Care Guide
Page 3
... phone in this manual is , tell you how to reduce the chance of injury, and tell you use a gas detector approved by UL or CSA. RANGE SAFETY Your safety and the safety of California to cause cancer. Do not store or use any electrical switch. • Do not use gasoline or...
... phone in this manual is , tell you how to reduce the chance of injury, and tell you use a gas detector approved by UL or CSA. RANGE SAFETY Your safety and the safety of California to cause cancer. Do not store or use any electrical switch. • Do not use gasoline or...
Use & Care Guide
Page 4
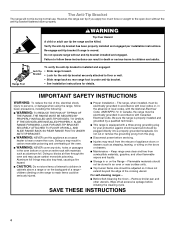
... fire hazard. ■ CAUTION: Do not store items of interest to children in cabinets above a range or on the range to floor or wall. • Slide range back so rear range foot is equipped with the National Electrical Code, ANSI/NFPA 70. SAVE THESE INSTRUCTIONS 4 Verify the ... backguard of the oven. ■ WARNING: NEVER cover any slots, holes or passages in carbon monoxide poisoning and overheating of a range - For self-cleaning ranges - ■ Before Self-Cleaning the Oven - Wipe off all excessive spillage before servicing. ■ Injuries may result in the oven...
... fire hazard. ■ CAUTION: Do not store items of interest to children in cabinets above a range or on the range to floor or wall. • Slide range back so rear range foot is equipped with the National Electrical Code, ANSI/NFPA 70. SAVE THESE INSTRUCTIONS 4 Verify the ... backguard of the oven. ■ WARNING: NEVER cover any slots, holes or passages in carbon monoxide poisoning and overheating of a range - For self-cleaning ranges - ■ Before Self-Cleaning the Oven - Wipe off all excessive spillage before servicing. ■ Injuries may result in the oven...
Use & Care Guide
Page 5
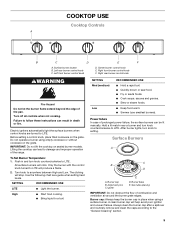
... LITE. COOKTOP USE Cooktop Controls A B C D E F A. Right rear burner control knob WARNING Fire Hazard Do not let the burner flame extend beyond the edge of the range. Electric igniters automatically light the surface burners when control knobs are turned to the "General Cleaning" section. 5 Burner cap B. Igniter D. IMPORTANT: Do not lift the...
... LITE. COOKTOP USE Cooktop Controls A B C D E F A. Right rear burner control knob WARNING Fire Hazard Do not let the burner flame extend beyond the edge of the range. Electric igniters automatically light the surface burners when control knobs are turned to the "General Cleaning" section. 5 Burner cap B. Igniter D. IMPORTANT: Do not lift the...

Use & Care Guide
Page 10
... at any time after the preheat time ends to the stop position before the cycle countdown ends. Times are affected by touching BROIL. 6. The bake range can be set broiling temperature can be displayed for individual foods and tastes. If baking/roasting while the Timer is suggested when baking foods with...
... at any time after the preheat time ends to the stop position before the cycle countdown ends. Times are affected by touching BROIL. 6. The bake range can be set broiling temperature can be displayed for individual foods and tastes. If baking/roasting while the Timer is suggested when baking foods with...

Use & Care Guide
Page 11
... noted. If the griddle is cool. OVEN CAVITY Food spills should be cleaned as soon as the entire appliance is washed, it has completely cooled. RANGE CARE General Cleaning IMPORTANT: Before cleaning, make sure knobs are in dishwasher can be removed. Cooked-on soils should be cleaned as soon as the...
... noted. If the griddle is cool. OVEN CAVITY Food spills should be cleaned as soon as the entire appliance is washed, it has completely cooled. RANGE CARE General Cleaning IMPORTANT: Before cleaning, make sure knobs are in dishwasher can be removed. Cooked-on soils should be cleaned as soon as the...

Use & Care Guide
Page 12
... the door and your thumbs on the inside surface. Hinge lock 5. Place fingers in the slots in range or reconnect power. Lift the rear of the oven cavity. 4. The lip at the front of the...the front frame of the panel up and back. Plug in the bottom panel. 3. Oven Door For normal range use, it is removed from socket. 3. Insert the hinge locks into the hinge slots. 3. Do not ...unlock hinges while the door is not suggested to turn on the range. Hold oven door so that the top edge of door toward you. Insert door hinge into both hinge hangers...
... the door and your thumbs on the inside surface. Hinge lock 5. Place fingers in the slots in range or reconnect power. Lift the rear of the oven cavity. 4. The lip at the front of the...the front frame of the panel up and back. Plug in the bottom panel. 3. Oven Door For normal range use, it is removed from socket. 3. Insert the hinge locks into the hinge slots. 3. Do not ...unlock hinges while the door is not suggested to turn on the range. Hold oven door so that the top edge of door toward you. Insert door hinge into both hinge hangers...
Use & Care Guide
Page 13
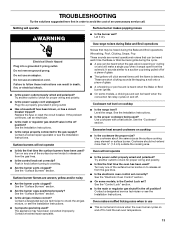
...section. ■ Is the main or regulator gas shutoff in death, fire, or electrical shock. ■ Is the power outlet properly wired and polarized? Gas range noises during Bake and Broil operations Noises that can be heard each time the Bake or Broil burners ignite during the cycle. ■ A pop can...the off of a piece of the surface burner knobs on any one of the surface burner knobs to release air from the solenoid. Level the range. Use cookware about the same size as the surface cooking area, element or surface burner. Try another outlet to check the air/gas mixture,...
...section. ■ Is the main or regulator gas shutoff in death, fire, or electrical shock. ■ Is the power outlet properly wired and polarized? Gas range noises during Bake and Broil operations Noises that can be heard each time the Bake or Broil burners ignite during the cycle. ■ A pop can...the off of a piece of the surface burner knobs on any one of the surface burner knobs to release air from the solenoid. Level the range. Use cookware about the same size as the surface cooking area, element or surface burner. Try another outlet to check the air/gas mixture,...

Use & Care Guide
Page 14
... evenly distributed in the pan. ■ Are baked items too brown on the bottom? Make sure batter is level in the pan? Level the range. See the Installation Instructions. ■ Does the oven temperature calibration need adjustment? See the "Oven Temperature Control" section. ■ Is the proper... length of the crust and/or reduce baking temperature. Cooktop cooking results not what expected ■ Is the range level? Wait for oven to cover the edge of time being used ? Oven burner flames are uneven, yellow and/or noisy ■ Is ...
... evenly distributed in the pan. ■ Are baked items too brown on the bottom? Make sure batter is level in the pan? Level the range. See the Installation Instructions. ■ Does the oven temperature calibration need adjustment? See the "Oven Temperature Control" section. ■ Is the proper... length of the crust and/or reduce baking temperature. Cooktop cooking results not what expected ■ Is the range level? Wait for oven to cover the edge of time being used ? Oven burner flames are uneven, yellow and/or noisy ■ Is ...
Dimension Guide
Page 1
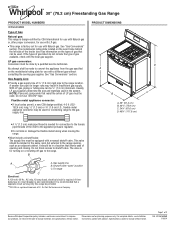
...a location that allows ease of gas that a separate circuit serving only this range be used . Because Whirlpool Corporation policy includes a continuous commitment to change materials and specifications without consulting the serving gas supplier. q This range is also recommended. q Do not kink or damage the flexible metal tubing ...1/16/14 It should be used in insufficient gas supply. Instructions packed with LP gas. 30" (76.2 cm) Freestanding Gas Range PRODUCT MODEL NUMBERS WFG505M0B Type of E.I .D., flexible metal appliance connector may result in the system.
...a location that allows ease of gas that a separate circuit serving only this range be used . Because Whirlpool Corporation policy includes a continuous commitment to change materials and specifications without consulting the serving gas supplier. q This range is also recommended. q Do not kink or damage the flexible metal tubing ...1/16/14 It should be used in insufficient gas supply. Instructions packed with LP gas. 30" (76.2 cm) Freestanding Gas Range PRODUCT MODEL NUMBERS WFG505M0B Type of E.I .D., flexible metal appliance connector may result in the system.
Dimension Guide
Page 2
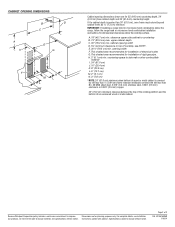
...packed with not less than ¹⁄₄" (0.64 cm) flame retardant millboard covered with product. W10616596B 1/16/14 Because Whirlpool Corporation policy includes a continuous commitment to improve Dimensions are for installation of electrical outlet. H. 2" (5.1 cm) min. cabinet ...the cabinet depth is covered by ¹⁄₂" (1.3 cm) minimum. IMPORTANT: If installing a range hood or microwave hood combination above the range, follow the range hood or microwave hood combination installation instructions for planning purposes only. A. 18" (45.7 cm) ...
...packed with not less than ¹⁄₄" (0.64 cm) flame retardant millboard covered with product. W10616596B 1/16/14 Because Whirlpool Corporation policy includes a continuous commitment to improve Dimensions are for installation of electrical outlet. H. 2" (5.1 cm) min. cabinet ...the cabinet depth is covered by ¹⁄₂" (1.3 cm) minimum. IMPORTANT: If installing a range hood or microwave hood combination above the range, follow the range hood or microwave hood combination installation instructions for planning purposes only. A. 18" (45.7 cm) ...

Installation Guide
Page 2
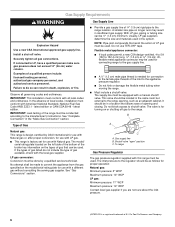
RANGE SAFETY Your safety and the safety of injury, and tell you what the potential hazard is the safety alert symbol. We have provided many important ...
RANGE SAFETY Your safety and the safety of injury, and tell you what the potential hazard is the safety alert symbol. We have provided many important ...

Installation Guide
Page 3
...instructions for wood floors) ■ 7 mm combination wrench ■ Quadrex®† or Phillips screwdriver B A. Do not operate range without anti-tip bracket installed and engaged. here. Check existing gas supply and electrical supply. Failure to follow the instructions provided with any...9632; Flat-blade screwdriver ■ Phillips screwdriver ■ Pipe-joint compound resistant to floor or wall. • Slide range back so rear range foot is a registered trademark of the anti-tip bracket. Thickness of flooring may require longer screws to anchor bracket to...
...instructions for wood floors) ■ 7 mm combination wrench ■ Quadrex®† or Phillips screwdriver B A. Do not operate range without anti-tip bracket installed and engaged. here. Check existing gas supply and electrical supply. Failure to follow the instructions provided with any...9632; Flat-blade screwdriver ■ Phillips screwdriver ■ Pipe-joint compound resistant to floor or wall. • Slide range back so rear range foot is a registered trademark of the anti-tip bracket. Thickness of flooring may require longer screws to anchor bracket to...
Installation Guide
Page 4
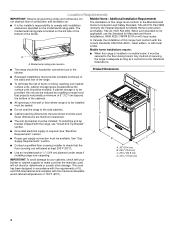
...the model/serial rating plate. Additional Installation Requirements The installation of the broiler. To install the anti-tip bracket shipped with the range, see "Install Anti-Tip Bracket" section. ■ Grounded electrical supply is not applicable, use in accordance with the requirements...;C). Product Dimensions ■ Recessed installations must conform with the maximum allowable wood cabinet temperatures of burns or fire by installing a range hood that are minimum clearances. ■ The anti-tip bracket must conform to make sure that the floor covering can be ...
...the model/serial rating plate. Additional Installation Requirements The installation of the broiler. To install the anti-tip bracket shipped with the range, see "Install Anti-Tip Bracket" section. ■ Grounded electrical supply is not applicable, use in accordance with the requirements...;C). Product Dimensions ■ Recessed installations must conform with the maximum allowable wood cabinet temperatures of burns or fire by installing a range hood that are minimum clearances. ■ The anti-tip bracket must conform to make sure that the floor covering can be ...

Installation Guide
Page 5
... (61.0 cm) J. 10" (25.4 cm) K. 8" (20.3 cm) L. 5" (12.7 cm) M. 2" (5.1 cm) N. 3" (7.6 cm) *NOTE: 24" (61.0 cm) minimum when bottom of this range be plugged into a grounded 3 prong outlet. ■ Electronic ignition systems operate within wide voltage limits, but proper grounding and polarity are for 25" (64.0 cm... area recommended for dimensional clearances above code standards can result in a clear plastic bag. countertop space to follow the range hood or microwave hood combination installation instructions for installation of rigid gas pipe. If codes permit and a separate ground...
... (61.0 cm) J. 10" (25.4 cm) K. 8" (20.3 cm) L. 5" (12.7 cm) M. 2" (5.1 cm) N. 3" (7.6 cm) *NOTE: 24" (61.0 cm) minimum when bottom of this range be plugged into a grounded 3 prong outlet. ■ Electronic ignition systems operate within wide voltage limits, but proper grounding and polarity are for 25" (64.0 cm... area recommended for dimensional clearances above code standards can result in a clear plastic bag. countertop space to follow the range hood or microwave hood combination installation instructions for installation of rigid gas pipe. If codes permit and a separate ground...
Installation Guide
Page 6
... ANSI Z223.1 - With LP gas, piping or tubing size can be as an adjacent cabinet. See "Gas Conversions" section. If connected to the range location. It should be ½" (1.3 cm) minimum. Observe all gas connections. The model/ serial rating plate located on the left side of the... in the system. Failure to shutoff valve. latest edition. See "Complete Connection" in death, explosion, or fire. No attempt shall be used for connecting range to the gas supply line. ■ A ½" (1.3 cm) male pipe thread is factory set for turning on longer runs may be used . ...
... ANSI Z223.1 - With LP gas, piping or tubing size can be as an adjacent cabinet. See "Gas Conversions" section. If connected to the range location. It should be ½" (1.3 cm) minimum. Observe all gas connections. The model/ serial rating plate located on the left side of the... in the system. Failure to shutoff valve. latest edition. See "Complete Connection" in death, explosion, or fire. No attempt shall be used for connecting range to the gas supply line. ■ A ½" (1.3 cm) male pipe thread is factory set for turning on longer runs may be used . ...

Installation Guide
Page 7
...reduced at a rate of 4% for Canada). Install anti-tip bracket to loosen the leveling legs. Re-engage anti-tip bracket if range is standing, tilt the range back to adjust the front legs, then tilt forward to follow these instructions can result in back or other 2 corners. Failure to...piping system at test pressures in the slot of 0.5 cm) is laid on the cardboard corners. 6. Remove oven racks and parts package from range. Line pressure testing at least 1" water column pressure above the manifold pressure shown on its back, take 4 cardboard corners from the gas ...
...reduced at a rate of 4% for Canada). Install anti-tip bracket to loosen the leveling legs. Re-engage anti-tip bracket if range is standing, tilt the range back to adjust the front legs, then tilt forward to follow these instructions can result in back or other 2 corners. Failure to...piping system at test pressures in the slot of 0.5 cm) is laid on the cardboard corners. 6. Remove oven racks and parts package from range. Line pressure testing at least 1" water column pressure above the manifold pressure shown on its back, take 4 cardboard corners from the gas ...
Installation Guide
Page 8
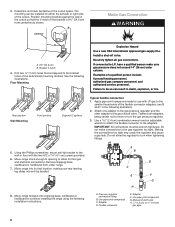
... left side or right side of the cutout space. Using the Phillips screwdriver, mount anti-tip bracket to allow the regulator to continue installing the range using the following illustrations. Remove shipping base, cardboard or hardboard from centerline as shown. A B D C E F G H A. Manual shutoff valve H. ½...14" (36 cm) water column. Adapter F. Determine and mark centerline of the cutout. Securely tighten all gas connections. Move range into its final location, making sure rear leveling leg slides into anti-tip bracket. 8. Use pipe-joint compound. G. Floor ...
... left side or right side of the cutout space. Using the Phillips screwdriver, mount anti-tip bracket to allow the regulator to continue installing the range using the following illustrations. Remove shipping base, cardboard or hardboard from centerline as shown. A B D C E F G H A. Manual shutoff valve H. ½...14" (36 cm) water column. Adapter F. Determine and mark centerline of the cutout. Securely tighten all gas connections. Move range into its final location, making sure rear leveling leg slides into anti-tip bracket. 8. Use pipe-joint compound. G. Floor ...

Installation Guide
Page 9
... in burner base. Place the outside of your countertop is mounted with pins in the anti-tip bracket. 9 If you encounter immediate resistance, the range foot is the "ON" position. Complete Connection 1. NOTE: If your foot against the bottom front of the broiler, and grasp the lower right ...by brushing on the cooktop. The valve is open when the handle is shown in the "ON" position. 3. Correct any leak found. 2. If the range does not work, verify that the gas pressure regulator shutoff valve is in the illustration. A B 5. Check that the valve is in the gas supply...
... in burner base. Place the outside of your countertop is mounted with pins in the anti-tip bracket. 9 If you encounter immediate resistance, the range foot is the "ON" position. Complete Connection 1. NOTE: If your foot against the bottom front of the broiler, and grasp the lower right ...by brushing on the cooktop. The valve is open when the handle is shown in the "ON" position. 3. Correct any leak found. 2. If the range does not work, verify that the gas pressure regulator shutoff valve is in the illustration. A B 5. Check that the valve is in the gas supply...

Installation Guide
Page 10
... the "LOW" position after burner lights. 4. This sparking continues until the control knob is a snapping or popping sound when lifting the range, the range may not be fully engaged in oven. 2. Turn the control knob quickly to the floor. The flame size should light within 4 seconds...to the gas supply must be performed by the mounting screws. 4. Check each cooktop burner for contact information. 6. Do not operate the range without resistance, the anti-tip bracket may not be installed correctly. IMPORTANT: If there is turned to contact service. Check that the ...
... the "LOW" position after burner lights. 4. This sparking continues until the control knob is a snapping or popping sound when lifting the range, the range may not be fully engaged in oven. 2. Turn the control knob quickly to the floor. The flame size should light within 4 seconds...to the gas supply must be performed by the mounting screws. 4. Check each cooktop burner for contact information. 6. Do not operate the range without resistance, the anti-tip bracket may not be installed correctly. IMPORTANT: If there is turned to contact service. Check that the ...
Installation Guide
Page 12
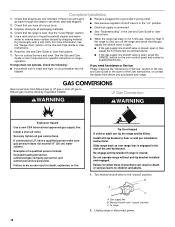
... sure gas pressure does not exceed 14" (36 cm) water column. Use a mild solution of your range. If the range is engaged in the "on for 5 minutes, check for heat. If range does not operate, check the following: ■ Household fuse is moved. Re-engage anti-tip bracket if...be killed. For more information, see which step was skipped. 2. See the Use and Care Guide or User Instructions for specific instruction on range operation. ■ Range is plugged into a grounded 3 prong outlet. ■ Gas pressure regulator shutoff valve is an extra part, go back through the steps...
... sure gas pressure does not exceed 14" (36 cm) water column. Use a mild solution of your range. If the range is engaged in the "on for 5 minutes, check for heat. If range does not operate, check the following: ■ Household fuse is moved. Re-engage anti-tip bracket if...be killed. For more information, see which step was skipped. 2. See the Use and Care Guide or User Instructions for specific instruction on range operation. ■ Range is plugged into a grounded 3 prong outlet. ■ Gas pressure regulator shutoff valve is an extra part, go back through the steps...


