
Use & Care Guide
Page 10
... time will light up " or "down , the set broiling temperature can be changed at any time during broiling. ■ Do not use broiler cavity for Part Number 4396923. 10 ■ Pull out the rack to the original position. Waiting an additional 10 minutes after this step by pressing Bake. 3. If broiling...
... time will light up " or "down , the set broiling temperature can be changed at any time during broiling. ■ Do not use broiler cavity for Part Number 4396923. 10 ■ Pull out the rack to the original position. Waiting an additional 10 minutes after this step by pressing Bake. 3. If broiling...

Use & Care Guide
Page 11
...grease to order. Gently clean cooktop controls because scrubbing may remove graphics or text. ■ affresh® Kitchen and Appliance Cleaner Part Number W10355010 (not included): See the "Assistance or Service" section to accumulate under knobs. Do not reassemble caps on panel. At... Gently clean around the model and serial number plate because scrubbing may remove nameplate. ■ affresh® Kitchen and Appliance Cleaner Part Number W10355010 (not included): See the "Assistance or Service" section to soft cloth or sponge, not directly on some models) Cleaning...
...grease to order. Gently clean cooktop controls because scrubbing may remove graphics or text. ■ affresh® Kitchen and Appliance Cleaner Part Number W10355010 (not included): See the "Assistance or Service" section to accumulate under knobs. Do not reassemble caps on panel. At... Gently clean around the model and serial number plate because scrubbing may remove nameplate. ■ affresh® Kitchen and Appliance Cleaner Part Number W10355010 (not included): See the "Assistance or Service" section to soft cloth or sponge, not directly on some models) Cleaning...
Use & Care Guide
Page 15
... Stainless Steel Cleaner (stainless steel models) Order Part Number W10355016 affresh® Kitchen and Appliance Cleaner Order Part Number W10355010 Gas Grate and Drip Pan Cleaner Order Part Number 31617 Broiler Pan Order Part Number 4396923 WHIRLPOOL CORPORATION MAJOR APPLIANCE WARRANTY ONE YEAR LIMITED WARRANTY ...the date of original consumer purchase. ASSISTANCE OR SERVICE Before calling for Factory Specified Parts and repair labor to correct defects in which it was purchased or at www.whirlpool.ca. Our consultants provide assistance with : ■ Features and specifications on our...
... Stainless Steel Cleaner (stainless steel models) Order Part Number W10355016 affresh® Kitchen and Appliance Cleaner Order Part Number W10355010 Gas Grate and Drip Pan Cleaner Order Part Number 31617 Broiler Pan Order Part Number 4396923 WHIRLPOOL CORPORATION MAJOR APPLIANCE WARRANTY ONE YEAR LIMITED WARRANTY ...the date of original consumer purchase. ASSISTANCE OR SERVICE Before calling for Factory Specified Parts and repair labor to correct defects in which it was purchased or at www.whirlpool.ca. Our consultants provide assistance with : ■ Features and specifications on our...
Use & Care Guide
Page 16
...that comes with the removal from unauthorized modifications made to better help by checking the "Assistance or Service" section or by Whirlpool. 5. Costs associated with this information on the model and serial number label located on the product. EXCLUSION OF INCIDENTAL ...where service by the customer. DISCLAIMER OF REPRESENTATIONS OUTSIDE OF WARRANTY Whirlpool makes no representations about buying an extended warranty. In the U.S.A., call 1-800-807-6777. 6/13 Keep this warranty. Repairs to parts or systems resulting from your home of the product. Major ...
...that comes with the removal from unauthorized modifications made to better help by checking the "Assistance or Service" section or by Whirlpool. 5. Costs associated with this information on the model and serial number label located on the product. EXCLUSION OF INCIDENTAL ...where service by the customer. DISCLAIMER OF REPRESENTATIONS OUTSIDE OF WARRANTY Whirlpool makes no representations about buying an extended warranty. In the U.S.A., call 1-800-807-6777. 6/13 Keep this warranty. Repairs to parts or systems resulting from your home of the product. Major ...

Warranty Information
Page 1
... assistance, you can also look in your telephone directory Yellow Pages. FSP® replacement parts will pay for assistance or service, please check "Troubleshooting." Whirlpool Canada LP designated service technicians are trained to fulfill the product warranty and provide afterwarranty service... Steel Cleaner (stainless steel models) Order Part Number W10355016 affresh® Kitchen and Appliance Cleaner Order Part Number W10355010 Gas Grate and Drip Pan Cleaner Order Part Number 31617 Broiler Pan Order Part Number 4396923 WHIRLPOOL CORPORATION MAJOR APPLIANCE WARRANTY ONE YEAR LIMITED ...
... assistance, you can also look in your telephone directory Yellow Pages. FSP® replacement parts will pay for assistance or service, please check "Troubleshooting." Whirlpool Canada LP designated service technicians are trained to fulfill the product warranty and provide afterwarranty service... Steel Cleaner (stainless steel models) Order Part Number W10355016 affresh® Kitchen and Appliance Cleaner Order Part Number W10355010 Gas Grate and Drip Pan Cleaner Order Part Number 31617 Broiler Pan Order Part Number 4396923 WHIRLPOOL CORPORATION MAJOR APPLIANCE WARRANTY ONE YEAR LIMITED ...

Warranty Information
Page 2
... reference. Some states and provinces do not allow the exclusion or limitation of consumables or cleaning products not approved by an authorized Whirlpool servicer is covered by calling Whirlpool. Consumable parts are excluded from the date of this major appliance, you . Cosmetic damage, including scratches, dents, chips or other built-in -home service...
... reference. Some states and provinces do not allow the exclusion or limitation of consumables or cleaning products not approved by an authorized Whirlpool servicer is covered by calling Whirlpool. Consumable parts are excluded from the date of this major appliance, you . Cosmetic damage, including scratches, dents, chips or other built-in -home service...

Installation Guide
Page 3
...anti-tip bracket if range is a registered trademark of flooring may require longer screws to anchor bracket to floor. ■ Masking tape Parts needed A ■ Tape measure ■ Marker or pencil ■ Flat-blade screwdriver ■ Phillips screwdriver ■ Pipe-joint... ■ ½" (1.3 cm) combination wrench 1.6 cm) combination wrench ■ ¹⁄₈" (3 mm) drill bit (for details. Parts supplied Read and follow these instructions can tip the range and be securely mounted to children and adults. Range Foot WARNING Tip Over Hazard A child...
...anti-tip bracket if range is a registered trademark of flooring may require longer screws to anchor bracket to floor. ■ Masking tape Parts needed A ■ Tape measure ■ Marker or pencil ■ Flat-blade screwdriver ■ Phillips screwdriver ■ Pipe-joint... ■ ½" (1.3 cm) combination wrench 1.6 cm) combination wrench ■ ¹⁄₈" (3 mm) drill bit (for details. Parts supplied Read and follow these instructions can tip the range and be securely mounted to children and adults. Range Foot WARNING Tip Over Hazard A child...
Installation Guide
Page 4
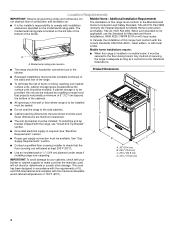
...Supply Requirements" section. ■ Contact a qualified floor covering installer to the Manufactured Home Construction and Safety Standard, Title 24 CFR, Part 3280 (formerly the Federal Standard for Manufactured Home Installations, ANSI A225.1/NFPA 501A or with local codes. Product Dimensions ■ Recessed installations...above the surface units should be located for convenient use the Standard for Mobile Home Construction and Safety, Title 24, HUD Part 280). D ■ Cabinet opening dimensions that are minimum clearances. ■ The anti-tip bracket must conform with your ...
...Supply Requirements" section. ■ Contact a qualified floor covering installer to the Manufactured Home Construction and Safety Standard, Title 24 CFR, Part 3280 (formerly the Federal Standard for Manufactured Home Installations, ANSI A225.1/NFPA 501A or with local codes. Product Dimensions ■ Recessed installations...above the surface units should be located for convenient use the Standard for Mobile Home Construction and Safety, Title 24, HUD Part 280). D ■ Cabinet opening dimensions that are minimum clearances. ■ The anti-tip bracket must conform with your ...

Installation Guide
Page 7
... add up to support the range when it is attached inside oven and broiler cavity. 4. Failure to loosen the leveling legs. Remove oven racks and parts package from inside the oven with the other injury. 1. Repeat with a wire tie. 2. Use an adjustable wrench to do so can result in death or...
... add up to support the range when it is attached inside oven and broiler cavity. 4. Failure to loosen the leveling legs. Remove oven racks and parts package from inside the oven with the other injury. 1. Repeat with a wire tie. 2. Use an adjustable wrench to do so can result in death or...

Installation Guide
Page 9
... gas pressure regulator shutoff valve is the "ON" position. Locate gas pressure regulator in the anti-tip bracket. 9 Remove cooktop burner caps and grates from parts package.
... gas pressure regulator shutoff valve is the "ON" position. Locate gas pressure regulator in the anti-tip bracket. 9 Remove cooktop burner caps and grates from parts package.
Installation Guide
Page 12
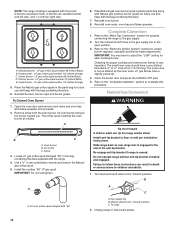
...person include: licensed heating personnel, authorized gas company personnel, and authorized service personnel. For more information, see which step was skipped. 2. Securely tighten all parts are now installed. Failure to see the "Range Care" section of your range. Unplug range or disconnect power. If there is open it, then ...repeat the 5-minute test as outlined above. ■ If the gas supply line shutoff valve is an extra part, go back through the steps to do so can tip the range and be done by shipping material. Install a shut-off the range and...
...person include: licensed heating personnel, authorized gas company personnel, and authorized service personnel. For more information, see which step was skipped. 2. Securely tighten all parts are now installed. Failure to see the "Range Care" section of your range. Unplug range or disconnect power. If there is open it, then ...repeat the 5-minute test as outlined above. ■ If the gas supply line shutoff valve is an extra part, go back through the steps to do so can tip the range and be done by shipping material. Install a shut-off the range and...
Installation Guide
Page 14
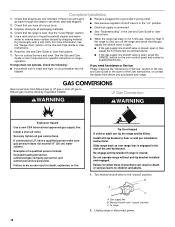
... Gas Connection" section for proper cooktop and oven burner flames is behind the oven burner air shutter. The outer cone is engaged in the parts bag for each cooktop burner. Slide range back so rear range foot is not as distinct as the inner cone. LP gas orifice spud ... ¼" to ½" (0.64 cm to the "closed " position C. Natural Gas Conversion WARNING Tip Over Hazard A child or adult can result in plastic parts bag along with Natural gas cooktop burner spuds for proper burner ingestion, operation and burner flame adjustments. Re-engage anti-tip bracket if range is...
... Gas Connection" section for proper cooktop and oven burner flames is behind the oven burner air shutter. The outer cone is engaged in the parts bag for each cooktop burner. Slide range back so rear range foot is not as distinct as the inner cone. LP gas orifice spud ... ¼" to ½" (0.64 cm to the "closed " position C. Natural Gas Conversion WARNING Tip Over Hazard A child or adult can result in plastic parts bag along with Natural gas cooktop burner spuds for proper burner ingestion, operation and burner flame adjustments. Re-engage anti-tip bracket if range is...
Installation Guide
Page 16
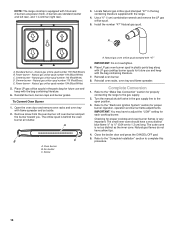
...2 burners are standard (center and left rear), and 1 is behind the oven burner air shutter. Locate Natural gas orifice spud stamped "47" in the parts bag for properly connecting the range to the open position. 3. Use a ³⁄₈" (1 cm) combination wrench and remove the LP gas orifice ... the gas supply line to the gas supply. 2. Reinstall oven racks, oven tray and flame spreader. Turn the manual shutoff valve in plastic parts bag along with the bag containing literature. 6. Refer to adjust the "LOW" setting for future use and keep with the bag containing literature...
...2 burners are standard (center and left rear), and 1 is behind the oven burner air shutter. Locate Natural gas orifice spud stamped "47" in the parts bag for properly connecting the range to the open position. 3. Use a ³⁄₈" (1 cm) combination wrench and remove the LP gas orifice ... the gas supply line to the gas supply. 2. Reinstall oven racks, oven tray and flame spreader. Turn the manual shutoff valve in plastic parts bag along with the bag containing literature. 6. Refer to adjust the "LOW" setting for future use and keep with the bag containing literature...


