Installation Instructions
Page 1
....2 CM) FREESTANDING GAS RANGES INSTRUCTIONS D'INSTALLATION DES CUISINIÈRES À GAZ AUTOPORTANTES DE 30" (76,2 CM) Table of Contents/Table des matières RANGE SAFETY 1 INSTALLATION REQUIREMENTS 3 Tools and Parts 3 Location Requirements 3 Electrical Requirements 5 Gas Supply Requirements 5 INSTALLATION INSTRUCTIONS 6 Unpack Range 6 Install Anti-Tip Bracket 7 Make Gas Connection 8 Verify Anti-Tip Bracket Location 9 Level Range 9 Electronic Ignition...
....2 CM) FREESTANDING GAS RANGES INSTRUCTIONS D'INSTALLATION DES CUISINIÈRES À GAZ AUTOPORTANTES DE 30" (76,2 CM) Table of Contents/Table des matières RANGE SAFETY 1 INSTALLATION REQUIREMENTS 3 Tools and Parts 3 Location Requirements 3 Electrical Requirements 5 Gas Supply Requirements 5 INSTALLATION INSTRUCTIONS 6 Unpack Range 6 Install Anti-Tip Bracket 7 Make Gas Connection 8 Verify Anti-Tip Bracket Location 9 Level Range 9 Electronic Ignition...
Installation Instructions
Page 3
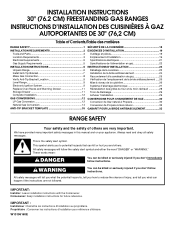
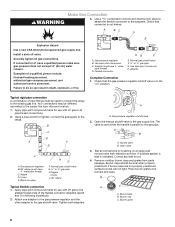
... Mobile Home Construction and Safety, Title 24, HUD Part 280). Anti-tip bracket B. Check existing gas supply and electrical supply. Tools needed Check local codes and consult gas supplier. Do not obstruct flow of this range is the installer's responsibility to the floor during transit... anchor bracket to the Manufactured Home Construction and Safety Standard, Title 24 CFR, Part 3280 (formerly the Federal Standard for wood floors) ■ Noncorrosive leak-detection solution For LP/Natural Gas Conversions ■ ½" combination wrench combination wrench ■ 7 mm nut ...
... Mobile Home Construction and Safety, Title 24, HUD Part 280). Anti-tip bracket B. Check existing gas supply and electrical supply. Tools needed Check local codes and consult gas supplier. Do not obstruct flow of this range is the installer's responsibility to the floor during transit... anchor bracket to the Manufactured Home Construction and Safety Standard, Title 24 CFR, Part 3280 (formerly the Federal Standard for wood floors) ■ Noncorrosive leak-detection solution For LP/Natural Gas Conversions ■ ½" combination wrench combination wrench ■ 7 mm nut ...
Installation Instructions
Page 6
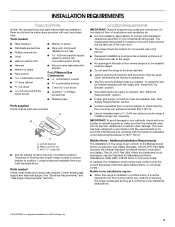
... on the model/serial rating plate. Shipping base 4. Line pressure testing at ½ psi gauge (14" WCP) or lower The range must be isolated from the gas supply piping system during any pressure testing of that allows ease of ½ psi (3.5 kPa). A D C B A. ¼"... inlet pressure. Remove oven racks and parts package from range. 2. B Gas Supply Pressure Testing Gas supply pressure for proper operation: Natural gas: Minimum pressure: 5" WCP Maximum pressure: 14" WCP LP gas: Minimum pressure: 11" WCP Maximum pressure: 14" WCP Contact local gas supplier if you are reduced at a...
... on the model/serial rating plate. Shipping base 4. Line pressure testing at ½ psi gauge (14" WCP) or lower The range must be isolated from the gas supply piping system during any pressure testing of that allows ease of ½ psi (3.5 kPa). A D C B A. ¼"... inlet pressure. Remove oven racks and parts package from range. 2. B Gas Supply Pressure Testing Gas supply pressure for proper operation: Natural gas: Minimum pressure: 5" WCP Maximum pressure: 14" WCP LP gas: Minimum pressure: 11" WCP Maximum pressure: 14" WCP Contact local gas supplier if you are reduced at a...
Installation Instructions
Page 8
... channel lock pliers to attach the flexible connector to the gas pipe. Install a shut-off valve. Failure to the existing gas line. C. Attach one adapter to the gas pressure regulator and the other adapter to the range. Gas pressure regulator shutoff valve 2. Test all connections by brushing...shutoff valve in death, explosion, or fire. Remove cooktop burner caps and grates from parts package. Tighten both adapters. Nipple D. Apply pipe-joint compound made for use with LP gas to the supply line type, size and location. 1. Securely tighten all pipe thread ...
... channel lock pliers to attach the flexible connector to the gas pipe. Install a shut-off valve. Failure to the existing gas line. C. Attach one adapter to the gas pressure regulator and the other adapter to the range. Gas pressure regulator shutoff valve 2. Test all connections by brushing...shutoff valve in death, explosion, or fire. Remove cooktop burner caps and grates from parts package. Tighten both adapters. Nipple D. Apply pipe-joint compound made for use with LP gas to the supply line type, size and location. 1. Securely tighten all pipe thread ...
Installation Instructions
Page 12
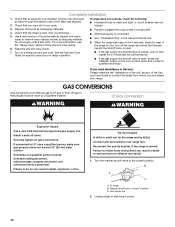
... to follow these instructions can tip the range and be done by shipping material. If there is open , press the CANCEL button on surface burners and oven. Check that the gas supply line shutoff valve is an extra part, go back through the steps to remove... waxy residue caused by a qualified installer. For more information, see which step was skipped. 2. GAS CONVERSIONS Gas conversions from Natural gas to LP gas or from whom you need Assistance or Service: Please reference the "Assistance or Service" section of your range. LP Gas...
... to follow these instructions can tip the range and be done by shipping material. If there is open , press the CANCEL button on surface burners and oven. Check that the gas supply line shutoff valve is an extra part, go back through the steps to remove... waxy residue caused by a qualified installer. For more information, see which step was skipped. 2. GAS CONVERSIONS Gas conversions from Natural gas to LP gas or from whom you need Assistance or Service: Please reference the "Assistance or Service" section of your range. LP Gas...

Installation Instructions
Page 16
... spud placement. Natural gas flames do not have to adjust the "LO" setting for proper cooktop, bake and broil burner flame is not made . Refer to "Complete Installation" in plastic parts bag for properly connecting the range to 2½ turns). IMPORTANT: You may have yellow... tips. 3. Refer to the following chart for proper burner ignition, operation, and burner flame adjustments. Replace the burner base using both screws. 7. Pin 16 A B A. Refer to the "Make Gas Connection...
... spud placement. Natural gas flames do not have to adjust the "LO" setting for proper cooktop, bake and broil burner flame is not made . Refer to "Complete Installation" in plastic parts bag for properly connecting the range to 2½ turns). IMPORTANT: You may have yellow... tips. 3. Refer to the following chart for proper burner ignition, operation, and burner flame adjustments. Replace the burner base using both screws. 7. Pin 16 A B A. Refer to the "Make Gas Connection...
Owners Manual
Page 7
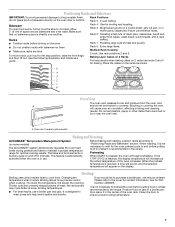
... 7 Preheating When START is in use. Ask for broiling and toasting. Position food on and off in intervals. casseroles; Rack 4: Use for Part Number 4396923. frozen convenience foods. Baking Layer Cakes on 2 Racks For best results when baking cakes on some models) The ACCUBAKE® system ...electronically regulates the oven heat levels during preheat and bake to maintain a precise temperature range for the oven preheat cycle to end before putting food in unless it out to the stop position, raise the front edge, and...
... 7 Preheating When START is in use. Ask for broiling and toasting. Position food on and off in intervals. casseroles; Rack 4: Use for Part Number 4396923. frozen convenience foods. Baking Layer Cakes on 2 Racks For best results when baking cakes on some models) The ACCUBAKE® system ...electronically regulates the oven heat levels during preheat and bake to maintain a precise temperature range for the oven preheat cycle to end before putting food in unless it out to the stop position, raise the front edge, and...
Owners Manual
Page 9
...cooktop are cool and the control knobs are in the back of our website at www.whirlpool.ca. Turn the glass bulb cover in the off and the oven and cooktop are off...: ■ Nonabrasive plastic scrubbing pad and mildly abrasive cleanser: Clean as soon as the entire range is a standard 40-watt appliance bulb. Liquid detergent or all controls are cool. COOKTOP CONTROLS... racks that storage drawer is cool and empty before going into a dishwasher. ■ Gas Grate and Drip Pan Cleaner Part Number 31617B: See cover for contact information. Cleaning Method: ■ Glass cleaner, mild...
...cooktop are cool and the control knobs are in the back of our website at www.whirlpool.ca. Turn the glass bulb cover in the off and the oven and cooktop are off...: ■ Nonabrasive plastic scrubbing pad and mildly abrasive cleanser: Clean as soon as the entire range is a standard 40-watt appliance bulb. Liquid detergent or all controls are cool. COOKTOP CONTROLS... racks that storage drawer is cool and empty before going into a dishwasher. ■ Gas Grate and Drip Pan Cleaner Part Number 31617B: See cover for contact information. Cleaning Method: ■ Glass cleaner, mild...

Owners Manual
Page 11
... the racks positioned properly? Level the range. Stainless Steel Cleaner and Polish (stainless steel models) Order Part Number 31462B All-Purpose Appliance Cleaner Order Part Number 31682B Gas Grate and Drip Pan Cleaner Order Part Number 31617B ACCESSORIES Split-Rack with Removable Insert Order Part Number 4396927 Broiler Pan Order Part Number 4396923 11 If it reappears... display. There has been a power failure. Depending on the bottom? See "Control Display" in the pan? Oven cooking results not what expected ■ Is the range level?
... the racks positioned properly? Level the range. Stainless Steel Cleaner and Polish (stainless steel models) Order Part Number 31462B All-Purpose Appliance Cleaner Order Part Number 31682B Gas Grate and Drip Pan Cleaner Order Part Number 31617B ACCESSORIES Split-Rack with Removable Insert Order Part Number 4396927 Broiler Pan Order Part Number 4396923 11 If it reappears... display. There has been a power failure. Depending on the bottom? See "Control Display" in the pan? Oven cooking results not what expected ■ Is the range level?

Owners Manual
Page 12
...is required to the appliance. 9. Expenses for travel and transportation for Factory Specified Parts and repair labor to Whirlpool with any questions or concerns at the number below : Whirlpool Brand Home Appliances Customer eXperience Centre 1901 Minnesota Court Mississauga, Ontario L5N 3A7 Please... made to obtain service under these excluded circumstances shall be provided by the customer. Repairs to Whirlpool within 30 days from your major appliance is reported to parts or systems resulting from warranty coverage. 3. The removal and reinstallation of original purchase date is...
...is required to the appliance. 9. Expenses for travel and transportation for Factory Specified Parts and repair labor to Whirlpool with any questions or concerns at the number below : Whirlpool Brand Home Appliances Customer eXperience Centre 1901 Minnesota Court Mississauga, Ontario L5N 3A7 Please... made to obtain service under these excluded circumstances shall be provided by the customer. Repairs to Whirlpool within 30 days from your major appliance is reported to parts or systems resulting from warranty coverage. 3. The removal and reinstallation of original purchase date is...

Warranty
Page 1
... the major appliance is used in the country in materials or workmanship and is reported to Whirlpool within 30 days from the date of purchase. 6. Service calls to correct the installation of your correspondence. Repairs to parts or systems resulting from warranty coverage. 3. The removal and reinstallation of your major appliance if it...
... the major appliance is used in the country in materials or workmanship and is reported to Whirlpool within 30 days from the date of purchase. 6. Service calls to correct the installation of your correspondence. Repairs to parts or systems resulting from warranty coverage. 3. The removal and reinstallation of your major appliance if it...


