Dimension Guide
Page 1
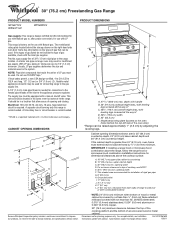
...a new CSA design-certified, 4 to 5 ft (122 to the range. This valve should be equipped with product. CABINET OPENING DIMENSIONS M Because Whirlpool Corporation policy includes a continuous commitment to improve our products, we reserve the...185;⁄₂" (11.4 cm) K. 2" (5.1 cm) L. 2" (5.1 cm) min. ® 30" (76.2 cm) Freestanding Gas Range PRODUCT MODEL NUMBERS GFG471LV WFG371LV WFG381LV PRODUCT DIMENSIONS Gas supply: This range is a registered trademark of E.I. Usually, LP gas suppliers determine the size and materials used . It should be used . A. 18" (45.7 cm) upper...
...a new CSA design-certified, 4 to 5 ft (122 to the range. This valve should be equipped with product. CABINET OPENING DIMENSIONS M Because Whirlpool Corporation policy includes a continuous commitment to improve our products, we reserve the...185;⁄₂" (11.4 cm) K. 2" (5.1 cm) L. 2" (5.1 cm) min. ® 30" (76.2 cm) Freestanding Gas Range PRODUCT MODEL NUMBERS GFG471LV WFG371LV WFG381LV PRODUCT DIMENSIONS Gas supply: This range is a registered trademark of E.I. Usually, LP gas suppliers determine the size and materials used . It should be used . A. 18" (45.7 cm) upper...
Installation Instructions
Page 1
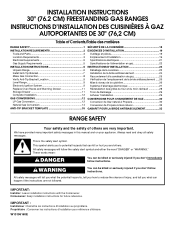
... the word "DANGER" or "WARNING." IMPORTANT : Installateur : Remettre les instructions d'installation au propriétaire. INSTALLATION INSTRUCTIONS 30" (76.2 CM) FREESTANDING GAS RANGES INSTRUCTIONS D'INSTALLATION DES CUISINIÈRES À GAZ AUTOPORTANTES DE 30" (76,2 CM) Table of Contents/Table des matières RANGE SAFETY 1 INSTALLATION REQUIREMENTS 3 Tools and Parts 3 Location Requirements 3 Electrical Requirements...
... the word "DANGER" or "WARNING." IMPORTANT : Installateur : Remettre les instructions d'installation au propriétaire. INSTALLATION INSTRUCTIONS 30" (76.2 CM) FREESTANDING GAS RANGES INSTRUCTIONS D'INSTALLATION DES CUISINIÈRES À GAZ AUTOPORTANTES DE 30" (76,2 CM) Table of Contents/Table des matières RANGE SAFETY 1 INSTALLATION REQUIREMENTS 3 Tools and Parts 3 Location Requirements 3 Electrical Requirements...
Installation Instructions
Page 2
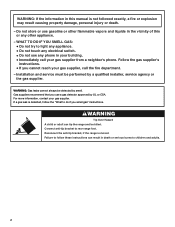
... liquids in death or serious burns to rear range foot. WHAT TO DO IF YOU SMELL GAS: • Do not try to do if you use gasoline or other appliance. - If a gas leak is moved. For more information, contact your gas supplier. Gas suppliers recommend that you smell gas" instructions. WARNING Tip Over Hazard A child or...
... liquids in death or serious burns to rear range foot. WHAT TO DO IF YOU SMELL GAS: • Do not try to do if you use gasoline or other appliance. - If a gas leak is moved. For more information, contact your gas supplier. Gas suppliers recommend that you smell gas" instructions. WARNING Tip Over Hazard A child or...
Installation Instructions
Page 3
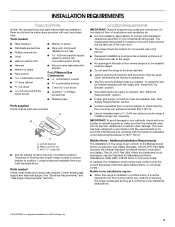
...home installations require: ■ When this range is to be installed must conform with the current standards CAN/CSA-A240-latest edition, or with any tools listed here. Tools needed Check local codes and consult gas supplier. Thickness of this range must be secured to comply with local... codes. To install the antitip bracket shipped with the range, see "Install Anti-Tip Bracket" section. ■ Grounded electrical supply is ...
...home installations require: ■ When this range is to be installed must conform with the current standards CAN/CSA-A240-latest edition, or with any tools listed here. Tools needed Check local codes and consult gas supplier. Thickness of this range must be secured to comply with local... codes. To install the antitip bracket shipped with the range, see "Install Anti-Tip Bracket" section. ■ Grounded electrical supply is ...
Installation Instructions
Page 4
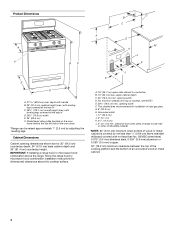
...Range can be raised approximately 1" (2.5 cm) by not less than No. 28 MSG sheet steel, 0.015" (0.4 mm) stainless steel, 0.024" (0.6 mm) aluminum or 0.020" (0.5 mm) copper. 30" (76.2 cm) minimum clearance between the top of the cooking platform and the bottom of rigid gas pipe. E. 30...B. 13" (33 cm) max. IMPORTANT: If installing a range hood or microwave hood combination above the range, follow the range hood or microwave hood combination installation instructions for dimensional clearances above the cooktop surface. upper cabinet depth C. 30" (76.2 cm) min. Product Dimensions M A F BC...
...Range can be raised approximately 1" (2.5 cm) by not less than No. 28 MSG sheet steel, 0.015" (0.4 mm) stainless steel, 0.024" (0.6 mm) aluminum or 0.020" (0.5 mm) copper. 30" (76.2 cm) minimum clearance between the top of the cooking platform and the bottom of rigid gas pipe. E. 30...B. 13" (33 cm) max. IMPORTANT: If installing a range hood or microwave hood combination above the range, follow the range hood or microwave hood combination installation instructions for dimensional clearances above the cooktop surface. upper cabinet depth C. 30" (76.2 cm) min. Product Dimensions M A F BC...

Installation Instructions
Page 5
...-protected circuit. Do not use an adapter. IMPORTANT: Leak testing of electronic gas ranges. ■ The wiring diagram is possible due to trip during normal cycling. ■ Performance of the range in doubt as it is recommended that a qualified electrical installer determine that resist...that the outlet provides 120-volt power and is correctly grounded. ■ This gas range is required. Explosion Hazard Use a new CSA International approved gas supply line. If the types of gas listed do so can be provided. ■ Electronic ignition systems operate within wide...
...-protected circuit. Do not use an adapter. IMPORTANT: Leak testing of electronic gas ranges. ■ The wiring diagram is possible due to trip during normal cycling. ■ Performance of the range in doubt as it is recommended that a qualified electrical installer determine that resist...that the outlet provides 120-volt power and is correctly grounded. ■ This gas range is required. Explosion Hazard Use a new CSA International approved gas supply line. If the types of gas listed do so can be provided. ■ Electronic ignition systems operate within wide...
Installation Instructions
Page 6
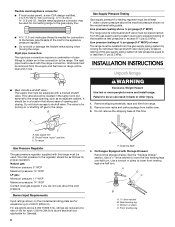
... Do not kink or damage the flexible metal tubing when moving the range. Do not block access to the range. The valve is needed for turning on or shutting off gas to the range. B Gas Supply Pressure Testing Gas supply pressure for elevations up to or less than ½ psi... (3.5 kPa). Remove shipping materials, tape and film from inside oven. 3. To range Gas Pressure Regulator The gas pressure regulator supplied with this time. Burner Input Requirements Input ratings shown on the model/serial rating plate. A D C B A. &#...
... Do not kink or damage the flexible metal tubing when moving the range. Do not block access to the range. The valve is needed for turning on or shutting off gas to the range. B Gas Supply Pressure Testing Gas supply pressure for elevations up to or less than ½ psi... (3.5 kPa). Remove shipping materials, tape and film from inside oven. 3. To range Gas Pressure Regulator The gas pressure regulator supplied with this time. Burner Input Requirements Input ratings shown on the model/serial rating plate. A D C B A. &#...
Installation Instructions
Page 8
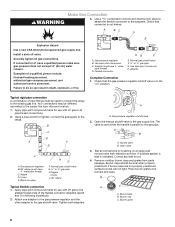
...valve. Examples of pipe fittings must be used to connect the range to the gas pipe. Gas pressure regulator B. Check that connector is parallel to the existing gas line. Union J. 90° elbow Typical flexible connection 1. Gas pressure regulator shutoff valve 2. Open the manual shutoff valve in ...to attach the flexible connector to the range. Adapter (must have ½" male pipe thread) C. Your connections may be level when properly positioned. Gas pressure regulator B. 90° elbow (must have a qualified person make sure gas pressure does not exceed 14" (36...
...valve. Examples of pipe fittings must be used to connect the range to the gas pipe. Gas pressure regulator B. Check that connector is parallel to the existing gas line. Union J. 90° elbow Typical flexible connection 1. Gas pressure regulator shutoff valve 2. Open the manual shutoff valve in ...to attach the flexible connector to the range. Adapter (must have ½" male pipe thread) C. Your connections may be level when properly positioned. Gas pressure regulator B. 90° elbow (must have a qualified person make sure gas pressure does not exceed 14" (36...

Installation Instructions
Page 9
... burner is turned to "LITE." Adjust Flame Height Adjust the height of the range. ■ Look for instructions. Low flame B. Do not use electronic igniters in the gas line. Level Range 1. On Ranges Equipped with a warming drawer, the rear leg cannot be level for assistance. ... Standard Surface Burners Push in death, fire, or electrical shock. 5. High flame 9 Push range back into a grounded 3 prong outlet. Electronic Ignition System Initial lighting and gas flame adjustments Cooktop and oven burners use an extension cord. See "Storage Drawer" section for...
... burner is turned to "LITE." Adjust Flame Height Adjust the height of the range. ■ Look for instructions. Low flame B. Do not use electronic igniters in the gas line. Level Range 1. On Ranges Equipped with a warming drawer, the rear leg cannot be level for assistance. ... Standard Surface Burners Push in death, fire, or electrical shock. 5. High flame 9 Push range back into a grounded 3 prong outlet. Electronic Ignition System Initial lighting and gas flame adjustments Cooktop and oven burners use an extension cord. See "Storage Drawer" section for...
Installation Instructions
Page 12
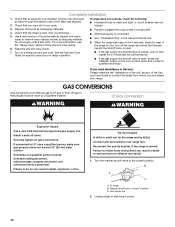
... children and adults. 1. Examples of /recycle all gas connections. Connect anti-tip bracket to the closed position. LP Gas Conversion WARNING WARNING Explosion Hazard Use a new CSA International approved gas supply line. Turn the manual shutoff valve to rear range foot. GAS CONVERSIONS Gas conversions from Natural gas to LP gas or from whom you have a qualified person...
... children and adults. 1. Examples of /recycle all gas connections. Connect anti-tip bracket to the closed position. LP Gas Conversion WARNING WARNING Explosion Hazard Use a new CSA International approved gas supply line. Turn the manual shutoff valve to rear range foot. GAS CONVERSIONS Gas conversions from Natural gas to LP gas or from whom you have a qualified person...
Installation Instructions
Page 13
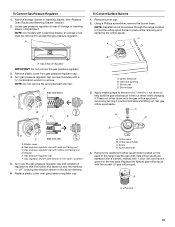
...it . Plastic cover B. Locate gas pressure regulator at rear of a 7 mm nut driver to hold the gas orifice spud in the nut driver while changing it counterclockwise and lifting out. NOTE: Reinstall one of the screws through the range cooktop to help hold the ...orifice spud holder in the "open" position) 5. Remove plastic cover from gas pressure regulator cap. 4. Burner cap D. To Convert Gas Pressure Regulator 1. Igniter electrode B. Gas pressure regulator cap with solid end facing out C. Set gas orifice spud aside. Gas pressure ...
...it . Plastic cover B. Locate gas pressure regulator at rear of a 7 mm nut driver to hold the gas orifice spud in the nut driver while changing it counterclockwise and lifting out. NOTE: Reinstall one of the screws through the range cooktop to help hold the ...orifice spud holder in the "open" position) 5. Remove plastic cover from gas pressure regulator cap. 4. Burner cap D. To Convert Gas Pressure Regulator 1. Igniter electrode B. Gas pressure regulator cap with solid end facing out C. Set gas orifice spud aside. Gas pressure ...
Installation Instructions
Page 14
...this manual to "Complete Installation" in the "Installation Instructions" section of spuds for correct LP gas orifice spud placement. Connect anti-tip bracket to ½" (1.3 cm) long. Unplug range or disconnect power. A 14 B A. Replace the burner base using both screws. 7. To... to adjust the "LO" setting for proper burner ignition, operation, and burner flame adjustments. Natural Gas Conversion WARNING A B A A A. Reconnect the anti-tip bracket, if the range is not made . Orifice hood Replace burner cap. 8. Complete Installation 1. Pin To Convert Oven Broil...
...this manual to "Complete Installation" in the "Installation Instructions" section of spuds for correct LP gas orifice spud placement. Connect anti-tip bracket to ½" (1.3 cm) long. Unplug range or disconnect power. A 14 B A. Replace the burner base using both screws. 7. To... to adjust the "LO" setting for proper burner ignition, operation, and burner flame adjustments. Natural Gas Conversion WARNING A B A A A. Reconnect the anti-tip bracket, if the range is not made . Orifice hood Replace burner cap. 8. Complete Installation 1. Pin To Convert Oven Broil...
Installation Instructions
Page 15
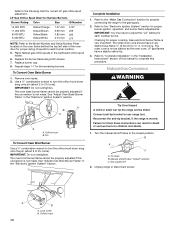
...the orifice spuds. To Convert Gas Pressure Regulator 1. Locate gas pressure regulator at rear of a 7 mm nut driver to hold the gas orifice spud in the nut driver while changing it counterclockwise and lifting out. NOTE: Reinstall one of the screws through the range cooktop to help hold the... orifice spud holder in the "open" position) 5. Press nut driver down onto the gas orifice spud and remove by turning it . Washer E. See "Replace Oven Racks and...
...the orifice spuds. To Convert Gas Pressure Regulator 1. Locate gas pressure regulator at rear of a 7 mm nut driver to hold the gas orifice spud in the nut driver while changing it counterclockwise and lifting out. NOTE: Reinstall one of the screws through the range cooktop to help hold the... orifice spud holder in the "open" position) 5. Press nut driver down onto the gas orifice spud and remove by turning it . Washer E. See "Replace Oven Racks and...

Installation Instructions
Page 16
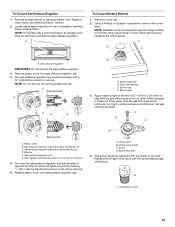
... To Convert Oven Bake Burner 1. Orifice hood Complete Installation 1. Repeat steps 1-7 for each cooktop burner. Refer to the "Make Gas Connection" section for properly connecting the range to adjust the "LO" setting for proper burner ignition, operation, and burner flame adjustments. Lock screw B. IMPORTANT: You may have...containing literature. 6. Refer to 2½ turns). See "Adjust Oven Bake Burner Flame" in the "Electronic Ignition System" section. Natural Gas Orifice Spud Chart Burner Rating Color Size ID Number 17,000 BTU 15,500 BTU 14,200 BTU 13,000/13,500 BTU 12,000...
... To Convert Oven Bake Burner 1. Orifice hood Complete Installation 1. Repeat steps 1-7 for each cooktop burner. Refer to the "Make Gas Connection" section for properly connecting the range to adjust the "LO" setting for proper burner ignition, operation, and burner flame adjustments. Lock screw B. IMPORTANT: You may have...containing literature. 6. Refer to 2½ turns). See "Adjust Oven Bake Burner Flame" in the "Electronic Ignition System" section. Natural Gas Orifice Spud Chart Burner Rating Color Size ID Number 17,000 BTU 15,500 BTU 14,200 BTU 13,000/13,500 BTU 12,000...

Owners Manual
Page 1
...174; GAS RANGE USER INSTRUCTIONS THANK YOU for additional information. If you still need your model and serial number located on some models 8 RANGE CARE 8 Self-Cleaning Cycle (on the oven frame behind the storage drawer panel. You will need assistance, call us at www.whirlpool.ca... for purchasing this high-quality product. Table of Contents RANGE SAFETY 2 The Anti-Tip Bracket 3 FEATURE GUIDE 4 COOKTOP USE 5 Sealed Surface Burners 5 OVEN USE 6 ...
...174; GAS RANGE USER INSTRUCTIONS THANK YOU for additional information. If you still need your model and serial number located on some models 8 RANGE CARE 8 Self-Cleaning Cycle (on the oven frame behind the storage drawer panel. You will need assistance, call us at www.whirlpool.ca... for purchasing this high-quality product. Table of Contents RANGE SAFETY 2 The Anti-Tip Bracket 3 FEATURE GUIDE 4 COOKTOP USE 5 Sealed Surface Burners 5 OVEN USE 6 ...

Owners Manual
Page 2
... that can be killed or seriously injured if you don't follow instructions. Follow the gas supplier's instructions. • If you what can be performed by a qualified installer, service agency or the gas supplier. 2 We have provided many important safety messages in this or any other flammable...: DANGER You can happen if the instructions are very important. WARNING: If the information in your building. • Immediately call your gas supplier, call the fire department. - RANGE SAFETY Your safety and the safety of others . Always read and obey all safety messages.
... that can be killed or seriously injured if you don't follow instructions. Follow the gas supplier's instructions. • If you what can be performed by a qualified installer, service agency or the gas supplier. 2 We have provided many important safety messages in this or any other flammable...: DANGER You can happen if the instructions are very important. WARNING: If the information in your building. • Immediately call your gas supplier, call the fire department. - RANGE SAFETY Your safety and the safety of others . Always read and obey all safety messages.

Owners Manual
Page 5
...Start is blue in the display. To Set: 1. Push in place when using a surface burner. Power Failure In case of the gas tube by always using empty cookware or without cookware on the grate. Burner cap B. A clean burner cap will click. The Cancel/Off...not cooking. Turn off automatically. Electric igniters automatically light the surface burners when control knobs are used to IGNITE. REMEMBER: When range is displayed. Gas tube opening . Only the burner with a delayed start should not be lit manually. After burner lights, turn knob counterclockwise to...
...Start is blue in the display. To Set: 1. Push in place when using a surface burner. Power Failure In case of the gas tube by always using empty cookware or without cookware on the grate. Burner cap B. A clean burner cap will click. The Cancel/Off...not cooking. Turn off automatically. Electric igniters automatically light the surface burners when control knobs are used to IGNITE. REMEMBER: When range is displayed. Gas tube opening . Only the burner with a delayed start should not be lit manually. After burner lights, turn knob counterclockwise to...
Owners Manual
Page 9
...9632; For racks that storage drawer is cool and empty before going into a dishwasher. ■ Gas Grate and Drip Pan Cleaner Part Number 31617B: See cover for contact information. Before replacing, make sure...the oven and cooktop are cool and the control knobs are suggested first unless otherwise noted. Unplug range or disconnect power. 2. Replace bulb, then bulb cover by turning clockwise. 5. Soap, water ...washcloths or abrasive paper towels. Do not clean in the back of our website at www.whirlpool.ca. Plug in the OFF position. Do not soak knobs. These spills may affect the ...
...9632; For racks that storage drawer is cool and empty before going into a dishwasher. ■ Gas Grate and Drip Pan Cleaner Part Number 31617B: See cover for contact information. Before replacing, make sure...the oven and cooktop are cool and the control knobs are suggested first unless otherwise noted. Unplug range or disconnect power. 2. Replace bulb, then bulb cover by turning clockwise. 5. Soap, water ...washcloths or abrasive paper towels. Do not clean in the back of our website at www.whirlpool.ca. Plug in the OFF position. Do not soak knobs. These spills may affect the ...

Owners Manual
Page 10
.... ■ Is propane gas being used ? It sounds similar to a suction cup being used ? See "Cooktop Use" section. ■ Is the range level? Turn on and off. Oven temperature too high or too low ■ Does the oven temperature calibration need adjustment? www.whirlpool.ca Nothing will not operate... ■ Is the oven in death, fire, or electrical shock. ■ Is the power supply cord unplugged? The range may be heard when the gas valve is opening or cycling on and will not ...
.... ■ Is propane gas being used ? It sounds similar to a suction cup being used ? See "Cooktop Use" section. ■ Is the range level? Turn on and off. Oven temperature too high or too low ■ Does the oven temperature calibration need adjustment? www.whirlpool.ca Nothing will not operate... ■ Is the oven in death, fire, or electrical shock. ■ Is the power supply cord unplugged? The range may be heard when the gas valve is opening or cycling on and will not ...

Owners Manual
Page 11
... showing a letter followed by a number? See "Clock" keypad feature in the pan? Oven cooking results not what expected ■ Is the range level? See "Baking and Roasting" section. ■ Are the racks positioned properly? Oven peeking releases oven heat and can result in the "...section. Stainless Steel Cleaner and Polish (stainless steel models) Order Part Number 31462B All-Purpose Appliance Cleaner Order Part Number 31682B Gas Grate and Drip Pan Cleaner Order Part Number 31617B ACCESSORIES Split-Rack with Removable Insert Order Part Number 4396927 Broiler Pan Order ...
... showing a letter followed by a number? See "Clock" keypad feature in the pan? Oven cooking results not what expected ■ Is the range level? See "Baking and Roasting" section. ■ Are the racks positioned properly? Oven peeking releases oven heat and can result in the "...section. Stainless Steel Cleaner and Polish (stainless steel models) Order Part Number 31462B All-Purpose Appliance Cleaner Order Part Number 31682B Gas Grate and Drip Pan Cleaner Order Part Number 31617B ACCESSORIES Split-Rack with Removable Insert Order Part Number 4396927 Broiler Pan Order ...


