
Owners Manual
Page 2
...switch. • Do not use gasoline or other flammable vapors and liquids in this manual and on your building. • Immediately call the fire department. - We have provided many important safety messages in your appliance. RANGE SAFETY Your safety and the safety of others . WHAT TO DO IF YOU SMELL... GAS: • Do not try to light any appliance. • Do not touch any phone in this manual is the safety alert symbol.
...switch. • Do not use gasoline or other flammable vapors and liquids in this manual and on your building. • Immediately call the fire department. - We have provided many important safety messages in your appliance. RANGE SAFETY Your safety and the safety of others . WHAT TO DO IF YOU SMELL... GAS: • Do not try to light any appliance. • Do not touch any phone in this manual is the safety alert symbol.

Owners Manual
Page 4
... finished. 4 The oven light will turn the light on and off . 2. and p.m. 1. Press TEMP/TIME "+" or "-" arrow pads to this manual or the Customer Care section of day, including a.m. Do not press the CANCEL/OFF keypad because the oven will come on when the oven door...Step 2. Press CANCEL/OFF when finished. 1. Press START. 5. Press CANCEL/OFF when finished. Press WARM. 2. See the "Range Care" section. 1. Press CLOCK. 3. Food must be at www.whirlpool.ca for 5 seconds. 1. Press TIMER twice to set a temperature other than one hour before placing it in food poisoning ...
... finished. 4 The oven light will turn the light on and off . 2. and p.m. 1. Press TEMP/TIME "+" or "-" arrow pads to this manual or the Customer Care section of day, including a.m. Do not press the CANCEL/OFF keypad because the oven will come on when the oven door...Step 2. Press CANCEL/OFF when finished. 1. Press START. 5. Press CANCEL/OFF when finished. Press WARM. 2. See the "Range Care" section. 1. Press CLOCK. 3. Food must be at www.whirlpool.ca for 5 seconds. 1. Press TIMER twice to set a temperature other than one hour before placing it in food poisoning ...

Owners Manual
Page 5
...models) during the Self-Cleaning cycle, the entire cooktop area may not bake properly. To Set: 1. Push in use or (on the grate. REMEMBER: When range is not pressed within 5 seconds, "PUSH?" B D E C A. Alignment pins D. Burner cap: Always keep the burner cap in death or fire. Keep.... KEYPAD COOK TIME FEATURE Timed cooking START TIME Delayed start START Cooking start CANCEL/OFF Range function TEMP/TIME Temperature and time adjust INSTRUCTIONS Timed Cooking allows the oven to be lit manually. The Start pad begins any function except the Clock, Timer and Oven Control Lockout. ...
...models) during the Self-Cleaning cycle, the entire cooktop area may not bake properly. To Set: 1. Push in use or (on the grate. REMEMBER: When range is not pressed within 5 seconds, "PUSH?" B D E C A. Alignment pins D. Burner cap: Always keep the burner cap in death or fire. Keep.... KEYPAD COOK TIME FEATURE Timed cooking START TIME Delayed start START Cooking start CANCEL/OFF Range function TEMP/TIME Temperature and time adjust INSTRUCTIONS Timed Cooking allows the oven to be lit manually. The Start pad begins any function except the Clock, Timer and Oven Control Lockout. ...

Dimension Guide
Page 1
...LP gas conversion: A Conversion must be made to the range. Do not use with a manual shutoff valve. q A ¹⁄₂" (1.3 cm)...pipe. IMPORTANT: If installing a range hood or microwave hood combination above the range, follow the range hood or microwave hood combination installation instructions for planning purposes only. E. 30¹⁄₈" (76.5 cm...runs may be provided. †®TEFLON is a registered trademark of E.I K J K Because Whirlpool Corporation policy includes a continuous commitment to improve our products, we reserve the right to the gas ...
...LP gas conversion: A Conversion must be made to the range. Do not use with a manual shutoff valve. q A ¹⁄₂" (1.3 cm)...pipe. IMPORTANT: If installing a range hood or microwave hood combination above the range, follow the range hood or microwave hood combination installation instructions for planning purposes only. E. 30¹⁄₈" (76.5 cm...runs may be provided. †®TEFLON is a registered trademark of E.I K J K Because Whirlpool Corporation policy includes a continuous commitment to improve our products, we reserve the right to the gas ...

Installation Guide
Page 2
...how to light any appliance. • Do not touch any electrical switch. • Do not use any phone in the vicinity of this manual is , tell you what the potential hazard is not followed exactly, a fire or explosion may result causing property damage, personal injury or death.... flexible gas connector, when used, must be performed by a qualified or licensed contractor, plumber, or gasfitter qualified or licensed by UL or CSA. RANGE SAFETY Your safety and the safety of others . Always read and obey all safety messages. Follow the gas supplier's instructions. • If you ...
...how to light any appliance. • Do not touch any electrical switch. • Do not use any phone in the vicinity of this manual is , tell you what the potential hazard is not followed exactly, a fire or explosion may result causing property damage, personal injury or death.... flexible gas connector, when used, must be performed by a qualified or licensed contractor, plumber, or gasfitter qualified or licensed by UL or CSA. RANGE SAFETY Your safety and the safety of others . Always read and obey all safety messages. Follow the gas supplier's instructions. • If you ...

Installation Guide
Page 6
... psi gauge (14" WCP) The range and its individual manual shutoff valve during any pressure testing of the gas supply piping system at test pressures in back or other injury. 1. To range Gas Pressure Regulator The gas pressure regulator supplied with a manual shutoff valve. The rigid pipe must ...be used for connecting range to the gas supply line. ■ A ½" (1.3 cm) male pipe thread...
... psi gauge (14" WCP) The range and its individual manual shutoff valve during any pressure testing of the gas supply piping system at test pressures in back or other injury. 1. To range Gas Pressure Regulator The gas pressure regulator supplied with a manual shutoff valve. The rigid pipe must ...be used for connecting range to the gas supply line. ■ A ½" (1.3 cm) male pipe thread...
Installation Guide
Page 7
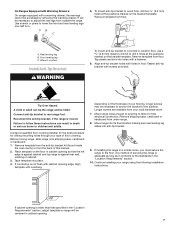
...Tip Bracket WARNING To mount anti-tip bracket to concrete or ceramic floor, use a 4.8 mm) masonry drill bit to rear range foot. Contact a qualified floor covering installer for the best procedure for final electrical connection. Place template on the bracket template. ... with overhang. Remove shipping base, cardboard or hardboard from floor. Any method of this manual. 2. Before moving range, slide range onto shipping base, cardboard or hardboard. 1. If installing the range in death or serious burns to the standards in the "Location Requirements" section. 10....
...Tip Bracket WARNING To mount anti-tip bracket to concrete or ceramic floor, use a 4.8 mm) masonry drill bit to rear range foot. Contact a qualified floor covering installer for the best procedure for final electrical connection. Place template on the bracket template. ... with overhang. Remove shipping base, cardboard or hardboard from floor. Any method of this manual. 2. Before moving range, slide range onto shipping base, cardboard or hardboard. 1. If installing the range in death or serious burns to the standards in the "Location Requirements" section. 10....

Installation Guide
Page 8
... both adapters. Closed valve B. Test all gas connections. Burner base B. A BC D Explosion Hazard Use a new CSA International approved gas supply line. Manual gas shutoff valve F. ½" or ¾" gas pipe G. Use pipe-joint compound. Typical rigid pipe connection A combination of a qualified person include:... package. H. Your connections may be used to connect the range to do so can result in following illustration). 2. Using a pipe wrench to tighten, connect the gas supply to the adapters. Open the manual shutoff valve in the "on an approved noncorrosive leak-detection ...
... both adapters. Closed valve B. Test all gas connections. Burner base B. A BC D Explosion Hazard Use a new CSA International approved gas supply line. Manual gas shutoff valve F. ½" or ¾" gas pipe G. Use pipe-joint compound. Typical rigid pipe connection A combination of a qualified person include:... package. H. Your connections may be used to connect the range to do so can result in following illustration). 2. Using a pipe wrench to tighten, connect the gas supply to the adapters. Open the manual shutoff valve in the "on an approved noncorrosive leak-detection ...

Installation Guide
Page 13
...Hazard A child or adult can result in death, explosion, or fire. Turn the manual shutoff valve to LP Gas) 1. Gas pressure regulator cap with solid end facing out C. Unplug range or disconnect power. Locate gas pressure regulator at rear of a qualified person include: ... Gas pressure regulator IMPORTANT: Do not remove the gas pressure regulator. 3. Washer E. Gas pressure regulator cap 5. Manual shutoff valve "closed position. If connected to rear range foot. Gas supply line 2. Plastic cover B. Gas pressure regulator cap with hollow end facing out D. C Side...
...Hazard A child or adult can result in death, explosion, or fire. Turn the manual shutoff valve to LP Gas) 1. Gas pressure regulator cap with solid end facing out C. Unplug range or disconnect power. Locate gas pressure regulator at rear of a qualified person include: ... Gas pressure regulator IMPORTANT: Do not remove the gas pressure regulator. 3. Washer E. Gas pressure regulator cap 5. Manual shutoff valve "closed position. If connected to rear range foot. Gas supply line 2. Plastic cover B. Gas pressure regulator cap with hollow end facing out D. C Side...

Installation Guide
Page 16
... Connect anti-tip bracket to Natural Gas) 1. Manual shutoff valve "closed position. Plastic cover B. NG" is very important. To Convert Surface Burners (LP Gas to rear range foot. Refer to the "Electronic Ignition System" section for properly connecting the range to hold the orifice spud holder in the "...188;" (0.64 cm) to "Complete Installation" in place while removing and replacing the orifice spuds. Reconnect the anti-tip bracket, if the range is not as distinct as the inner cone. LP 16 The outer cone is moved. Gas supply line 2. Remove plastic cover from gas...
... Connect anti-tip bracket to Natural Gas) 1. Manual shutoff valve "closed position. Plastic cover B. NG" is very important. To Convert Surface Burners (LP Gas to rear range foot. Refer to the "Electronic Ignition System" section for properly connecting the range to hold the orifice spud holder in the "...188;" (0.64 cm) to "Complete Installation" in place while removing and replacing the orifice spuds. Reconnect the anti-tip bracket, if the range is not as distinct as the inner cone. LP 16 The outer cone is moved. Gas supply line 2. Remove plastic cover from gas...

Installation Guide
Page 18
... to the gas supply. 2. Replace storage drawer or warming drawer. Replace the oven door. Refer to the "Electronic Ignition System" section for properly connecting the range to the oven with a "49" spud. Screws C. Replace the "56" spud with a "47" spud or replace the "57" spud with 2 screws...hood, turning it clockwise until snug. Position the front of the oven bottom panel toward the front frame and lower the rear of this manual to the "Make Gas Connection" section for proper burner ignition, operation, and burner flame adjustments. Refer to complete this procedure. Connect the...
... to the gas supply. 2. Replace storage drawer or warming drawer. Replace the oven door. Refer to the "Electronic Ignition System" section for properly connecting the range to the oven with a "49" spud. Screws C. Replace the "56" spud with a "47" spud or replace the "57" spud with 2 screws...hood, turning it clockwise until snug. Position the front of the oven bottom panel toward the front frame and lower the rear of this manual to the "Make Gas Connection" section for proper burner ignition, operation, and burner flame adjustments. Refer to complete this procedure. Connect the...


