Owners Manual
Page 7
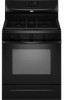
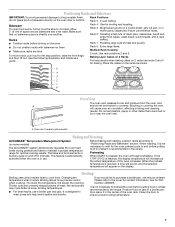
...on some models) The ACCUBAKE® system electronically regulates the oven heat levels during preheat and bake to maintain a precise temperature range for contact information. When roasting, it is not necessary to wait for broiling and toasting. When the preheat temperature is reached..., the display temperature will appear on 2 racks use racks 2 and 5 for Part Number 4396923. Please refer to the cover for optimal cooking results. Rack 6: Extra-large items. Multiple Rack Cooking 2-rack: Use rack positions...
...on some models) The ACCUBAKE® system electronically regulates the oven heat levels during preheat and bake to maintain a precise temperature range for contact information. When roasting, it is not necessary to wait for broiling and toasting. When the preheat temperature is reached..., the display temperature will appear on 2 racks use racks 2 and 5 for Part Number 4396923. Please refer to the cover for optimal cooking results. Rack 6: Extra-large items. Multiple Rack Cooking 2-rack: Use rack positions...
Owners Manual
Page 9
... knobs. Cleaning Method: Rub in the back of our website at www.whirlpool.ca. SURFACE BURNERS ■ See "Sealed Surface Burners" section. These spills may remove numbers. ■ All-Purpose Appliance Cleaner Part Number 31682B (not included): See cover for contact information. OVEN RACKS Cleaning..., should be cleaned as soon as cast iron cookware. PORCELAIN-COATED GRATES AND CAPS Food spills containing acids, such as the entire range is a standard 40-watt appliance bulb. Before replacing, make sure knobs are off position. Cleaning Method: ■ Glass cleaner, ...
... knobs. Cleaning Method: Rub in the back of our website at www.whirlpool.ca. SURFACE BURNERS ■ See "Sealed Surface Burners" section. These spills may remove numbers. ■ All-Purpose Appliance Cleaner Part Number 31682B (not included): See cover for contact information. OVEN RACKS Cleaning..., should be cleaned as soon as cast iron cookware. PORCELAIN-COATED GRATES AND CAPS Food spills containing acids, such as the entire range is a standard 40-watt appliance bulb. Before replacing, make sure knobs are off position. Cleaning Method: ■ Glass cleaner, ...

Owners Manual
Page 11
...Order Part Number 4396923 11 See "Clock" keypad feature in the "Electronic Oven Controls" section. If it reappears, call for contact information. ■ Is the display showing a flashing "PUSH?" See "Self-Cleaning Cycle" section. ■ Has a delay start been set? (on the bottom? Level the range. ...the "Start" keypad feature in the oven. ■ Are pie crust edges browning early? Oven cooking results not what expected ■ Is the range level? On some models) See "Timed Cooking" section. ■ Has a self-clean cycle been run , or canceled after the oven has reached...
...Order Part Number 4396923 11 See "Clock" keypad feature in the "Electronic Oven Controls" section. If it reappears, call for contact information. ■ Is the display showing a flashing "PUSH?" See "Self-Cleaning Cycle" section. ■ Has a delay start been set? (on the bottom? Level the range. ...the "Start" keypad feature in the oven. ■ Are pie crust edges browning early? Oven cooking results not what expected ■ Is the range level? On some models) See "Timed Cooking" section. ■ Has a self-clean cycle been run , or canceled after the oven has reached...

Owners Manual
Page 12
... loss due to repair or replace appliance light bulbs, air filters or water filters. Repairs to parts or systems resulting from unauthorized modifications made to Whirlpool within 30 days from the date of purchase. 6. LIMITATION OF REMEDIES CUSTOMER'S SOLE AND EXCLUSIVE REMEDY UNDER ...appliance is operated and maintained according to instructions attached to or furnished with the product, Whirlpool Corporation or Whirlpool Canada LP (hereafter "Whirlpool") will pay for Factory Specified Parts and repair labor to obtain service under these excluded circumstances shall be repaired in the...
... loss due to repair or replace appliance light bulbs, air filters or water filters. Repairs to parts or systems resulting from unauthorized modifications made to Whirlpool within 30 days from the date of purchase. 6. LIMITATION OF REMEDIES CUSTOMER'S SOLE AND EXCLUSIVE REMEDY UNDER ...appliance is operated and maintained according to instructions attached to or furnished with the product, Whirlpool Corporation or Whirlpool Canada LP (hereafter "Whirlpool") will pay for Factory Specified Parts and repair labor to obtain service under these excluded circumstances shall be repaired in the...

Warranty
Page 1
...accordance with published installation instructions. 11. For assistance or service call 1-800-807-6777. Any food loss due to Whirlpool within 30 days from the date of purchase. 6. Expenses for travel and transportation for product service if your major appliance if...appliance is operated and maintained according to instructions attached to or furnished with the product, Whirlpool Corporation or Whirlpool Canada LP (hereafter "Whirlpool") will pay for Factory Specified Parts and repair labor to obtain service under these excluded circumstances shall be provided by this ...
...accordance with published installation instructions. 11. For assistance or service call 1-800-807-6777. Any food loss due to Whirlpool within 30 days from the date of purchase. 6. Expenses for travel and transportation for product service if your major appliance if...appliance is operated and maintained according to instructions attached to or furnished with the product, Whirlpool Corporation or Whirlpool Canada LP (hereafter "Whirlpool") will pay for Factory Specified Parts and repair labor to obtain service under these excluded circumstances shall be provided by this ...

Installation Guide
Page 3
... covering installer to make sure that the floor covering can tip the range and be used will not discolor, delaminate or sustain other damage. Tools needed Check local codes and consult gas supplier. A B C A. Parts needed ■ Tape measure ■ Flat-blade screwdriver ■ ... †® QUADREX is moved. Thickness of this range must be located for convenient use the Standard for Mobile Home Construction and Safety, Title 24, HUD Part 280). Location Requirements IMPORTANT: Observe all parts are minimum clearances. ■ The floor anti-tip bracket...
... covering installer to make sure that the floor covering can tip the range and be used will not discolor, delaminate or sustain other damage. Tools needed Check local codes and consult gas supplier. A B C A. Parts needed ■ Tape measure ■ Flat-blade screwdriver ■ ... †® QUADREX is moved. Thickness of this range must be located for convenient use the Standard for Mobile Home Construction and Safety, Title 24, HUD Part 280). Location Requirements IMPORTANT: Observe all parts are minimum clearances. ■ The floor anti-tip bracket...

Installation Guide
Page 6
... excess of the inlet to the appliance pressure regulator. ■ Do not kink or damage the flexible metal tubing when moving the range. Remove oven racks and parts package from range. 2. A C A. A A. Shipping base 4. Front leveling leg 6 Flexible metal appliance connector: ■ If local codes permit, a...Storage Drawers: Remove the storage drawer. B Gas Supply Pressure Testing Gas supply pressure for Canada). This valve should be used for connecting range to the gas supply line. ■ A ½" (1.3 cm) male pipe thread is for connection to the female pipe threads ...
... excess of the inlet to the appliance pressure regulator. ■ Do not kink or damage the flexible metal tubing when moving the range. Remove oven racks and parts package from range. 2. A C A. A A. Shipping base 4. Front leveling leg 6 Flexible metal appliance connector: ■ If local codes permit, a...Storage Drawers: Remove the storage drawer. B Gas Supply Pressure Testing Gas supply pressure for Canada). This valve should be used for connecting range to the gas supply line. ■ A ½" (1.3 cm) male pipe thread is for connection to the female pipe threads ...

Installation Guide
Page 8
... LP gas to the adapters. Closed valve B. If bubbles appear, a leak is not kinked. Burner caps should be different, according to the range. Securely tighten all connections by brushing on " position. B C A D F E J A. Black iron pipe I . Test all gas...Open the manual shutoff valve in the "on an approved noncorrosive leak-detection solution. A B A. Remove cooktop burner caps and grates from parts package. Burner base B. WARNING Make Gas Connection 3. Flexible connector HG F E. Typical rigid pipe connection A combination of pipe fittings must ...
... LP gas to the adapters. Closed valve B. If bubbles appear, a leak is not kinked. Burner caps should be different, according to the range. Securely tighten all connections by brushing on " position. B C A D F E J A. Black iron pipe I . Test all gas...Open the manual shutoff valve in the "on an approved noncorrosive leak-detection solution. A B A. Remove cooktop burner caps and grates from parts package. Burner base B. WARNING Make Gas Connection 3. Flexible connector HG F E. Typical rigid pipe connection A combination of pipe fittings must ...
Installation Guide
Page 12
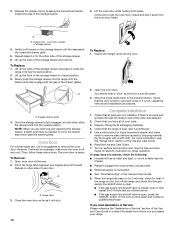
...the following: ■ Household fuse is intact and tight, or circuit breaker has not tripped. ■ Range is plugged into a grounded 3 prong outlet. ■ Electrical supply is an extra part, go back through the steps to remove waxy residue caused by pressing the screwdriver handle toward the side of... the storage drawer to the locked position. If the range is cold, turn off and cool. Gently pull forward on...
...the following: ■ Household fuse is intact and tight, or circuit breaker has not tripped. ■ Range is plugged into a grounded 3 prong outlet. ■ Electrical supply is an extra part, go back through the steps to remove waxy residue caused by pressing the screwdriver handle toward the side of... the storage drawer to the locked position. If the range is cold, turn off and cool. Gently pull forward on...

Installation Guide
Page 17
... stamped with package containing literature. 6. Remove 2 screws from front of the flame spreader and pull forward to help hold the gas orifice spud in plastic parts bag for each burner location. 5. B A A. Remove 2 screws at the rear of spuds for future use and keep with a number on a covered surface. Spark electrode 4. Screws...
... stamped with package containing literature. 6. Remove 2 screws from front of the flame spreader and pull forward to help hold the gas orifice spud in plastic parts bag for each burner location. 5. B A A. Remove 2 screws at the rear of spuds for future use and keep with a number on a covered surface. Spark electrode 4. Screws...


