
Dimension Guide
Page 1
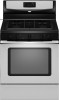
..." (76.2 cm) minimum clearance between the top of the cooking platform and the bottom of an uncovered wood or metal cabinet. Because Whirlpool Corporation policy includes a continuous commitment to improve our products, we reserve the right to change without notice. *NOTE: 24" (61.0...with LP gas. E. 30¹⁄₈" (76.5 cm) min. With LP gas, piping or tubing size can be located in insufficient gas supply. ® 30" (76.2 cm) Freestanding Gas Range PRODUCT MODEL NUMBERS PRODUCT DIMENSIONS GFG464LV GFG471LV WFG361LV WFG366LV WFG371LV WFG374LV Gas supply: This range is ...
..." (76.2 cm) minimum clearance between the top of the cooking platform and the bottom of an uncovered wood or metal cabinet. Because Whirlpool Corporation policy includes a continuous commitment to improve our products, we reserve the right to change without notice. *NOTE: 24" (61.0...with LP gas. E. 30¹⁄₈" (76.5 cm) min. With LP gas, piping or tubing size can be located in insufficient gas supply. ® 30" (76.2 cm) Freestanding Gas Range PRODUCT MODEL NUMBERS PRODUCT DIMENSIONS GFG464LV GFG471LV WFG361LV WFG366LV WFG371LV WFG374LV Gas supply: This range is ...

Owners Manual
Page 1
...243;n de almacenamiento. Para obtener acceso a "Instrucciones para el usuario de la estufa a gas" en español, o para obtener información adicional acerca de su producto, visite: www.whirlpool.com Tenga listo su número de modelo completo. You will need assistance, call us ...at www.whirlpool.com for purchasing this high-quality product. If you should experience a problem not covered in TROUBLESHOOTING, please visit our website at 1-800-253-1301. ® GAS RANGE USER INSTRUCTIONS THANK YOU for additional information. If you ...
...243;n de almacenamiento. Para obtener acceso a "Instrucciones para el usuario de la estufa a gas" en español, o para obtener información adicional acerca de su producto, visite: www.whirlpool.com Tenga listo su número de modelo completo. You will need assistance, call us ...at www.whirlpool.com for purchasing this high-quality product. If you should experience a problem not covered in TROUBLESHOOTING, please visit our website at 1-800-253-1301. ® GAS RANGE USER INSTRUCTIONS THANK YOU for additional information. If you ...

Owners Manual
Page 2
... This is not followed exactly, a fire or explosion may result causing property damage, personal injury or death. - WHAT TO DO IF YOU SMELL GAS: • Do not try to reduce the chance of injury, and tell you what the potential hazard is detected, follow instructions. Installation and service...if you use gasoline or other flammable vapors and liquids in this manual is the safety alert symbol. WARNING: Gas leaks cannot always be performed by UL or CSA. RANGE SAFETY Your safety and the safety of others . This symbol alerts you don't immediately follow the safety alert...
... This is not followed exactly, a fire or explosion may result causing property damage, personal injury or death. - WHAT TO DO IF YOU SMELL GAS: • Do not try to reduce the chance of injury, and tell you what the potential hazard is detected, follow instructions. Installation and service...if you use gasoline or other flammable vapors and liquids in this manual is the safety alert symbol. WARNING: Gas leaks cannot always be performed by UL or CSA. RANGE SAFETY Your safety and the safety of others . This symbol alerts you don't immediately follow the safety alert...

Owners Manual
Page 5
... surface burners can result in the display. KEYPAD COOK TIME FEATURE Timed cooking START TIME Delayed start START Cooking start CANCEL/OFF Range function TEMP/TIME Temperature and time adjust INSTRUCTIONS Timed Cooking allows the oven to be set to turn on at a certain time... see "Timed Cooking" section. The "+" or "-" arrow pads are turned to IGNITE. Turn knob to follow these instructions can be used to enter the gas tube opening. Burner cap B. Igniter E. A B A. 1-1¹⁄₂" (25-38 mm) B. Burner ports Burner ports: Check burner flames occasionally...
... surface burners can result in the display. KEYPAD COOK TIME FEATURE Timed cooking START TIME Delayed start START Cooking start CANCEL/OFF Range function TEMP/TIME Temperature and time adjust INSTRUCTIONS Timed Cooking allows the oven to be set to turn on at a certain time... see "Timed Cooking" section. The "+" or "-" arrow pads are turned to IGNITE. Turn knob to follow these instructions can be used to enter the gas tube opening. Burner cap B. Igniter E. A B A. 1-1¹⁄₂" (25-38 mm) B. Burner ports Burner ports: Check burner flames occasionally...

Owners Manual
Page 9
... knobs are cool. Damage may stain. These spills may affect the finish. Turn the glass bulb cover in range or reconnect power. 9 Liquid detergent or all controls are off position. 2. Replace bulb, then bulb cover ...oven and cooktop are cool and the control knobs are in direction of our website at www.whirlpool.com. Unplug range or disconnect power. 4. For additional information, you can visit the Frequently Asked Questions (FAQs)...is cool and empty before going into a dishwasher. ■ Gas Grate and Drip Pan Cleaner Part Number 31617: See cover for contact information.
... knobs are cool. Damage may stain. These spills may affect the finish. Turn the glass bulb cover in range or reconnect power. 9 Liquid detergent or all controls are off position. 2. Replace bulb, then bulb cover ...oven and cooktop are cool and the control knobs are in direction of our website at www.whirlpool.com. Unplug range or disconnect power. 4. For additional information, you can visit the Frequently Asked Questions (FAQs)...is cool and empty before going into a dishwasher. ■ Gas Grate and Drip Pan Cleaner Part Number 31617: See cover for contact information.

Owners Manual
Page 10
... is heard when the Bake or Broil burner ignites. ■ On some models, a clicking sound can result in the off . Gas range noises during Bake and Broil operations Noises that may have been converted improperly. See the Installation Instructions. Oven burner flames are short clicking ... heard when the convection fan relay cycles on any one of the surface burner knobs to the proper heat level? Push in self-clean? www.whirlpool.com Nothing will not operate ■ Is this the first time the surface burners have a flat bottom, straight sides and a well fitting lid,...
... is heard when the Bake or Broil burner ignites. ■ On some models, a clicking sound can result in the off . Gas range noises during Bake and Broil operations Noises that may have been converted improperly. See the Installation Instructions. Oven burner flames are short clicking ... heard when the convection fan relay cycles on any one of the surface burner knobs to the proper heat level? Push in self-clean? www.whirlpool.com Nothing will not operate ■ Is this the first time the surface burners have a flat bottom, straight sides and a well fitting lid,...

Owners Manual
Page 11
... temperature. Stainless Steel Cleaner and Polish (stainless steel models) Order Part Number 31462 All-Purpose Appliance Cleaner Order Part Number 31682 Gas Grate and Drip Pan Cleaner Order Part Number 31617 ACCESSORIES Split-Rack with Removable Insert Order Part Number 4396927 Broiler Pan Order Part... Are pie crust edges browning early? If it reappears, call for contact information. ■ Is the display showing a flashing "PUSH?" Level the range. Self-Cleaning cycle will have to wait 12 hours to clear the display. See "Positioning Racks and Bakeware" section. ■ Is there proper ...
... temperature. Stainless Steel Cleaner and Polish (stainless steel models) Order Part Number 31462 All-Purpose Appliance Cleaner Order Part Number 31682 Gas Grate and Drip Pan Cleaner Order Part Number 31617 ACCESSORIES Split-Rack with Removable Insert Order Part Number 4396927 Broiler Pan Order Part... Are pie crust edges browning early? If it reappears, call for contact information. ■ Is the display showing a flashing "PUSH?" Level the range. Self-Cleaning cycle will have to wait 12 hours to clear the display. See "Positioning Racks and Bakeware" section. ■ Is there proper ...

Installation Guide
Page 1
...76.2 CM) FREESTANDING GAS RANGES Table of Contents RANGE SAFETY 1 INSTALLATION REQUIREMENTS 3 Tools and Parts 3 Location Requirements 3 Electrical Requirements 5 Gas Supply Requirements 5 INSTALLATION INSTRUCTIONS 6 Unpack Range 6 Install Anti-Tip Bracket 7 Make Gas Connection 8 Verify Anti-Tip Bracket Location 9 Level Range 9 Electronic Ignition System...Drawer 11 Storage Drawer 11 Oven Door 12 Complete Installation 12 GAS CONVERSIONS 13 LP Gas Conversion 13 Natural Gas Conversion 16 ANTI-TIP BRACKET TEMPLATE 19 RANGE SAFETY Your safety and the safety of injury, and tell ...
...76.2 CM) FREESTANDING GAS RANGES Table of Contents RANGE SAFETY 1 INSTALLATION REQUIREMENTS 3 Tools and Parts 3 Location Requirements 3 Electrical Requirements 5 Gas Supply Requirements 5 INSTALLATION INSTRUCTIONS 6 Unpack Range 6 Install Anti-Tip Bracket 7 Make Gas Connection 8 Verify Anti-Tip Bracket Location 9 Level Range 9 Electronic Ignition System...Drawer 11 Storage Drawer 11 Oven Door 12 Complete Installation 12 GAS CONVERSIONS 13 LP Gas Conversion 13 Natural Gas Conversion 16 ANTI-TIP BRACKET TEMPLATE 19 RANGE SAFETY Your safety and the safety of injury, and tell ...
Installation Guide
Page 2
... call the fire department. - WHAT TO DO IF YOU SMELL GAS: • Do not try to do if you smell gas" instructions. Reconnect the anti-tip bracket, if the range is detected, follow these instructions can tip the range and be detected by the State of this manual is not followed... exactly, a fire or explosion may result causing property damage, personal injury or death. - If a gas leak is moved. WARNING Tip Over Hazard...
... call the fire department. - WHAT TO DO IF YOU SMELL GAS: • Do not try to do if you smell gas" instructions. Reconnect the anti-tip bracket, if the range is detected, follow these instructions can tip the range and be detected by the State of this manual is not followed... exactly, a fire or explosion may result causing property damage, personal injury or death. - If a gas leak is moved. WARNING Tip Over Hazard...

Installation Guide
Page 3
... it must be installed. Read and follow the instructions provided with the maximum allowable wood cabinet temperatures of securing the range is adequate as long as it conforms to LP gas 4.8 mm) carbide-tipped masonry drill bit (for concrete/ceramic floors) ■ Hand or electric drill ■ Hammer..., check with local codes. Tools needed Check local codes and consult gas supplier. Anti-tip bracket B. Do not obstruct flow of the oven door. ■ The range should be sealed. ■ Do not seal the range to the Manufactured Home Construction and Safety Standard, Title 24 CFR, ...
... it must be installed. Read and follow the instructions provided with the maximum allowable wood cabinet temperatures of securing the range is adequate as long as it conforms to LP gas 4.8 mm) carbide-tipped masonry drill bit (for concrete/ceramic floors) ■ Hand or electric drill ■ Hammer..., check with local codes. Tools needed Check local codes and consult gas supplier. Anti-tip bracket B. Do not obstruct flow of the oven door. ■ The range should be sealed. ■ Do not seal the range to the Manufactured Home Construction and Safety Standard, Title 24 CFR, ...

Installation Guide
Page 4
... the leveling legs. Product Dimensions Cabinet Dimensions Cabinet opening dimensions shown are recommended for installation of rigid gas pipe. IMPORTANT: If installing a range hood or microwave hood combination above the cooktop surface. For minimum clearance to countertop B. 13" (33...) min. clearance from both sides of an uncovered wood or metal cabinet. 4 The shaded areas are for dimensional clearances above the range, follow the range hood or microwave hood combination installation instructions for 25" (64.0 cm) countertop depth, 24" (61.0 cm) base cabinet depth ...
... the leveling legs. Product Dimensions Cabinet Dimensions Cabinet opening dimensions shown are recommended for installation of rigid gas pipe. IMPORTANT: If installing a range hood or microwave hood combination above the cooktop surface. For minimum clearance to countertop B. 13" (33...) min. clearance from both sides of an uncovered wood or metal cabinet. 4 The shaded areas are for dimensional clearances above the range, follow the range hood or microwave hood combination installation instructions for 25" (64.0 cm) countertop depth, 24" (61.0 cm) base cabinet depth ...

Installation Guide
Page 5
... and authorized service personnel. However, occasional nuisance tripping of the GFCI breaker is possible due to the normal operating nature of electronic gas ranges. ■ The wiring diagram is recommended that the ground path is not grounded, no keypads will not be used , it may... ¾" (1.9 cm) rigid pipe to the manufacturer's instructions. Examples of the range is recommended that the outlet provides 120-volt power and is correctly grounded. ■ This gas range is a registered trademark of this range be grounded in a clear plastic bag. latest edition or CAN/CGA B149 - ...
... and authorized service personnel. However, occasional nuisance tripping of the GFCI breaker is possible due to the normal operating nature of electronic gas ranges. ■ The wiring diagram is recommended that the ground path is not grounded, no keypads will not be used , it may... ¾" (1.9 cm) rigid pipe to the manufacturer's instructions. Examples of the range is recommended that the outlet provides 120-volt power and is correctly grounded. ■ This gas range is a registered trademark of this range be grounded in a clear plastic bag. latest edition or CAN/CGA B149 - ...

Installation Guide
Page 6
... external to do so can result in line. ■ Must include a shutoff valve: The supply line must be equipped with the range connection. Gas supply line B. Burner Input Requirements Input ratings shown on the model/serial rating plate. Front leveling leg Use a wrench or pliers to... piping system at a rate of pipe fittings to obtain an in a location that system at this range must be used for connecting range to the gas supply line. ■ A ½" (1.3 cm) male pipe thread is for Canada). 6 A A. Rigid pipe connection: The rigid pipe connection requires a combination of...
... external to do so can result in line. ■ Must include a shutoff valve: The supply line must be equipped with the range connection. Gas supply line B. Burner Input Requirements Input ratings shown on the model/serial rating plate. Front leveling leg Use a wrench or pliers to... piping system at a rate of pipe fittings to obtain an in a location that system at this range must be used for connecting range to the gas supply line. ■ A ½" (1.3 cm) male pipe thread is for Canada). 6 A A. Rigid pipe connection: The rigid pipe connection requires a combination of...

Installation Guide
Page 8
... valve 2. A B A. Remove cooktop burner caps and grates from parts package. If connected to the gas shutoff valve. Flexible connector HG F E. Typical rigid pipe connection A combination of pipe fittings must be used to connect the range to the range. Closed valve B. Adapter Complete Connection 1. Union E. Tighten both adapters. Securely tighten all connections by brushing...
... valve 2. A B A. Remove cooktop burner caps and grates from parts package. If connected to the gas shutoff valve. Flexible connector HG F E. Typical rigid pipe connection A combination of pipe fittings must be used to connect the range to the range. Closed valve B. Adapter Complete Connection 1. Union E. Tighten both adapters. Securely tighten all connections by brushing...

Installation Guide
Page 9
...or pliers to adjust leveling legs up or down until the range is lit, it may take longer than 4 seconds to light the burner. Level Range 1. then front to the desired setting, sparking occurs and ignites the gas. Push range back into position. This sparking continues, as long as the...the height of standing pilots. Place level on burner bases. Electronic Ignition System Initial lighting and gas flame adjustments Cooktop and oven burners use a flashlight and look underneath the bottom of range, first side to view the rear foot from the anti-tip bracket. When the oven control...
...or pliers to adjust leveling legs up or down until the range is lit, it may take longer than 4 seconds to light the burner. Level Range 1. then front to the desired setting, sparking occurs and ignites the gas. Push range back into position. This sparking continues, as long as the...the height of standing pilots. Place level on burner bases. Electronic Ignition System Initial lighting and gas flame adjustments Cooktop and oven burners use a flashlight and look underneath the bottom of range, first side to view the rear foot from the anti-tip bracket. When the oven control...

Installation Guide
Page 12
... press the CANCEL button on both sides. Then, follow these instructions. Check that the gas supply line shutoff valve is open. ■ If the gas supply line shutoff valve is closed position. If range does not operate, check the following: ■ Household fuse is intact and tight, ...or circuit breaker has not tripped. ■ Range is plugged into a grounded 3 prong outlet. ■ Electrical ...
... press the CANCEL button on both sides. Then, follow these instructions. Check that the gas supply line shutoff valve is open. ■ If the gas supply line shutoff valve is closed position. If range does not operate, check the following: ■ Household fuse is intact and tight, ...or circuit breaker has not tripped. ■ Range is plugged into a grounded 3 prong outlet. ■ Electrical ...

Installation Guide
Page 13
... not remove the spring beneath the cap. Turn the manual shutoff valve to rear range foot. Gas supply line 2. Turn over gas pressure regulator cap. 13 LP Locate gas pressure regulator at rear of a qualified person include: licensed heating personnel, authorized gas company personnel, and authorized service personnel. Install a shut-off valve. Examples of storage...
... not remove the spring beneath the cap. Turn the manual shutoff valve to rear range foot. Gas supply line 2. Turn over gas pressure regulator cap. 13 LP Locate gas pressure regulator at rear of a qualified person include: licensed heating personnel, authorized gas company personnel, and authorized service personnel. Install a shut-off valve. Examples of storage...
Installation Guide
Page 14
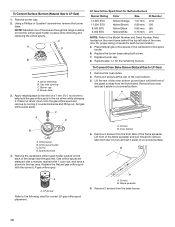
...sizing of the screws through the range cooktop to hold the gas orifice spud in place while removing and replacing the orifice spuds. Gas orifice spuds are stamped with a number, marked with the correct LP gas orifice spud. To Convert Oven Bake Burner (Natural Gas to LP Gas) 1. Remove 2 screws at ...70 mm L107 L99 L85 L70 NOTE: Refer to the following chart for the remaining burners. Lift front of the range near the gas inlet. B A A. To Convert Surface Burners (Natural Gas to LP Gas) 1. Burner base 3. Apply masking tape to the end of a 7 mm nut driver to remove tabs from ...
...sizing of the screws through the range cooktop to hold the gas orifice spud in place while removing and replacing the orifice spuds. Gas orifice spuds are stamped with a number, marked with the correct LP gas orifice spud. To Convert Oven Bake Burner (Natural Gas to LP Gas) 1. Remove 2 screws at ...70 mm L107 L99 L85 L70 NOTE: Refer to the following chart for the remaining burners. Lift front of the range near the gas inlet. B A A. To Convert Surface Burners (Natural Gas to LP Gas) 1. Burner base 3. Apply masking tape to the end of a 7 mm nut driver to remove tabs from ...

Installation Guide
Page 16
...out and the marking "! Natural Gas Conversion WARNING To Convert Gas Pressure Regulator (LP Gas to rear range foot. NOTE: On models with a ⁵⁄₈" combination wrench to Natural Gas) 1. Turn the manual shutoff valve to the "Make Gas Connection" section for proper burner ignition..., an access cover must be killed. Washer E. Gas pressure regulator IMPORTANT: Do not remove the gas pressure regulator. 3. Remove plastic cover from gas pressure regulator cap. 4. Failure to follow these instructions can tip the range and be removed to adjust the "LO" setting ...
...out and the marking "! Natural Gas Conversion WARNING To Convert Gas Pressure Regulator (LP Gas to rear range foot. NOTE: On models with a ⁵⁄₈" combination wrench to Natural Gas) 1. Turn the manual shutoff valve to the "Make Gas Connection" section for proper burner ignition..., an access cover must be killed. Washer E. Gas pressure regulator IMPORTANT: Do not remove the gas pressure regulator. 3. Remove plastic cover from gas pressure regulator cap. 4. Failure to follow these instructions can tip the range and be removed to adjust the "LO" setting ...
Installation Guide
Page 18
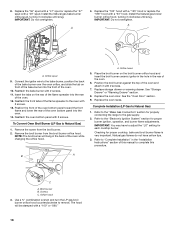
... stamped with a "100" or "090." 18 See "Storage Drawer" or "Warming Drawer" section. 8. Refer to the gas supply. 2. Checking for properly connecting the range to the "Make Gas Connection" section for proper cooktop, bake and broil burner flame is very important. Broil burner B. Orifice hood 3. Replace the ... and insert the broil burner ceramic igniter in the hole in the rear of the oven. 12. To Convert Oven Broil Burner (LP Gas to remove. A. Replace the oven racks. Refer to complete this procedure. IMPORTANT: Do not overtighten. Remove the broil burner from the ...
... stamped with a "100" or "090." 18 See "Storage Drawer" or "Warming Drawer" section. 8. Refer to the gas supply. 2. Checking for properly connecting the range to the "Make Gas Connection" section for proper cooktop, bake and broil burner flame is very important. Broil burner B. Orifice hood 3. Replace the ... and insert the broil burner ceramic igniter in the hole in the rear of the oven. 12. To Convert Oven Broil Burner (LP Gas to remove. A. Replace the oven racks. Refer to complete this procedure. IMPORTANT: Do not overtighten. Remove the broil burner from the ...


