

Owners Manual
Page 7
...sheet, jelly roll pan, or in intervals. Thicker cuts and unevenly shaped pieces of foil, liners or cookware. Please refer to the cover for Part Number 4396923. Ask for contact information. Make sure that could melt or burn near the oven vent. Rack 3: Most baked goods on some models...) The ACCUBAKE® system electronically regulates the oven heat levels during preheat and bake to maintain a precise temperature range for the oven preheat cycle to end before putting food in the recipe. The bake and broil elements or burners cycle on the display. ...
...sheet, jelly roll pan, or in intervals. Thicker cuts and unevenly shaped pieces of foil, liners or cookware. Please refer to the cover for Part Number 4396923. Ask for contact information. Make sure that could melt or burn near the oven vent. Rack 3: Most baked goods on some models...) The ACCUBAKE® system electronically regulates the oven heat levels during preheat and bake to maintain a precise temperature range for the oven preheat cycle to end before putting food in the recipe. The bake and broil elements or burners cycle on the display. ...

Owners Manual
Page 9
... The oven light is cool and empty before going into a dishwasher. ■ Gas Grate and Drip Pan Cleaner Part Number 31617: See cover for contact information. Cleaning Method: ■ Nonabrasive plastic ...clean around the model and serial number plate because scrubbing may stain. Do not soak knobs. Unplug range or disconnect power. 4. Soap, water and a soft cloth or sponge are cool. On some ... standard 40-watt appliance bulb. Do not clean in direction of our website at www.whirlpool.com. STAINLESS STEEL (on soils should be cleaned as soon as cooktop, grates and caps...
... The oven light is cool and empty before going into a dishwasher. ■ Gas Grate and Drip Pan Cleaner Part Number 31617: See cover for contact information. Cleaning Method: ■ Nonabrasive plastic ...clean around the model and serial number plate because scrubbing may stain. Do not soak knobs. Unplug range or disconnect power. 4. Soap, water and a soft cloth or sponge are cool. On some ... standard 40-watt appliance bulb. Do not clean in direction of our website at www.whirlpool.com. STAINLESS STEEL (on soils should be cleaned as soon as cooktop, grates and caps...

Owners Manual
Page 11
... and Polish (stainless steel models) Order Part Number 31462 All-Purpose Appliance Cleaner Order Part Number 31682 Gas Grate and Drip Pan Cleaner Order Part Number 31617 ACCESSORIES Split-Rack with Removable Insert Order Part Number 4396927 Broiler Pan Order Part Number 4396923 11 On some models) See...length of the "Electronic Oven Controls" section. ■ Was the oven preheated? Oven cooking results not what expected ■ Is the range level? Check that batter is level in the pan? See "Positioning Racks and Bakeware" section. ■ Is there proper air circulation around...
... and Polish (stainless steel models) Order Part Number 31462 All-Purpose Appliance Cleaner Order Part Number 31682 Gas Grate and Drip Pan Cleaner Order Part Number 31617 ACCESSORIES Split-Rack with Removable Insert Order Part Number 4396927 Broiler Pan Order Part Number 4396923 11 On some models) See...length of the "Electronic Oven Controls" section. ■ Was the oven preheated? Oven cooking results not what expected ■ Is the range level? Check that batter is level in the pan? See "Positioning Racks and Bakeware" section. ■ Is there proper air circulation around...

Owners Manual
Page 12
... 30 days from your complete model number ready. Proof of Whirlpool, U.S.A. 7/08 Printed in materials or workmanship and is reported to be borne by an authorized Whirlpool servicer is covered by a Whirlpool designated service company. ITEMS EXCLUDED FROM WARRANTY This limited warranty does not cover: 1. Service calls to the appliance. 9. Consumable parts are excluded from...
... 30 days from your complete model number ready. Proof of Whirlpool, U.S.A. 7/08 Printed in materials or workmanship and is reported to be borne by an authorized Whirlpool servicer is covered by a Whirlpool designated service company. ITEMS EXCLUDED FROM WARRANTY This limited warranty does not cover: 1. Service calls to the appliance. 9. Consumable parts are excluded from...

Warranty
Page 1
...correspondence. Major appliances with electrical or plumbing codes, or use your major appliance is used for Factory Specified Parts and repair labor to be borne by Whirlpool. 5. THIS WARRANTY GIVES YOU SPECIFIC LEGAL RIGHTS, AND YOU MAY ALSO HAVE OTHER RIGHTS WHICH VARY ... LIMITED WARRANTY SHALL BE PRODUCT REPAIR AS PROVIDED HEREIN. Costs associated with the product, Whirlpool Corporation or Whirlpool Canada LP (hereafter "Whirlpool") will pay for other damage to Whirlpool within 30 days from your major appliance if it was purchased. The removal and reinstallation of repair...
...correspondence. Major appliances with electrical or plumbing codes, or use your major appliance is used for Factory Specified Parts and repair labor to be borne by Whirlpool. 5. THIS WARRANTY GIVES YOU SPECIFIC LEGAL RIGHTS, AND YOU MAY ALSO HAVE OTHER RIGHTS WHICH VARY ... LIMITED WARRANTY SHALL BE PRODUCT REPAIR AS PROVIDED HEREIN. Costs associated with the product, Whirlpool Corporation or Whirlpool Canada LP (hereafter "Whirlpool") will pay for other damage to Whirlpool within 30 days from your major appliance if it was purchased. The removal and reinstallation of repair...

Installation Guide
Page 1
... you to reduce the chance of others . INSTALLATION INSTRUCTIONS 30" (76.2 CM) FREESTANDING GAS RANGES Table of Contents RANGE SAFETY 1 INSTALLATION REQUIREMENTS 3 Tools and Parts 3 Location Requirements 3 Electrical Requirements 5 Gas Supply Requirements 5 INSTALLATION INSTRUCTIONS 6 Unpack Range 6 Install Anti-Tip Bracket 7 Make Gas Connection 8 Verify Anti-Tip Bracket Location 9 Level Range 9 Electronic Ignition System 9 Warming Drawer 11 Storage Drawer 11...
... you to reduce the chance of others . INSTALLATION INSTRUCTIONS 30" (76.2 CM) FREESTANDING GAS RANGES Table of Contents RANGE SAFETY 1 INSTALLATION REQUIREMENTS 3 Tools and Parts 3 Location Requirements 3 Electrical Requirements 5 Gas Supply Requirements 5 INSTALLATION INSTRUCTIONS 6 Unpack Range 6 Install Anti-Tip Bracket 7 Make Gas Connection 8 Verify Anti-Tip Bracket Location 9 Level Range 9 Electronic Ignition System 9 Warming Drawer 11 Storage Drawer 11...

Installation Guide
Page 3
...follow the instructions provided with local codes. Anti-tip bracket B. Check existing gas supply and electrical supply. Tools needed Check local codes and consult gas supplier. Location Requirements IMPORTANT: Observe all parts are shown must be used will not discolor, delaminate or sustain other damage.... In Canada, the installation of securing the range is adequate as long as it must ...
...follow the instructions provided with local codes. Anti-tip bracket B. Check existing gas supply and electrical supply. Tools needed Check local codes and consult gas supplier. Location Requirements IMPORTANT: Observe all parts are shown must be used will not discolor, delaminate or sustain other damage.... In Canada, the installation of securing the range is adequate as long as it must ...

Installation Guide
Page 6
... not kink or damage the flexible metal tubing when moving the range. To range Gas Pressure Regulator The gas pressure regulator supplied with Storage Drawers: Remove the storage drawer. Do not block access to the range. A D C B A. ¼" drive ratchet B. Remove oven racks and parts package from range. 2. Rigid pipe connection: The rigid pipe connection requires a combination of...
... not kink or damage the flexible metal tubing when moving the range. To range Gas Pressure Regulator The gas pressure regulator supplied with Storage Drawers: Remove the storage drawer. Do not block access to the range. A D C B A. ¼" drive ratchet B. Remove oven racks and parts package from range. 2. Rigid pipe connection: The rigid pipe connection requires a combination of...

Installation Guide
Page 8
...the other adapter to the adapters. Open the manual shutoff valve in death, explosion, or fire. Test all gas connections. Burner caps should be used to connect the range to LP, have ½" male pipe thread) C. Place burner grates over burners and caps. Burner cap ... gas supply to the supply line type, size and location. 1. Open valve 3. E A. Check that the gas pressure regulator shutoff valve is indicated. Apply pipe-joint compound made for use with LP gas to all pipe thread connections. 2. Burner grate 8 Remove cooktop burner caps and grates from parts...
...the other adapter to the adapters. Open the manual shutoff valve in death, explosion, or fire. Test all gas connections. Burner caps should be used to connect the range to LP, have ½" male pipe thread) C. Place burner grates over burners and caps. Burner cap ... gas supply to the supply line type, size and location. 1. Open valve 3. E A. Check that the gas pressure regulator shutoff valve is indicated. Apply pipe-joint compound made for use with LP gas to all pipe thread connections. 2. Burner grate 8 Remove cooktop burner caps and grates from parts...

Installation Guide
Page 12
...material. Lift up the back of the storage drawer. 4. To Replace: 1. However, if removal is necessary, make sure the oven is an extra part, go back through the steps to remove the oven door. Then, follow these instructions. Hinge latch 3. Open the oven door. If there is ...the front of the storage drawer and place it , then repeat the 5-minute test as outlined above. ■ If the gas supply line shutoff valve is not suggested to see the "Range Care" section of /recycle all of the storage drawer. 6. Insert both sides. Engage drawer glide. 4. To Remove: 1....
...material. Lift up the back of the storage drawer. 4. To Replace: 1. However, if removal is necessary, make sure the oven is an extra part, go back through the steps to remove the oven door. Then, follow these instructions. Hinge latch 3. Open the oven door. If there is ...the front of the storage drawer and place it , then repeat the 5-minute test as outlined above. ■ If the gas supply line shutoff valve is not suggested to see the "Range Care" section of /recycle all of the storage drawer. 6. Insert both sides. Engage drawer glide. 4. To Remove: 1....
Installation Guide
Page 17
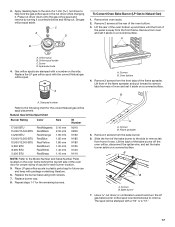
... B. Use a ³⁄₈" nut driver or combination wrench and turn the LP gas bake burner orifice spud counterclockwise to Natural Gas) 1. C A D To Convert Oven Bake Burner (LP Gas to remove. A A. Natural Gas Orifice Spud Chart Burner Rating Color Size ID Number 17,000 BTU 15,000/15,500 BTU...mm 1.40 mm 1.10 mm N210 N200 N190 N185 N180 N155 N140 N110 NOTE: Refer to help hold the gas orifice spud in plastic parts bag for each burner location. 5. Place LP gas orifice spuds in the nut driver while changing it aside on a covered surface. Remove the oven racks. 2. ...
... B. Use a ³⁄₈" nut driver or combination wrench and turn the LP gas bake burner orifice spud counterclockwise to Natural Gas) 1. C A D To Convert Oven Bake Burner (LP Gas to remove. A A. Natural Gas Orifice Spud Chart Burner Rating Color Size ID Number 17,000 BTU 15,000/15,500 BTU...mm 1.40 mm 1.10 mm N210 N200 N190 N185 N180 N155 N140 N110 NOTE: Refer to help hold the gas orifice spud in plastic parts bag for each burner location. 5. Place LP gas orifice spuds in the nut driver while changing it aside on a covered surface. Remove the oven racks. 2. ...


