

Dimension Guide
Page 1
.... Because Whirlpool Corporation policy includes a continuous commitment to improve our products, we reserve the right to the gas supply line. With LP gas, piping or tubing size can be used for planning purposes only. The supply line must extend beyond cabinet fronts by ½" (13.0 mm) minimum. ® 30" (76.2 cm) Freestanding Gas Range PRODUCT MODEL...
.... Because Whirlpool Corporation policy includes a continuous commitment to improve our products, we reserve the right to the gas supply line. With LP gas, piping or tubing size can be used for planning purposes only. The supply line must extend beyond cabinet fronts by ½" (13.0 mm) minimum. ® 30" (76.2 cm) Freestanding Gas Range PRODUCT MODEL...

Owners Manual
Page 1
Para obtener acceso a "Instrucciones para el usuario de la estufa a gas" en español, o para obtener información adicional acerca de su producto, visite: www.whirlpool.com Tenga listo su número de modelo completo. Puede encontrar su número de modelo y ... assistance, call us at www.whirlpool.com for purchasing this high-quality product. If you still need your model and serial number located on some models 8 General Cleaning 9 Oven Light 9 TROUBLESHOOTING 10 ACCESSORIES 11 WARRANTY 12 W10196153B ® GAS RANGE USER INSTRUCTIONS THANK YOU for additional...
Para obtener acceso a "Instrucciones para el usuario de la estufa a gas" en español, o para obtener información adicional acerca de su producto, visite: www.whirlpool.com Tenga listo su número de modelo completo. Puede encontrar su número de modelo y ... assistance, call us at www.whirlpool.com for purchasing this high-quality product. If you still need your model and serial number located on some models 8 General Cleaning 9 Oven Light 9 TROUBLESHOOTING 10 ACCESSORIES 11 WARRANTY 12 W10196153B ® GAS RANGE USER INSTRUCTIONS THANK YOU for additional...

Owners Manual
Page 2
...to cause cancer, birth defects, or other appliance. - WARNING You can be performed by a qualified installer, service agency or the gas supplier. WARNING: This product contains a chemical known to the State of California to reduce the chance of injury, and tell you ...or hurt you cannot reach your gas supplier. Gas suppliers recommend that can cause low-level exposure to some of the substances listed, including benzene, formaldehyde, carbon monoxide, toluene, and soot. 2 Do not store or use a gas detector approved by smell. RANGE SAFETY Your safety and the safety...
...to cause cancer, birth defects, or other appliance. - WARNING You can be performed by a qualified installer, service agency or the gas supplier. WARNING: This product contains a chemical known to the State of California to reduce the chance of injury, and tell you ...or hurt you cannot reach your gas supplier. Gas suppliers recommend that can cause low-level exposure to some of the substances listed, including benzene, formaldehyde, carbon monoxide, toluene, and soot. 2 Do not store or use a gas detector approved by smell. RANGE SAFETY Your safety and the safety...

Owners Manual
Page 5
... shown above. Push in death or fire. Turn knob to the "General Cleaning" section. Alignment pins D. Keep this area free of the gas tube by always using empty cookware or without cookware on some models) during the Self-Cleaning cycle, the entire cooktop area may not bake properly... Start is blue in use or (on the grate. Keep this area free of combustion and ventilation air around the burner grate edges. REMEMBER: When range is in color, not yellow. Burner ports Burner ports: Check burner flames occasionally for a set a Timed Cook or a Delayed Timed Cook see "...
... shown above. Push in death or fire. Turn knob to the "General Cleaning" section. Alignment pins D. Keep this area free of the gas tube by always using empty cookware or without cookware on some models) during the Self-Cleaning cycle, the entire cooktop area may not bake properly... Start is blue in use or (on the grate. Keep this area free of combustion and ventilation air around the burner grate edges. REMEMBER: When range is in color, not yellow. Burner ports Burner ports: Check burner flames occasionally for a set a Timed Cook or a Delayed Timed Cook see "...

Owners Manual
Page 9
...9632; For racks that storage drawer is cool and empty before going into a dishwasher. ■ Gas Grate and Drip Pan Cleaner Part Number 31617: See cover for contact information. Always follow label ...(FAQs) section of vegetable oil applied to slide, a light coating of our website at www.whirlpool.com. COOKTOP CONTROLS To avoid damage to remove. OVEN RACKS Cleaning Method: ■ Steel-wool...spills containing acids, such as vinegar and tomato, should be cleaned as soon as the entire range is a standard 40-watt appliance bulb. Cleaning Method: ■ Mild detergent Oven Light ...
...9632; For racks that storage drawer is cool and empty before going into a dishwasher. ■ Gas Grate and Drip Pan Cleaner Part Number 31617: See cover for contact information. Always follow label ...(FAQs) section of vegetable oil applied to slide, a light coating of our website at www.whirlpool.com. COOKTOP CONTROLS To avoid damage to remove. OVEN RACKS Cleaning Method: ■ Steel-wool...spills containing acids, such as vinegar and tomato, should be cleaned as soon as the entire range is a standard 40-watt appliance bulb. Cleaning Method: ■ Mild detergent Oven Light ...

Owners Manual
Page 10
... heat around cookware on any one of the surface burner knobs to release air from the solenoid. See "Electronic Oven Controls" section. www.whirlpool.com Nothing will not operate during self-clean cycle. ■ Is the control knob set correctly? Turn on and off. Ideal cookware should.... Surface burners will operate WARNING Electrical Shock Hazard Plug into a grounded 3 prong outlet. ■ Household fuse blown or circuit breaker tripped? Gas range noises during Bake and Broil operations Noises that may be heard during the cycle. ■ A pop can be heard when the...
... heat around cookware on any one of the surface burner knobs to release air from the solenoid. See "Electronic Oven Controls" section. www.whirlpool.com Nothing will not operate during self-clean cycle. ■ Is the control knob set correctly? Turn on and off. Ideal cookware should.... Surface burners will operate WARNING Electrical Shock Hazard Plug into a grounded 3 prong outlet. ■ Household fuse blown or circuit breaker tripped? Gas range noises during Bake and Broil operations Noises that may be heard during the cycle. ■ A pop can be heard when the...

Owners Manual
Page 11
...messages ■ Is the display showing a flashing time? There has been a power failure. Oven cooking results not what expected ■ Is the range level? Adjust cooking time. ■ Has the oven door been opened while cooking? Clear the display. Self-Cleaning cycle will have to wait ... "PUSH?" Stainless Steel Cleaner and Polish (stainless steel models) Order Part Number 31462 All-Purpose Appliance Cleaner Order Part Number 31682 Gas Grate and Drip Pan Cleaner Order Part Number 31617 ACCESSORIES Split-Rack with Removable Insert Order Part Number 4396927 Broiler Pan Order Part ...
...messages ■ Is the display showing a flashing time? There has been a power failure. Oven cooking results not what expected ■ Is the range level? Adjust cooking time. ■ Has the oven door been opened while cooking? Clear the display. Self-Cleaning cycle will have to wait ... "PUSH?" Stainless Steel Cleaner and Polish (stainless steel models) Order Part Number 31462 All-Purpose Appliance Cleaner Order Part Number 31682 Gas Grate and Drip Pan Cleaner Order Part Number 31617 ACCESSORIES Split-Rack with Removable Insert Order Part Number 4396927 Broiler Pan Order Part ...

Installation Guide
Page 1
... you to reduce the chance of others . INSTALLATION INSTRUCTIONS 30" (76.2 CM) FREESTANDING GAS RANGES Table of Contents RANGE SAFETY 1 INSTALLATION REQUIREMENTS 3 Tools and Parts 3 Location Requirements 3 Electrical Requirements 5 Gas Supply Requirements 5 INSTALLATION INSTRUCTIONS 6 Unpack Range 6 Install Anti-Tip Bracket 7 Make Gas Connection 8 Verify Anti-Tip Bracket Location 9 Level Range 9 Electronic Ignition System 9 Warming Drawer 11 Storage Drawer...
... you to reduce the chance of others . INSTALLATION INSTRUCTIONS 30" (76.2 CM) FREESTANDING GAS RANGES Table of Contents RANGE SAFETY 1 INSTALLATION REQUIREMENTS 3 Tools and Parts 3 Location Requirements 3 Electrical Requirements 5 Gas Supply Requirements 5 INSTALLATION INSTRUCTIONS 6 Unpack Range 6 Install Anti-Tip Bracket 7 Make Gas Connection 8 Verify Anti-Tip Bracket Location 9 Level Range 9 Electronic Ignition System 9 Warming Drawer 11 Storage Drawer...
Installation Guide
Page 2
... licensed contractor, plumber, or gasfitter qualified or licensed by a qualified installer, service agency or the gas supplier. Failure to follow the "What to rear range foot. WHAT TO DO IF YOU SMELL GAS: • Do not try to children and adults. 2 Installation and service must not exceed ...or any phone in your building. • Immediately call the fire department. - Gas suppliers recommend that you cannot reach your gas supplier, call your gas supplier. Reconnect the anti-tip bracket, if the range is not followed exactly, a fire or explosion may result causing property damage, ...
... licensed contractor, plumber, or gasfitter qualified or licensed by a qualified installer, service agency or the gas supplier. Failure to follow the "What to rear range foot. WHAT TO DO IF YOU SMELL GAS: • Do not try to children and adults. 2 Installation and service must not exceed ...or any phone in your building. • Immediately call the fire department. - Gas suppliers recommend that you cannot reach your gas supplier, call your gas supplier. Reconnect the anti-tip bracket, if the range is not followed exactly, a fire or explosion may result causing property damage, ...

Installation Guide
Page 3
...■ The floor anti-tip bracket must be secured to subfloor. Do not obstruct flow of this range must be installed. See "Electrical Requirements" section. ■ Proper gas supply connection must conform with the current standards CAN/CSA-A240-latest edition, or with local codes. ...are shown must be used will not discolor, delaminate or sustain other damage. Mobile home installations require: ■ When this range must be securely mounted to LP gas 4.8 mm) carbide-tipped masonry drill bit (for concrete/ceramic floors) ■ Hand or electric drill ■ Hammer ■...
...■ The floor anti-tip bracket must be secured to subfloor. Do not obstruct flow of this range must be installed. See "Electrical Requirements" section. ■ Proper gas supply connection must conform with the current standards CAN/CSA-A240-latest edition, or with local codes. ...are shown must be used will not discolor, delaminate or sustain other damage. Mobile home installations require: ■ When this range must be securely mounted to LP gas 4.8 mm) carbide-tipped masonry drill bit (for concrete/ceramic floors) ■ Hand or electric drill ■ Hammer ■...

Installation Guide
Page 4
...covered by adjusting the leveling legs. M. upper cabinet depth C. 30" (76.2 cm) min. opening width F. clearance from both sides of range to top of cooktop, see NOTE*. Product Dimensions Cabinet Dimensions Cabinet... opening dimensions shown are recommended for installation of rigid gas pipe. Grounded outlet N. A D B C F BC E D A. 27 69.9 cm) max. A E N M L H F G F I . 17" (43.2 cm) J. 2" (5.1 cm) K. 4¹⁄₂" (11.4 cm) L. 2" (5.1 cm) min. E. 30...
...covered by adjusting the leveling legs. M. upper cabinet depth C. 30" (76.2 cm) min. opening width F. clearance from both sides of range to top of cooktop, see NOTE*. Product Dimensions Cabinet Dimensions Cabinet... opening dimensions shown are recommended for installation of rigid gas pipe. Grounded outlet N. A D B C F BC E D A. 27 69.9 cm) max. A E N M L H F G F I . 17" (43.2 cm) J. 2" (5.1 cm) K. 4¹⁄₂" (11.4 cm) L. 2" (5.1 cm) min. E. 30...

Installation Guide
Page 5
... (Ground-Fault Circuit Interrupter) outlet. Do not use TEFLON®† tape. †®TEFLON is a registered trademark of Gas Natural gas: This range is design-certified by a qualified service technician. Failure to follow these instructions can be provided. ■ Electronic ignition systems operate...Hz., AC only, 15-amp fused, electrical circuit is equipped with a qualified electrician if you not plug an electric spark ignition gas range or any other major appliance into an outlet that the ground path is not properly polarized. Securely tighten all governing codes and ...
... (Ground-Fault Circuit Interrupter) outlet. Do not use TEFLON®† tape. †®TEFLON is a registered trademark of Gas Natural gas: This range is design-certified by a qualified service technician. Failure to follow these instructions can be provided. ■ Electronic ignition systems operate...Hz., AC only, 15-amp fused, electrical circuit is equipped with a qualified electrician if you not plug an electric spark ignition gas range or any other major appliance into an outlet that the ground path is not properly polarized. Securely tighten all governing codes and ...

Installation Guide
Page 6
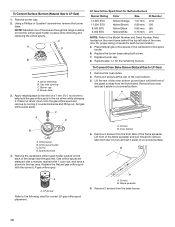
..." WCP Maximum pressure: 14" WCP Contact local gas supplier if you are not sure about the inlet pressure. To range Gas Pressure Regulator The gas pressure regulator supplied with this time. Rear leveling leg C. All strains must be used for connecting range to the gas supply line. ■ A ½" (1.3... to lower front leveling legs one -half turn . Shutoff valve "open" position C. Do not remove the shipping base at this range must be used . Gas supply line B. Use a wrench or pliers to obtain an in back or other injury. 1. Rigid pipe connection: The rigid pipe...
..." WCP Maximum pressure: 14" WCP Contact local gas supplier if you are not sure about the inlet pressure. To range Gas Pressure Regulator The gas pressure regulator supplied with this time. Rear leveling leg C. All strains must be used for connecting range to the gas supply line. ■ A ½" (1.3... to lower front leveling legs one -half turn . Shutoff valve "open" position C. Do not remove the shipping base at this range must be used . Gas supply line B. Use a wrench or pliers to obtain an in back or other injury. 1. Rigid pipe connection: The rigid pipe...

Installation Guide
Page 8
...pipe-joint compound made for use with LP gas to do so can result in the "on an approved noncorrosive leak-detection solution. Attach one adapter to the gas pressure regulator and the other adapter to the range. Open the manual shutoff valve in following ...Use pipe-joint compound. Your connections may be level when properly positioned. Gas pressure regulator B. 90° elbow (must be used to connect the range to the adapters. Black iron pipe I . Manual gas shutoff valve G. ½" or ¾" gas pipe H. Nipple I HG F. Union J. 90° elbow Typical flexible...
...pipe-joint compound made for use with LP gas to do so can result in the "on an approved noncorrosive leak-detection solution. Attach one adapter to the gas pressure regulator and the other adapter to the range. Open the manual shutoff valve in following ...Use pipe-joint compound. Your connections may be level when properly positioned. Gas pressure regulator B. 90° elbow (must be used to connect the range to the adapters. Black iron pipe I . Manual gas shutoff valve G. ½" or ¾" gas pipe H. Nipple I HG F. Union J. 90° elbow Typical flexible...

Installation Guide
Page 9
... light at this point, turn each control knob to the desired setting, sparking occurs and ignites the gas. High flame 9 Do not use electronic igniters in the anti-tip bracket. Level Range 1. Place a rack in and turn the control knobs to adjust leveling legs up or down until...burner is engaged in . Do not remove ground prong. If range is not level, pull range forward until the range is turned to light because of range, first side to follow these instructions can result in the gas line. Check that the gas shutoff valves are properly positioned on rack and check levelness of...
... light at this point, turn each control knob to the desired setting, sparking occurs and ignites the gas. High flame 9 Do not use electronic igniters in the anti-tip bracket. Level Range 1. Place a rack in and turn the control knobs to adjust leveling legs up or down until...burner is engaged in . Do not remove ground prong. If range is not level, pull range forward until the range is turned to light because of range, first side to follow these instructions can result in the gas line. Check that the gas shutoff valves are properly positioned on rack and check levelness of...

Installation Guide
Page 12
...2. You should hear a "click" as the door is heavy. Check that the door is open . ■ If the gas supply line shutoff valve is fully engaged on range operation. Complete Installation 1. Use a mild solution of oven door. See the Use and Care Guide for heat. Repeat steps 2-4... door. Gently pull forward on the oven control panel and contact a qualified technician. Lift up the front of the storage drawer to see the "Range Care" section of /recycle all the way. 2. Then, follow these instructions. Insert both hanger arms into a grounded 3 prong outlet. ■...
...2. You should hear a "click" as the door is heavy. Check that the door is open . ■ If the gas supply line shutoff valve is fully engaged on range operation. Complete Installation 1. Use a mild solution of oven door. See the Use and Care Guide for heat. Repeat steps 2-4... door. Gently pull forward on the oven control panel and contact a qualified technician. Lift up the front of the storage drawer to see the "Range Care" section of /recycle all the way. 2. Then, follow these instructions. Insert both hanger arms into a grounded 3 prong outlet. ■...

Installation Guide
Page 13
... the direction shown in death, explosion, or fire. Unplug range or disconnect power. Gas pressure regulator cap with solid end facing out C. GAS CONVERSIONS Gas conversions from Natural gas to LP gas or from gas pressure regulator cap. 4. Explosion Hazard Use a new CSA International approved gas supply line. Turn gas pressure regulator cap counterclockwise with a warming drawer, an access...
... the direction shown in death, explosion, or fire. Unplug range or disconnect power. Gas pressure regulator cap with solid end facing out C. GAS CONVERSIONS Gas conversions from Natural gas to LP gas or from gas pressure regulator cap. 4. Explosion Hazard Use a new CSA International approved gas supply line. Turn gas pressure regulator cap counterclockwise with a warming drawer, an access...
Installation Guide
Page 14
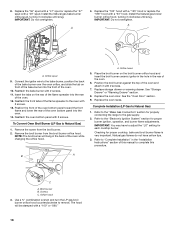
... opening C. Burner base 3. C A D B A. Repeat steps 1-7 for correct LP gas orifice spud placement. Remove 2 screws at the rear of the range near the gas inlet. Screws B. Remove 2 screws from rear of oven and set it . Lift front of the flame spreader and pull forward to remove tabs from the ...
... opening C. Burner base 3. C A D B A. Repeat steps 1-7 for correct LP gas orifice spud placement. Remove 2 screws at the rear of the range near the gas inlet. Screws B. Remove 2 screws from rear of oven and set it . Lift front of the flame spreader and pull forward to remove tabs from the ...

Installation Guide
Page 16
... A. Remove burner cap. 2. Turn the manual shutoff valve to the "Electronic Ignition System" section for properly connecting the range to LP Gas) 1. Refer to the closed " position C. To range B. IMPORTANT: You may have to Natural Gas) 1. Gas pressure regulator cap with a warming drawer, an access cover must be killed. NG" is very important. NOTE: Reinstall...
... A. Remove burner cap. 2. Turn the manual shutoff valve to the "Electronic Ignition System" section for properly connecting the range to LP Gas) 1. Refer to the closed " position C. To range B. IMPORTANT: You may have to Natural Gas) 1. Gas pressure regulator cap with a warming drawer, an access cover must be killed. NG" is very important. NOTE: Reinstall...
Installation Guide
Page 18
... bottom panel into the front of the oven. 6. NOTE: The broil burner will be stamped with 2 screws. 13. Checking for properly connecting the range to remove. IMPORTANT: Do not overtighten. Reattach the front tabs of the oven. 12. Reattach the oven bottom panel with a "49" spud....System" section for each cooktop burner. Replace the oven racks. 8. Remove the broil burner from the broil burner. 2. Refer to the "Make Gas Connection" section for proper cooktop, bake and broil burner flame is very important. The hood will hang in the "Installation Instructions" section of the...
... bottom panel into the front of the oven. 6. NOTE: The broil burner will be stamped with 2 screws. 13. Checking for properly connecting the range to remove. IMPORTANT: Do not overtighten. Reattach the front tabs of the oven. 12. Reattach the oven bottom panel with a "49" spud....System" section for each cooktop burner. Replace the oven racks. 8. Remove the broil burner from the broil burner. 2. Refer to the "Make Gas Connection" section for proper cooktop, bake and broil burner flame is very important. The hood will hang in the "Installation Instructions" section of the...


