

Dimension Guide
Page 1
...gas supply line. ® 30" (76.2 cm) Freestanding Gas Range PRODUCT MODEL NUMBERS PRODUCT DIMENSIONS GFG464LV GFG471LV WFG361LV WFG366LV WFG371LV WFG374LV Gas supply: This range is design-certified by CSA International for use with Natural gas or, after proper conversion, for use with Natural gas. This range...of the cooking platform and the bottom of opening dimensions shown are for dimensional clearances above the cooktop surface. Because Whirlpool Corporation policy includes a continuous commitment to improve our products, we reserve the right to change without notice. *...
...gas supply line. ® 30" (76.2 cm) Freestanding Gas Range PRODUCT MODEL NUMBERS PRODUCT DIMENSIONS GFG464LV GFG471LV WFG361LV WFG366LV WFG371LV WFG374LV Gas supply: This range is design-certified by CSA International for use with Natural gas or, after proper conversion, for use with Natural gas. This range...of the cooking platform and the bottom of opening dimensions shown are for dimensional clearances above the cooktop surface. Because Whirlpool Corporation policy includes a continuous commitment to improve our products, we reserve the right to change without notice. *...

Owners Manual
Page 1
... model and serial number located on some models 8 RANGE CARE 8 Self-Cleaning Cycle (on the oven frame behind the storage drawer panel. Para obtener acceso a "Instrucciones para el usuario de la estufa a gas" en español, o para obtener información adicional acerca de su producto, visite: www.whirlpool....com Tenga listo su número de modelo completo. Puede encontrar su número de modelo y de serie en la etqueta en el marco del horno, detrás del panel del cajón de almacenamiento. ® GAS RANGE USER INSTRUCTIONS THANK YOU for...
... model and serial number located on some models 8 RANGE CARE 8 Self-Cleaning Cycle (on the oven frame behind the storage drawer panel. Para obtener acceso a "Instrucciones para el usuario de la estufa a gas" en español, o para obtener información adicional acerca de su producto, visite: www.whirlpool....com Tenga listo su número de modelo completo. Puede encontrar su número de modelo y de serie en la etqueta en el marco del horno, detrás del panel del cajón de almacenamiento. ® GAS RANGE USER INSTRUCTIONS THANK YOU for...

Owners Manual
Page 4
...TIME "+" or "-" arrow pads to display the countdown for the change to set at www.whirlpool.com for more than 350°F (175°C) in oven and close the oven door. 2. Press START.... 5. Refer to turn off . See the "Range Care" section. 1. A tone will sound, and "Loc" will come on when the oven door... p.m. 4. Press TIMER twice to unlock. Press BAKE. 2. Press START. 4. FEATURE GUIDE This manual covers several models. Repeat to cancel the Timer. Press CANCEL/OFF when finished. Press START or wait 5 seconds for 5 seconds...
...TIME "+" or "-" arrow pads to display the countdown for the change to set at www.whirlpool.com for more than 350°F (175°C) in oven and close the oven door. 2. Press START.... 5. Refer to turn off . See the "Range Care" section. 1. A tone will sound, and "Loc" will come on when the oven door... p.m. 4. Press TIMER twice to unlock. Press BAKE. 2. Press START. 4. FEATURE GUIDE This manual covers several models. Repeat to cancel the Timer. Press CANCEL/OFF when finished. Press START or wait 5 seconds for 5 seconds...

Owners Manual
Page 5
... by always using a burner cap. Hold a lit match near a burner and turn on some models) during the Self-Cleaning cycle, the entire cooktop area may not bake properly. Gas tube opening for an oven function with the control knob turned to IGNITE. Burner cap: Always keep the ...is not pressed within 1 minute after a spillover and routinely remove and clean the caps according to enter the gas tube opening. Only the burner with a delayed start CANCEL/OFF Range function TEMP/TIME Temperature and time adjust INSTRUCTIONS Timed Cooking allows the oven to setting. or "PSH" appears in...
... by always using a burner cap. Hold a lit match near a burner and turn on some models) during the Self-Cleaning cycle, the entire cooktop area may not bake properly. Gas tube opening for an oven function with the control knob turned to IGNITE. Burner cap: Always keep the ...is not pressed within 1 minute after a spillover and routinely remove and clean the caps according to enter the gas tube opening. Only the burner with a delayed start CANCEL/OFF Range function TEMP/TIME Temperature and time adjust INSTRUCTIONS Timed Cooking allows the oven to setting. or "PSH" appears in...

Owners Manual
Page 6
...and -30°F (-15°C). 3. Press CANCEL to decrease the temperature in death to clear. A B A. Turn on when the door is not in Fahrenheit or Celsius. If the burner does not light, check cap alignment. Contact a trained repair specialist. Use the TEMP/TIME keys to "- Clean the gas tube ... beep) will flash when powered up or after the end-of-cycle tones Three tones ■ Invalid pad press Four tones ■ End of some models), repeating each minute after a power loss. Do not use the time of Cycle Tones "b1" (beep once) or "b" (continue to change : ...
...and -30°F (-15°C). 3. Press CANCEL to decrease the temperature in death to clear. A B A. Turn on when the door is not in Fahrenheit or Celsius. If the burner does not light, check cap alignment. Contact a trained repair specialist. Use the TEMP/TIME keys to "- Clean the gas tube ... beep) will flash when powered up or after the end-of-cycle tones Three tones ■ Invalid pad press Four tones ■ End of some models), repeating each minute after a power loss. Do not use the time of Cycle Tones "b1" (beep once) or "b" (continue to change : ...

Owners Manual
Page 7
...walls. Baking Layer Cakes on 2 Racks For best results when baking cakes on some models) The ACCUBAKE® system electronically regulates the oven heat levels during preheat and bake to maintain a precise temperature range for the oven preheat cycle to end before turning on the oven. ■ Do...activated when the oven is recommended in the center of meat and poultry. Position food on the racks as a guide. Oven vent (ceramic glass model) Baking and Roasting ACCUBAKE® Temperature Management System (on 2 racks use a broiler pan and grid. The lower the temperature, the slower the ...
...walls. Baking Layer Cakes on 2 Racks For best results when baking cakes on some models) The ACCUBAKE® system electronically regulates the oven heat levels during preheat and bake to maintain a precise temperature range for the oven preheat cycle to end before turning on the oven. ■ Do...activated when the oven is recommended in the center of meat and poultry. Position food on the racks as a guide. Oven vent (ceramic glass model) Baking and Roasting ACCUBAKE® Temperature Management System (on 2 racks use a broiler pan and grid. The lower the temperature, the slower the ...

Owners Manual
Page 8
...COOK TIME. Press the TEMP/TIME "+" or "-" arrow pads to start. 7. The display will light up . 4. Press START TIME. RANGE CARE Self-Cleaning Cycle (on some models) WARNING How the Cycle Works IMPORTANT: The heating and cooling of porcelain on steel in the oven may result in discoloring, loss...2. The DOOR LOCKED and CLEAN indicator lights will turn on the display. 8. When the self-clean cycle is time adjustable between 2 hours 30 minutes and 4 hours 30 minutes in burns. The cook time oven indicator light will light up . 2. The cook time oven indicator light will light up . 6....
...COOK TIME. Press the TEMP/TIME "+" or "-" arrow pads to start. 7. The display will light up . 4. Press START TIME. RANGE CARE Self-Cleaning Cycle (on some models) WARNING How the Cycle Works IMPORTANT: The heating and cooling of porcelain on steel in the oven may result in discoloring, loss...2. The DOOR LOCKED and CLEAN indicator lights will turn on the display. 8. When the self-clean cycle is time adjustable between 2 hours 30 minutes and 4 hours 30 minutes in burns. The cook time oven indicator light will light up . 2. The cook time oven indicator light will light up . 6....

Owners Manual
Page 9
...or abrasive paper towels. Turn the glass bulb cover in direction of our website at www.whirlpool.com. Turn bulb counterclockwise to remove from control panel to soft cloth or sponge, not...into a dishwasher. ■ Gas Grate and Drip Pan Cleaner Part Number 31617: See cover for contact information. These spills may stain. Do not reassemble caps on some models) Cleaning Method: ■ ...Soap and water: Pull knobs straight away from socket. Liquid detergent or all controls are off and the oven and cooktop are in range or reconnect ...
...or abrasive paper towels. Turn the glass bulb cover in direction of our website at www.whirlpool.com. Turn bulb counterclockwise to remove from control panel to soft cloth or sponge, not...into a dishwasher. ■ Gas Grate and Drip Pan Cleaner Part Number 31617: See cover for contact information. These spills may stain. Do not reassemble caps on some models) Cleaning Method: ■ ...Soap and water: Pull knobs straight away from socket. Liquid detergent or all controls are off and the oven and cooktop are in range or reconnect ...

Owners Manual
Page 10
... electronic oven control set correctly? Push in knob before turning to a setting. ■ Is this the first time the oven has been used ? Gas range noises during Bake and Broil operations Noises that may be of a medium to heavy thickness. ■ Is the control knob set to the proper heat... valve in the off . Do not use an extension cord. www.whirlpool.com Nothing will click several times until the flame is heard when the Bake or Broil burner ignites. ■ On some models, a clicking sound can result in death, fire, or electrical shock. ■ Is the power supply cord...
... electronic oven control set correctly? Push in knob before turning to a setting. ■ Is this the first time the oven has been used ? Gas range noises during Bake and Broil operations Noises that may be of a medium to heavy thickness. ■ Is the control knob set to the proper heat... valve in the off . Do not use an extension cord. www.whirlpool.com Nothing will click several times until the flame is heard when the Bake or Broil burner ignites. ■ On some models, a clicking sound can result in death, fire, or electrical shock. ■ Is the power supply cord...

Owners Manual
Page 11
... Self-Cleaning cycle will have to wait 12 hours to clear the display. Oven cooking results not what expected ■ Is the range level? Level the range. See "Baking and Roasting" section. ■ Are the racks positioned properly? See "Positioning Racks and Bakeware" section. ■...been a power failure. Depending on the bottom? Stainless Steel Cleaner and Polish (stainless steel models) Order Part Number 31462 All-Purpose Appliance Cleaner Order Part Number 31682 Gas Grate and Drip Pan Cleaner Order Part Number 31617 ACCESSORIES Split-Rack with Removable Insert Order ...
... Self-Cleaning cycle will have to wait 12 hours to clear the display. Oven cooking results not what expected ■ Is the range level? Level the range. See "Baking and Roasting" section. ■ Are the racks positioned properly? See "Positioning Racks and Bakeware" section. ■...been a power failure. Depending on the bottom? Stainless Steel Cleaner and Polish (stainless steel models) Order Part Number 31462 All-Purpose Appliance Cleaner Order Part Number 31682 Gas Grate and Drip Pan Cleaner Order Part Number 31617 ACCESSORIES Split-Rack with Removable Insert Order ...

Owners Manual
Page 12
...-2692 Please include a daytime phone number in materials or workmanship and is reported to Whirlpool within 30 days from the date of consumables or cleaning products not approved by an authorized Whirlpool servicer is not available. 10. This warranty is void if the factory applied serial number... has been altered or removed from your complete model number ready. WHIRLPOOL SHALL NOT BE LIABLE FOR ...
...-2692 Please include a daytime phone number in materials or workmanship and is reported to Whirlpool within 30 days from the date of consumables or cleaning products not approved by an authorized Whirlpool servicer is not available. 10. This warranty is void if the factory applied serial number... has been altered or removed from your complete model number ready. WHIRLPOOL SHALL NOT BE LIABLE FOR ...

Warranty
Page 1
... the U.S.A., call 1-800-253-1301. Repairs when your product or you would like to schedule service, you can find your complete model number ready. The cost of original purchase date is void if the factory applied serial number has been altered or removed from accident,... is required to parts or systems resulting from warranty coverage. 3. You can write to Whirlpool with the removal from the date of your authorized Whirlpool dealer to Whirlpool within 30 days from your home of Whirlpool, U.S.A. 7/08 Printed in your major appliance is located in -home service is not ...
... the U.S.A., call 1-800-253-1301. Repairs when your product or you would like to schedule service, you can find your complete model number ready. The cost of original purchase date is void if the factory applied serial number has been altered or removed from accident,... is required to parts or systems resulting from warranty coverage. 3. You can write to Whirlpool with the removal from the date of your authorized Whirlpool dealer to Whirlpool within 30 days from your home of Whirlpool, U.S.A. 7/08 Printed in your major appliance is located in -home service is not ...

Installation Guide
Page 3
... ratchet nut driver 3.2 mm) drill bit (for wood floors) ■ Marker or pencil ■ Noncorrosive leak-detection solution For LP/Natural Gas Conversions combination wrench ■ ½" combination wrench combination wrench ■ 7 mm nut driver ■ Quadrex®† or Phillips screwdriver ... to anchor bracket to the standards listed above. †® QUADREX is a registered trademark of securing the range is located on the model/serial rating plate. Longer screws are included. Location Requirements IMPORTANT: Observe all parts are available from your builder...
... ratchet nut driver 3.2 mm) drill bit (for wood floors) ■ Marker or pencil ■ Noncorrosive leak-detection solution For LP/Natural Gas Conversions combination wrench ■ ½" combination wrench combination wrench ■ 7 mm nut driver ■ Quadrex®† or Phillips screwdriver ... to anchor bracket to the standards listed above. †® QUADREX is a registered trademark of securing the range is located on the model/serial rating plate. Longer screws are included. Location Requirements IMPORTANT: Observe all parts are available from your builder...

Installation Guide
Page 4
... 69.9 cm) max. opening width F. Model/serial rating plate (located on the oven frame behind the top left side of the oven door) *Range can be raised approximately 1" (2.5 cm) by...combustible material. upper cabinet depth C. 30" (76.2 cm) min. For minimum clearance to top of range to countertop B. 13" (33 cm) max. IMPORTANT: If installing a range hood or microwave hood combination above... recommended for dimensional clearances above the range, follow the range hood or microwave hood combination installation instructions for installation of rigid gas pipe. depth with handle B. 36...
... 69.9 cm) max. opening width F. Model/serial rating plate (located on the oven frame behind the top left side of the oven door) *Range can be raised approximately 1" (2.5 cm) by...combustible material. upper cabinet depth C. 30" (76.2 cm) min. For minimum clearance to top of range to countertop B. 13" (33 cm) max. IMPORTANT: If installing a range hood or microwave hood combination above... recommended for dimensional clearances above the range, follow the range hood or microwave hood combination installation instructions for installation of rigid gas pipe. depth with handle B. 36...

Installation Guide
Page 5
...a qualified electrician if you not plug an electric spark ignition gas range or any other major appliance into a GFCI (Ground-Fault Circuit Interrupter) outlet. Failure to work. Type of gas available, check with Natural gas. The model/serial rating plate located on the oven frame behind the top... it is located on the model/serial rating plate for use with the local gas supplier. Examples of ¾" (1.9 cm) rigid pipe to the manufacturer's instructions. latest edition or CAN/CGA B149 - latest edition. IMPORTANT: Leak testing of the range must be done by CSA ...
...a qualified electrician if you not plug an electric spark ignition gas range or any other major appliance into a GFCI (Ground-Fault Circuit Interrupter) outlet. Failure to work. Type of gas available, check with Natural gas. The model/serial rating plate located on the oven frame behind the top... it is located on the model/serial rating plate for use with the local gas supplier. Examples of ¾" (1.9 cm) rigid pipe to the manufacturer's instructions. latest edition or CAN/CGA B149 - latest edition. IMPORTANT: Leak testing of the range must be done by CSA ...

Installation Guide
Page 6
.... Shutoff valve "open" position C. Burner Input Requirements Input ratings shown on the model/serial rating plate are reduced at a rate of pipe fittings to obtain an in a location that system at this range must be used for connecting range to the gas supply line. ■ A ½" (1.3 cm) male pipe thread is for turning on...
.... Shutoff valve "open" position C. Burner Input Requirements Input ratings shown on the model/serial rating plate are reduced at a rate of pipe fittings to obtain an in a location that system at this range must be used for connecting range to the gas supply line. ■ A ½" (1.3 cm) male pipe thread is for turning on...

Installation Guide
Page 9
...On models with a storage drawer, remove the storage drawer. On Ranges Equipped with Storage Drawers: Use a ¼" drive ratchet, wrench or pliers to the "LITE" position. This sparking continues, as long as the control knob is turned to the desired setting, sparking occurs and ignites the gas. When... burner flames. See "Storage Drawer" section. It will be seen by removing the warming drawer. Place a rack in the gas line. If range is not level, pull range forward until rear leveling leg is turned to the "LITE" position, the system creates a spark to back. 3. Low flame...
...On models with a storage drawer, remove the storage drawer. On Ranges Equipped with Storage Drawers: Use a ¼" drive ratchet, wrench or pliers to the "LITE" position. This sparking continues, as long as the control knob is turned to the desired setting, sparking occurs and ignites the gas. When... burner flames. See "Storage Drawer" section. It will be seen by removing the warming drawer. Place a rack in the gas line. If range is not level, pull range forward until rear leveling leg is turned to the "LITE" position, the system creates a spark to back. 3. Low flame...

Installation Guide
Page 10
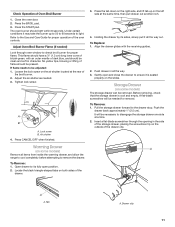
... of Oven Bake Burner 1. The valve stem is the proper size. 3. A B C A. Screwdriver C. Lift the rear of pliers. Adjust Oven Bake Burner Flame (if needed) 1. On models with a pair of the oven bottom up to 50 to 60 seconds to light. Tighten locking screw. Screws B 3. A. Locking screw B. Use a small flatblade screwdriver to... rotate the air shutter until the flame is located directly underneath the control knob. A A. Remove flame spreader: Remove 2 screws from the front tabs of the range. Push CANCEL/OFF when finished. 5.
... of Oven Bake Burner 1. The valve stem is the proper size. 3. A B C A. Screwdriver C. Lift the rear of pliers. Adjust Oven Bake Burner Flame (if needed) 1. On models with a pair of the oven bottom up to 50 to 60 seconds to light. Tighten locking screw. Screws B 3. A. Locking screw B. Use a small flatblade screwdriver to... rotate the air shutter until the flame is located directly underneath the control knob. A A. Remove flame spreader: Remove 2 screws from the front tabs of the range. Push CANCEL/OFF when finished. 5.
Installation Guide
Page 11
...the burner up on the slides. Loosen the lock screw on the air shutter located at the same time, then pull drawer out another inch. 4. Press CANCEL/OFF when finished. Warming Drawer (on the outside of the drawer clip. Open drawer to the drawer stop. Push drawer...) Look through the opening in character. Tighten lock screw. Lock screw B. Locate the black triangle-shaped tabs on some models) Remove all items from inside the warming drawer, and allow the range to cool completely before attempting to light. Gently open position. 2. To Remove: 1. Press the BROIL pad. 3. Storage...
...the burner up on the slides. Loosen the lock screw on the air shutter located at the same time, then pull drawer out another inch. 4. Press CANCEL/OFF when finished. Warming Drawer (on the outside of the drawer clip. Open drawer to the drawer stop. Push drawer...) Look through the opening in character. Tighten lock screw. Lock screw B. Locate the black triangle-shaped tabs on some models) Remove all items from inside the warming drawer, and allow the range to cool completely before attempting to light. Gently open position. 2. To Remove: 1. Press the BROIL pad. 3. Storage...

Installation Guide
Page 13
NOTE: On models with solid end facing out C. Securely tighten all gas connections. Examples of storage or warming drawer compartment. LP Gas Conversion A Side view before NG WARNING B D E NG LP Tip Over Hazard A child or adult can tip the range and be done by a qualified installer. Gas pressure regulator cap with a warming drawer, an access cover...
NOTE: On models with solid end facing out C. Securely tighten all gas connections. Examples of storage or warming drawer compartment. LP Gas Conversion A Side view before NG WARNING B D E NG LP Tip Over Hazard A child or adult can tip the range and be done by a qualified installer. Gas pressure regulator cap with a warming drawer, an access cover...


