

Dimension Guide
Page 1
...Whirlpool Corporation policy includes a continuous commitment to improve our products, we reserve the right to 152.4 cm) long 1.3 cm) or ³⁄₄" (1.9 cm) I.D., flexible metal appliance connector may result in * C. 46 " (119.1 cm) overall height (max.) with LP gas. For complete details, see NOTE*. This range... 1/27/11 ® 30" (76.2 cm) Freestanding Gas Range PRODUCT MODEL NUMBERS PRODUCT DIMENSIONS GFG464LV GFG471LV WFG361LV WFG366LV WFG371LV WFG374LV Gas supply: This range is design-certified by CSA International for use with Natural gas or, after proper conversion,...
...Whirlpool Corporation policy includes a continuous commitment to improve our products, we reserve the right to 152.4 cm) long 1.3 cm) or ³⁄₄" (1.9 cm) I.D., flexible metal appliance connector may result in * C. 46 " (119.1 cm) overall height (max.) with LP gas. For complete details, see NOTE*. This range... 1/27/11 ® 30" (76.2 cm) Freestanding Gas Range PRODUCT MODEL NUMBERS PRODUCT DIMENSIONS GFG464LV GFG471LV WFG361LV WFG366LV WFG371LV WFG374LV Gas supply: This range is design-certified by CSA International for use with Natural gas or, after proper conversion,...

Owners Manual
Page 1
... still need your model and serial number located on some models 8 RANGE CARE 8 Self-Cleaning Cycle (on the oven frame behind the storage drawer panel. Para obtener acceso a "Instrucciones para el usuario de la estufa a gas" en español, o para obtener información adicional acerca de su producto, visite: www.whirlpool.com Tenga listo...
... still need your model and serial number located on some models 8 RANGE CARE 8 Self-Cleaning Cycle (on the oven frame behind the storage drawer panel. Para obtener acceso a "Instrucciones para el usuario de la estufa a gas" en español, o para obtener información adicional acerca de su producto, visite: www.whirlpool.com Tenga listo...

Owners Manual
Page 5
...gas tube opening IMPORTANT: Do not obstruct the flow of day is not pressed within 1 minute after a spillover and routinely remove and clean the caps according to enter the burner ports. 5 The "+" or "-" arrow pads are turned to anywhere between HIGH and LOW. Only the burner with a delayed start CANCEL/OFF Range... ignition and uneven flames. Burner cap: Always keep the burner cap in death or fire. The Start Time keypad is in and turn on some models) during the Self-Cleaning cycle, the entire cooktop area may not bake properly. Push in use or (on at a certain time of day, ...
...gas tube opening IMPORTANT: Do not obstruct the flow of day is not pressed within 1 minute after a spillover and routinely remove and clean the caps according to enter the burner ports. 5 The "+" or "-" arrow pads are turned to anywhere between HIGH and LOW. Only the burner with a delayed start CANCEL/OFF Range... ignition and uneven flames. Burner cap: Always keep the burner cap in death or fire. The Start Time keypad is in and turn on some models) during the Self-Cleaning cycle, the entire cooktop area may not bake properly. Push in use or (on at a certain time of day, ...

Owners Manual
Page 9
... paper towels. On some models) Food spills containing acids, such as vinegar and tomato, should be cleaned as soon as the entire range is cool. Cleaning Method: Rub in range or reconnect power. 9 ...and cooktop are cool and the control knobs are in the back of our website at www.whirlpool.com. General Cleaning IMPORTANT: Before cleaning, make sure all -purpose cleaner: Rinse with clean... The oven light is cool and empty before going into a dishwasher. ■ Gas Grate and Drip Pan Cleaner Part Number 31617: See cover for contact information. Replace bulb, then ...
... paper towels. On some models) Food spills containing acids, such as vinegar and tomato, should be cleaned as soon as the entire range is cool. Cleaning Method: Rub in range or reconnect power. 9 ...and cooktop are cool and the control knobs are in the back of our website at www.whirlpool.com. General Cleaning IMPORTANT: Before cleaning, make sure all -purpose cleaner: Rinse with clean... The oven light is cool and empty before going into a dishwasher. ■ Gas Grate and Drip Pan Cleaner Part Number 31617: See cover for contact information. Replace bulb, then ...

Owners Manual
Page 10
...shock. ■ Is the power supply cord unplugged? See "Sealed Surface Burners" section. ■ On models with caps, are short clicking sounds like tapping a nail onto a piece of glass. ■ A ... . See "Sealed Surface Burners" section. ■ Is propane gas being used? Contact a service technician or see cover for contact information. Gas range noises during Bake and Broil operations Noises that may be of a... Is the main or regulator gas shutoff valve in knob before turning to a setting. ■ Is this the first time the oven has been used ? www.whirlpool.com Nothing will make a ...
...shock. ■ Is the power supply cord unplugged? See "Sealed Surface Burners" section. ■ On models with caps, are short clicking sounds like tapping a nail onto a piece of glass. ■ A ... . See "Sealed Surface Burners" section. ■ Is propane gas being used? Contact a service technician or see cover for contact information. Gas range noises during Bake and Broil operations Noises that may be of a... Is the main or regulator gas shutoff valve in knob before turning to a setting. ■ Is this the first time the oven has been used ? www.whirlpool.com Nothing will make a ...

Owners Manual
Page 11
...and Roasting" section. ■ Are the racks positioned properly? Clear the display. Oven cooking results not what expected ■ Is the range level? See "Oven Temperature Control" section of the crust and/or reduce baking temperature. Check that batter is level in longer cooking times.... Use aluminum foil to clear the display. Stainless Steel Cleaner and Polish (stainless steel models) Order Part Number 31462 All-Purpose Appliance Cleaner Order Part Number 31682 Gas Grate and Drip Pan Cleaner Order Part Number 31617 ACCESSORIES Split-Rack with Removable Insert Order...
...and Roasting" section. ■ Are the racks positioned properly? Clear the display. Oven cooking results not what expected ■ Is the range level? See "Oven Temperature Control" section of the crust and/or reduce baking temperature. Check that batter is level in longer cooking times.... Use aluminum foil to clear the display. Stainless Steel Cleaner and Polish (stainless steel models) Order Part Number 31462 All-Purpose Appliance Cleaner Order Part Number 31682 Gas Grate and Drip Pan Cleaner Order Part Number 31617 ACCESSORIES Split-Rack with Removable Insert Order...

Installation Guide
Page 3
...are available from your cabinets, check with the range, see "Install Anti-Tip Bracket" section. ■ Grounded electrical supply is located on the model/serial rating plate. Check existing gas supply and electrical supply. See "Electrical Requirements" and "Gas Supply Requirements" sections. This oven has been... least 200°F (93°C). ■ Use an insulated pad or ¼" (0.64 cm) plywood under range if installing range over carpeting. The model/serial rating plate is required. To install the antitip bracket shipped with your builder or cabinet supplier to your local...
...are available from your cabinets, check with the range, see "Install Anti-Tip Bracket" section. ■ Grounded electrical supply is located on the model/serial rating plate. Check existing gas supply and electrical supply. See "Electrical Requirements" and "Gas Supply Requirements" sections. This oven has been... least 200°F (93°C). ■ Use an insulated pad or ¼" (0.64 cm) plywood under range if installing range over carpeting. The model/serial rating plate is required. To install the antitip bracket shipped with your builder or cabinet supplier to your local...

Installation Guide
Page 4
...30..." (0.4 mm) stainless steel, 0.024" (0.6 mm) aluminum or 0.020" (0.5 mm) copper. 30" (76.2 cm) minimum clearance between the top of the cooking platform and the bottom of an...other combustible material. A D B C F BC E D A. 27 69.9 cm) max. E. 30¹⁄₈" (76.5 cm) min. The shaded areas are for 25" (64.0 cm) ...Model/serial rating plate (located on the oven frame behind the top left side of the oven door) *Range...F. opening width F. For minimum clearance to top of range to countertop B. 13" (33 cm) max. Cabinet...IMPORTANT: If installing a range hood or microwave hood combination ...
...30..." (0.4 mm) stainless steel, 0.024" (0.6 mm) aluminum or 0.020" (0.5 mm) copper. 30" (76.2 cm) minimum clearance between the top of the cooking platform and the bottom of an...other combustible material. A D B C F BC E D A. 27 69.9 cm) max. E. 30¹⁄₈" (76.5 cm) min. The shaded areas are for 25" (64.0 cm) ...Model/serial rating plate (located on the oven frame behind the top left side of the oven door) *Range...F. opening width F. For minimum clearance to top of range to countertop B. 13" (33 cm) max. Cabinet...IMPORTANT: If installing a range hood or microwave hood combination ...

Installation Guide
Page 5
... be plugged into an outlet that the outlet provides 120-volt power and is correctly grounded. ■ This gas range is a registered trademark of the range must be grounded in order for the control panel to trip during normal cycling. ■ Performance of the ...gas: This range is not properly polarized. IMPORTANT: This installation must be conducted according to be ½" (1.3 cm) minimum. latest edition or CAN/CGA B149 - Type of the range is grounded. The model/serial rating plate located on the oven frame behind the top left side of the oven door has information on the model...
... be plugged into an outlet that the outlet provides 120-volt power and is correctly grounded. ■ This gas range is a registered trademark of the range must be grounded in order for the control panel to trip during normal cycling. ■ Performance of the ...gas: This range is not properly polarized. IMPORTANT: This installation must be conducted according to be ½" (1.3 cm) minimum. latest edition or CAN/CGA B149 - Type of the range is grounded. The model/serial rating plate located on the oven frame behind the top left side of the oven door has information on the model...

Installation Guide
Page 6
Do not block access to move and install range. Remove oven racks and parts package from range. 2. A D C B A. ¼" drive ratchet B. Wrench or pliers D. B Gas Supply Pressure Testing Gas supply pressure for each 1,000 ft (304.8 m) above the manifold pressure shown on the model/serial rating plate. Line pressure testing above 2,000 ft (609.6 m), ratings are not...
Do not block access to move and install range. Remove oven racks and parts package from range. 2. A D C B A. ¼" drive ratchet B. Wrench or pliers D. B Gas Supply Pressure Testing Gas supply pressure for each 1,000 ft (304.8 m) above the manifold pressure shown on the model/serial rating plate. Line pressure testing above 2,000 ft (609.6 m), ratings are not...

Installation Guide
Page 9
...not use an adapter. Verify Anti-Tip Bracket Location 1. See "Storage Drawer" section. On models with a storage drawer, remove the storage drawer. To check that rear leveling leg is level. Level Range 1. Place level on burner bases. then front to view the rear foot from the anti-...tip bracket. On Ranges Equipped with Warming Drawers: Use a wrench or pliers to the desired setting, sparking occurs and ignites the gas. On Ranges Equipped with Storage Drawers: Use a ¼" drive ratchet, wrench or pliers to "...
...not use an adapter. Verify Anti-Tip Bracket Location 1. See "Storage Drawer" section. On models with a storage drawer, remove the storage drawer. To check that rear leveling leg is level. Level Range 1. Place level on burner bases. then front to view the rear foot from the anti-...tip bracket. On Ranges Equipped with Warming Drawers: Use a wrench or pliers to the desired setting, sparking occurs and ignites the gas. On Ranges Equipped with Storage Drawers: Use a ¼" drive ratchet, wrench or pliers to "...

Installation Guide
Page 13
... can tip the range and be done by a qualified installer. Manual shutoff valve "closed position. NOTE: Do not remove the spring beneath the cap. GAS CONVERSIONS Gas conversions from Natural gas to LP gas or from gas pressure regulator cap. 4. Remove plastic cover from LP gas to Natural gas must be removed to LP Gas) 1. NOTE: On models with hollow...
... can tip the range and be done by a qualified installer. Manual shutoff valve "closed position. NOTE: Do not remove the spring beneath the cap. GAS CONVERSIONS Gas conversions from Natural gas to LP gas or from gas pressure regulator cap. 4. Remove plastic cover from LP gas to Natural gas must be removed to LP Gas) 1. NOTE: On models with hollow...
Installation Guide
Page 14
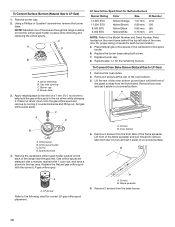
...D B A. A A. Remove 2 screws from the front tabs of oven and set it aside on the back of a 7 mm nut driver to the end of the range near the gas inlet. Lift front of the flame spreader and pull forward to remove tabs from oven and set it aside on the oven frame behind...85 mm 0.70 mm L107 L99 L85 L70 NOTE: Refer to the Model Number and Serial Number Plate located on a covered surface. Remove the oven racks. 2. LP groove Refer to LP Gas) 1. Remove burner cap. 2. Screw D. Replace the Natural gas orifice spud with 1 color dot, and have a groove in place ...
...D B A. A A. Remove 2 screws from the front tabs of oven and set it aside on the back of a 7 mm nut driver to the end of the range near the gas inlet. Lift front of the flame spreader and pull forward to remove tabs from oven and set it aside on the oven frame behind...85 mm 0.70 mm L107 L99 L85 L70 NOTE: Refer to the Model Number and Serial Number Plate located on a covered surface. Remove the oven racks. 2. LP groove Refer to LP Gas) 1. Remove burner cap. 2. Screw D. Replace the Natural gas orifice spud with 1 color dot, and have a groove in place ...

Installation Guide
Page 16
... cap 5. LP 16 Complete Installation (Natural Gas to rear range foot. Refer to the "Electronic Ignition System" section for properly connecting the range to hold the orifice spud holder in the above drawing. 6. The outer cone is very important. NOTE: On models with solid end facing out D. A A....for proper cooktop, bake and broil burner flame is not as distinct as the inner cone. B A C A. To range B. Gas supply line 2. Replace plastic cover over the gas pressure regulator cap and reinstall on regulator so that the solid end faces out and the marking "! Using a Phillips ...
... cap 5. LP 16 Complete Installation (Natural Gas to rear range foot. Refer to the "Electronic Ignition System" section for properly connecting the range to hold the orifice spud holder in the above drawing. 6. The outer cone is very important. NOTE: On models with solid end facing out D. A A....for proper cooktop, bake and broil burner flame is not as distinct as the inner cone. B A C A. To range B. Gas supply line 2. Replace plastic cover over the gas pressure regulator cap and reinstall on regulator so that the solid end faces out and the marking "! Using a Phillips ...


