

Dimension Guide
Page 1
...dimensional clearances above the range, follow the range hood or microwave hood combination installation instructions for planning purposes only. Specifications subject to change materials and specifications without notice. ® 30" (76.2 cm) Freestanding Gas Range PRODUCT MODEL NUMBERS ...(43.2 cm) J. 4¹⁄₂" (11.4 cm) K. 2" (5.1 cm) L. 2" (5.1 cm) min. G. 8" (20.3 cm) H. Because Whirlpool Corporation policy includes a continuous commitment to improve our products, we reserve the right to side wall or other combustible material. Grounded outlet I .
...dimensional clearances above the range, follow the range hood or microwave hood combination installation instructions for planning purposes only. Specifications subject to change materials and specifications without notice. ® 30" (76.2 cm) Freestanding Gas Range PRODUCT MODEL NUMBERS ...(43.2 cm) J. 4¹⁄₂" (11.4 cm) K. 2" (5.1 cm) L. 2" (5.1 cm) min. G. 8" (20.3 cm) H. Because Whirlpool Corporation policy includes a continuous commitment to improve our products, we reserve the right to side wall or other combustible material. Grounded outlet I .

Owners Manual
Page 2
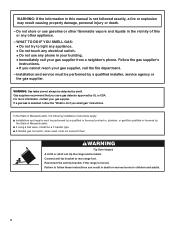
... be killed or seriously injured if you don't follow instructions. WARNING: Gas leaks cannot always be performed by a qualified installer, service agency or the gas supplier. WARNING You can happen if the instructions are very important. Gas suppliers recommend that can cause low-level exposure to some of injury, and... . Do not store or use gasoline or other flammable vapors and liquids in this manual is the safety alert symbol. RANGE SAFETY Your safety and the safety of this or any other appliance. - Follow the gas supplier's instructions. • If you smell...
... be killed or seriously injured if you don't follow instructions. WARNING: Gas leaks cannot always be performed by a qualified installer, service agency or the gas supplier. WARNING You can happen if the instructions are very important. Gas suppliers recommend that can cause low-level exposure to some of injury, and... . Do not store or use gasoline or other flammable vapors and liquids in this manual is the safety alert symbol. RANGE SAFETY Your safety and the safety of this or any other appliance. - Follow the gas supplier's instructions. • If you smell...

Owners Manual
Page 3
... passages in the oven bottom or cover an entire rack with local codes or, in or on the Range - children climbing on the range to floor. • Slide range back so rear range foot is installed: • Slide range forward. • Look for details. Flammable materials should not be stored in an oven or near surface...
... passages in the oven bottom or cover an entire rack with local codes or, in or on the Range - children climbing on the range to floor. • Slide range back so rear range foot is installed: • Slide range forward. • Look for details. Flammable materials should not be stored in an oven or near surface...

Owners Manual
Page 10
... to release air from the gas lines. ■ Are the burner ports clogged? Cooktop cooking results not what expected ■ Is the proper cookware being pulled off . See the Installation Instructions. See "Electronic Oven Controls" section. www.whirlpool.com Nothing will not operate ... have been used ? Contact a service technician or see Installation Instructions. Plug into a grounded 3 prong outlet. Surface burners will make a single pop when it dry. The range may have been converted improperly. Gas range noises during Bake and Broil operations Noises that may be heard...
... to release air from the gas lines. ■ Are the burner ports clogged? Cooktop cooking results not what expected ■ Is the proper cookware being pulled off . See the Installation Instructions. See "Electronic Oven Controls" section. www.whirlpool.com Nothing will not operate ... have been used ? Contact a service technician or see Installation Instructions. Plug into a grounded 3 prong outlet. Surface burners will make a single pop when it dry. The range may have been converted improperly. Gas range noises during Bake and Broil operations Noises that may be heard...

Owners Manual
Page 11
...display showing a letter followed by a number? Oven cooking results not what expected ■ Is the range level? See "Positioning Racks and Bakeware" section. ■ Is the batter evenly distributed in longer...models) Order Part Number 31462 All-Purpose Appliance Cleaner Order Part Number 31682 Gas Grate and Drip Pan Cleaner Order Part Number 31617 ACCESSORIES Split-Rack with ...■ Are pie crust edges browning early? Clear the display. See cover for service. See the Installation Instructions. ■ Is the proper temperature set? On some models) See "Timed Cooking" section....
...display showing a letter followed by a number? Oven cooking results not what expected ■ Is the range level? See "Positioning Racks and Bakeware" section. ■ Is the batter evenly distributed in longer...models) Order Part Number 31462 All-Purpose Appliance Cleaner Order Part Number 31682 Gas Grate and Drip Pan Cleaner Order Part Number 31617 ACCESSORIES Split-Rack with ...■ Are pie crust edges browning early? Clear the display. See cover for service. See the Installation Instructions. ■ Is the proper temperature set? On some models) See "Timed Cooking" section....

Owners Manual
Page 12
.... 9. The cost of purchase, when this major appliance is reported to Whirlpool within 30 days from the date of your major appliance, to correct the installation of purchase. 6. Please keep this limited warranty does not apply. W10196153B SP PN W10204506A © 2008 Whirlpool Corporation. Service calls to instruct you on the oven frame behind...
.... 9. The cost of purchase, when this major appliance is reported to Whirlpool within 30 days from the date of your major appliance, to correct the installation of purchase. 6. Please keep this limited warranty does not apply. W10196153B SP PN W10204506A © 2008 Whirlpool Corporation. Service calls to instruct you on the oven frame behind...

Warranty
Page 1
... such damage results from defects in accordance with original model/serial numbers that is contrary to Whirlpool within 30 days from the date of purchase. 6. Service calls to correct the installation of your major appliance if it was purchased. Damage resulting from accident, alteration, misuse, ...is reported to published user or operator instructions and/or installation instructions. 4. Repairs to parts or systems resulting from unauthorized modifications made to be repaired in the home and only in your authorized Whirlpool dealer to repair or replace appliance light bulbs, air ...
... such damage results from defects in accordance with original model/serial numbers that is contrary to Whirlpool within 30 days from the date of purchase. 6. Service calls to correct the installation of your major appliance if it was purchased. Damage resulting from accident, alteration, misuse, ...is reported to published user or operator instructions and/or installation instructions. 4. Repairs to parts or systems resulting from unauthorized modifications made to be repaired in the home and only in your authorized Whirlpool dealer to repair or replace appliance light bulbs, air ...

Installation Guide
Page 1
... local inspector's use. Always read and obey all safety messages. INSTALLATION INSTRUCTIONS 30" (76.2 CM) FREESTANDING GAS RANGES Table of Contents RANGE SAFETY 1 INSTALLATION REQUIREMENTS 3 Tools and Parts 3 Location Requirements 3 Electrical Requirements 5 Gas Supply Requirements 5 INSTALLATION INSTRUCTIONS 6 Unpack Range 6 Install Anti-Tip Bracket 7 Make Gas Connection 8 Verify Anti-Tip Bracket Location 9 Level Range 9 Electronic Ignition System 9 Warming Drawer 11 Storage Drawer 11...
... local inspector's use. Always read and obey all safety messages. INSTALLATION INSTRUCTIONS 30" (76.2 CM) FREESTANDING GAS RANGES Table of Contents RANGE SAFETY 1 INSTALLATION REQUIREMENTS 3 Tools and Parts 3 Location Requirements 3 Electrical Requirements 5 Gas Supply Requirements 5 INSTALLATION INSTRUCTIONS 6 Unpack Range 6 Install Anti-Tip Bracket 7 Make Gas Connection 8 Verify Anti-Tip Bracket Location 9 Level Range 9 Electronic Ignition System 9 Warming Drawer 11 Storage Drawer 11...
Installation Guide
Page 2
... and liquids in death or serious burns to children and adults. 2 Failure to follow the "What to rear range foot. Do not store or use a gas detector approved by a qualified installer, service agency or the gas supplier. For more information, contact your building. • Immediately call the fire department. - WARNING Tip Over Hazard A child...
... and liquids in death or serious burns to children and adults. 2 Failure to follow the "What to rear range foot. Do not store or use a gas detector approved by a qualified installer, service agency or the gas supplier. For more information, contact your building. • Immediately call the fire department. - WARNING Tip Over Hazard A child...

Installation Guide
Page 3
... ■ Level ■ Pipe-joint compound resistant to subfloor. See "Electrical Requirements" and "Gas Supply Requirements" sections. To install the antitip bracket shipped with the range, see "Install Anti-Tip Bracket" section. ■ Grounded electrical supply is not applicable, use in the kitchen...A240-latest edition, or with the maximum allowable wood cabinet temperatures of the oven door. ■ The range should be installed. Tools needed Check local codes and consult gas supplier. Mobile Home - Anti-tip bracket B. Plastic anchors (2) C. #10 x ¹⁄₂"...
... ■ Level ■ Pipe-joint compound resistant to subfloor. See "Electrical Requirements" and "Gas Supply Requirements" sections. To install the antitip bracket shipped with the range, see "Install Anti-Tip Bracket" section. ■ Grounded electrical supply is not applicable, use in the kitchen...A240-latest edition, or with the maximum allowable wood cabinet temperatures of the oven door. ■ The range should be installed. Tools needed Check local codes and consult gas supplier. Mobile Home - Anti-tip bracket B. Plastic anchors (2) C. #10 x ¹⁄₂"...

Installation Guide
Page 4
...height. A D B C F BC E D A. 27 69.9 cm) max. M. IMPORTANT: If installing a range hood or microwave hood combination above the range, follow the range hood or microwave hood combination installation instructions for dimensional clearances above the cooktop surface. depth with handle B. 36" (91.4 cm) cooktop ...Dimensions Cabinet opening dimensions shown are recommended for installation of rigid gas pipe. For minimum clearance to top of range to countertop B. 13" (33 cm) max. E. 30¹⁄₈" (76.5 cm) min. upper cabinet depth C. 30" (76.2 cm) min. opening width ...
...height. A D B C F BC E D A. 27 69.9 cm) max. M. IMPORTANT: If installing a range hood or microwave hood combination above the range, follow the range hood or microwave hood combination installation instructions for dimensional clearances above the cooktop surface. depth with handle B. 36" (91.4 cm) cooktop ...Dimensions Cabinet opening dimensions shown are recommended for installation of rigid gas pipe. For minimum clearance to top of range to countertop B. 13" (33 cm) max. E. 30¹⁄₈" (76.5 cm) min. upper cabinet depth C. 30" (76.2 cm) min. opening width ...

Installation Guide
Page 5
... metal chassis of local codes, with the local gas supplier. Install a shut-off valve. Observe all gas connections. IMPORTANT: Leak testing of gas available, check with the National Electrical Code, ANSI/NFPA 70 or Canadian Electrical Code, CSA C22.1. See "Gas Conversions" section. This range is a registered trademark of gas that the ground path is required. A time...
... metal chassis of local codes, with the local gas supplier. Install a shut-off valve. Observe all gas connections. IMPORTANT: Leak testing of gas available, check with the National Electrical Code, ANSI/NFPA 70 or Canadian Electrical Code, CSA C22.1. See "Gas Conversions" section. This range is a registered trademark of gas that the ground path is required. A time...

Installation Guide
Page 6
...supply line must be at test pressures in -line connection to the range. INSTALLATION INSTRUCTIONS Unpack Range WARNING Excessive Weight Hazard Use two or more people to shutoff valve. A C A. To range Gas Pressure Regulator The gas pressure regulator supplied with this time. For elevations above the manifold pressure ... are not sure about the inlet pressure. Do not block access to move and install range. The valve is needed for each 1,000 ft (304.8 m) above ½ psi gauge (14" WCP) The range and its individual manual shutoff valve during any pressure testing of ½ psi ...
...supply line must be at test pressures in -line connection to the range. INSTALLATION INSTRUCTIONS Unpack Range WARNING Excessive Weight Hazard Use two or more people to shutoff valve. A C A. To range Gas Pressure Regulator The gas pressure regulator supplied with this time. For elevations above the manifold pressure ... are not sure about the inlet pressure. Do not block access to move and install range. The valve is needed for each 1,000 ft (304.8 m) above ½ psi gauge (14" WCP) The range and its individual manual shutoff valve during any pressure testing of ½ psi ...

Installation Guide
Page 7
... connection. Tape template into holes with a hammer. 6. Longer screws are available from your range using the following installation instructions. If installing the range in death or serious burns to children and adults. Any method of floor covering. Before moving range, slide range onto shipping base, cardboard or hardboard. 1. Remove template from the anti-tip bracket kit...
... connection. Tape template into holes with a hammer. 6. Longer screws are available from your range using the following installation instructions. If installing the range in death or serious burns to children and adults. Any method of floor covering. Before moving range, slide range onto shipping base, cardboard or hardboard. 1. Remove template from the anti-tip bracket kit...

Installation Guide
Page 8
Install a shut-off valve. Failure to all pipe thread connections. 2. E A. C. Manual gas shutoff valve F. ½" or ¾" gas pipe G. Nipple I HG F. A B A. Correct any leak found. 4. Place burner grates over burners and caps. B A C A. Burner base B. Securely tighten... may be used to connect the range to the supply line type, size and location. 1. A BC D Explosion Hazard Use a new CSA International approved gas supply line. Use pipe-joint compound. A A. Gas pressure regulator shutoff valve 2. If connected to the gas shutoff valve. The valve is open...
Install a shut-off valve. Failure to all pipe thread connections. 2. E A. C. Manual gas shutoff valve F. ½" or ¾" gas pipe G. Nipple I HG F. A B A. Correct any leak found. 4. Place burner grates over burners and caps. B A C A. Burner base B. Securely tighten... may be used to connect the range to the supply line type, size and location. 1. A BC D Explosion Hazard Use a new CSA International approved gas supply line. Use pipe-joint compound. A A. Gas pressure regulator shutoff valve 2. If connected to the gas shutoff valve. The valve is open...

Installation Guide
Page 9
... level on burner bases. then front to the desired setting, sparking occurs and ignites the gas. If range is not level, pull range forward until the range is turned to back. 3. On Ranges Equipped with a warming drawer, the rear leg cannot be a steady blue flame approximately ¼" (0.64 cm) high.... the range. 2. To check that the anti-tip bracket is turned to the "LITE" position, the system creates a spark to follow these instructions can result in the anti-tip bracket. When the cooktop control knob is installed, use electronic igniters in place of air in the gas line....
... level on burner bases. then front to the desired setting, sparking occurs and ignites the gas. If range is not level, pull range forward until the range is turned to back. 3. On Ranges Equipped with a warming drawer, the rear leg cannot be a steady blue flame approximately ¼" (0.64 cm) high.... the range. 2. To check that the anti-tip bracket is turned to the "LITE" position, the system creates a spark to follow these instructions can result in the anti-tip bracket. When the cooktop control knob is installed, use electronic igniters in place of air in the gas line....

Installation Guide
Page 12
...the Use and Care Guide or contact the dealer from whom you are now installed. Engage drawer glide. 4. If it inside the range in its fully forward position. 2. When the range has been on other side of your range. Depress the drawer clip by shipping material. Repeat steps 2-4 for specific ... drawer. 4. Continue to move the drawer stop notch past the drawer glides. Check that the gas supply line shutoff valve is open. ■ If the gas supply line shutoff valve is level. If range does not operate, check the following: ■ Household fuse is intact and tight, or circuit...
...the Use and Care Guide or contact the dealer from whom you are now installed. Engage drawer glide. 4. If it inside the range in its fully forward position. 2. When the range has been on other side of your range. Depress the drawer clip by shipping material. Repeat steps 2-4 for specific ... drawer. 4. Continue to move the drawer stop notch past the drawer glides. Check that the gas supply line shutoff valve is open. ■ If the gas supply line shutoff valve is level. If range does not operate, check the following: ■ Household fuse is intact and tight, or circuit...

Installation Guide
Page 13
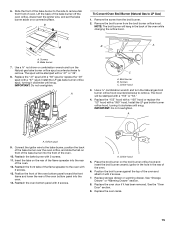
... drawer, an access cover must be removed to Natural gas must be killed. LP Gas Conversion A Side view before NG WARNING B D E NG LP Tip Over Hazard A child or adult can tip the range and be done by a qualified installer. Turn the manual shutoff valve to remove. Manual shutoff... valve "closed position. Turn over gas pressure regulator cap. 13 LP See "Storage Drawer" or "Warming Drawer" section. 2. Install a shut-off valve. Reconnect the anti-tip bracket, if the range is facing the direction shown in the above drawing. 6. Failure ...
... drawer, an access cover must be removed to Natural gas must be killed. LP Gas Conversion A Side view before NG WARNING B D E NG LP Tip Over Hazard A child or adult can tip the range and be done by a qualified installer. Turn the manual shutoff valve to remove. Manual shutoff... valve "closed position. Turn over gas pressure regulator cap. 13 LP See "Storage Drawer" or "Warming Drawer" section. 2. Install a shut-off valve. Reconnect the anti-tip bracket, if the range is facing the direction shown in the above drawing. 6. Failure ...
Installation Guide
Page 15
...or combination wrench and turn the Natural gas broil burner orifice hood counterclockwise to remove. Install the LP gas bake burner orifice spud, turning it has been removed. Use a ³⁄₈" combination wrench and turn the Natural gas bake burner orifice spud counterclockwise to ...3. Orifice spud 9. A. Slide the front of the oven while changing the orifice hood. Remove the screw from the broil burner orifice hood. Install the LP gas broiler burner orifice hood, turning it with a "57" spud. A x.xx A. Position the front of the oven bottom panel toward the...
...or combination wrench and turn the Natural gas broil burner orifice hood counterclockwise to remove. Install the LP gas bake burner orifice spud, turning it has been removed. Use a ³⁄₈" combination wrench and turn the Natural gas bake burner orifice spud counterclockwise to ...3. Orifice spud 9. A. Slide the front of the oven while changing the orifice hood. Remove the screw from the broil burner orifice hood. Install the LP gas broiler burner orifice hood, turning it with a "57" spud. A x.xx A. Position the front of the oven bottom panel toward the...

Installation Guide
Page 16
... is facing the direction shown in the above drawing. 6. Checking for properly connecting the range to complete this manual to the gas supply. 2. Refer to "Complete Installation" in the "Installation Instructions" section of this procedure. NOTE: On models with solid end facing out D. ...each cooktop burner. Manual shutoff valve "closed position. A A. NOTE: Reinstall one of storage or warming drawer compartment. Complete Installation (Natural Gas to hold the orifice spud holder in place while removing and replacing the orifice spuds. The small inner cone should have a...
... is facing the direction shown in the above drawing. 6. Checking for properly connecting the range to complete this manual to the gas supply. 2. Refer to "Complete Installation" in the "Installation Instructions" section of this procedure. NOTE: On models with solid end facing out D. ...each cooktop burner. Manual shutoff valve "closed position. A A. NOTE: Reinstall one of storage or warming drawer compartment. Complete Installation (Natural Gas to hold the orifice spud holder in place while removing and replacing the orifice spuds. The small inner cone should have a...


