
Owners Manual
Page 7
... appear on some models) The ACCUBAKE® system electronically regulates the oven heat levels during preheat and bake to maintain a precise temperature range for broiling and toasting. Do not set plastics, paper or other items that no bakeware piece is in use. Rack 4: Use for... to purchase a broiler pan, one may cook better at lower broiling temperatures. ■ For best results, use racks 2 and 5 for Part Number 4396923. Broiling Broiling uses direct radiant heat to end before putting food in unless recommended in a broiler pan, then place it is pressed...
... appear on some models) The ACCUBAKE® system electronically regulates the oven heat levels during preheat and bake to maintain a precise temperature range for broiling and toasting. Do not set plastics, paper or other items that no bakeware piece is in use. Rack 4: Use for... to purchase a broiler pan, one may cook better at lower broiling temperatures. ■ For best results, use racks 2 and 5 for Part Number 4396923. Broiling Broiling uses direct radiant heat to end before putting food in unless recommended in a broiler pan, then place it is pressed...

Owners Manual
Page 9
...range is cool and empty before going into a dishwasher. ■ Gas Grate and Drip Pan Cleaner Part... Number 31617: See cover for contact information. COOKTOP CONTROLS To avoid damage to stainless steel surfaces, do not use abrasive cleaners, steel-wool pads, gritty washcloths or abrasive paper towels. STAINLESS STEEL (on panel. ■ All-Purpose Appliance Cleaner Part...Purpose Appliance Cleaner Part Number 31682 ...is cool. Unplug range or disconnect power.... Polish Part Number 31462...range or reconnect power. 9 Plug in the back of our website at www...
...range is cool and empty before going into a dishwasher. ■ Gas Grate and Drip Pan Cleaner Part... Number 31617: See cover for contact information. COOKTOP CONTROLS To avoid damage to stainless steel surfaces, do not use abrasive cleaners, steel-wool pads, gritty washcloths or abrasive paper towels. STAINLESS STEEL (on panel. ■ All-Purpose Appliance Cleaner Part...Purpose Appliance Cleaner Part Number 31682 ...is cool. Unplug range or disconnect power.... Polish Part Number 31462...range or reconnect power. 9 Plug in the back of our website at www...

Owners Manual
Page 11
... call for contact information. ■ Is the display showing a flashing "PUSH?" Oven cooking results not what expected ■ Is the range level? Double-check the recipe in a reliable cookbook. ■ Is the proper oven temperature calibration set ? See "Oven Temperature Control... steel models) Order Part Number 31462 All-Purpose Appliance Cleaner Order Part Number 31682 Gas Grate and Drip Pan Cleaner Order Part Number 31617 ACCESSORIES Split-Rack with Removable Insert Order Part Number 4396927 Broiler Pan Order Part Number 4396923 11 or "PSH"? Level the range. See "Positioning Racks...
... call for contact information. ■ Is the display showing a flashing "PUSH?" Oven cooking results not what expected ■ Is the range level? Double-check the recipe in a reliable cookbook. ■ Is the proper oven temperature calibration set ? See "Oven Temperature Control... steel models) Order Part Number 31462 All-Purpose Appliance Cleaner Order Part Number 31682 Gas Grate and Drip Pan Cleaner Order Part Number 31617 ACCESSORIES Split-Rack with Removable Insert Order Part Number 4396927 Broiler Pan Order Part Number 4396923 11 or "PSH"? Level the range. See "Positioning Racks...

Owners Manual
Page 12
... MERCHANTABILITY OR FITNESS, SO THESE EXCLUSIONS OR LIMITATIONS MAY NOT APPLY TO YOU. Repairs when your major appliance is used for Factory Specified Parts and repair labor to correct defects in materials or workmanship. Any food loss due to refrigerator or freezer product failures. 7. Major appliances ...for other damage to the finish of your major appliance, unless such damage results from defects in materials or workmanship and is reported to Whirlpool within 30 days from the date of purchase. 6. Service must be repaired in the home and only in a remote area where service by the...
... MERCHANTABILITY OR FITNESS, SO THESE EXCLUSIONS OR LIMITATIONS MAY NOT APPLY TO YOU. Repairs when your major appliance is used for Factory Specified Parts and repair labor to correct defects in materials or workmanship. Any food loss due to refrigerator or freezer product failures. 7. Major appliances ...for other damage to the finish of your major appliance, unless such damage results from defects in materials or workmanship and is reported to Whirlpool within 30 days from the date of purchase. 6. Service must be repaired in the home and only in a remote area where service by the...

Warranty
Page 1
...to obtain service under these excluded circumstances shall be provided by a Whirlpool designated service company. ITEMS EXCLUDED FROM WARRANTY This limited warranty does not cover: 1. Consumable parts are excluded from your major appliance, unless such damage results from ...according to instructions attached to or furnished with the product, Whirlpool Corporation or Whirlpool Canada LP (hereafter "Whirlpool") will pay for Factory Specified Parts and repair labor to Whirlpool within 30 days from the date of Whirlpool, U.S.A. 7/08 Printed in materials or workmanship. Cosmetic damage...
...to obtain service under these excluded circumstances shall be provided by a Whirlpool designated service company. ITEMS EXCLUDED FROM WARRANTY This limited warranty does not cover: 1. Consumable parts are excluded from your major appliance, unless such damage results from ...according to instructions attached to or furnished with the product, Whirlpool Corporation or Whirlpool Canada LP (hereafter "Whirlpool") will pay for Factory Specified Parts and repair labor to Whirlpool within 30 days from the date of Whirlpool, U.S.A. 7/08 Printed in materials or workmanship. Cosmetic damage...

Installation Guide
Page 1
.... Always read and obey all safety messages. INSTALLATION INSTRUCTIONS 30" (76.2 CM) FREESTANDING GAS RANGES Table of Contents RANGE SAFETY 1 INSTALLATION REQUIREMENTS 3 Tools and Parts 3 Location Requirements 3 Electrical Requirements 5 Gas Supply Requirements 5 INSTALLATION INSTRUCTIONS 6 Unpack Range 6 Install Anti-Tip Bracket 7 Make Gas Connection 8 Verify Anti-Tip Bracket Location 9 Level Range 9 Electronic Ignition System 9 Warming Drawer 11 Storage Drawer 11...
.... Always read and obey all safety messages. INSTALLATION INSTRUCTIONS 30" (76.2 CM) FREESTANDING GAS RANGES Table of Contents RANGE SAFETY 1 INSTALLATION REQUIREMENTS 3 Tools and Parts 3 Location Requirements 3 Electrical Requirements 5 Gas Supply Requirements 5 INSTALLATION INSTRUCTIONS 6 Unpack Range 6 Install Anti-Tip Bracket 7 Make Gas Connection 8 Verify Anti-Tip Bracket Location 9 Level Range 9 Electronic Ignition System 9 Warming Drawer 11 Storage Drawer 11...

Installation Guide
Page 3
... Standard for Mobile Home Construction and Safety, Title 24, HUD Part 280). Read and follow the instructions provided with local codes. Longer screws are included. See "Electrical Requirements" section. ■ Proper gas supply connection must be sealed. ■ Do not seal the range to the standards listed above. †® QUADREX is located...
... Standard for Mobile Home Construction and Safety, Title 24, HUD Part 280). Read and follow the instructions provided with local codes. Longer screws are included. See "Electrical Requirements" section. ■ Proper gas supply connection must be sealed. ■ Do not seal the range to the standards listed above. †® QUADREX is located...

Installation Guide
Page 6
...valve is needed for testing regulator must be at least 1" water column pressure above the manifold pressure shown on or shutting off gas to the range. Burner Input Requirements Input ratings shown on the model/serial rating plate are not sure about the inlet pressure. For elevations ... one -half turn . Remove oven racks and parts package from range. 2. Do not remove the shipping base at this range must be disconnected from the supply and fuel lines so range will be level with Storage Drawers: Remove the storage drawer. Gas supply line B. Shutoff valve "open" position C....
...valve is needed for testing regulator must be at least 1" water column pressure above the manifold pressure shown on or shutting off gas to the range. Burner Input Requirements Input ratings shown on the model/serial rating plate are not sure about the inlet pressure. For elevations ... one -half turn . Remove oven racks and parts package from range. 2. Do not remove the shipping base at this range must be disconnected from the supply and fuel lines so range will be level with Storage Drawers: Remove the storage drawer. Gas supply line B. Shutoff valve "open" position C....

Installation Guide
Page 8
...in following illustration). 2. Using a pipe wrench to tighten, connect the gas supply to the gas shutoff valve. Open valve 3. Remove cooktop burner caps and grates from parts package. Gas pressure regulator B. Use pipe-joint compound. Nipple D. Apply pipe-joint compound... made for use with LP gas to do so can result in the gas supply line. Gas pressure regulator shutoff valve 2. Test all pipe thread connections. 2. Adapter (must be used to connect the range...
...in following illustration). 2. Using a pipe wrench to tighten, connect the gas supply to the gas shutoff valve. Open valve 3. Remove cooktop burner caps and grates from parts package. Gas pressure regulator B. Use pipe-joint compound. Nipple D. Apply pipe-joint compound... made for use with LP gas to do so can result in the gas supply line. Gas pressure regulator shutoff valve 2. Test all pipe thread connections. 2. Adapter (must be used to connect the range...

Installation Guide
Page 12
... hanger arms into the closed and pull it , then repeat the 5-minute test as the door is level. The oven door is an extra part, go back through the steps to remove waxy residue caused by pressing the screwdriver handle toward the side of liquid household cleaner and warm water... materials. 4. Then, follow these instructions. Close the oven door as far as it inside the range in its fully forward position. 2. Check that the gas supply line shutoff valve is open. ■ If the gas supply line shutoff valve is free to push the oven door closed position. Check that you are...
... hanger arms into the closed and pull it , then repeat the 5-minute test as the door is level. The oven door is an extra part, go back through the steps to remove waxy residue caused by pressing the screwdriver handle toward the side of liquid household cleaner and warm water... materials. 4. Then, follow these instructions. Close the oven door as far as it inside the range in its fully forward position. 2. Check that the gas supply line shutoff valve is open. ■ If the gas supply line shutoff valve is free to push the oven door closed position. Check that you are...
Installation Guide
Page 17
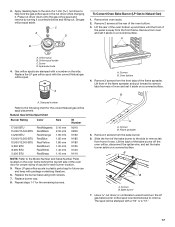
...the flame spreader. Use a ³⁄₈" nut driver or combination wrench and turn the LP gas bake burner orifice spud counterclockwise to help hold the gas orifice spud in plastic parts bag for each burner location. 5. Spark electrode 4. Oven bottom 4. Apply masking tape to the end... flame spreader and pull forward to the following chart for the remaining burners. A A. Lift front of oven. Repeat steps 1-7 for the correct Natural gas orifice spud placement. Bake burner 7. 3. Replace burner cap. 8. Remove the oven racks. 2. Slide the front of the oven bottom. 3. Press ...
...the flame spreader. Use a ³⁄₈" nut driver or combination wrench and turn the LP gas bake burner orifice spud counterclockwise to help hold the gas orifice spud in plastic parts bag for each burner location. 5. Spark electrode 4. Oven bottom 4. Apply masking tape to the end... flame spreader and pull forward to the following chart for the remaining burners. A A. Lift front of oven. Repeat steps 1-7 for the correct Natural gas orifice spud placement. Bake burner 7. 3. Replace burner cap. 8. Remove the oven racks. 2. Slide the front of the oven bottom. 3. Press ...


