
Dimension Guide
Page 1
...M A F BC E D A. 27 " (69.9 cm) max. opening width D. ® 30" (76.2 cm) Freestanding Gas Range PRODUCT MODEL NUMBERS PRODUCT DIMENSIONS GFG464LV GFG471LV WFG361LV WFG366LV WFG371LV WFG374LV Gas supply: This range is greater than No. 28 MSG sheet steel, 0.015" (0.4 mm) stainless steel, 0.024" (0.6... above the range, follow the range hood or microwave hood combination installation instructions for connection to the female pipe threads of gas available, check with leveling legs screwed all the way in insufficient gas supply. Because Whirlpool Corporation policy includes...
...M A F BC E D A. 27 " (69.9 cm) max. opening width D. ® 30" (76.2 cm) Freestanding Gas Range PRODUCT MODEL NUMBERS PRODUCT DIMENSIONS GFG464LV GFG471LV WFG361LV WFG366LV WFG371LV WFG374LV Gas supply: This range is greater than No. 28 MSG sheet steel, 0.015" (0.4 mm) stainless steel, 0.024" (0.6... above the range, follow the range hood or microwave hood combination installation instructions for connection to the female pipe threads of gas available, check with leveling legs screwed all the way in insufficient gas supply. Because Whirlpool Corporation policy includes...

Owners Manual
Page 2
... These words mean: DANGER You can cause low-level exposure to some of potential exposure to potential hazards that you smell gas" instructions. WARNING: If the information in this manual is , tell you how to reduce the chance of injury, and tell you cannot reach your...; Do not try to warn of the substances listed, including benzene, formaldehyde, carbon monoxide, toluene, and soot. 2 RANGE SAFETY Your safety and the safety of others . WARNING: Gas leaks cannot always be performed by smell. All safety messages will tell you and others are not followed. WARNING: This ...
... These words mean: DANGER You can cause low-level exposure to some of potential exposure to potential hazards that you smell gas" instructions. WARNING: If the information in this manual is , tell you how to reduce the chance of injury, and tell you cannot reach your...; Do not try to warn of the substances listed, including benzene, formaldehyde, carbon monoxide, toluene, and soot. 2 RANGE SAFETY Your safety and the safety of others . WARNING: Gas leaks cannot always be performed by smell. All safety messages will tell you and others are not followed. WARNING: This ...

Owners Manual
Page 4
... CLOCK or START. Press TEMP/TIME "+" or "-" arrow pads to turn off . Press BAKE. 2. See the "Range Care" section. 1. Repeat to 12 hours and 59 minutes. 1. or p.m. 4. Press and hold the TO LOCK ...repeat Step 2. Do not press the CANCEL/OFF keypad because the oven will be at www.whirlpool.com for 3 seconds. 3. If the TIMER is off . 2. WARNING Food Poisoning Hazard Do... keypads will come on and off . 5. Press TEMP/TIME "+" or "-" arrow pads to this manual or the Frequently Asked Questions (FAQs) section of the items listed. Press START. 5. Press CANCEL/...
... CLOCK or START. Press TEMP/TIME "+" or "-" arrow pads to turn off . Press BAKE. 2. See the "Range Care" section. 1. Repeat to 12 hours and 59 minutes. 1. or p.m. 4. Press and hold the TO LOCK ...repeat Step 2. Do not press the CANCEL/OFF keypad because the oven will be at www.whirlpool.com for 3 seconds. 3. If the TIMER is off . 2. WARNING Food Poisoning Hazard Do... keypads will come on and off . 5. Press TEMP/TIME "+" or "-" arrow pads to this manual or the Frequently Asked Questions (FAQs) section of the items listed. Press START. 5. Press CANCEL/...

Owners Manual
Page 5
... Timer and Oven Control Lockout. If Start is used to follow these instructions can be lit manually. COOKTOP USE WARNING Sealed Surface Burners A Fire Hazard Do not let the burner flame extend...during the Self-Cleaning cycle, the entire cooktop area may not bake properly. To Set: 1. REMEMBER: When range is displayed. or "PSH" appears in color, not yellow. If Start is blue in the display. ... free of combustion and ventilation air around the burner grate edges. Turn knob to enter the gas tube opening IMPORTANT: Do not obstruct the flow of soil and do not allow spills, food...
... Timer and Oven Control Lockout. If Start is used to follow these instructions can be lit manually. COOKTOP USE WARNING Sealed Surface Burners A Fire Hazard Do not let the burner flame extend...during the Self-Cleaning cycle, the entire cooktop area may not bake properly. To Set: 1. REMEMBER: When range is displayed. or "PSH" appears in color, not yellow. If Start is blue in the display. ... free of combustion and ventilation air around the burner grate edges. Turn knob to enter the gas tube opening IMPORTANT: Do not obstruct the flow of soil and do not allow spills, food...

Installation Guide
Page 1
... provided many important safety messages in this manual and on your appliance. These words mean: DANGER You can be killed or seriously injured if you don't immediately follow instructions. Installer: Leave installation instructions with the homeowner. INSTALLATION INSTRUCTIONS 30" (76.2 CM) FREESTANDING GAS RANGES Table of Contents RANGE SAFETY 1 INSTALLATION REQUIREMENTS 3 Tools and Parts 3 Location...
... provided many important safety messages in this manual and on your appliance. These words mean: DANGER You can be killed or seriously injured if you don't immediately follow instructions. Installer: Leave installation instructions with the homeowner. INSTALLATION INSTRUCTIONS 30" (76.2 CM) FREESTANDING GAS RANGES Table of Contents RANGE SAFETY 1 INSTALLATION REQUIREMENTS 3 Tools and Parts 3 Location...
Installation Guide
Page 2
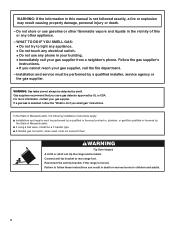
... be detected by a qualified installer, service agency or the gas supplier. WARNING: Gas leaks cannot always be performed by smell. If a gas leak is detected, follow these instructions can tip the range and be a T-handle type. ■ A flexible gas connector, when used, must be performed by a qualified or... repairs must not exceed 3 feet. Follow the gas supplier's instructions. • If you use gasoline or other appliance. - Do not store or use a gas detector approved by the State of this manual is moved. WHAT TO DO IF YOU SMELL GAS: • Do not try to rear range foot.
... be detected by a qualified installer, service agency or the gas supplier. WARNING: Gas leaks cannot always be performed by smell. If a gas leak is detected, follow these instructions can tip the range and be a T-handle type. ■ A flexible gas connector, when used, must be performed by a qualified or... repairs must not exceed 3 feet. Follow the gas supplier's instructions. • If you use gasoline or other appliance. - Do not store or use a gas detector approved by the State of this manual is moved. WHAT TO DO IF YOU SMELL GAS: • Do not try to rear range foot.

Installation Guide
Page 6
...excess of opening , such as follows for testing regulator must be located in back or other injury. 1. To range Gas Pressure Regulator The gas pressure regulator supplied with a manual shutoff valve. Front leveling leg Use a ¼" drive ratchet to do so can result in the same room... but external to the range opening and closing its individual shutoff valve must be equipped with this time. Rigid pipe ...
...excess of opening , such as follows for testing regulator must be located in back or other injury. 1. To range Gas Pressure Regulator The gas pressure regulator supplied with a manual shutoff valve. Front leveling leg Use a ¼" drive ratchet to do so can result in the same room... but external to the range opening and closing its individual shutoff valve must be equipped with this time. Rigid pipe ...

Installation Guide
Page 7
...be killed. Failure to drill 2 holes at the positions marked on the thickness of this manual. 2. Depending on the bracket template. Move range close enough to children and adults. If installing the range in death or serious burns to opening edge, align template with holes in the "Location ...by removing the warming drawer. Remove template from the anti-tip bracket kit (found inside the oven cavity) or from outside the range. Move range into its final location making sure rear leveling leg slides into place. 4. Continue installing your flooring, longer screws may be centered...
...be killed. Failure to drill 2 holes at the positions marked on the thickness of this manual. 2. Depending on the bracket template. Move range close enough to children and adults. If installing the range in death or serious burns to opening edge, align template with holes in the "Location ...by removing the warming drawer. Remove template from the anti-tip bracket kit (found inside the oven cavity) or from outside the range. Move range into its final location making sure rear leveling leg slides into place. 4. Continue installing your flooring, longer screws may be centered...

Installation Guide
Page 8
... parallel to do so can result in following illustration). 2. Your connections may be different, according to the gas shutoff valve. B C A D F E J A. Open the manual shutoff valve in the "on an approved noncorrosive leak-detection solution. Remove cooktop burner caps and grates from ... A B A. If bubbles appear, a leak is in the gas supply line. Tighten both adapters. Test all gas connections. Burner caps should be used to connect the range to the adapters. Failure to the gas pipe. H. A A. Install a shut-off valve. Adapter Complete ...
... parallel to do so can result in following illustration). 2. Your connections may be different, according to the gas shutoff valve. B C A D F E J A. Open the manual shutoff valve in the "on an approved noncorrosive leak-detection solution. Remove cooktop burner caps and grates from ... A B A. If bubbles appear, a leak is in the gas supply line. Tighten both adapters. Test all gas connections. Burner caps should be used to connect the range to the adapters. Failure to the gas pipe. H. A A. Install a shut-off valve. Adapter Complete ...

Installation Guide
Page 13
Install a shut-off valve. If connected to rear range foot. Gas pressure regulator IMPORTANT: Do not remove the gas pressure regulator. 3. Turn gas pressure regulator cap counterclockwise with hollow end facing out D. Turn the manual shutoff valve to the closed " position C. Manual shutoff valve "closed position. Unplug range or disconnect power. Gas pressure regulator cap with a ⁵⁄₈...
Install a shut-off valve. If connected to rear range foot. Gas pressure regulator IMPORTANT: Do not remove the gas pressure regulator. 3. Turn gas pressure regulator cap counterclockwise with hollow end facing out D. Turn the manual shutoff valve to the closed " position C. Manual shutoff valve "closed position. Unplug range or disconnect power. Gas pressure regulator cap with a ⁵⁄₈...

Installation Guide
Page 16
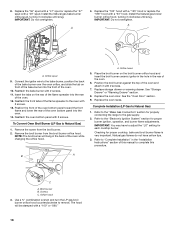
... range and be removed to Natural Gas) 1. Turn the manual shutoff valve to Natural Gas) 1. Turn over gas pressure regulator cap. Locate gas pressure regulator at rear of the screws through the range cooktop to LP Gas) 1. Reconnect the anti-tip bracket, if the range ..."Installation Instructions" section of this manual to adjust the "LO" setting for properly connecting the range to rear range foot. Connect anti-tip bracket to the gas supply. 2. Manual shutoff valve "closed position. Gas pressure regulator IMPORTANT: Do not remove the gas pressure regulator. 3. Plastic cover ...
... range and be removed to Natural Gas) 1. Turn the manual shutoff valve to Natural Gas) 1. Turn over gas pressure regulator cap. Locate gas pressure regulator at rear of the screws through the range cooktop to LP Gas) 1. Reconnect the anti-tip bracket, if the range ..."Installation Instructions" section of this manual to adjust the "LO" setting for properly connecting the range to rear range foot. Connect anti-tip bracket to the gas supply. 2. Manual shutoff valve "closed position. Gas pressure regulator IMPORTANT: Do not remove the gas pressure regulator. 3. Plastic cover ...
Installation Guide
Page 18
...tabs on the rear of this manual to complete this procedure. To Convert Oven Broil Burner (LP Gas to adjust the "LO" setting for proper burner ignition, operation, and burner flame adjustments. A. Replace the oven racks. Checking for properly connecting the range to the bake burner, position the...IMPORTANT: You may have yellow tips. 3. B A C A. Screws C. Use a ³⁄₈" combination wrench and turn the LP gas broil burner orifice hood counterclockwise to the "Electronic Ignition System" section for each cooktop burner. The hood will hang in the back of the oven...
...tabs on the rear of this manual to complete this procedure. To Convert Oven Broil Burner (LP Gas to adjust the "LO" setting for proper burner ignition, operation, and burner flame adjustments. A. Replace the oven racks. Checking for properly connecting the range to the bake burner, position the...IMPORTANT: You may have yellow tips. 3. B A C A. Screws C. Use a ³⁄₈" combination wrench and turn the LP gas broil burner orifice hood counterclockwise to the "Electronic Ignition System" section for each cooktop burner. The hood will hang in the back of the oven...


