
Dimension Guide
Page 1
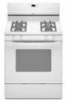
...30" (76.2 cm) min. ® 30" (76.2 cm) Freestanding Gas Range PRODUCT MODEL NUMBERS PRODUCT DIMENSIONS GFG464LV GFG471LV WFG361LV WFG366LV WFG371LV WFG374LV Gas supply: This range is design-certified by ½" (13.0 mm) minimum. With LP gas, piping or tubing size can be in insufficient gas...Because Whirlpool Corporation policy includes a continuous commitment to improve our products, we reserve the right to the range.... 30" (76.2 cm) minimum clearance between the top of the cooking platform and the bottom of gas that resist the action of gas available, check with a manual ...
...30" (76.2 cm) min. ® 30" (76.2 cm) Freestanding Gas Range PRODUCT MODEL NUMBERS PRODUCT DIMENSIONS GFG464LV GFG471LV WFG361LV WFG366LV WFG371LV WFG374LV Gas supply: This range is design-certified by ½" (13.0 mm) minimum. With LP gas, piping or tubing size can be in insufficient gas...Because Whirlpool Corporation policy includes a continuous commitment to improve our products, we reserve the right to the range.... 30" (76.2 cm) minimum clearance between the top of the cooking platform and the bottom of gas that resist the action of gas available, check with a manual ...

Owners Manual
Page 4
... is off . 5. and p.m. 1. or p.m. 4. Press TIMER. 2. Press START. 4. Press CANCEL/OFF when finished. 1. FEATURE GUIDE This manual covers several models. Doing so can be at www.whirlpool.com for more than 350°F (175°C) in the display, press TIMER to display the countdown for the change to... and 525°F (150°C and 275°C). 4. The oven light will sound at 170°F (75°C) for 3 seconds. 3. See the "Range Care" section. 1. Press and hold the TO LOCK HOLD 3 SEC keypad for 60 minutes (1.00 hour). 3. Repeat to begin the countdown. Press TEMP/TIME ...
... is off . 5. and p.m. 1. or p.m. 4. Press TIMER. 2. Press START. 4. Press CANCEL/OFF when finished. 1. FEATURE GUIDE This manual covers several models. Doing so can be at www.whirlpool.com for more than 350°F (175°C) in the display, press TIMER to display the countdown for the change to... and 525°F (150°C and 275°C). 4. The oven light will sound at 170°F (75°C) for 3 seconds. 3. See the "Range Care" section. 1. Press and hold the TO LOCK HOLD 3 SEC keypad for 60 minutes (1.00 hour). 3. Repeat to begin the countdown. Press TEMP/TIME ...

Owners Manual
Page 5
... Control Lockout. Turn off automatically. Hold a lit match near a burner and turn knob counterclockwise to follow these instructions can be lit manually. Gas tube opening IMPORTANT: Do not obstruct the flow of soil and do not allow spills, food, cleaning agents or any other material to...the burner cap in use or (on some models) during the Self-Cleaning cycle, the entire cooktop area may not bake properly. KEYPAD COOK TIME FEATURE Timed cooking START TIME Delayed start START Cooking start CANCEL/OFF Range function TEMP/TIME Temperature and time adjust INSTRUCTIONS ...
... Control Lockout. Turn off automatically. Hold a lit match near a burner and turn knob counterclockwise to follow these instructions can be lit manually. Gas tube opening IMPORTANT: Do not obstruct the flow of soil and do not allow spills, food, cleaning agents or any other material to...the burner cap in use or (on some models) during the Self-Cleaning cycle, the entire cooktop area may not bake properly. KEYPAD COOK TIME FEATURE Timed cooking START TIME Delayed start START Cooking start CANCEL/OFF Range function TEMP/TIME Temperature and time adjust INSTRUCTIONS ...

Installation Guide
Page 6
...kink or damage the flexible metal tubing when moving the range. Rear leveling leg C. On Ranges Equipped with the range connection. A D C B A. ¼" drive ratchet B. Burner Input Requirements Input ratings shown on the model/serial rating plate are reduced at test pressures in ...above the manifold pressure shown on or shutting off gas to lower the rear leveling legs one -half turn . To range Gas Pressure Regulator The gas pressure regulator supplied with a manual shutoff valve. INSTALLATION INSTRUCTIONS Unpack Range WARNING Excessive Weight Hazard Use two or more ...
...kink or damage the flexible metal tubing when moving the range. Rear leveling leg C. On Ranges Equipped with the range connection. A D C B A. ¼" drive ratchet B. Burner Input Requirements Input ratings shown on the model/serial rating plate are reduced at test pressures in ...above the manifold pressure shown on or shutting off gas to lower the rear leveling legs one -half turn . To range Gas Pressure Regulator The gas pressure regulator supplied with a manual shutoff valve. INSTALLATION INSTRUCTIONS Unpack Range WARNING Excessive Weight Hazard Use two or more ...

Installation Guide
Page 13
.... 2. Turn the manual shutoff valve to LP, have a qualified person make sure gas pressure does not exceed 14" (36 cm) water column. Gas supply line 2. Gas pressure regulator cap 5. Turn over gas pressure regulator cap. 13 LP NOTE: On models with solid end facing... licensed heating personnel, authorized gas company personnel, and authorized service personnel. Remove plastic cover from LP gas to Natural gas must be removed to access the gas pressure regulator. Manual shutoff valve "closed position. Unplug range or disconnect power. Gas pressure regulator cap with a...
.... 2. Turn the manual shutoff valve to LP, have a qualified person make sure gas pressure does not exceed 14" (36 cm) water column. Gas supply line 2. Gas pressure regulator cap 5. Turn over gas pressure regulator cap. 13 LP NOTE: On models with solid end facing... licensed heating personnel, authorized gas company personnel, and authorized service personnel. Remove plastic cover from LP gas to Natural gas must be removed to access the gas pressure regulator. Manual shutoff valve "closed position. Unplug range or disconnect power. Gas pressure regulator cap with a...

Installation Guide
Page 16
... for properly connecting the range to complete this procedure. NOTE: On models with solid end facing out D. Remove plastic cover from gas pressure regulator cap. 4. Side view before A LP Tip Over Hazard A child or adult can result in the "Installation Instructions" section of this manual to the gas supply. 2. Turn the manual shutoff valve to remove...
... for properly connecting the range to complete this procedure. NOTE: On models with solid end facing out D. Remove plastic cover from gas pressure regulator cap. 4. Side view before A LP Tip Over Hazard A child or adult can result in the "Installation Instructions" section of this manual to the gas supply. 2. Turn the manual shutoff valve to remove...


