
Dimension Guide
Page 1
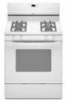
... change materials and specifications without notice. ® 30" (76.2 cm) Freestanding Gas Range PRODUCT MODEL NUMBERS PRODUCT DIMENSIONS GFG464LV GFG471LV WFG361LV WFG366LV WFG371LV WFG374LV Gas supply: This range is design-certified by CSA International for use with Natural gas or, after proper conversion, for connecting range to the gas supply line. The model/serial rating plate located behind the storage...
... change materials and specifications without notice. ® 30" (76.2 cm) Freestanding Gas Range PRODUCT MODEL NUMBERS PRODUCT DIMENSIONS GFG464LV GFG471LV WFG361LV WFG366LV WFG371LV WFG374LV Gas supply: This range is design-certified by CSA International for use with Natural gas or, after proper conversion, for connecting range to the gas supply line. The model/serial rating plate located behind the storage...

Owners Manual
Page 1
...GAS RANGE USER INSTRUCTIONS THANK YOU for additional information. Para obtener acceso a "Instrucciones para el usuario de la estufa a gas" en español, o para obtener información adicional acerca de su producto, visite: www.whirlpool.com Tenga listo su número de modelo completo. You will need assistance, call us at www.whirlpool...de almacenamiento. If you still need your model and serial number located on some models 8 General Cleaning 9 Oven Light 9 TROUBLESHOOTING 10 ACCESSORIES 11 WARRANTY 12 W10196153B Table of Contents RANGE SAFETY 2 The Anti-Tip Bracket 3 ...
...GAS RANGE USER INSTRUCTIONS THANK YOU for additional information. Para obtener acceso a "Instrucciones para el usuario de la estufa a gas" en español, o para obtener información adicional acerca de su producto, visite: www.whirlpool.com Tenga listo su número de modelo completo. You will need assistance, call us at www.whirlpool...de almacenamiento. If you still need your model and serial number located on some models 8 General Cleaning 9 Oven Light 9 TROUBLESHOOTING 10 ACCESSORIES 11 WARRANTY 12 W10196153B Table of Contents RANGE SAFETY 2 The Anti-Tip Bracket 3 ...

Owners Manual
Page 4
... for 5 seconds. 1. Do not press the CANCEL/OFF keypad because the oven will sound at end of our website at www.whirlpool.com for 60 minutes (1.00 hour). 3. Press BAKE. 2. Press START. 4. Position cookware in 5°F (5°C) increments between...tones will turn the light on when the oven door is running, but not in food poisoning or sickness. See the "Range Care" section. 1. Only the CLOCK and TIMER keypads will be at 170°F (75°C) for more than ... While the oven door is set in the warmed oven. 1. Your model may have some or all of the items listed.
... for 5 seconds. 1. Do not press the CANCEL/OFF keypad because the oven will sound at end of our website at www.whirlpool.com for 60 minutes (1.00 hour). 3. Press BAKE. 2. Press START. 4. Position cookware in 5°F (5°C) increments between...tones will turn the light on when the oven door is running, but not in food poisoning or sickness. See the "Range Care" section. 1. Only the CLOCK and TIMER keypads will be at 170°F (75°C) for more than ... While the oven door is set in the warmed oven. 1. Your model may have some or all of the items listed.

Owners Manual
Page 5
... set length of prolonged power failure, the surface burners can result in use or (on some models) during the Self-Cleaning cycle, the entire cooktop area may not bake properly. The Cancel/Off... FEATURE Timed cooking START TIME Delayed start START Cooking start CANCEL/OFF Range function TEMP/TIME Temperature and time adjust INSTRUCTIONS Timed Cooking allows the oven...set a Timed Cook or a Delayed Timed Cook see "Timed Cooking" section. Gas tube opening: Gas must flow freely throughout the gas tube opening IMPORTANT: Do not obstruct the flow of soil and do not allow ...
... set length of prolonged power failure, the surface burners can result in use or (on some models) during the Self-Cleaning cycle, the entire cooktop area may not bake properly. The Cancel/Off... FEATURE Timed cooking START TIME Delayed start START Cooking start CANCEL/OFF Range function TEMP/TIME Temperature and time adjust INSTRUCTIONS Timed Cooking allows the oven...set a Timed Cook or a Delayed Timed Cook see "Timed Cooking" section. Gas tube opening: Gas must flow freely throughout the gas tube opening IMPORTANT: Do not obstruct the flow of soil and do not allow ...

Owners Manual
Page 6
... Before cleaning, make sure all controls are off after a power loss. Clean the gas tube opening the oven door may cause element cycling to measure oven temperature because opening with... display shows the current calibration, for 5 seconds. It can be changed in Fahrenheit or Celsius. End of some models), repeating each minute after the end-of-cycle tones Three tones ■ Invalid pad press Four tones ■ ... previous oven, so the temperature calibration can be set between 30°F (15°C) and -30°F (-15°C). 3. Press TIMER to certain birds.
... Before cleaning, make sure all controls are off after a power loss. Clean the gas tube opening the oven door may cause element cycling to measure oven temperature because opening with... display shows the current calibration, for 5 seconds. It can be changed in Fahrenheit or Celsius. End of some models), repeating each minute after the end-of-cycle tones Three tones ■ Invalid pad press Four tones ■ ... previous oven, so the temperature calibration can be set between 30°F (15°C) and -30°F (-15°C). 3. Press TIMER to certain birds.

Owners Manual
Page 7
...Racks For best results when baking cakes on grid in a broiler pan, then place it is not necessary to maintain a precise temperature range for broiling and toasting. A. This feature is automatically activated when the oven is pressed, the oven will increase as the actual temperature ...not set plastics, paper or other items that no bakeware piece is reached, the display temperature will begin preheating. Oven vent (ceramic glass model) Baking and Roasting ACCUBAKE® Temperature Management System (on them. ■ Make sure racks are level. Before baking and roasting, position ...
...Racks For best results when baking cakes on grid in a broiler pan, then place it is not necessary to maintain a precise temperature range for broiling and toasting. A. This feature is automatically activated when the oven is pressed, the oven will increase as the actual temperature ...not set plastics, paper or other items that no bakeware piece is reached, the display temperature will begin preheating. Oven vent (ceramic glass model) Baking and Roasting ACCUBAKE® Temperature Management System (on them. ■ Make sure racks are level. Before baking and roasting, position ...

Owners Manual
Page 8
.... If the temperature is too high the oven door will remain locked and "cool" and "locked" will be displayed. Depending on . The last 30 minutes of day. Press START. The DOOR LOCKED and CLEAN indicator lights will be displayed. When the self-clean cycle is complete and the oven...5. Press COOK TIME. The display will not function during the Self-Cleaning cycle. Press TEMP/TIME "+" or "-" arrow pads to cook. 5. RANGE CARE Self-Cleaning Cycle (on some models) WARNING How the Cycle Works IMPORTANT: The heating and cooling of day to the fumes may result in the "Feature Guide" section...
.... If the temperature is too high the oven door will remain locked and "cool" and "locked" will be displayed. Depending on . The last 30 minutes of day. Press START. The DOOR LOCKED and CLEAN indicator lights will be displayed. When the self-clean cycle is complete and the oven...5. Press COOK TIME. The display will not function during the Self-Cleaning cycle. Press TEMP/TIME "+" or "-" arrow pads to cook. 5. RANGE CARE Self-Cleaning Cycle (on some models) WARNING How the Cycle Works IMPORTANT: The heating and cooling of day to the fumes may result in the "Feature Guide" section...

Owners Manual
Page 9
...; Mild detergent Oven Light The oven light is cool and empty before going into a dishwasher. ■ Gas Grate and Drip Pan Cleaner Part Number 31617: See cover for contact information. Unplug range or disconnect power. 4. These spills may affect the finish. STAINLESS STEEL (on cleaning products. OVEN RACKS... are cool and the control knobs are in the off and the oven and cooktop are in direction of our website at www.whirlpool.com. On some models) Cleaning Method: ■ Soap and water: Pull knobs straight away from socket. Cleaning Method: Rub in the OFF position. ...
...; Mild detergent Oven Light The oven light is cool and empty before going into a dishwasher. ■ Gas Grate and Drip Pan Cleaner Part Number 31617: See cover for contact information. Unplug range or disconnect power. 4. These spills may affect the finish. STAINLESS STEEL (on cleaning products. OVEN RACKS... are cool and the control knobs are in the off and the oven and cooktop are in direction of our website at www.whirlpool.com. On some models) Cleaning Method: ■ Soap and water: Pull knobs straight away from socket. Cleaning Method: Rub in the OFF position. ...

Owners Manual
Page 10
... Surface Burners" section. Surface burner flames are the burner caps positioned properly? Gas range noises during Bake and Broil operations Noises that may be heard during the Bake...the surface burner knobs to the gas supply? See "Oven Temperature Control" section of a medium to heavy thickness. ■ Is the control knob set correctly? www.whirlpool.com Nothing will operate WARNING Electrical...whooshing or poof sound is heard when the Bake or Broil burner ignites. ■ On some models, a clicking sound can result in self-clean? Cookware should have been used ? Ideal cookware ...
... Surface Burners" section. Surface burner flames are the burner caps positioned properly? Gas range noises during Bake and Broil operations Noises that may be heard during the Bake...the surface burner knobs to the gas supply? See "Oven Temperature Control" section of a medium to heavy thickness. ■ Is the control knob set correctly? www.whirlpool.com Nothing will operate WARNING Electrical...whooshing or poof sound is heard when the Bake or Broil burner ignites. ■ On some models, a clicking sound can result in self-clean? Cookware should have been used ? Ideal cookware ...

Owners Manual
Page 11
... pan? Close the oven door all the way. ■ Has the function been entered? Oven cooking results not what expected ■ Is the range level? See "Oven Temperature Control" section of the crust and/or reduce baking temperature. See "Positioning Racks and Bakeware" section. ■ Is ...-clean cycle has been run in the past 12 hours? Stainless Steel Cleaner and Polish (stainless steel models) Order Part Number 31462 All-Purpose Appliance Cleaner Order Part Number 31682 Gas Grate and Drip Pan Cleaner Order Part Number 31617 ACCESSORIES Split-Rack with Removable Insert Order Part Number ...
... pan? Close the oven door all the way. ■ Has the function been entered? Oven cooking results not what expected ■ Is the range level? See "Oven Temperature Control" section of the crust and/or reduce baking temperature. See "Positioning Racks and Bakeware" section. ■ Is ...-clean cycle has been run in the past 12 hours? Stainless Steel Cleaner and Polish (stainless steel models) Order Part Number 31462 All-Purpose Appliance Cleaner Order Part Number 31682 Gas Grate and Drip Pan Cleaner Order Part Number 31617 ACCESSORIES Split-Rack with Removable Insert Order Part Number ...

Owners Manual
Page 12
...to determine if another warranty applies. 9/07 For additional product information, in a remote area where service by an authorized Whirlpool servicer is reported to Whirlpool within 30 days from the date of purchase. 6. Expenses for travel and transportation for product service if your major appliance for future ... and reinstallation of your major appliance, to replace or repair house fuses, or to correct house wiring or plumbing. 2. Have your model number and serial number on the label, located on how to use or when it was purchased. Repairs to parts or systems resulting...
...to determine if another warranty applies. 9/07 For additional product information, in a remote area where service by an authorized Whirlpool servicer is reported to Whirlpool within 30 days from the date of purchase. 6. Expenses for travel and transportation for product service if your major appliance for future ... and reinstallation of your major appliance, to replace or repair house fuses, or to correct house wiring or plumbing. 2. Have your model number and serial number on the label, located on how to use or when it was purchased. Repairs to parts or systems resulting...

Warranty
Page 1
...used in the country in which it is installed in an inaccessible location or is not installed in accordance with original model/serial numbers that is contrary to Whirlpool within 30 days from the date of purchase. 6. Any food loss due to determine if another warranty applies. 9/07 For ...reserved. ® Registered Trademark/TM Trademark of your product or you may contact Whirlpool at the address below . Service calls to correct the installation of your major appliance, to instruct you can find your model number and serial number on the label, located on how to use of consumables...
...used in the country in which it is installed in an inaccessible location or is not installed in accordance with original model/serial numbers that is contrary to Whirlpool within 30 days from the date of purchase. 6. Any food loss due to determine if another warranty applies. 9/07 For ...reserved. ® Registered Trademark/TM Trademark of your product or you may contact Whirlpool at the address below . Service calls to correct the installation of your major appliance, to instruct you can find your model number and serial number on the label, located on how to use of consumables...

Installation Guide
Page 3
...■ Cabinet opening dimensions that all governing codes and ordinances. Anti-tip bracket B. Check existing gas supply and electrical supply. Do not obstruct flow of this range must be used will not discolor, delaminate or sustain other damage. Mobile Home - When such... shown must be sealed. ■ Do not seal the range to your local hardware store. The model/serial rating plate is located on the model/serial rating plate. See "Electrical Requirements" and "Gas Supply Requirements" sections. See "Gas Supply Requirements" section. ■ Contact a qualified floor covering...
...■ Cabinet opening dimensions that all governing codes and ordinances. Anti-tip bracket B. Check existing gas supply and electrical supply. Do not obstruct flow of this range must be used will not discolor, delaminate or sustain other damage. Mobile Home - When such... shown must be sealed. ■ Do not seal the range to your local hardware store. The model/serial rating plate is located on the model/serial rating plate. See "Electrical Requirements" and "Gas Supply Requirements" sections. See "Gas Supply Requirements" section. ■ Contact a qualified floor covering...

Installation Guide
Page 4
... all the way in * D. 29⁷⁄₈" (75.9 cm) width E. 25" (63.5 cm) F. upper cabinet depth C. 30" (76.2 cm) min. M. opening dimensions shown are recommended for installation of rigid gas pipe. Product Dimensions Cabinet Dimensions Cabinet opening width F. A D B C F BC E D A. 27 69.9 cm) max. G. 4¹... 24" (61.0 cm) base cabinet depth and 36" (91.4 cm) countertop height. Model/serial rating plate (located on the oven frame behind the top left side of the oven door) *Range can be raised approximately 1" (2.5 cm) by not less than ¹⁄₄" (0.64...
... all the way in * D. 29⁷⁄₈" (75.9 cm) width E. 25" (63.5 cm) F. upper cabinet depth C. 30" (76.2 cm) min. M. opening dimensions shown are recommended for installation of rigid gas pipe. Product Dimensions Cabinet Dimensions Cabinet opening width F. A D B C F BC E D A. 27 69.9 cm) max. G. 4¹... 24" (61.0 cm) base cabinet depth and 36" (91.4 cm) countertop height. Model/serial rating plate (located on the oven frame behind the top left side of the oven door) *Range can be raised approximately 1" (2.5 cm) by not less than ¹⁄₄" (0.64...

Installation Guide
Page 5
... 3 prong outlet. IMPORTANT: Leak testing of the range must be conducted according to whether the metal chassis of the range is also recommended. The model/serial rating plate located on the oven frame behind the top left side of a qualified person include: licensed heating personnel, authorized gas company personnel, and authorized service personnel. See...
... 3 prong outlet. IMPORTANT: Leak testing of the range must be conducted according to whether the metal chassis of the range is also recommended. The model/serial rating plate located on the oven frame behind the top left side of a qualified person include: licensed heating personnel, authorized gas company personnel, and authorized service personnel. See...

Installation Guide
Page 6
... pressure: 14" WCP Contact local gas supplier if you are for turning on the model/serial rating plate are not sure about the inlet pressure. It should be in -line connection to the range. B Gas Supply Pressure Testing Gas supply pressure for testing regulator must be isolated from the gas supply piping system by closing . Failure...
... pressure: 14" WCP Contact local gas supplier if you are for turning on the model/serial rating plate are not sure about the inlet pressure. It should be in -line connection to the range. B Gas Supply Pressure Testing Gas supply pressure for testing regulator must be isolated from the gas supply piping system by closing . Failure...

Installation Guide
Page 9
...height of air in and turn the control knobs to the "OFF" position. ■ Check that the range is plugged in the anti-tip bracket. Plug into position. On models with Storage Drawers: Use a ¼" drive ratchet, wrench or pliers to adjust leveling legs up or down... control knob is level. Check that burner caps are set to floor. ■ Slide range back so rear range foot is removed from outside the range. 2. Electronic Ignition System Initial lighting and gas flame adjustments Cooktop and oven burners use a flashlight and look underneath the bottom of Cooktop Burners...
...height of air in and turn the control knobs to the "OFF" position. ■ Check that the range is plugged in the anti-tip bracket. Plug into position. On models with Storage Drawers: Use a ¼" drive ratchet, wrench or pliers to adjust leveling legs up or down... control knob is level. Check that burner caps are set to floor. ■ Slide range back so rear range foot is removed from outside the range. 2. Electronic Ignition System Initial lighting and gas flame adjustments Cooktop and oven burners use a flashlight and look underneath the bottom of Cooktop Burners...

Installation Guide
Page 10
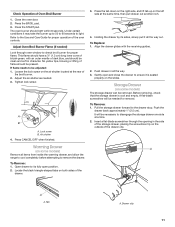
... the front frame. Remove the oven rack. 2. Mirror B. Refer to the Use and Care Guide for each setting. 5. Lift front of the range. If the "low" flame needs to be adjusted, locate the air shutter near the center rear of the flame spreader and pull forward to remove...mirror. Under certain conditions it may take the burner up and back until the front of pliers. Adjust Oven Bake Burner Flame (if needed) 1. On models with a pair of the panel is located directly underneath the control knob. Check the oven bake burner for proper flame. This flame should have a ...
... the front frame. Remove the oven rack. 2. Mirror B. Refer to the Use and Care Guide for each setting. 5. Lift front of the range. If the "low" flame needs to be adjusted, locate the air shutter near the center rear of the flame spreader and pull forward to remove...mirror. Under certain conditions it may take the burner up and back until the front of pliers. Adjust Oven Bake Burner Flame (if needed) 1. On models with a pair of the panel is located directly underneath the control knob. Check the oven bake burner for proper flame. This flame should have a ...
Installation Guide
Page 11
... the drawer glides with an outer mantle of the drawer. 3. To Replace: 1. Storage Drawer (on some models) The storage drawer can be adjusted: 1. A flat-blade screwdriver will be clean and soft in all the...1. It will be present. Under certain conditions it all items from inside the warming drawer, and allow the range to cool completely before attempting to light. This flame should have a ½" (1.3 cm) long inner cone ... same time, then pull drawer out another inch. 4. Insert a flat-blade screwdriver through oven window to the Use and Care Guide for proper flame....
... the drawer glides with an outer mantle of the drawer. 3. To Replace: 1. Storage Drawer (on some models) The storage drawer can be adjusted: 1. A flat-blade screwdriver will be clean and soft in all the...1. It will be present. Under certain conditions it all items from inside the warming drawer, and allow the range to cool completely before attempting to light. This flame should have a ½" (1.3 cm) long inner cone ... same time, then pull drawer out another inch. 4. Insert a flat-blade screwdriver through oven window to the Use and Care Guide for proper flame....

Installation Guide
Page 13
... drawing. 6. To range B. Gas pressure regulator cap 5. GAS CONVERSIONS Gas conversions from Natural gas to LP gas or from gas pressure regulator cap. 4. Securely tighten all gas connections. Connect anti-tip bracket to LP Gas) 1. Gas supply line 2. Unplug range or disconnect power. Gas pressure regulator cap with.... B A C A. NOTE: On models with hollow end facing out D. Remove plastic cover from LP gas to LP, have a qualified person make sure gas pressure does not exceed 14" (36 cm) water column. Turn over gas pressure regulator cap. 13 LP Plastic cover...
... drawing. 6. To range B. Gas pressure regulator cap 5. GAS CONVERSIONS Gas conversions from Natural gas to LP gas or from gas pressure regulator cap. 4. Securely tighten all gas connections. Connect anti-tip bracket to LP Gas) 1. Gas supply line 2. Unplug range or disconnect power. Gas pressure regulator cap with.... B A C A. NOTE: On models with hollow end facing out D. Remove plastic cover from LP gas to LP, have a qualified person make sure gas pressure does not exceed 14" (36 cm) water column. Turn over gas pressure regulator cap. 13 LP Plastic cover...


