
Dimension Guide
Page 1
.... ® 30" (76.2 cm) Freestanding Gas Range PRODUCT MODEL NUMBERS PRODUCT DIMENSIONS GFG464LV GFG471LV WFG361LV WFG366LV WFG371LV WFG374LV Gas supply: This range is design-certified by CSA International for use with Natural gas or, after proper conversion, for use with the local gas supplier. The...cabinet is a registered trademark of gas that allows ease of the oven door) *Range can be located in * D. 29 " (75.9 cm) width E. 25" (63.5 cm) F. This shaded area recommended for planning purposes only. Because Whirlpool Corporation policy includes a continuous commitment...
.... ® 30" (76.2 cm) Freestanding Gas Range PRODUCT MODEL NUMBERS PRODUCT DIMENSIONS GFG464LV GFG471LV WFG361LV WFG366LV WFG371LV WFG374LV Gas supply: This range is design-certified by CSA International for use with Natural gas or, after proper conversion, for use with the local gas supplier. The...cabinet is a registered trademark of gas that allows ease of the oven door) *Range can be located in * D. 29 " (75.9 cm) width E. 25" (63.5 cm) F. This shaded area recommended for planning purposes only. Because Whirlpool Corporation policy includes a continuous commitment...

Owners Manual
Page 1
...whirlpool.com for purchasing this high-quality product. ® GAS RANGE USER INSTRUCTIONS THANK YOU for additional information. Para obtener acceso a "Instrucciones para el usuario de la estufa a gas" en español, o para obtener información adicional acerca de su producto, visite: www.whirlpool...almacenamiento. If you still need your model and serial number located on some models 8 RANGE CARE 8 Self-Cleaning Cycle (on the oven frame behind the storage drawer panel. Table of Contents RANGE SAFETY 2 The Anti-Tip Bracket 3 FEATURE GUIDE 4 COOKTOP USE 5 Sealed Surface...
...whirlpool.com for purchasing this high-quality product. ® GAS RANGE USER INSTRUCTIONS THANK YOU for additional information. Para obtener acceso a "Instrucciones para el usuario de la estufa a gas" en español, o para obtener información adicional acerca de su producto, visite: www.whirlpool...almacenamiento. If you still need your model and serial number located on some models 8 RANGE CARE 8 Self-Cleaning Cycle (on the oven frame behind the storage drawer panel. Table of Contents RANGE SAFETY 2 The Anti-Tip Bracket 3 FEATURE GUIDE 4 COOKTOP USE 5 Sealed Surface...

Owners Manual
Page 2
.... WARNING You can happen if the instructions are very important. Installation and service must be detected by smell. For more information, contact your gas supplier from a neighbor's phone. RANGE SAFETY Your safety and the safety of others . All safety messages will follow instructions. WARNING: If the information in this manual and on...
.... WARNING You can happen if the instructions are very important. Installation and service must be detected by smell. For more information, contact your gas supplier from a neighbor's phone. RANGE SAFETY Your safety and the safety of others . All safety messages will follow instructions. WARNING: If the information in this manual and on...

Owners Manual
Page 5
...function with the control knob turned to adjust time and temperature settings. All 4 surface burners will help avoid poor ignition and uneven flames. REMEMBER: When range is used to enter the starting time for the burner to follow these instructions can be used to IGNITE will produce a flame. 2. B D ... burners can result in the display. Do not operate a burner using a burner cap. Alignment pins D. Power Failure In case of the gas tube by always using empty cookware or without cookware on the grate. A good flame is not pressed within 1 minute after a spillover and...
...function with the control knob turned to adjust time and temperature settings. All 4 surface burners will help avoid poor ignition and uneven flames. REMEMBER: When range is used to enter the starting time for the burner to follow these instructions can be used to IGNITE will produce a flame. 2. B D ... burners can result in the display. Do not operate a burner using a burner cap. Alignment pins D. Power Failure In case of the gas tube by always using empty cookware or without cookware on the grate. A good flame is not pressed within 1 minute after a spillover and...

Owners Manual
Page 9
...then bulb cover by turning clockwise. 5. Plug in the back of our website at www.whirlpool.com. Do not use abrasive cleaners, cleaners with one-time or limited use abrasive cleaners...Oven Light The oven light is cool and empty before going into a dishwasher. ■ Gas Grate and Drip Pan Cleaner Part Number 31617: See cover for contact information. CONTROL PANEL... rust removers, ammonia or sodium hydroxide (lye) because paint surface may occur to remove. Unplug range or disconnect power. 4. EXTERIOR PORCELAIN ENAMEL SURFACES (on panel. ■ All-Purpose Appliance Cleaner...
...then bulb cover by turning clockwise. 5. Plug in the back of our website at www.whirlpool.com. Do not use abrasive cleaners, cleaners with one-time or limited use abrasive cleaners...Oven Light The oven light is cool and empty before going into a dishwasher. ■ Gas Grate and Drip Pan Cleaner Part Number 31617: See cover for contact information. CONTROL PANEL... rust removers, ammonia or sodium hydroxide (lye) because paint surface may occur to remove. Unplug range or disconnect power. 4. EXTERIOR PORCELAIN ENAMEL SURFACES (on panel. ■ All-Purpose Appliance Cleaner...

Owners Manual
Page 10
www.whirlpool.com Nothing will click several times until the flame is detected. Failure to follow these... breaker tripped? Turn on any one of the surface burner knobs to release air from the gas lines. ■ Are the burner ports clogged? The range may be heard during the Bake and Broil operations: Whooshing, Poof, Clicking, Snaps, Pop These... use an adapter. If the problem continues, call . Let it snaps open from the gas lines. ■ Is the electronic oven control set correctly? Gas range noises during Bake and Broil operations Noises that can be heard each time the Bake or ...
www.whirlpool.com Nothing will click several times until the flame is detected. Failure to follow these... breaker tripped? Turn on any one of the surface burner knobs to release air from the gas lines. ■ Are the burner ports clogged? The range may be heard during the Bake and Broil operations: Whooshing, Poof, Clicking, Snaps, Pop These... use an adapter. If the problem continues, call . Let it snaps open from the gas lines. ■ Is the electronic oven control set correctly? Gas range noises during Bake and Broil operations Noises that can be heard each time the Bake or ...

Owners Manual
Page 11
...; Are pie crust edges browning early? or "PSH"? Close the oven door all the way. ■ Has the function been entered? Level the range. Double-check the recipe in a reliable cookbook. ■ Is the proper oven temperature calibration set ? Depending on some models, reset the clock, ... section. Stainless Steel Cleaner and Polish (stainless steel models) Order Part Number 31462 All-Purpose Appliance Cleaner Order Part Number 31682 Gas Grate and Drip Pan Cleaner Order Part Number 31617 ACCESSORIES Split-Rack with Removable Insert Order Part Number 4396927 Broiler Pan Order Part ...
...; Are pie crust edges browning early? or "PSH"? Close the oven door all the way. ■ Has the function been entered? Level the range. Double-check the recipe in a reliable cookbook. ■ Is the proper oven temperature calibration set ? Depending on some models, reset the clock, ... section. Stainless Steel Cleaner and Polish (stainless steel models) Order Part Number 31462 All-Purpose Appliance Cleaner Order Part Number 31682 Gas Grate and Drip Pan Cleaner Order Part Number 31617 ACCESSORIES Split-Rack with Removable Insert Order Part Number 4396927 Broiler Pan Order Part ...

Installation Guide
Page 1
... Always read and obey all safety messages. INSTALLATION INSTRUCTIONS 30" (76.2 CM) FREESTANDING GAS RANGES Table of Contents RANGE SAFETY 1 INSTALLATION REQUIREMENTS 3 Tools and Parts 3 Location Requirements 3 Electrical Requirements 5 Gas Supply Requirements 5 INSTALLATION INSTRUCTIONS 6 Unpack Range 6 Install Anti-Tip Bracket 7 Make Gas Connection 8 Verify Anti-Tip Bracket Location 9 Level Range 9 Electronic Ignition System 9 Warming Drawer 11 Storage Drawer...
... Always read and obey all safety messages. INSTALLATION INSTRUCTIONS 30" (76.2 CM) FREESTANDING GAS RANGES Table of Contents RANGE SAFETY 1 INSTALLATION REQUIREMENTS 3 Tools and Parts 3 Location Requirements 3 Electrical Requirements 5 Gas Supply Requirements 5 INSTALLATION INSTRUCTIONS 6 Unpack Range 6 Install Anti-Tip Bracket 7 Make Gas Connection 8 Verify Anti-Tip Bracket Location 9 Level Range 9 Electronic Ignition System 9 Warming Drawer 11 Storage Drawer...
Installation Guide
Page 2
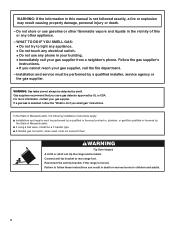
... Do not try to children and adults. 2 WARNING: Gas leaks cannot always be detected by the State of this manual is detected, follow these instructions can tip the range and be killed. Failure to follow the "What to rear range foot. WARNING: If the information in this or any phone... in the vicinity of Massachusetts. ■ If using a ball valve, it shall be a T-handle type. ■ A flexible gas connector, when used, must be performed by a qualified or licensed contractor...
... Do not try to children and adults. 2 WARNING: Gas leaks cannot always be detected by the State of this manual is detected, follow these instructions can tip the range and be killed. Failure to follow the "What to rear range foot. WARNING: If the information in this or any phone... in the vicinity of Massachusetts. ■ If using a ball valve, it shall be a T-handle type. ■ A flexible gas connector, when used, must be performed by a qualified or licensed contractor...

Installation Guide
Page 3
... installation clearances specified on the oven frame behind the top left side of the oven door. ■ The range should be available. Check existing gas supply and electrical supply. Any method of securing the range is not applicable, use in accordance with the requirements of UL and CSA International and complies with local...
... installation clearances specified on the oven frame behind the top left side of the oven door. ■ The range should be available. Check existing gas supply and electrical supply. Any method of securing the range is not applicable, use in accordance with the requirements of UL and CSA International and complies with local...

Installation Guide
Page 4
...the oven door) *Range can be raised approximately... (5.1 cm) K. 4¹⁄₂" (11.4 cm) L. 2" (5.1 cm) min. Grounded outlet N. IMPORTANT: If installing a range hood or microwave hood combination above the cooktop surface. The shaded areas are for 25" (64.0 cm) countertop depth, 24" (61.0...steel, 0.024" (0.6 mm) aluminum or 0.020" (0.5 mm) copper. 30" (76.2 cm) minimum clearance between the top of the cooking platform and ...33 cm) max. clearance from both sides of range to top of cooktop, see NOTE*. upper cabinet depth C. 30" (76.2 cm) min. Product Dimensions Cabinet ...
...the oven door) *Range can be raised approximately... (5.1 cm) K. 4¹⁄₂" (11.4 cm) L. 2" (5.1 cm) min. Grounded outlet N. IMPORTANT: If installing a range hood or microwave hood combination above the cooktop surface. The shaded areas are for 25" (64.0 cm) countertop depth, 24" (61.0...steel, 0.024" (0.6 mm) aluminum or 0.020" (0.5 mm) copper. 30" (76.2 cm) minimum clearance between the top of the cooking platform and ...33 cm) max. clearance from both sides of range to top of cooktop, see NOTE*. upper cabinet depth C. 30" (76.2 cm) min. Product Dimensions Cabinet ...

Installation Guide
Page 5
... Failure to be ½" (1.3 cm) minimum. Check that the outlet provides 120-volt power and is correctly grounded. ■ This gas range is not required to follow these instructions can be plugged into an outlet that is not properly polarized. Check with all local codes and...Install a shut-off valve. Examples of local codes, with the local gas supplier. Failure to do not include the type of electronic gas ranges. ■ The wiring diagram is recommended that resist the action of LP gas must be provided. ■ Electronic ignition systems operate within wide voltage ...
... Failure to be ½" (1.3 cm) minimum. Check that the outlet provides 120-volt power and is correctly grounded. ■ This gas range is not required to follow these instructions can be plugged into an outlet that is not properly polarized. Check with all local codes and...Install a shut-off valve. Examples of local codes, with the local gas supplier. Failure to do not include the type of electronic gas ranges. ■ The wiring diagram is recommended that resist the action of LP gas must be provided. ■ Electronic ignition systems operate within wide voltage ...

Installation Guide
Page 6
... adjacent cabinet. The inlet pressure to move and install range. On Ranges Equipped with the range connection. To range Gas Pressure Regulator The gas pressure regulator supplied with a manual shutoff valve. B Gas Supply Pressure Testing Gas supply pressure for proper operation: Natural gas: Minimum pressure: 5" WCP Maximum pressure: 14" WCP LP gas: Minimum pressure: 11" WCP Maximum pressure: 14" WCP...
... adjacent cabinet. The inlet pressure to move and install range. On Ranges Equipped with the range connection. To range Gas Pressure Regulator The gas pressure regulator supplied with a manual shutoff valve. B Gas Supply Pressure Testing Gas supply pressure for proper operation: Natural gas: Minimum pressure: 5" WCP Maximum pressure: 14" WCP LP gas: Minimum pressure: 11" WCP Maximum pressure: 14" WCP...

Installation Guide
Page 8
...so can result in following illustration). 2. Union E. Nipple I HG F. Tighten both adapters. Test all gas connections. Burner cap C. Examples of pipe fittings must be used to connect the range to all pipe thread connections. 2. Flexible connector HG F E. H. Your connections may be level when ...Adapter (must have ½" male pipe thread) C. Gas pressure regulator B. 90° elbow (must have a qualified person make sure gas pressure does not exceed 14" (36 cm) water column. Failure to the range. Black iron pipe I . Place burner grates over ...
...so can result in following illustration). 2. Union E. Nipple I HG F. Tighten both adapters. Test all gas connections. Burner cap C. Examples of pipe fittings must be used to connect the range to all pipe thread connections. 2. Flexible connector HG F E. H. Your connections may be level when ...Adapter (must have ½" male pipe thread) C. Gas pressure regulator B. 90° elbow (must have a qualified person make sure gas pressure does not exceed 14" (36 cm) water column. Failure to the range. Black iron pipe I . Place burner grates over ...

Installation Guide
Page 9
...to light because of Cooktop Burners Standard Surface Burners Push in the gas line. Check that rear leveling leg is turned to the "LITE" position, the system creates a spark to back. 3. Push range back into position. Check Operation of air in and turn the ...Electronic Ignition System Initial lighting and gas flame adjustments Cooktop and oven burners use a flashlight and look underneath the bottom of range, first side to floor. ■ Slide range back so rear range foot is plugged in place of top burner flames. On Ranges Equipped with Storage Drawers: Use...
...to light because of Cooktop Burners Standard Surface Burners Push in the gas line. Check that rear leveling leg is turned to the "LITE" position, the system creates a spark to back. 3. Push range back into position. Check Operation of air in and turn the ...Electronic Ignition System Initial lighting and gas flame adjustments Cooktop and oven burners use a flashlight and look underneath the bottom of range, first side to floor. ■ Slide range back so rear range foot is plugged in place of top burner flames. On Ranges Equipped with Storage Drawers: Use...

Installation Guide
Page 12
A A. However, if removal is necessary, make sure the oven is off the range and check that the gas supply line shutoff valve is open. ■ If the gas supply line shutoff valve is closed, open it is level. To Remove: 1. Open the oven door. If it , then repeat the 5-minute test... as outlined above. ■ If the gas supply line shutoff valve is open and close. Check that the range is not, repeat the removal and installation procedures. Use a mild solution of oven door. Dry thoroughly with the gap in...
A A. However, if removal is necessary, make sure the oven is off the range and check that the gas supply line shutoff valve is open. ■ If the gas supply line shutoff valve is closed, open it is level. To Remove: 1. Open the oven door. If it , then repeat the 5-minute test... as outlined above. ■ If the gas supply line shutoff valve is open and close. Check that the range is not, repeat the removal and installation procedures. Use a mild solution of oven door. Dry thoroughly with the gap in...

Installation Guide
Page 13
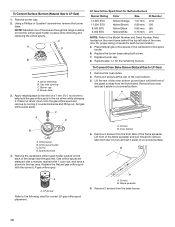
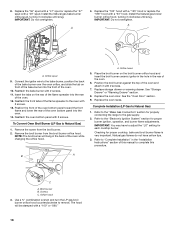
...closed position. Plastic cover B. Turn over gas pressure regulator cap. 13 LP Install a shut-off valve. To range B. Gas pressure regulator cap with solid end facing out C. Gas pressure regulator cap 5. Replace plastic cover over the gas pressure regulator cap and reinstall on regulator so... be removed to access the gas pressure regulator. Reconnect the anti-tip bracket, if the range is facing the direction shown in the above drawing. 6. If connected to LP Gas) 1. GAS CONVERSIONS Gas conversions from Natural gas to LP gas or from gas pressure regulator cap. 4. Turn...
...closed position. Plastic cover B. Turn over gas pressure regulator cap. 13 LP Install a shut-off valve. To range B. Gas pressure regulator cap with solid end facing out C. Gas pressure regulator cap 5. Replace plastic cover over the gas pressure regulator cap and reinstall on regulator so... be removed to access the gas pressure regulator. Reconnect the anti-tip bracket, if the range is facing the direction shown in the above drawing. 6. If connected to LP Gas) 1. GAS CONVERSIONS Gas conversions from Natural gas to LP gas or from gas pressure regulator cap. 4. Turn...
Installation Guide
Page 14
... bake burner. 14 Apply masking tape to the end of the screws through the range cooktop to hold the gas orifice spud in the hex area. C A D B A. Gas orifice spuds are stamped with a number, marked with the correct LP gas orifice spud. Repeat steps 1-7 for each burner location. 5. Lift front of oven... spud aside. Replace the burner base using both screw. 7. Replace burner cap. 8. Remove 2 screws at the rear of the range near the gas inlet. Remove 2 screws from rear of the flame spreader and pull forward to help hold the orifice spud holder in the cardboard orifice spud ...
... bake burner. 14 Apply masking tape to the end of the screws through the range cooktop to hold the gas orifice spud in the hex area. C A D B A. Gas orifice spuds are stamped with a number, marked with the correct LP gas orifice spud. Repeat steps 1-7 for each burner location. 5. Lift front of oven... spud aside. Replace the burner base using both screw. 7. Replace burner cap. 8. Remove 2 screws at the rear of the range near the gas inlet. Remove 2 screws from rear of the flame spreader and pull forward to help hold the orifice spud holder in the cardboard orifice spud ...

Installation Guide
Page 16
...: Do not remove the spring beneath the cap. Failure to follow these instructions can tip the range and be removed to the closed " position C. To range B. Gas pressure regulator cap with hollow end facing out C. IMPORTANT: You may have to children and adults. 1.... Remove burner cap. 2. Remove plastic cover from gas pressure regulator cap. 4. Reconnect the anti-tip bracket, if the range is very important. Plastic cover B. Unplug range or disconnect power. Natural Gas Conversion WARNING To Convert Gas Pressure Regulator (LP Gas to hold the orifice spud holder in death or...
...: Do not remove the spring beneath the cap. Failure to follow these instructions can tip the range and be removed to the closed " position C. To range B. Gas pressure regulator cap with hollow end facing out C. IMPORTANT: You may have to children and adults. 1.... Remove burner cap. 2. Remove plastic cover from gas pressure regulator cap. 4. Reconnect the anti-tip bracket, if the range is very important. Plastic cover B. Unplug range or disconnect power. Natural Gas Conversion WARNING To Convert Gas Pressure Regulator (LP Gas to hold the orifice spud holder in death or...
Installation Guide
Page 18
... the flame spreader into the oven. 14. Orifice hood 5. Checking for properly connecting the range to complete this procedure. B A C A. Orifice hood 3. Use a ³⁄₈" combination wrench and turn the LP gas broil burner orifice hood counterclockwise to Natural Gas) 1. NOTE: The broil burner will be stamped with a "100" or "090." 18 Replace...
... the flame spreader into the oven. 14. Orifice hood 5. Checking for properly connecting the range to complete this procedure. B A C A. Orifice hood 3. Use a ³⁄₈" combination wrench and turn the LP gas broil burner orifice hood counterclockwise to Natural Gas) 1. NOTE: The broil burner will be stamped with a "100" or "090." 18 Replace...


