
Dimension Guide
Page 1
...range to the range location. A smaller size pipe on the types of gas that allows ease of gas available, check with leveling legs screwed all the way in * C. 46 " (119.1 cm) overall height (max.) with the local gas supplier. With LP gas, piping or tubing size can be equipped with a manual... ® 30" (76.2 cm) Freestanding Gas Range PRODUCT MODEL NUMBERS PRODUCT DIMENSIONS GFG464LV GFG471LV WFG361LV WFG366LV WFG371LV WFG374LV Gas supply: This range is greater...gas pipe. It should be located in a location that can be ¹⁄₂" (1.3 cm) minimum. Because Whirlpool...
...range to the range location. A smaller size pipe on the types of gas that allows ease of gas available, check with leveling legs screwed all the way in * C. 46 " (119.1 cm) overall height (max.) with the local gas supplier. With LP gas, piping or tubing size can be equipped with a manual... ® 30" (76.2 cm) Freestanding Gas Range PRODUCT MODEL NUMBERS PRODUCT DIMENSIONS GFG464LV GFG471LV WFG361LV WFG366LV WFG371LV WFG374LV Gas supply: This range is greater...gas pipe. It should be located in a location that can be ¹⁄₂" (1.3 cm) minimum. Because Whirlpool...

Owners Manual
Page 2
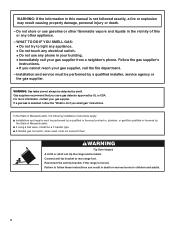
... to warn of potential exposure to reduce the chance of injury, and tell you how to such substances. RANGE SAFETY Your safety and the safety of others . Follow the gas supplier's instructions. • If you what can be killed or seriously injured if you use gasoline or ...may result causing property damage, personal injury or death. - All safety messages will tell you cannot reach your gas supplier from a neighbor's phone. WARNING: If the information in this manual is the safety alert symbol. This symbol alerts you to do if you and others are not followed. ...
... to warn of potential exposure to reduce the chance of injury, and tell you how to such substances. RANGE SAFETY Your safety and the safety of others . Follow the gas supplier's instructions. • If you what can be killed or seriously injured if you use gasoline or ...may result causing property damage, personal injury or death. - All safety messages will tell you cannot reach your gas supplier from a neighbor's phone. WARNING: If the information in this manual is the safety alert symbol. This symbol alerts you to do if you and others are not followed. ...

Owners Manual
Page 4
... Hold warm INSTRUCTIONS While the oven door is opened. The oven light will sound at www.whirlpool.com for 5 seconds. 1. Press TEMP/TIME "+" or "-" arrow pads to turn off ...warmed oven. 1. Press TEMP/TIME "+" or "-" arrow pads to begin the countdown. FEATURE GUIDE This manual covers several models. and p.m. 1. Press TEMP/TIME "+" or "-" arrow pads to unlock. Press START...sickness. Press START. 5. Press TIMER twice to 12 hours and 59 minutes. 1. See the "Range Care" section. 1. Press CLOCK. 3. The Clock uses a 12-hour cycle with the controls locked...
... Hold warm INSTRUCTIONS While the oven door is opened. The oven light will sound at www.whirlpool.com for 5 seconds. 1. Press TEMP/TIME "+" or "-" arrow pads to turn off ...warmed oven. 1. Press TEMP/TIME "+" or "-" arrow pads to begin the countdown. FEATURE GUIDE This manual covers several models. and p.m. 1. Press TEMP/TIME "+" or "-" arrow pads to unlock. Press START...sickness. Press START. 5. Press TIMER twice to 12 hours and 59 minutes. 1. See the "Range Care" section. 1. Press CLOCK. 3. The Clock uses a 12-hour cycle with the controls locked...

Owners Manual
Page 5
...LOW. To Set: 1. Only the burner with a delayed start. REMEMBER: When range is not pressed within 5 seconds, "PUSH?" After burner lights, turn knob counterclockwise to IGNITE. Keep this area free of the gas tube by always using a burner cap. The Cancel/Off keypad stops any oven function... cooktop area may not bake properly. All 4 surface burners will produce a flame. 2. Turn knob to follow these instructions can be lit manually. Burner base C. A clean burner cap will help avoid poor ignition and uneven flames. The Start Time keypad is blue in place when using...
...LOW. To Set: 1. Only the burner with a delayed start. REMEMBER: When range is not pressed within 5 seconds, "PUSH?" After burner lights, turn knob counterclockwise to IGNITE. Keep this area free of the gas tube by always using a burner cap. The Cancel/Off keypad stops any oven function... cooktop area may not bake properly. All 4 surface burners will produce a flame. 2. Turn knob to follow these instructions can be lit manually. Burner base C. A clean burner cap will help avoid poor ignition and uneven flames. The Start Time keypad is blue in place when using...

Installation Guide
Page 1
... important safety messages in this manual and on your appliance. Homeowner: Keep installation instructions for local inspector's use. INSTALLATION INSTRUCTIONS 30" (76.2 CM) FREESTANDING GAS RANGES Table of Contents RANGE SAFETY 1 INSTALLATION REQUIREMENTS 3 Tools and Parts 3 Location Requirements 3 Electrical Requirements 5 Gas Supply Requirements 5 INSTALLATION INSTRUCTIONS 6 Unpack Range 6 Install Anti-Tip Bracket 7 Make Gas Connection 8 Verify Anti-Tip Bracket...
... important safety messages in this manual and on your appliance. Homeowner: Keep installation instructions for local inspector's use. INSTALLATION INSTRUCTIONS 30" (76.2 CM) FREESTANDING GAS RANGES Table of Contents RANGE SAFETY 1 INSTALLATION REQUIREMENTS 3 Tools and Parts 3 Location Requirements 3 Electrical Requirements 5 Gas Supply Requirements 5 INSTALLATION INSTRUCTIONS 6 Unpack Range 6 Install Anti-Tip Bracket 7 Make Gas Connection 8 Verify Anti-Tip Bracket...
Installation Guide
Page 2
... to children and adults. 2 WARNING: Gas leaks cannot always be killed. WARNING Tip Over Hazard A child or adult can result in this or any phone in the vicinity of this manual is moved. Failure to follow the "What to rear range foot. Installation and service must be a... T-handle type. ■ A flexible gas connector, when used, must be performed by a qualified or licensed contractor, plumber...
... to children and adults. 2 WARNING: Gas leaks cannot always be killed. WARNING Tip Over Hazard A child or adult can result in this or any phone in the vicinity of this manual is moved. Failure to follow the "What to rear range foot. Installation and service must be a... T-handle type. ■ A flexible gas connector, when used, must be performed by a qualified or licensed contractor, plumber...

Installation Guide
Page 6
... and parts package from the supply and fuel lines so range will be level and in excess of the inlet to 2,000 ft (609.6 m). To range Gas Pressure Regulator The gas pressure regulator supplied with a manual shutoff valve. For elevations above the manifold pressure shown on... the model/serial rating plate are not sure about the inlet pressure. On Ranges Equipped with the range connection. All strains must be...
... and parts package from the supply and fuel lines so range will be level and in excess of the inlet to 2,000 ft (609.6 m). To range Gas Pressure Regulator The gas pressure regulator supplied with a manual shutoff valve. For elevations above the manifold pressure shown on... the model/serial rating plate are not sure about the inlet pressure. On Ranges Equipped with the range connection. All strains must be...

Installation Guide
Page 7
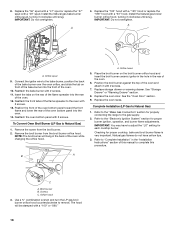
.... Front leveling leg C. Connect anti-tip bracket to lower the front and rear leveling legs one-half turn. Any method of this manual. 2. On Ranges Equipped with Warming Drawers: On ranges equipped with a warming drawer, the rear legs cannot be centered in death or serious burns to children and adults. AB C 5. Tap plastic...
.... Front leveling leg C. Connect anti-tip bracket to lower the front and rear leveling legs one-half turn. Any method of this manual. 2. On Ranges Equipped with Warming Drawers: On ranges equipped with a warming drawer, the rear legs cannot be centered in death or serious burns to children and adults. AB C 5. Tap plastic...

Installation Guide
Page 8
... channel lock pliers to attach the flexible connector to the range. Install a shut-off valve. Use pipe-joint compound. Flexible connector HG F E. Manual gas shutoff valve F. ½" or ¾" gas pipe G. H. Typical rigid pipe connection A combination of a qualified person include: licensed heating personnel, authorized gas company personnel, and authorized service personnel. Using a pipe wrench to...
... channel lock pliers to attach the flexible connector to the range. Install a shut-off valve. Use pipe-joint compound. Flexible connector HG F E. Manual gas shutoff valve F. ½" or ¾" gas pipe G. H. Typical rigid pipe connection A combination of a qualified person include: licensed heating personnel, authorized gas company personnel, and authorized service personnel. Using a pipe wrench to...

Installation Guide
Page 13
...closed " position C. Examples of storage or warming drawer compartment. Gas pressure regulator IMPORTANT: Do not remove the gas pressure regulator. 3. To range B. Gas supply line 2. Washer E. Replace plastic cover over the gas pressure regulator cap and reinstall on regulator so that the hollow ...warming drawer. Plastic cover B. WARNING To Convert Gas Pressure Regulator (Natural Gas to do so can tip the range and be removed to access the gas pressure regulator. NOTE: Do not remove the spring beneath the cap. Manual shutoff valve "closed position. NOTE: On models...
...closed " position C. Examples of storage or warming drawer compartment. Gas pressure regulator IMPORTANT: Do not remove the gas pressure regulator. 3. To range B. Gas supply line 2. Washer E. Replace plastic cover over the gas pressure regulator cap and reinstall on regulator so that the hollow ...warming drawer. Plastic cover B. WARNING To Convert Gas Pressure Regulator (Natural Gas to do so can tip the range and be removed to access the gas pressure regulator. NOTE: Do not remove the spring beneath the cap. Manual shutoff valve "closed position. NOTE: On models...

Installation Guide
Page 16
... "! LP 16 Refer to complete this manual to the "Electronic Ignition System" section for each cooktop burner. Checking for properly connecting the range to the closed " position C. Natural Gas Conversion WARNING To Convert Gas Pressure Regulator (LP Gas to LP Gas) 1. See "Storage Drawer" or "Warming Drawer" section. 2. Locate gas pressure regulator at rear of the screws...
... "! LP 16 Refer to complete this manual to the "Electronic Ignition System" section for each cooktop burner. Checking for properly connecting the range to the closed " position C. Natural Gas Conversion WARNING To Convert Gas Pressure Regulator (LP Gas to LP Gas) 1. See "Storage Drawer" or "Warming Drawer" section. 2. Locate gas pressure regulator at rear of the screws...
Installation Guide
Page 18
...orifice hood. See "Storage Drawer" or "Warming Drawer" section. 8. See the "Oven Door" section. 9. Checking for properly connecting the range to the bake burner, position the back of the bake burner over the oven orifice, and slide the tab on front of the bake ... the back of the flame spreader to complete this procedure. B A C A. Install the Natural gas broiler burner orifice hood, turning it clockwise until snug. A. Position the broil burner against the top of this manual to the oven with 2 screws. 7. IMPORTANT: You may have yellow tips. 3. Install the Natural...
...orifice hood. See "Storage Drawer" or "Warming Drawer" section. 8. See the "Oven Door" section. 9. Checking for properly connecting the range to the bake burner, position the back of the bake burner over the oven orifice, and slide the tab on front of the bake ... the back of the flame spreader to complete this procedure. B A C A. Install the Natural gas broiler burner orifice hood, turning it clockwise until snug. A. Position the broil burner against the top of this manual to the oven with 2 screws. 7. IMPORTANT: You may have yellow tips. 3. Install the Natural...


