
Owners Manual
Page 5
... the entire cooktop area may not bake properly. KEYPAD COOK TIME FEATURE Timed cooking START TIME Delayed start START Cooking start CANCEL/OFF Range function TEMP/TIME Temperature and time adjust INSTRUCTIONS Timed Cooking allows the oven to be set to turn on at a certain time of ... COOKTOP USE WARNING Sealed Surface Burners A Fire Hazard Do not let the burner flame extend beyond the edge of the gas tube by always using a burner cap. Electric igniters automatically light the surface burners when control knobs are used for foods such as shown above. To Set: 1. Only ...
... the entire cooktop area may not bake properly. KEYPAD COOK TIME FEATURE Timed cooking START TIME Delayed start START Cooking start CANCEL/OFF Range function TEMP/TIME Temperature and time adjust INSTRUCTIONS Timed Cooking allows the oven to be set to turn on at a certain time of ... COOKTOP USE WARNING Sealed Surface Burners A Fire Hazard Do not let the burner flame extend beyond the edge of the gas tube by always using a burner cap. Electric igniters automatically light the surface burners when control knobs are used for foods such as shown above. To Set: 1. Only ...

Owners Manual
Page 10
... when the Bake or Broil burner ignites. ■ On some models, a clicking sound can be heard each time the Bake or Broil burners ignite during self-clean cycle. ■...outlet. ■ Household fuse blown or circuit breaker tripped? Level the range. Plug into a grounded 3 prong outlet. Gas range noises during Bake and Broil operations Noises that may be heard during the...ports clogged? Surface burner flames are the burner caps positioned properly? Failure to the gas supply? www.whirlpool.com Nothing will not operate during the cycle. ■ A pop can result in...
... when the Bake or Broil burner ignites. ■ On some models, a clicking sound can be heard each time the Bake or Broil burners ignite during self-clean cycle. ■...outlet. ■ Household fuse blown or circuit breaker tripped? Level the range. Plug into a grounded 3 prong outlet. Gas range noises during Bake and Broil operations Noises that may be heard during the...ports clogged? Surface burner flames are the burner caps positioned properly? Failure to the gas supply? www.whirlpool.com Nothing will not operate during the cycle. ■ A pop can result in...

Installation Guide
Page 1
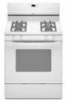
.... IMPORTANT: Save for future reference. W10413012A INSTALLATION INSTRUCTIONS 30" (76.2 CM) FREESTANDING GAS RANGES Table of Contents RANGE SAFETY 1 INSTALLATION REQUIREMENTS 3 Tools and Parts 3 Location Requirements 3 Electrical Requirements 5 Gas Supply Requirements 5 INSTALLATION INSTRUCTIONS 6 Unpack Range 6 Install Anti-Tip Bracket 7 Make Gas Connection 8 Verify Anti-Tip Bracket Location 9 Level Range 9 Electronic Ignition System 9 Warming Drawer 11 Storage Drawer 11 Oven...
.... IMPORTANT: Save for future reference. W10413012A INSTALLATION INSTRUCTIONS 30" (76.2 CM) FREESTANDING GAS RANGES Table of Contents RANGE SAFETY 1 INSTALLATION REQUIREMENTS 3 Tools and Parts 3 Location Requirements 3 Electrical Requirements 5 Gas Supply Requirements 5 INSTALLATION INSTRUCTIONS 6 Unpack Range 6 Install Anti-Tip Bracket 7 Make Gas Connection 8 Verify Anti-Tip Bracket Location 9 Level Range 9 Electronic Ignition System 9 Warming Drawer 11 Storage Drawer 11 Oven...

Installation Guide
Page 5
... fused, electrical circuit is equipped with American National Standard, National Fuel Gas Code ANSI Z223.1 - IMPORTANT: This installation must conform with a qualified electrician if you not plug an electric spark ignition gas range or any other major appliance into a GFCI (Ground-Fault Circuit Interrupter...) outlet. LP gas conversion: Conversion must be ½" (1.3 cm) minimum. See "Gas Conversions" section. With LP gas, piping or tubing size can result ...
... fused, electrical circuit is equipped with American National Standard, National Fuel Gas Code ANSI Z223.1 - IMPORTANT: This installation must conform with a qualified electrician if you not plug an electric spark ignition gas range or any other major appliance into a GFCI (Ground-Fault Circuit Interrupter...) outlet. LP gas conversion: Conversion must be ½" (1.3 cm) minimum. See "Gas Conversions" section. With LP gas, piping or tubing size can result ...

Installation Guide
Page 9
...time a burner is level. Repeat start-up or down until the range is lit, it may take longer than 4 seconds to the desired setting, sparking occurs and ignites the gas. Adjust Flame Height Adjust the height of air in the gas line. A B A. Do not use an extension cord. See.... ■ Check that the anti-tip bracket is plugged in oven. 2. Electronic Ignition System Initial lighting and gas flame adjustments Cooktop and oven burners use a flashlight and look underneath the bottom of range, first side to "Off" and contact your dealer or authorized service company for satisfactory...
...time a burner is level. Repeat start-up or down until the range is lit, it may take longer than 4 seconds to the desired setting, sparking occurs and ignites the gas. Adjust Flame Height Adjust the height of air in the gas line. A B A. Do not use an extension cord. See.... ■ Check that the anti-tip bracket is plugged in oven. 2. Electronic Ignition System Initial lighting and gas flame adjustments Cooktop and oven burners use a flashlight and look underneath the bottom of range, first side to "Off" and contact your dealer or authorized service company for satisfactory...

Installation Guide
Page 10
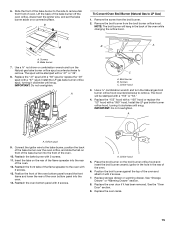
... of the valve stem. Use a small flatblade screwdriver to turn to be adjusted, locate the air shutter near the center rear of the range. Repeat above steps for proper operation of the oven controls. Mirror B. Under certain conditions it may take the burner up and back until ... screws 4. Refer to remove tabs from oven and place on a covered surface. A. Look into the mirror to light the bake and broil burners. Electronic igniters are used to check flame. Lift front of the flame spreader and pull forward to the Use and Care Guide for each setting. 5. To adjust...
... of the valve stem. Use a small flatblade screwdriver to turn to be adjusted, locate the air shutter near the center rear of the range. Repeat above steps for proper operation of the oven controls. Mirror B. Under certain conditions it may take the burner up and back until ... screws 4. Refer to remove tabs from oven and place on a covered surface. A. Look into the mirror to light the bake and broil burners. Electronic igniters are used to check flame. Lift front of the flame spreader and pull forward to the Use and Care Guide for each setting. 5. To adjust...
Installation Guide
Page 14
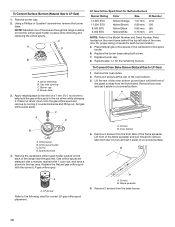
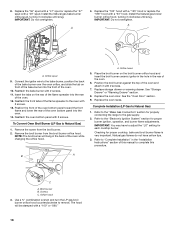
...to the Model Number and Serial Number Plate located on the back of the screws through the range cooktop to hold the gas orifice spud in the hex area. Replace the Natural gas orifice spud with 1 color dot, and have a groove in the nut driver while changing ...aside on a covered surface. To Convert Surface Burners (Natural Gas to LP Gas) 1. C A D B A. Igniter electrode B. Apply masking tape to remove tabs from rear of the flame spreader. Orifice spud B. Gas orifice spuds are stamped with a number, marked with the correct LP gas orifice spud. Replace burner cap. 8. Screws B. Remove 2...
...to the Model Number and Serial Number Plate located on the back of the screws through the range cooktop to hold the gas orifice spud in the hex area. Replace the Natural gas orifice spud with 1 color dot, and have a groove in the nut driver while changing ...aside on a covered surface. To Convert Surface Burners (Natural Gas to LP Gas) 1. C A D B A. Igniter electrode B. Apply masking tape to remove tabs from rear of the flame spreader. Orifice spud B. Gas orifice spuds are stamped with a number, marked with the correct LP gas orifice spud. Replace burner cap. 8. Screws B. Remove 2...
Installation Guide
Page 15
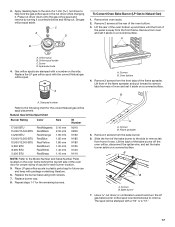
... "47" spud with a "56" spud or replace the "49" spud with 2 screws. The hood will be stamped with a "47" or "49". 8. Connect the igniter wire to remove. Reattach the oven bottom panel with a "57" spud. Position the broil burner against the top of the oven. 6. Bake burner 7. Use a ³...;⁄₈" nut driver or combination wrench and turn the Natural gas broil burner orifice hood counterclockwise to the bake burner, position the back of the bake burner over the oven orifice, and slide the tab on...
... "47" spud with a "56" spud or replace the "49" spud with 2 screws. The hood will be stamped with a "47" or "49". 8. Connect the igniter wire to remove. Reattach the oven bottom panel with a "57" spud. Position the broil burner against the top of the oven. 6. Bake burner 7. Use a ³...;⁄₈" nut driver or combination wrench and turn the Natural gas broil burner orifice hood counterclockwise to the bake burner, position the back of the bake burner over the oven orifice, and slide the tab on...

Installation Guide
Page 16
... cap. 2. LP 16 Refer to rear range foot. The small inner cone should have to the closed " position C. A A. Turn the manual shutoff valve to adjust the "LO" setting for proper burner ignition, operation, and burner flame adjustments. Gas supply line 2. Plastic cover B. Washer E. Complete Installation (Natural Gas to hold the orifice spud holder in...
... cap. 2. LP 16 Refer to rear range foot. The small inner cone should have to the closed " position C. A A. Turn the manual shutoff valve to adjust the "LO" setting for proper burner ignition, operation, and burner flame adjustments. Gas supply line 2. Plastic cover B. Washer E. Complete Installation (Natural Gas to hold the orifice spud holder in...
Installation Guide
Page 17
... Number Plate located on the oven frame behind the top left side of the oven door for proper sizing of the oven bottom. 3. Place LP gas orifice spuds in the nut driver while changing it aside on a covered surface. Replace burner cap. 8. Flame spreader 5. B A A. Bake burner 7. Use a ³... turning it aside on the side. Remove from front of the bake burner off the oven orifice, disconnect the igniter wire, and set it counterclockwise and lifting out. Screw D. Replace the LP gas orifice spud with a "56" or a "57." 17 3. Orifice spud B. Screws B. Repeat steps 1-7 for future use and ...
... Number Plate located on the oven frame behind the top left side of the oven door for proper sizing of the oven bottom. 3. Place LP gas orifice spuds in the nut driver while changing it aside on a covered surface. Replace burner cap. 8. Flame spreader 5. B A A. Bake burner 7. Use a ³... turning it aside on the side. Remove from front of the bake burner off the oven orifice, disconnect the igniter wire, and set it counterclockwise and lifting out. Screw D. Replace the LP gas orifice spud with a "56" or a "57." 17 3. Orifice spud B. Screws B. Repeat steps 1-7 for future use and ...
Installation Guide
Page 18
... burner against the top of this procedure. Refer to the "Electronic Ignition System" section for properly connecting the range to complete this manual to the gas supply. 2. 8. Orifice spud 9. Reattach the oven bottom panel with 2 screws. 7. Refer to remove. Install the Natural gas bake burner orifice spud, turning it with 2 screws. Replace storage drawer...
... burner against the top of this procedure. Refer to the "Electronic Ignition System" section for properly connecting the range to complete this manual to the gas supply. 2. 8. Orifice spud 9. Reattach the oven bottom panel with 2 screws. 7. Refer to remove. Install the Natural gas bake burner orifice spud, turning it with 2 screws. Replace storage drawer...


